Choices in Dataverse
In this exercise, we will learn how to create or use standard choice lists called choices in dataverse that we can use across all our Power Apps.
Define choice column
Choices provide an exact list of options that people can choose (more than one option can be selected). Choices help streamline new record creation and standardize data entry, and they are best suited for a small set of standard short terms rather than a long list of complex entries. We should not use choices when the field usually contains unique entries that are not easily standardized.
Choices are managed as a separate list and then associated with a drop-down field. When used properly and closely managed, choices help ensure consistent data entry and improves the quality and usefulness of the data that you collect. choices can help create meaningful reports and identify trends and clusters of data. Finally, we can make fields of type choices required when they are created or edited.
Let’s create a choice in dataverse and attach it to a table:
Step 1: Sign in to the Power Apps with the organizational account.
Step 2: On the left pane, select Choices, if it is not visible then click on … More and then click on Choices.
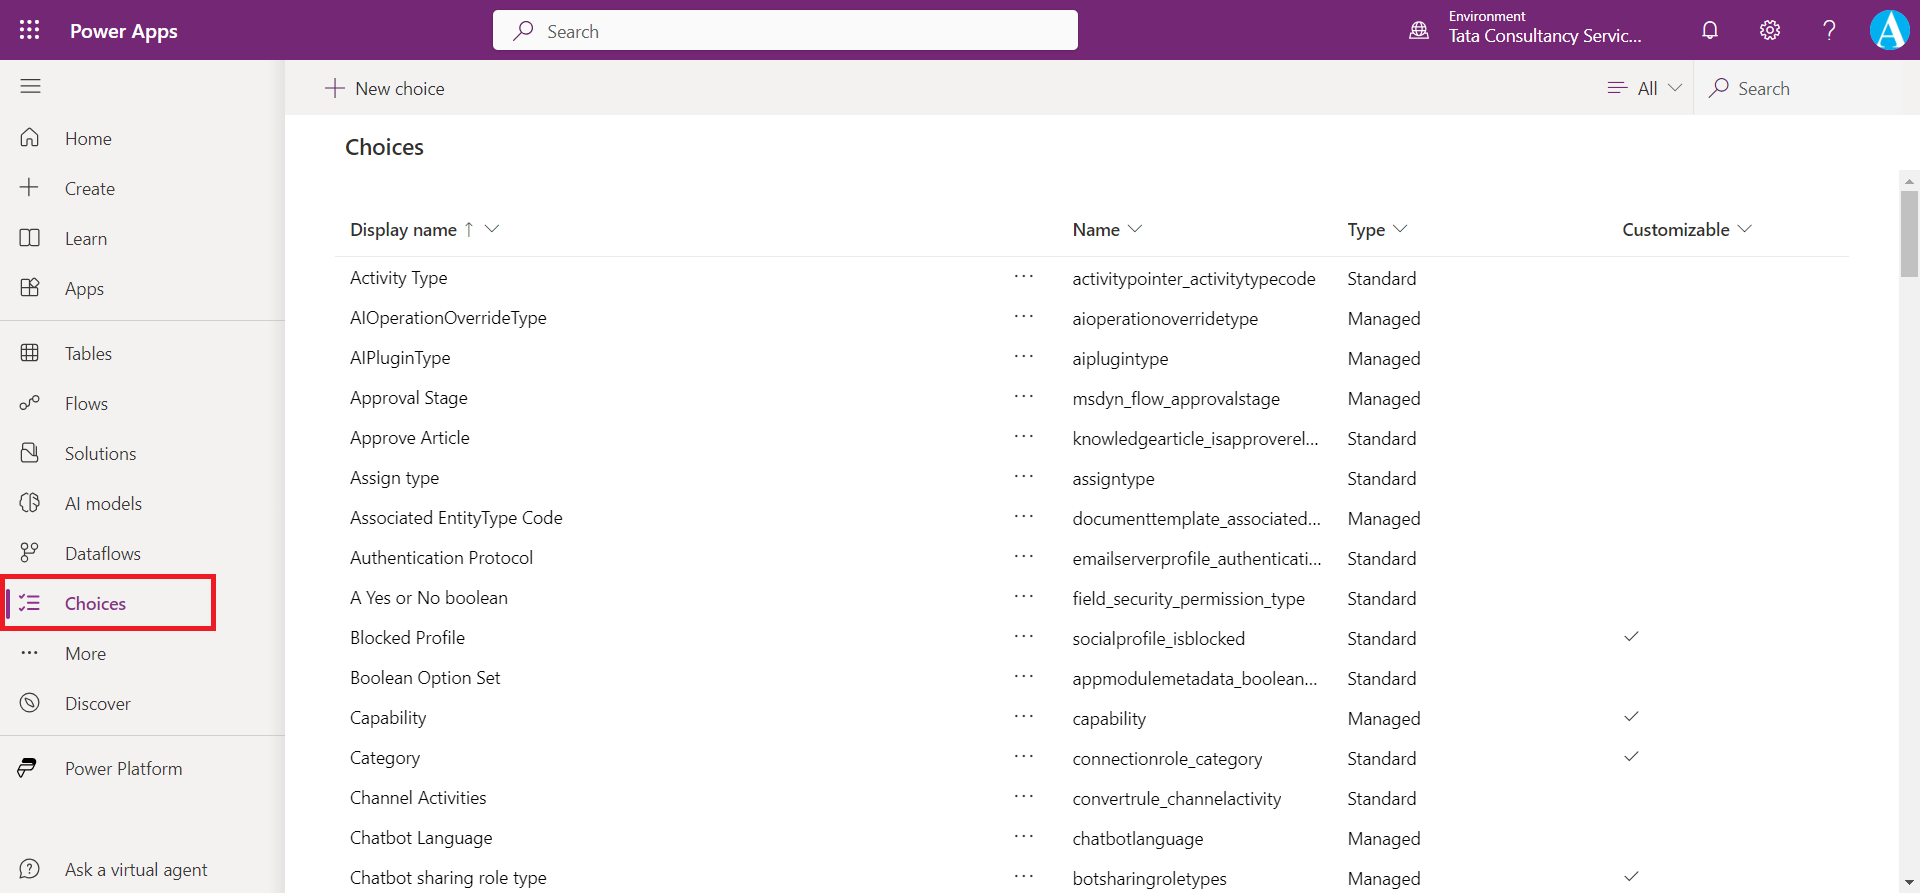
Here we can see over one hundred standard choices that are created each time that we instantiate a new instance of a Dataverse database. Some Standard choices are not editable and some are editable.
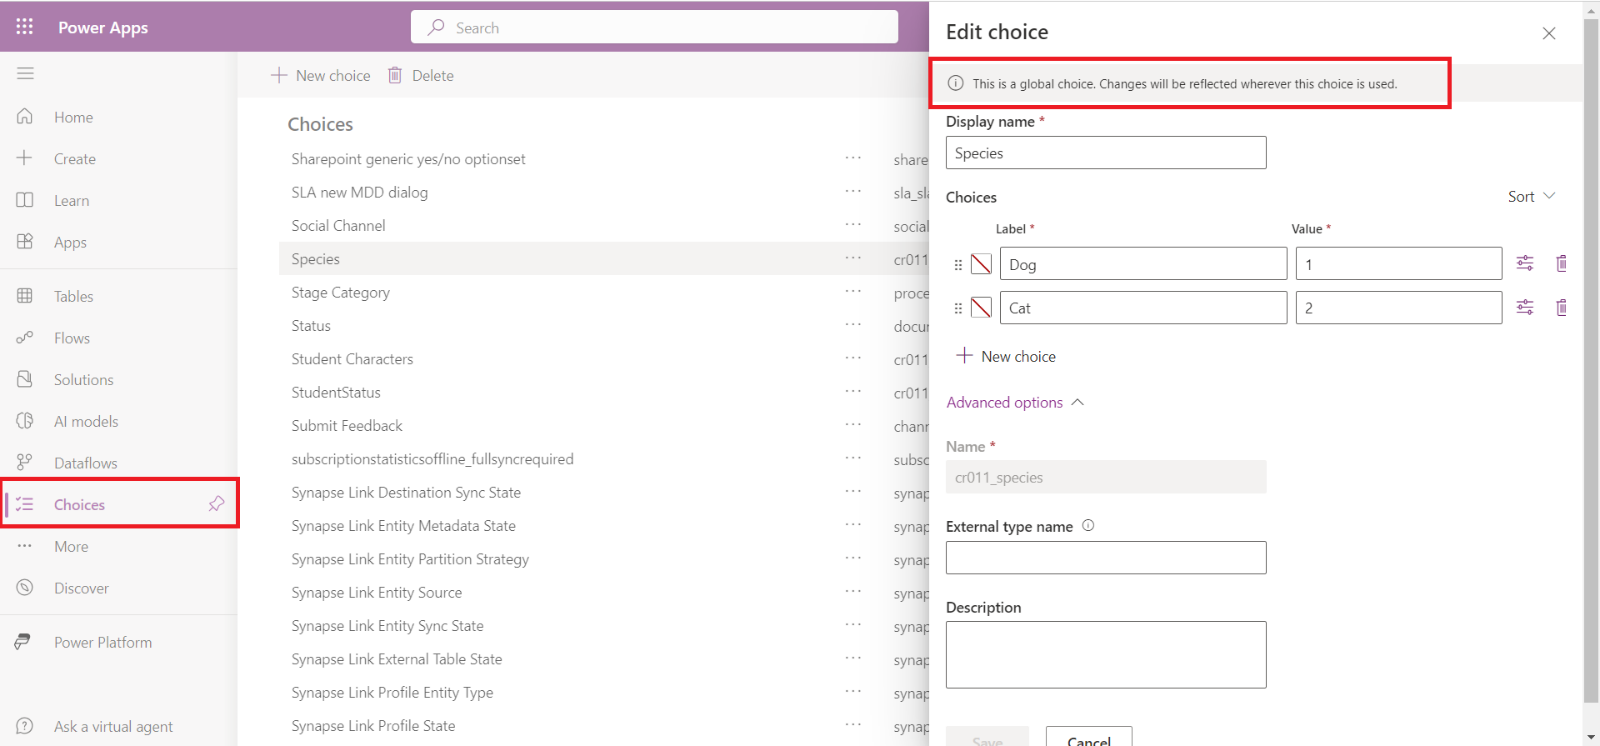
If we click on any choice then we can see a message which states that if we change anything in global choice it is reflected everywhere that choice is used.
Step 3: Create a new custom choice We can create a new custom choice to use across many entities in Microsoft Dataverse. We can create a choice in two ways: by creating a choice when we define a new field within a table, or by creating a choice by using the choice functionality within the Power Apps portal.
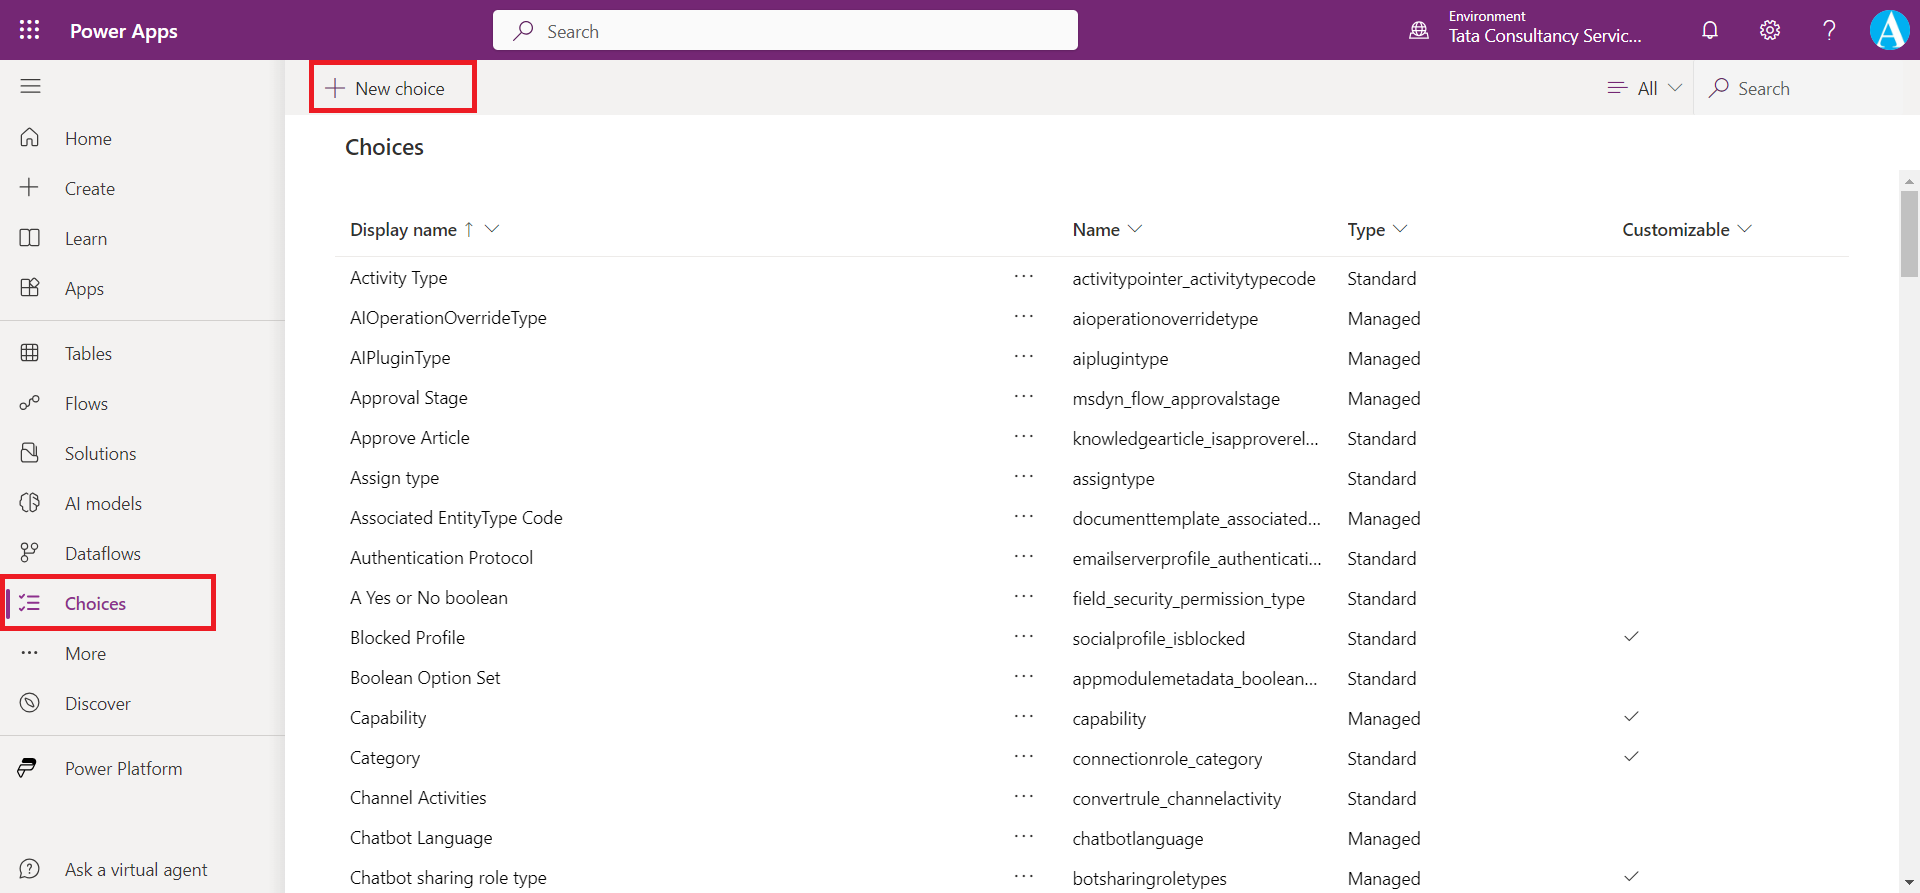
To create a new custom choice by using the choice functionality in the Power Apps Portal, click on + New choice on the menu at the top of the Choices list, we can create a global choice, if we need to create a local choice then local choice cannot be created from here, that option is only available when we are creating a choice while adding a field in the table, and not through the Choices list.
Step 4: Enter a Tourist Cities for the Display name.
Step 5: Add the following items to the choice:
Jaipur
Mumbai
Delhi
Lucknow
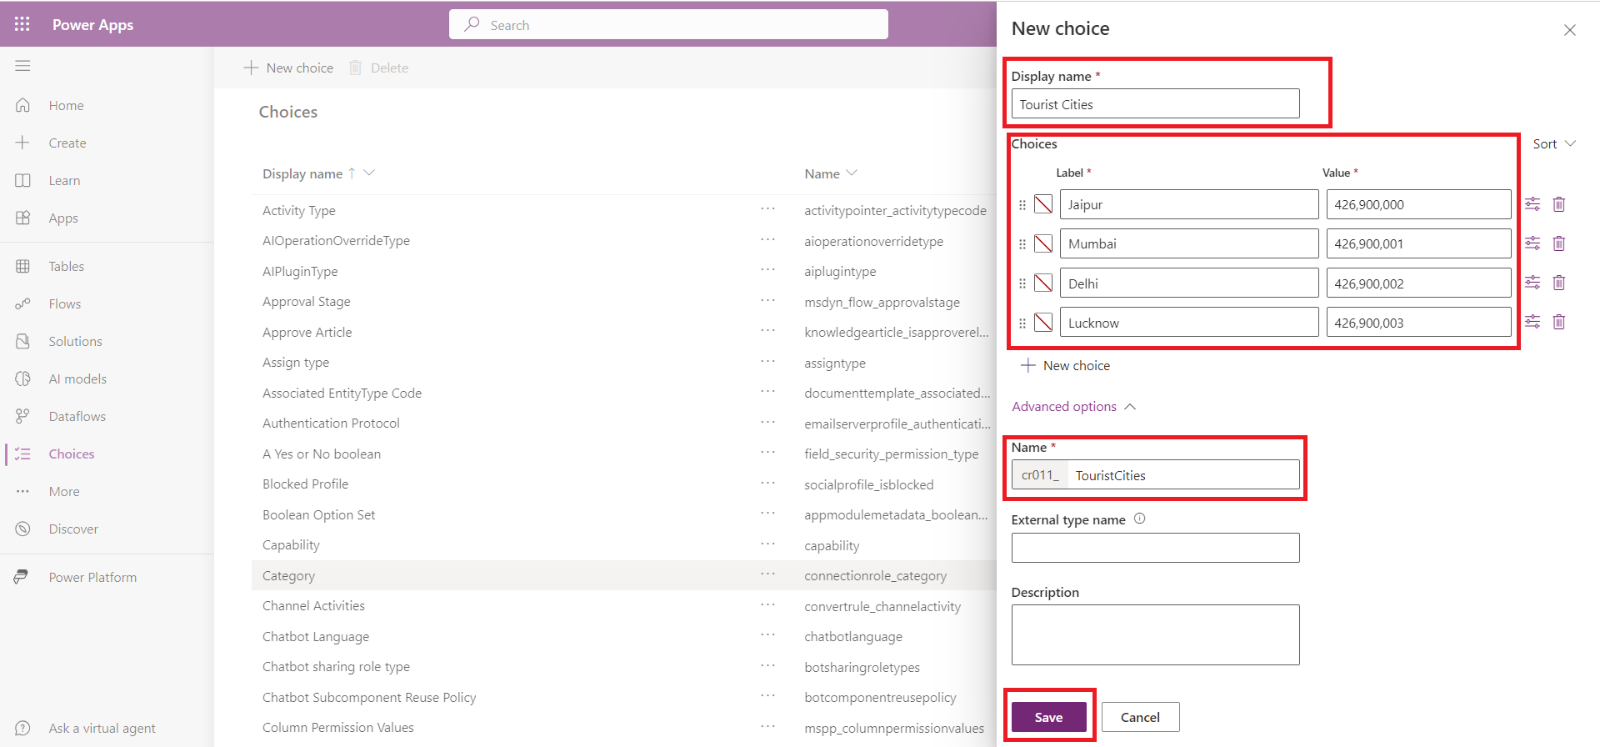
Note: We can assign a unique numeric value by setting the value in the box beside the choice entry.
Step 6: Select the Save button.
After saving we can see our choice in this list. It might take a few minutes for the new choice to appear in the list of available choices.
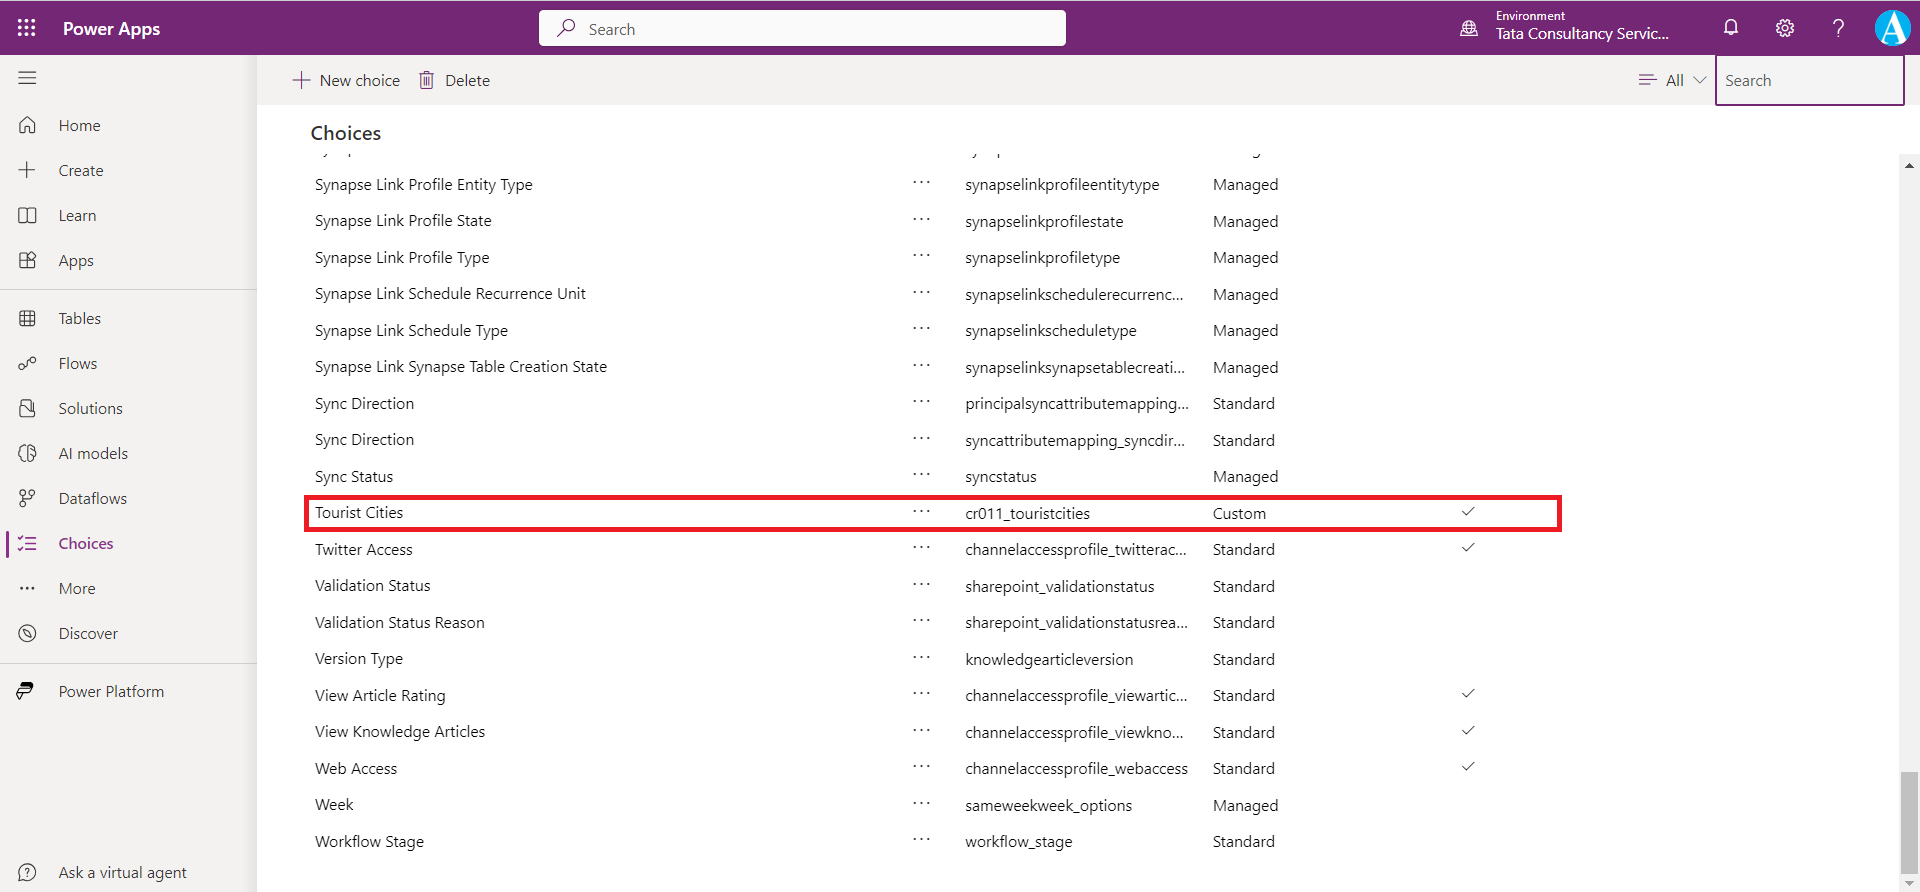
The choice set Tourist Cities is now available to use with any field in any entity within the environment. To use the new choice.
Modify an existing choice in the Dataverse
If we want to modify an existing choice, follow these steps:
Step 1: Sign in to Power Apps and sign in with the organizational account.
Step 2: On the left pane, select Choices.
Step 3: Select the Choice that we want to modify.
a. Add a new entry by selecting the + New choice button.
b. We can delete an item by selecting the trashcan.
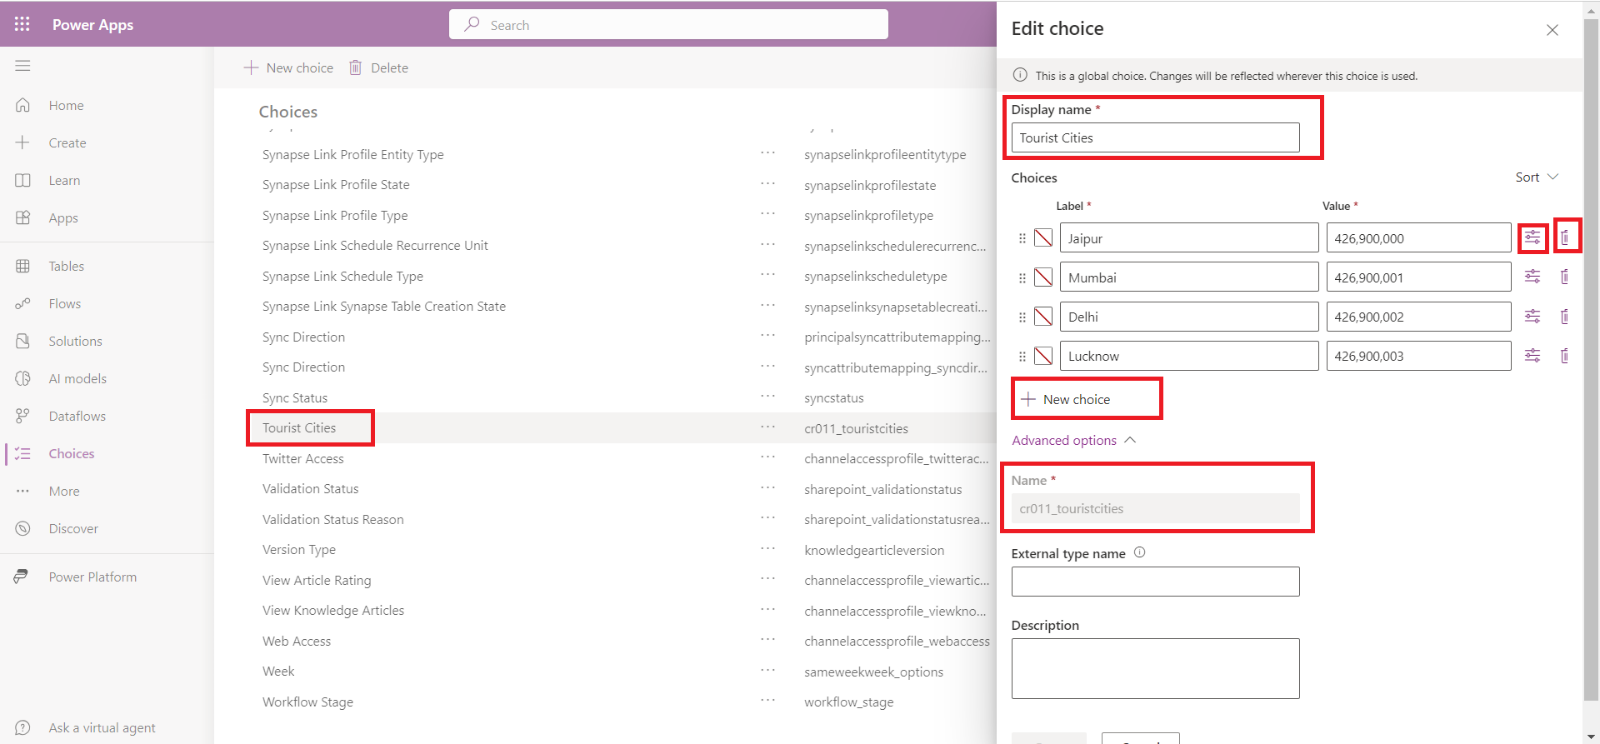
c. We can add additional properties by selecting the settings icon next to the entry.
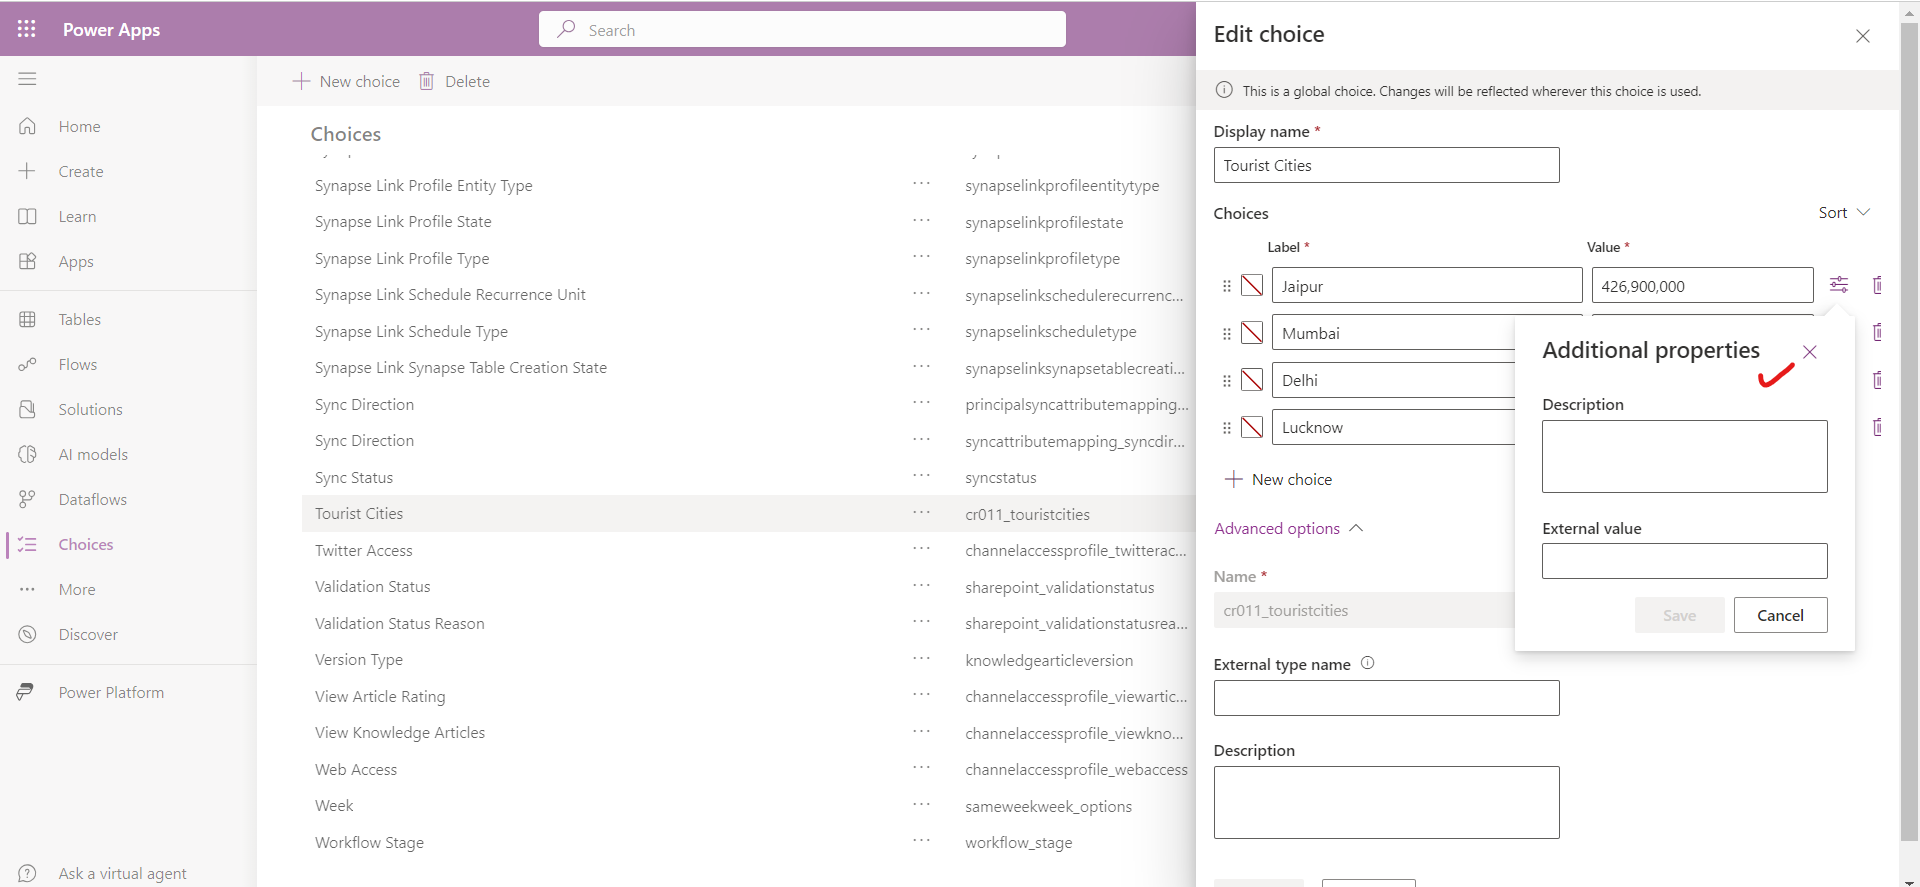
Step 4: Select the Save button to save changes.
Create a Choice at the time of creation of field in the Dataverse table
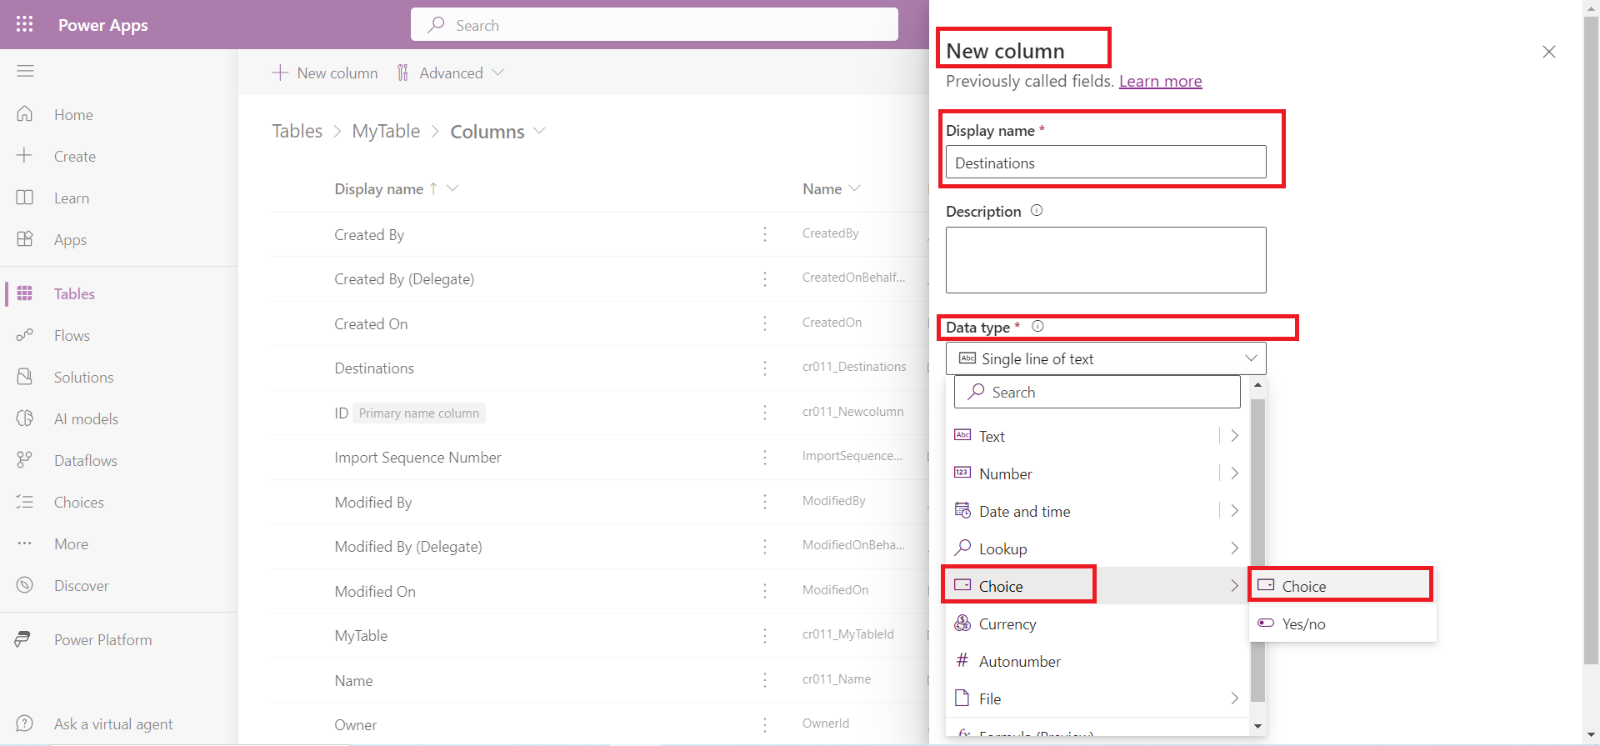
Step 1: To create a new column in the table, click on + New column. In the New column pane on the right of the screen:
• Enter the Display name to Destinations which is shown to the users.
• Select the Data type to Choice, and then select Choice from the dropdown.
Step 2: We have a checkbox called “Selecting multiple choices is allowed”. If we checked then we can save multiple options from the choice set in the column, otherwise we can save only one option at a time.
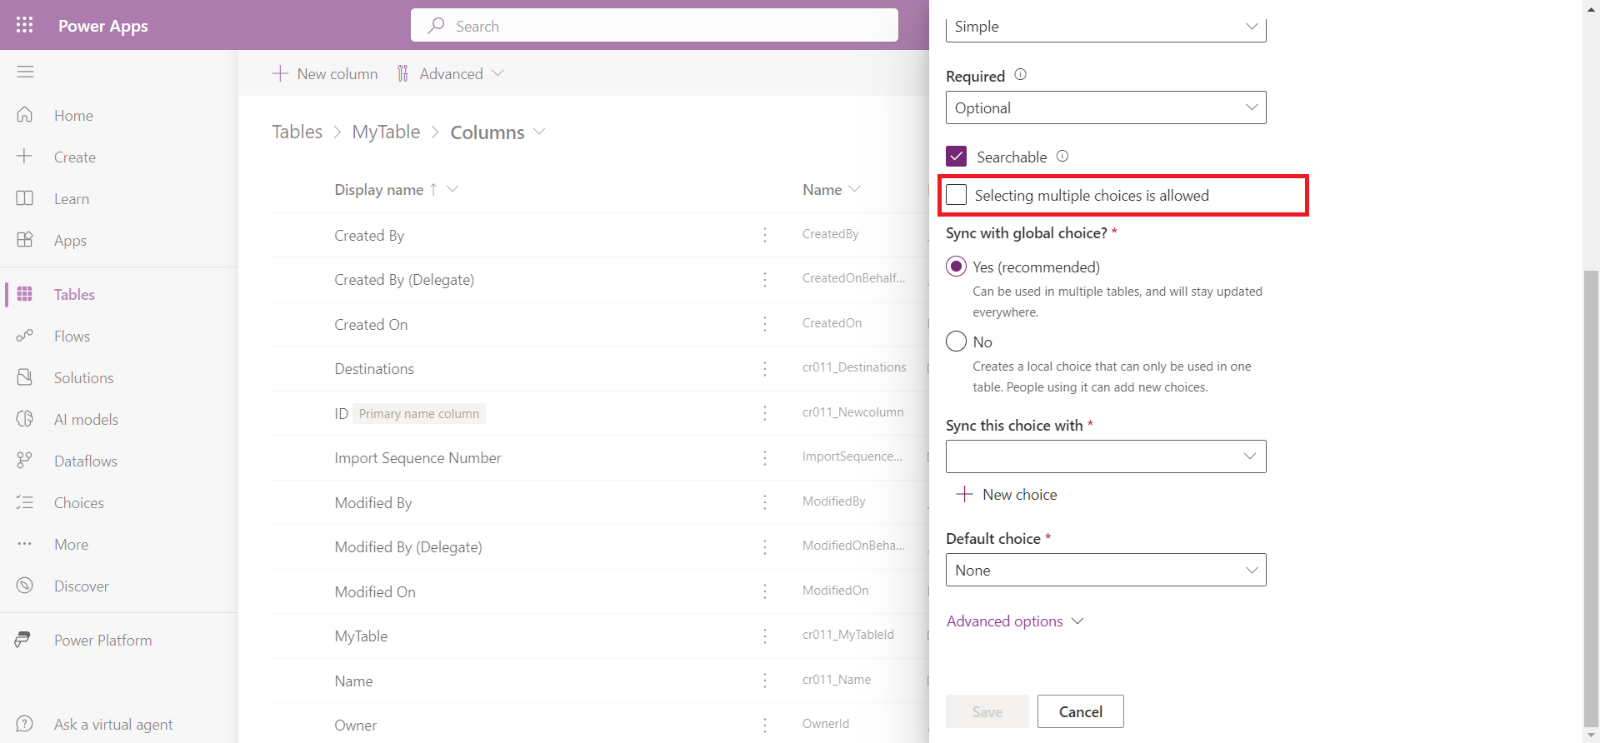
Note: We cannot change our selection after creating the column. By default, it is not checked.
Step 3: When creating a new field of Choice data type, we have a question Sync with global choice? with options Yes or No.
By selecting Yes, we can either sync the global choice that is already created in the current environment with the column or we have an option to create a new global choice in the current environment, by clicking on + New choice.
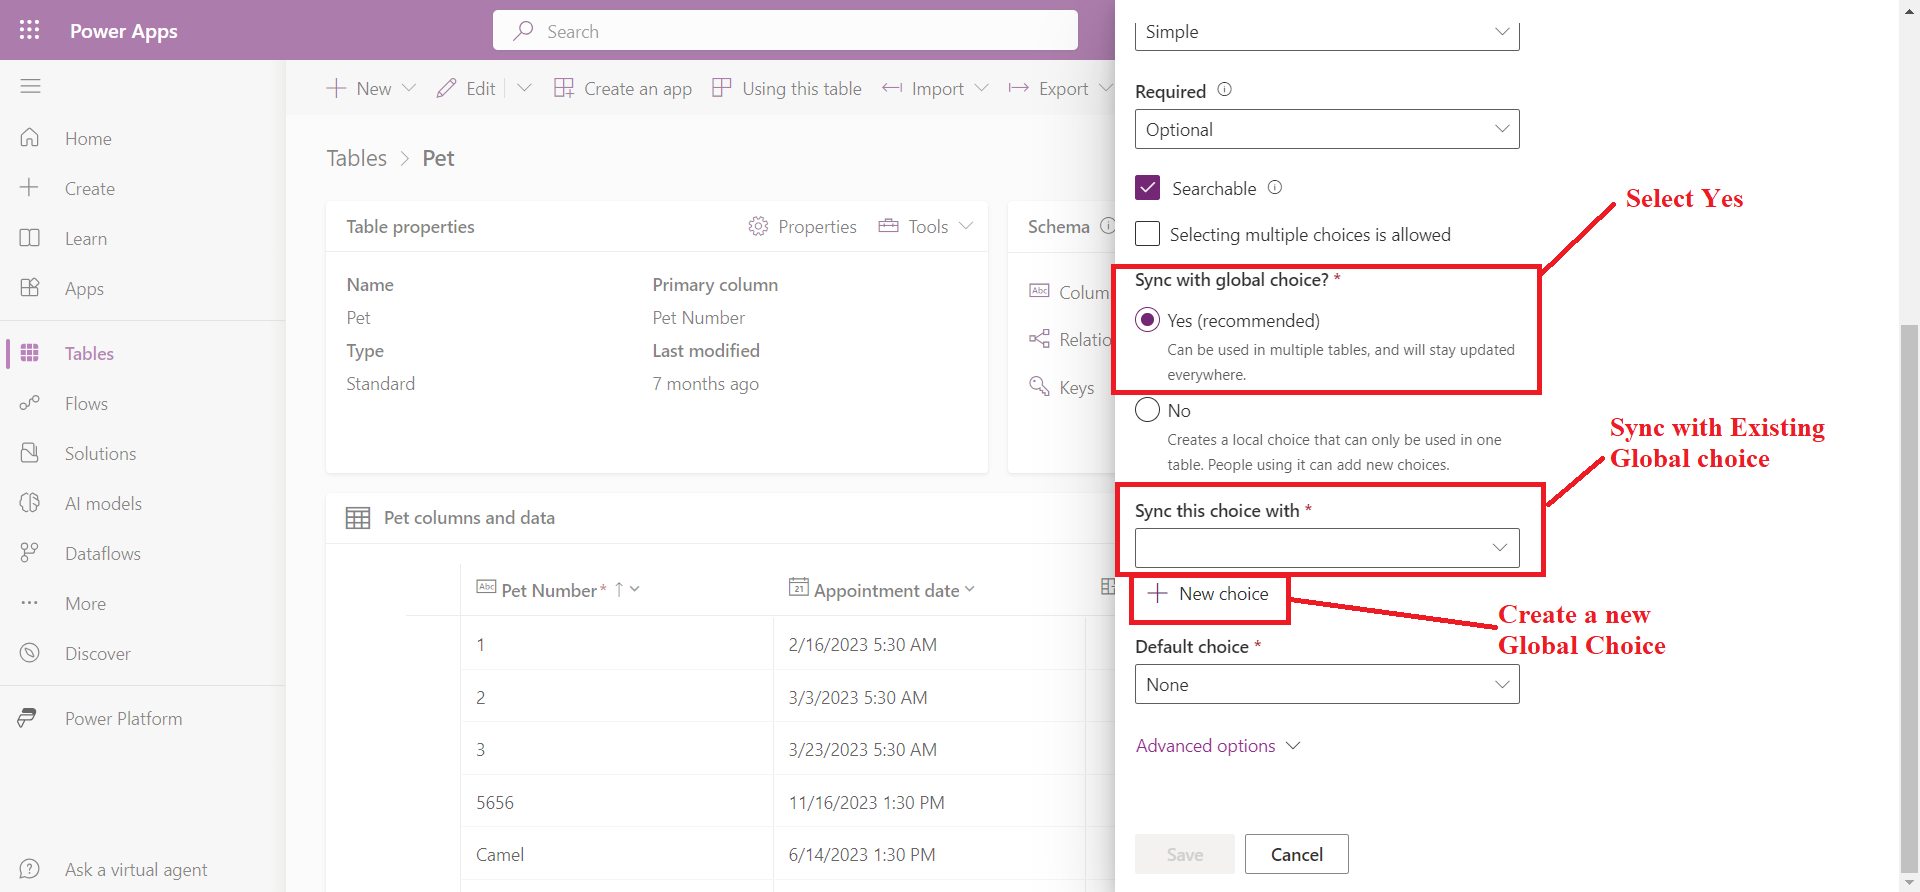
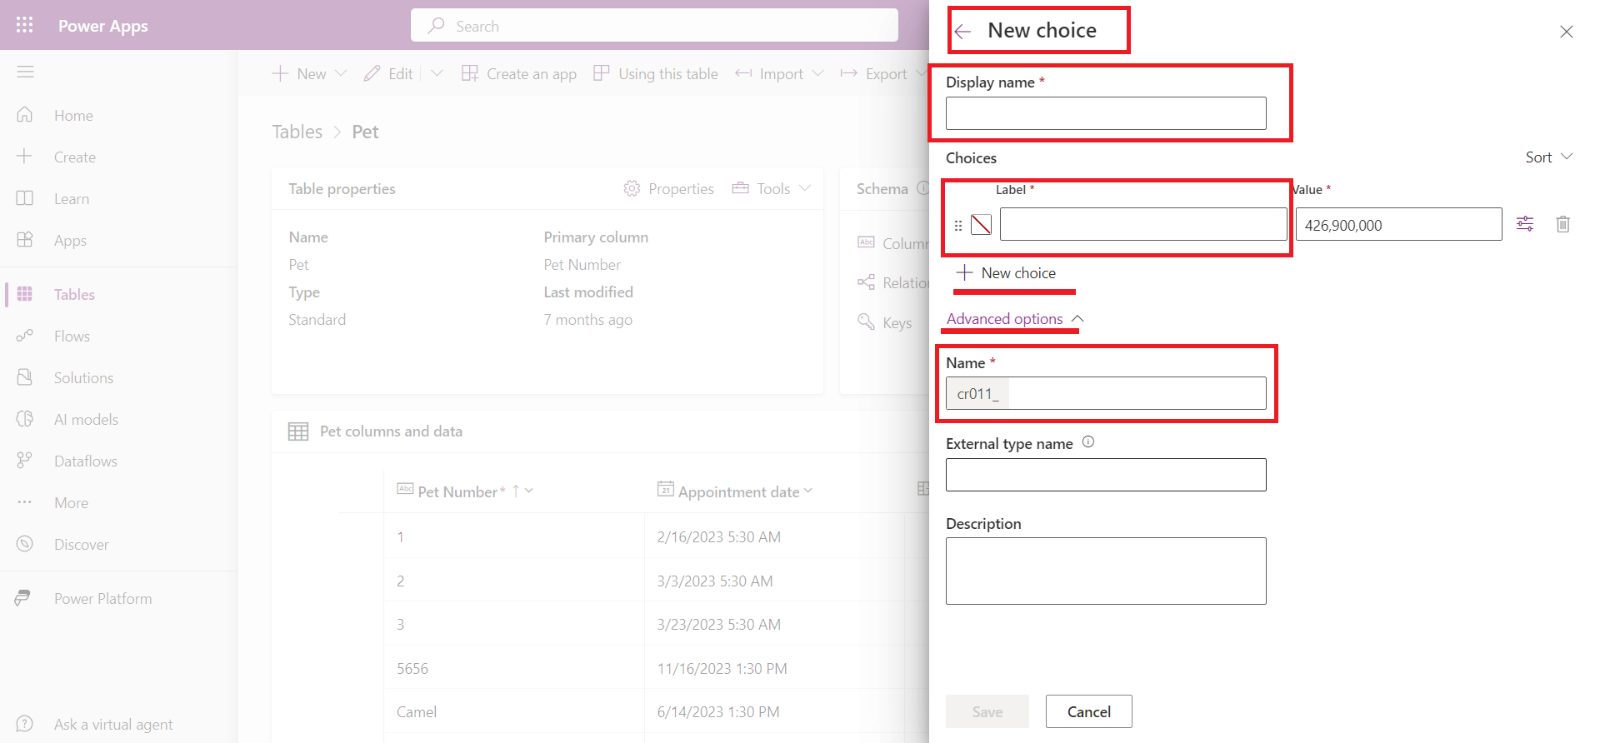
By clicking on + New choice then a new screen appears in which we need to define the Display name of our global choice and our choice options. By expanding the Advanced options, we can see the Name which defines the internal name of our global choice.
By selecting No, we can create choice which is local to the table.
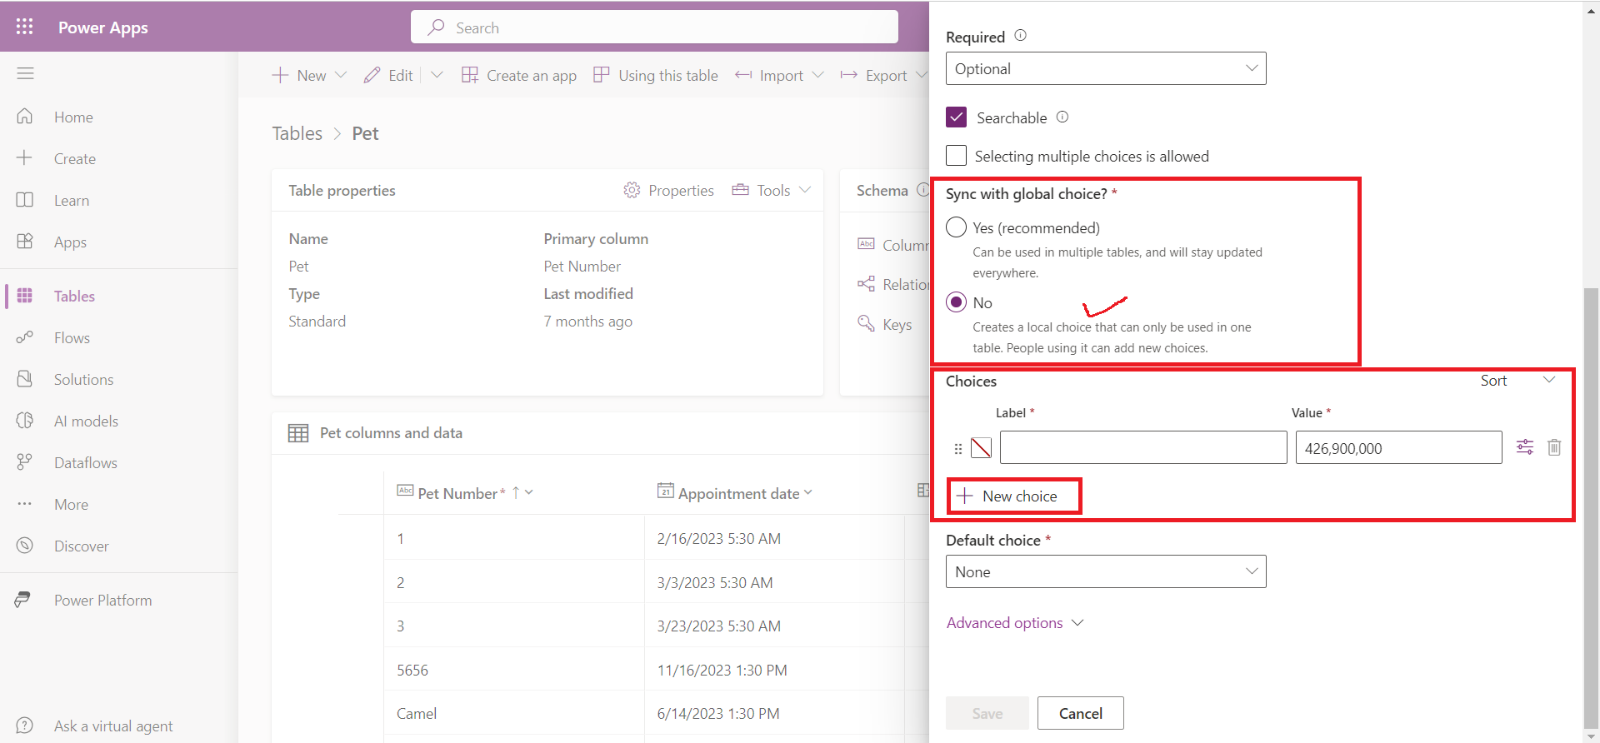
In this case we need to define our choices just below the No button in the Label. (At least one is required.) Power Apps will automatically assign an integer value for that item, which we can change according to our need. By clicking on + New choice more choice options can be added.
Note: We can also select a color for each choice by selecting the box just to the left of our entered Label name. In the Select color popup, we can hard-code the color value through the entry fields for Hex or the R-G-B values. Alternatively, we can adjust the color slider bar and fine-tune what's in the color slider by using the box above the slider.
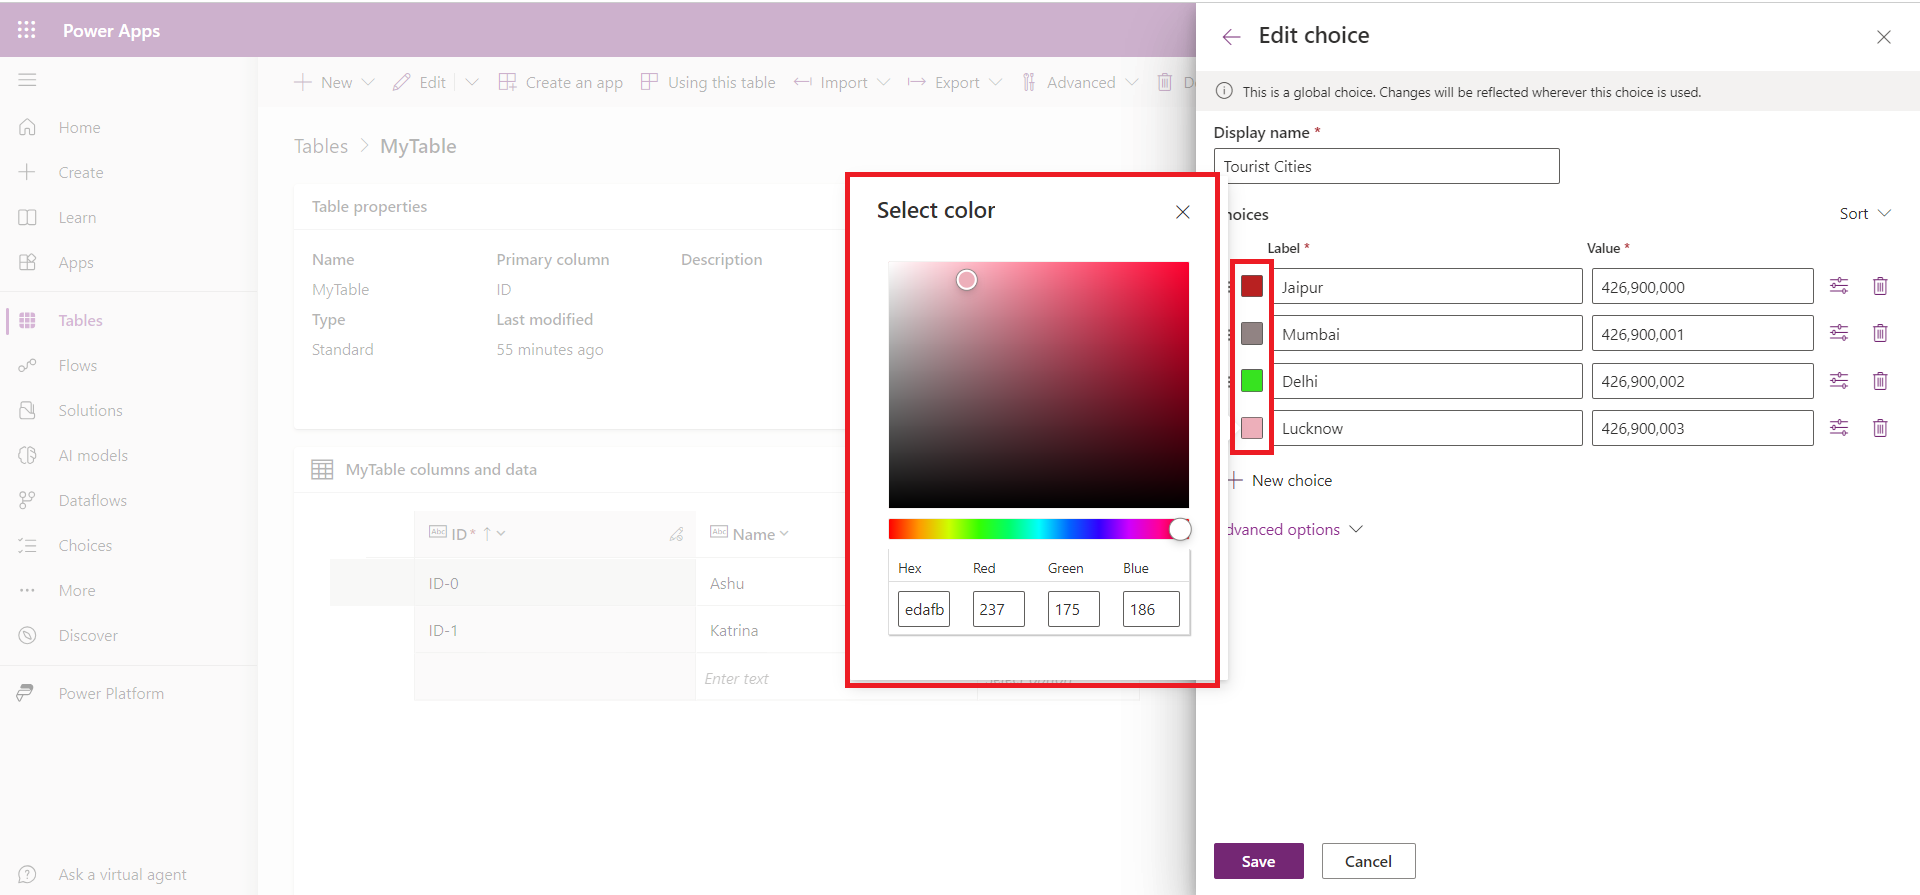
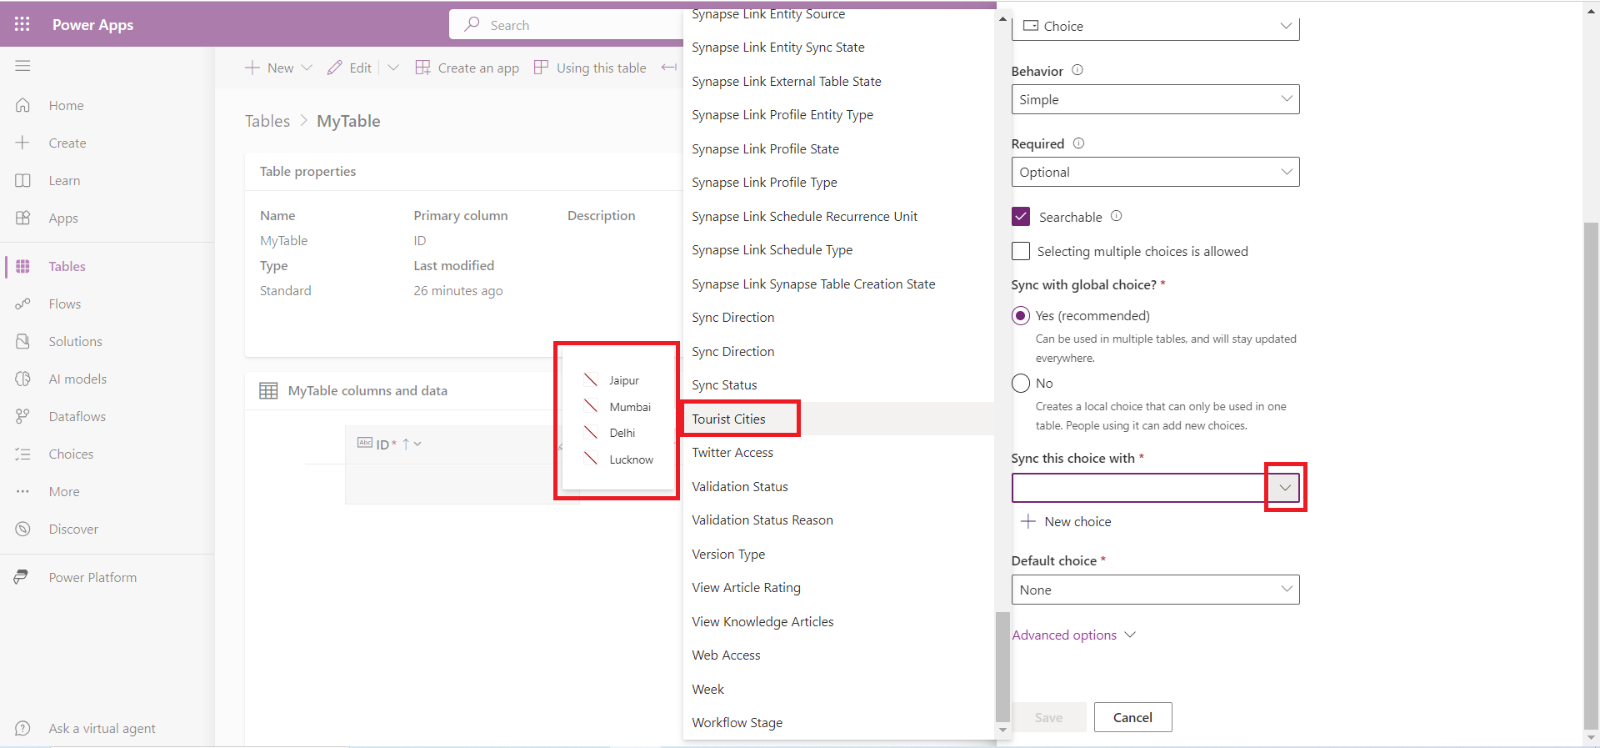
Step 4: Let's say we choose Yes in Sync with global choice? and select the Tourist Cities choice set that we have created earlier.
By clicking on the arrow icon, the global choice sets in the current environment is shown from which we can choose our Tourist Cities choice set.
Here we also have the option to edit the choice by clicking on Edit choice. And create a new global choice by clicking on the + New choice.
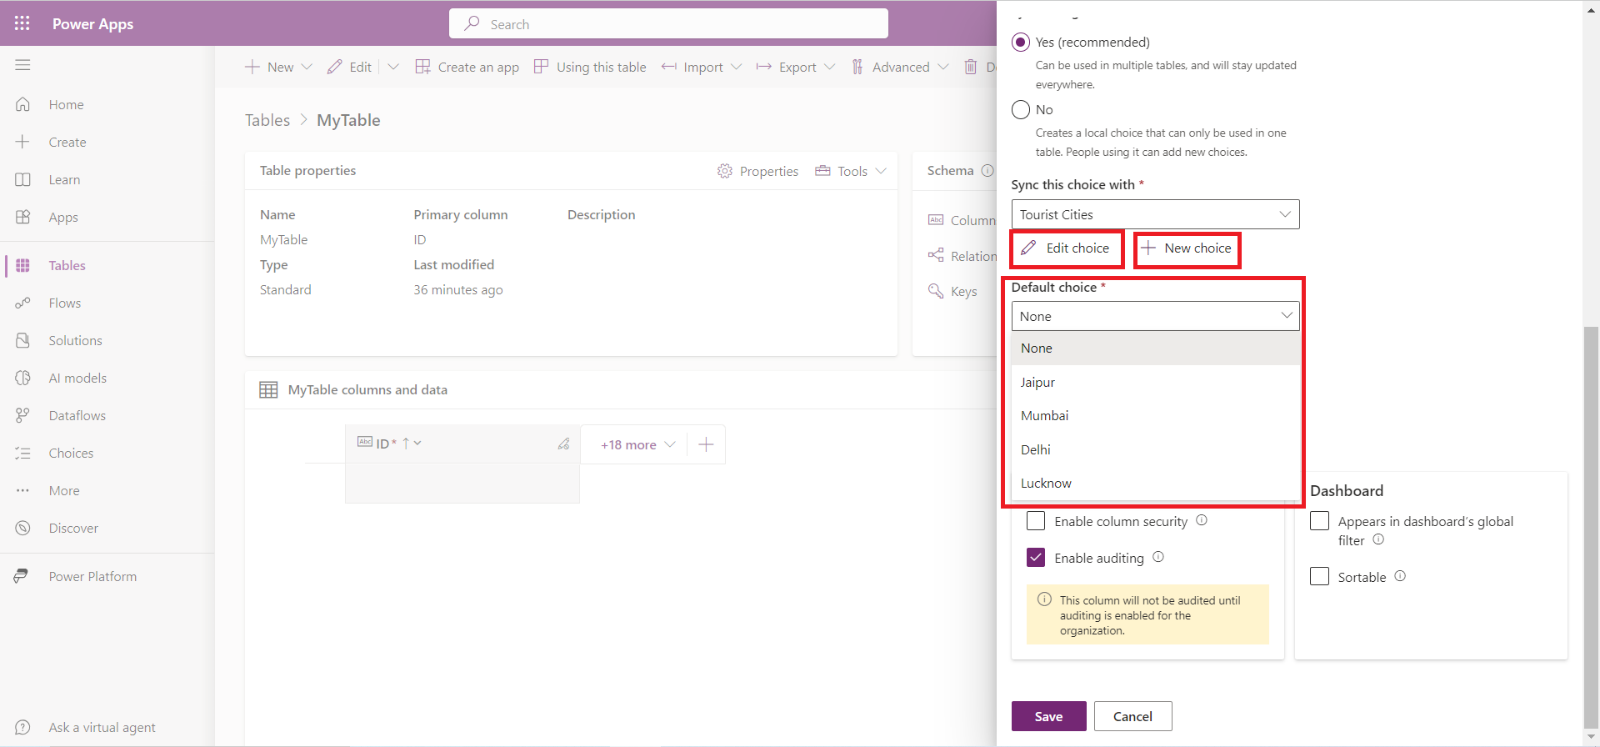
Step 5: After setting the choices we have the option to the select the default choice option from the Default choice dropdown. If we don’t want to set to any default value from the option set then set it to None and None is its default value. We can change the Default choice even later also.
Step 6: Select the Save button to save the changes.
Now we can see the values in the options.
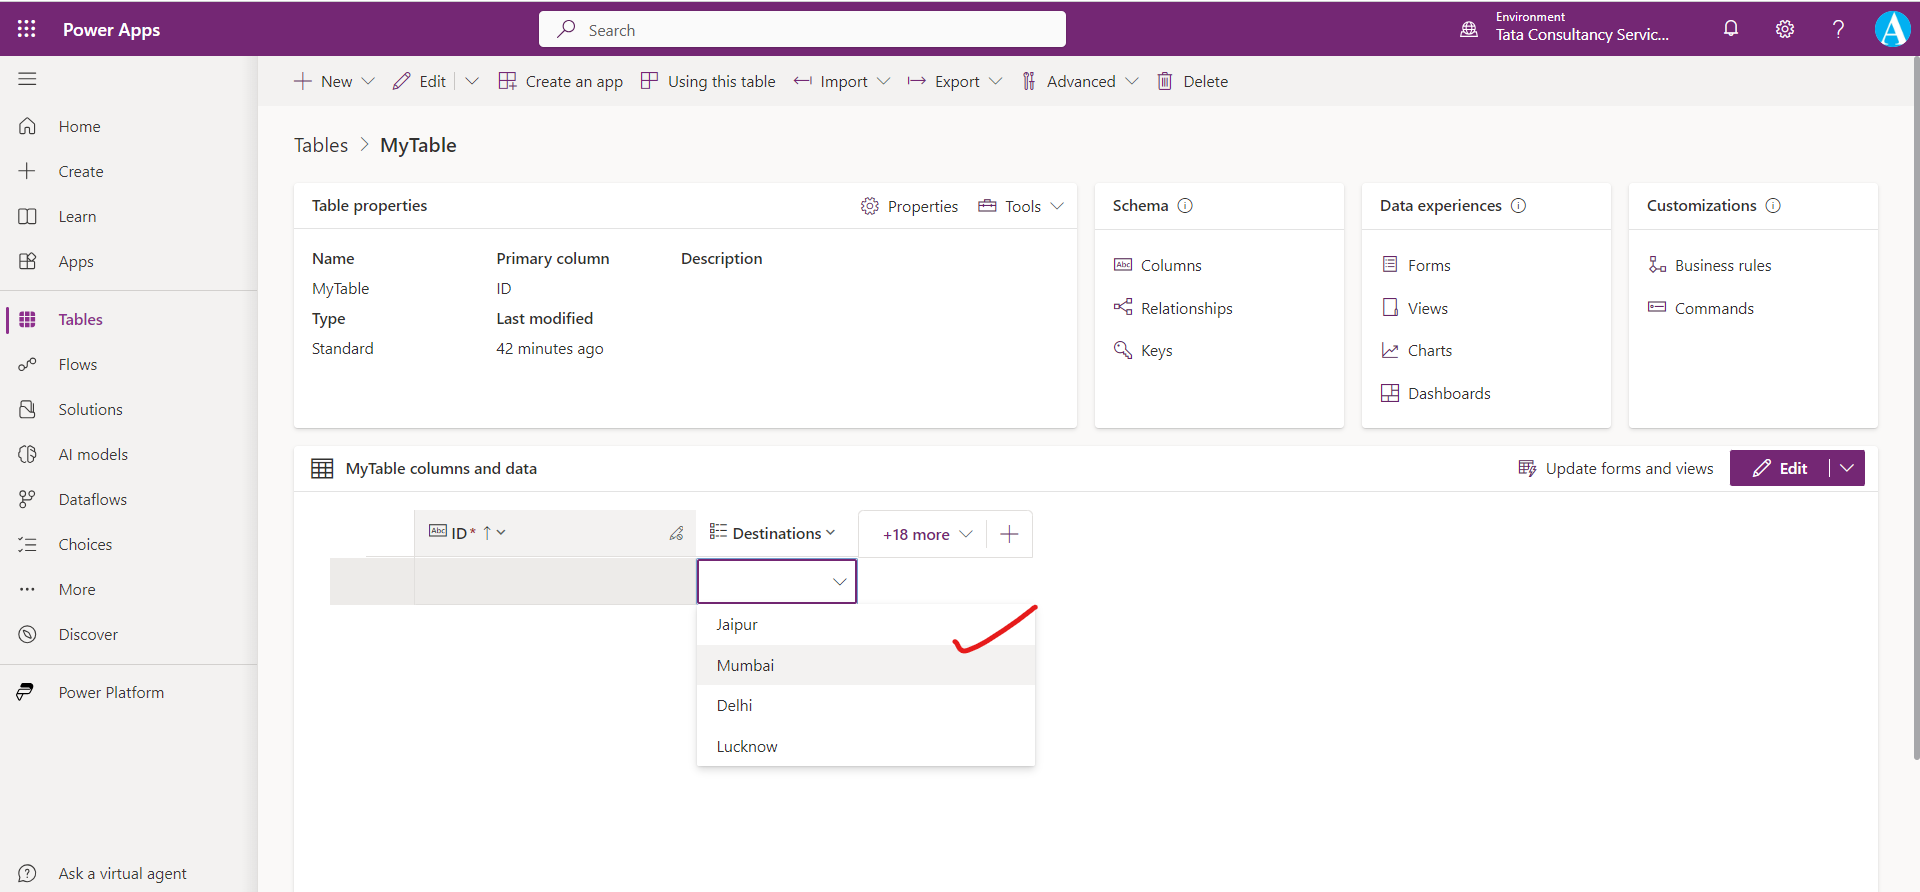
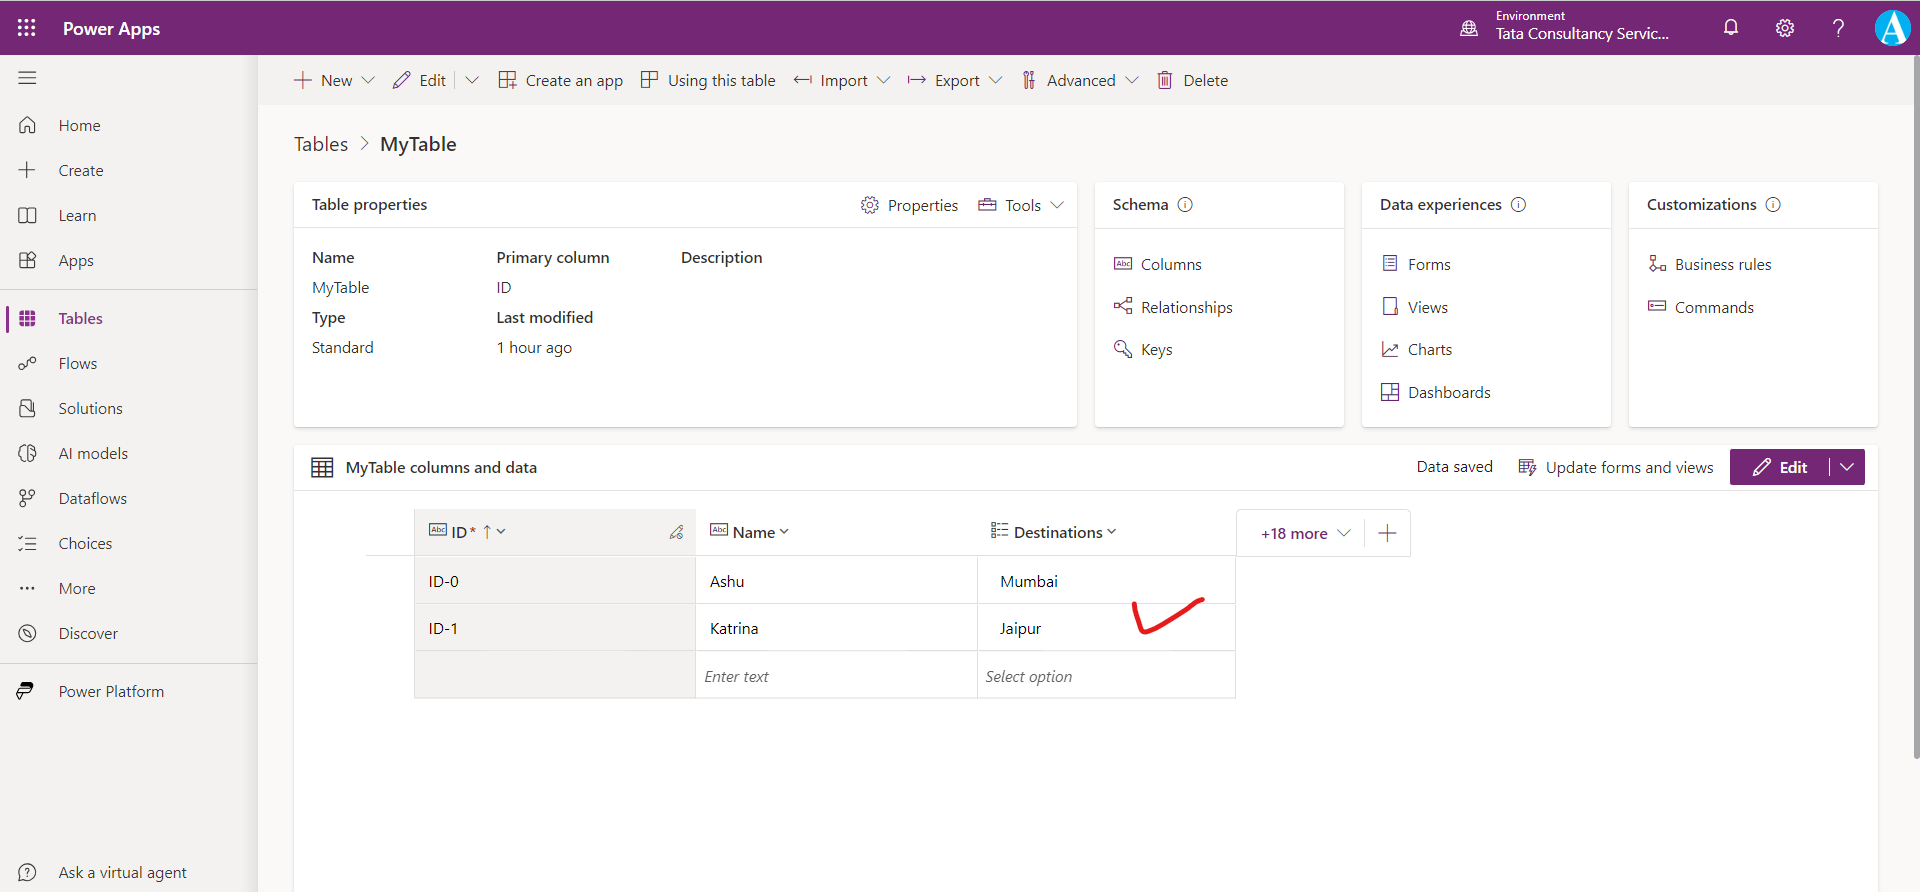
After creating some records, the choice is shown like this.
Local choice vs Global choice 1. Local choices can only be used by the table and column that they are created against and cannot be reused on other tables.
2. The Global choice option allows the list to be used for multiple columns in the same table or in many different tables.
When we create a new Choice column, the default value for the option Sync with global choice? is Yes (which is recommended). The Global choice option allows use of the same choices in other tables. Unless we are confident that the values only apply to that single column in that single table, we want to use global choice values.
Choice column used in Canvas Power Apps The simplest way to set a choice column value in our table is to use an Edit form control in power apps. When we add a choice column to the form, it sets up the field to complete the following tasks:
• Set up as either a dropdown menu (for a single choice) or a combo box (more than one choice). (When we add an Edit form, Power Apps will set up both with a combo box, we can allow multiple selections in Combo box.)
• Use the Choices() function to populate the list of values that the user can select (again this is done automatically when using Edit form). The Choices() Power apps formula returns a table of possible values for a Choice column.
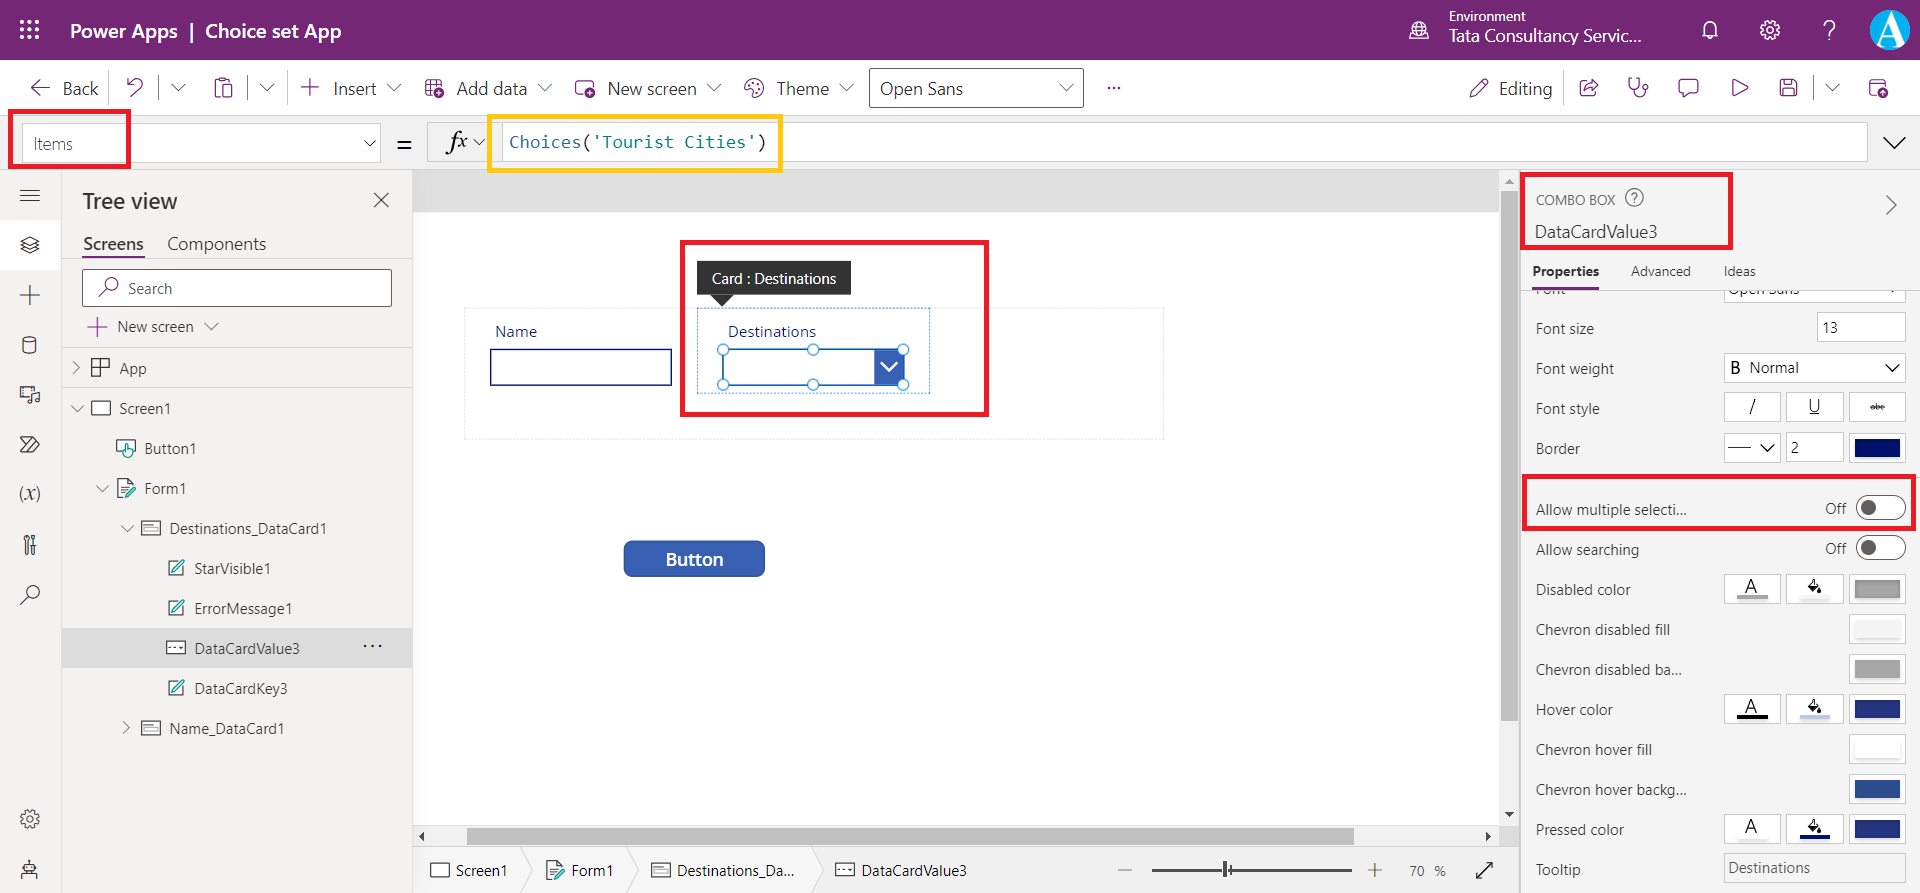
We can set the control value to save the value to our table we can use the SubmitForm function on a control (such as a button).
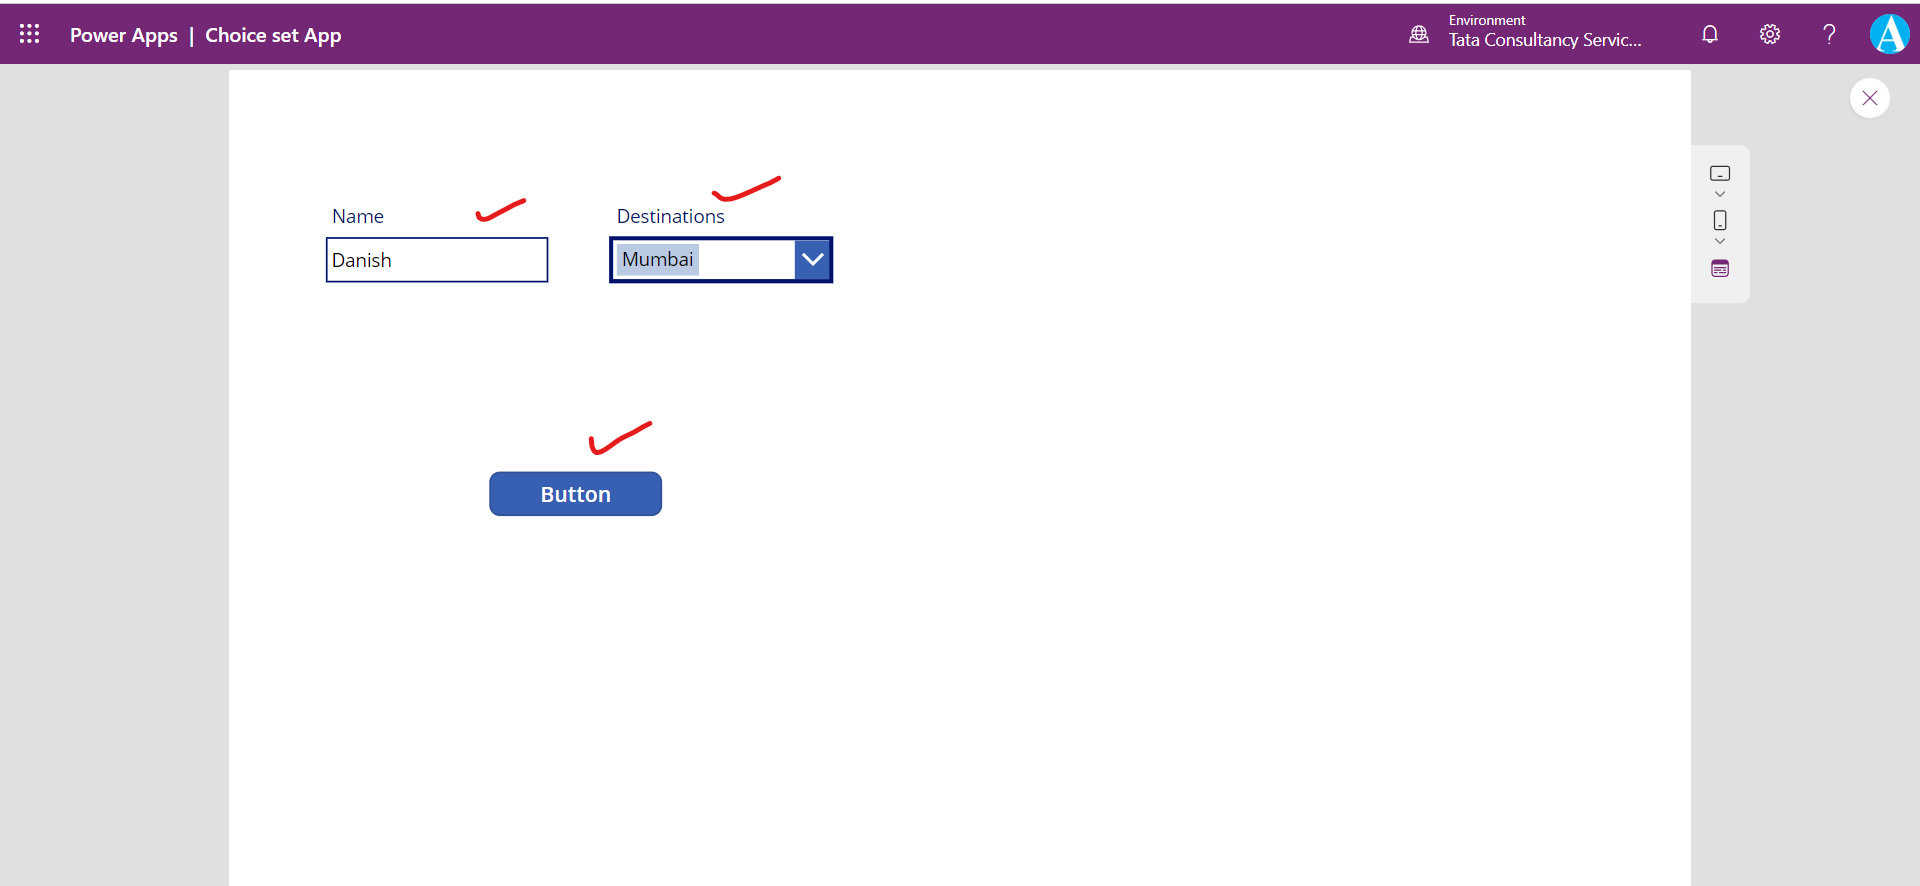
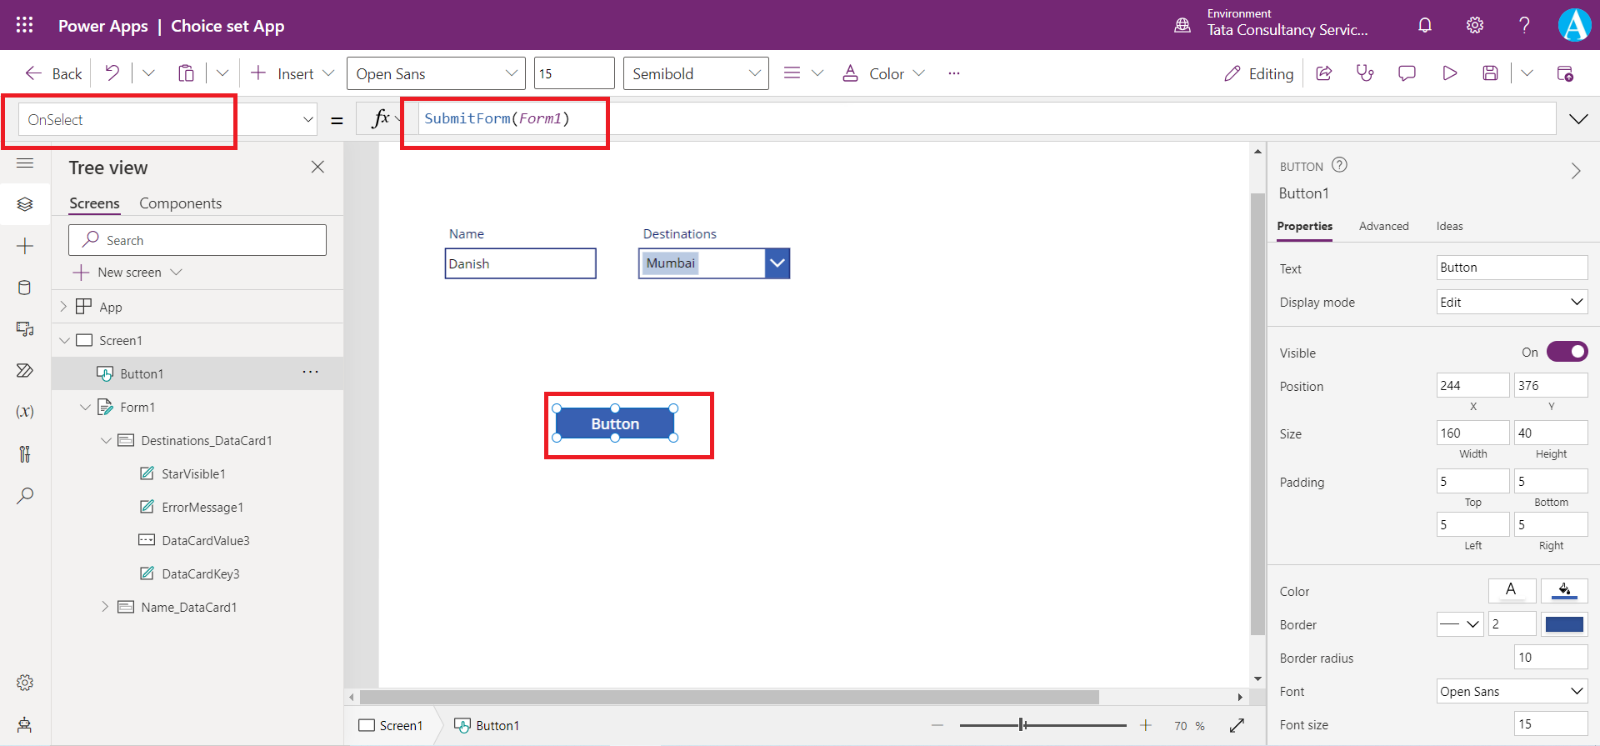
On the button we have the following formula written on its OnSelect property.
Power Apps Formula
Here, Form1 is the name of the form.
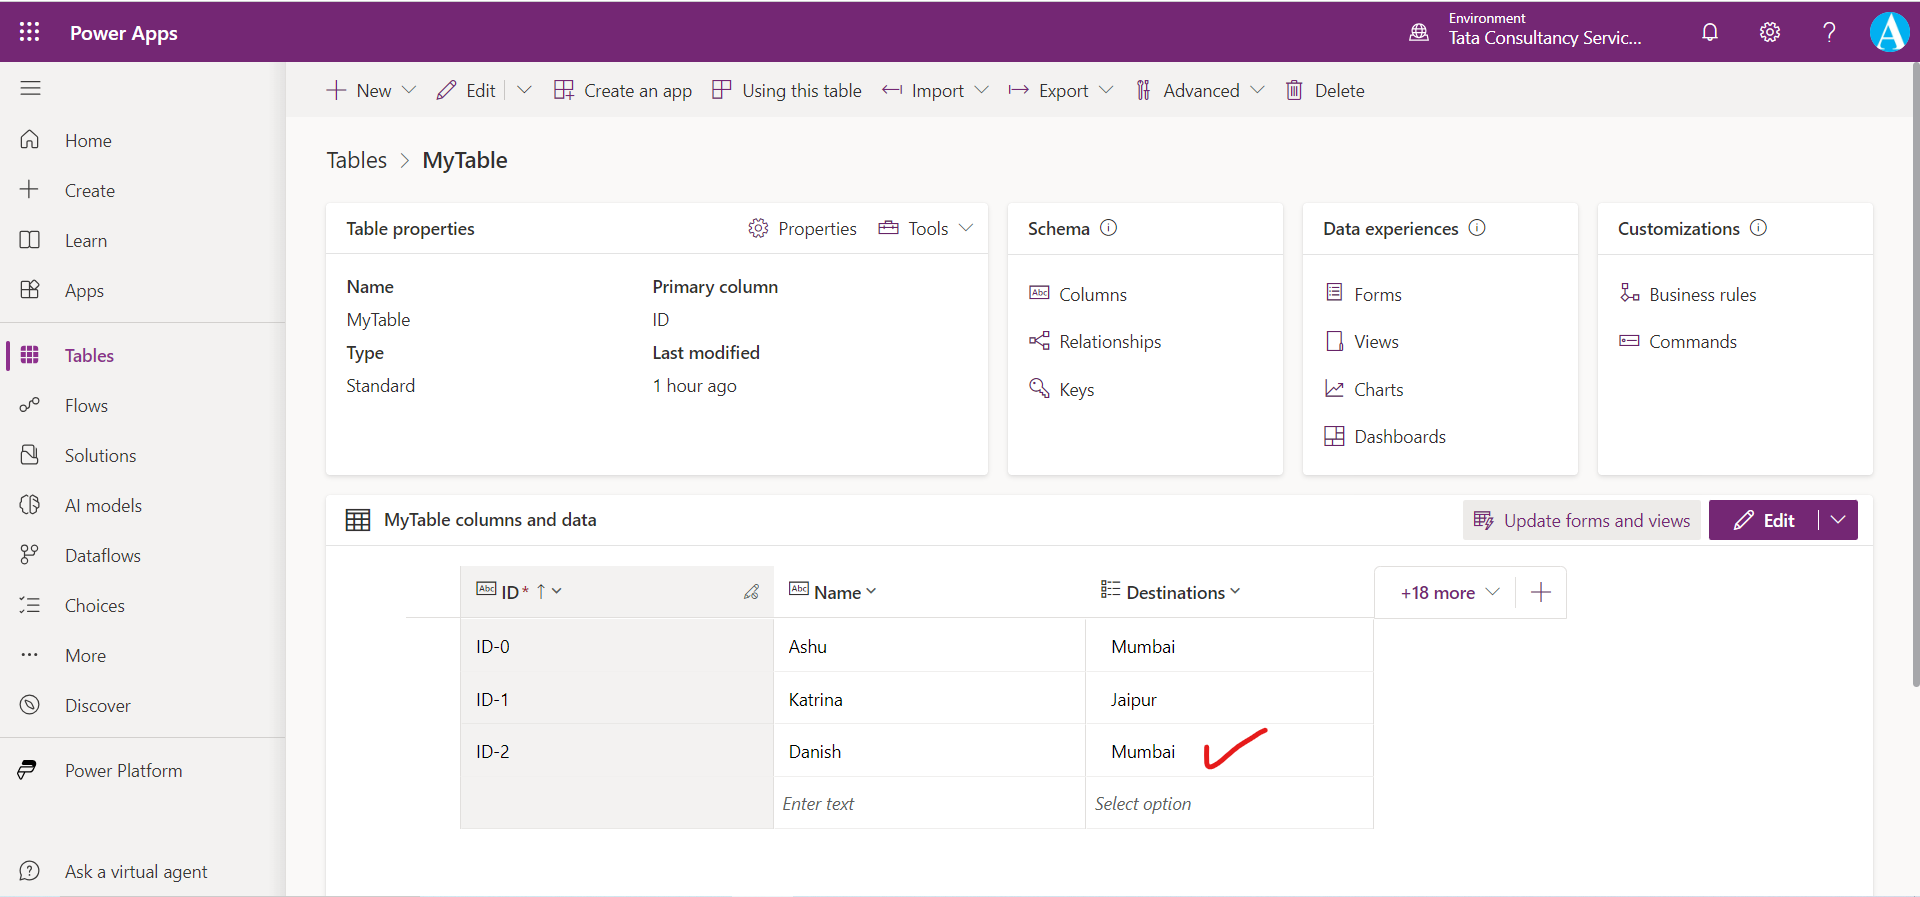
We can see our entry is created in the dataverse table.
Patch the Choice Column in dataverse
We can create or modify choice columns by using the Patch() function.
We can set the following powerapps formula on the OnSelect property of a button in the Gallery control.
Power Apps Formula
Here,
• Destinations is the name of our choice column and
• Tourist Cities is the name of our choice set
This formula set the Destinations column value to Delhi.
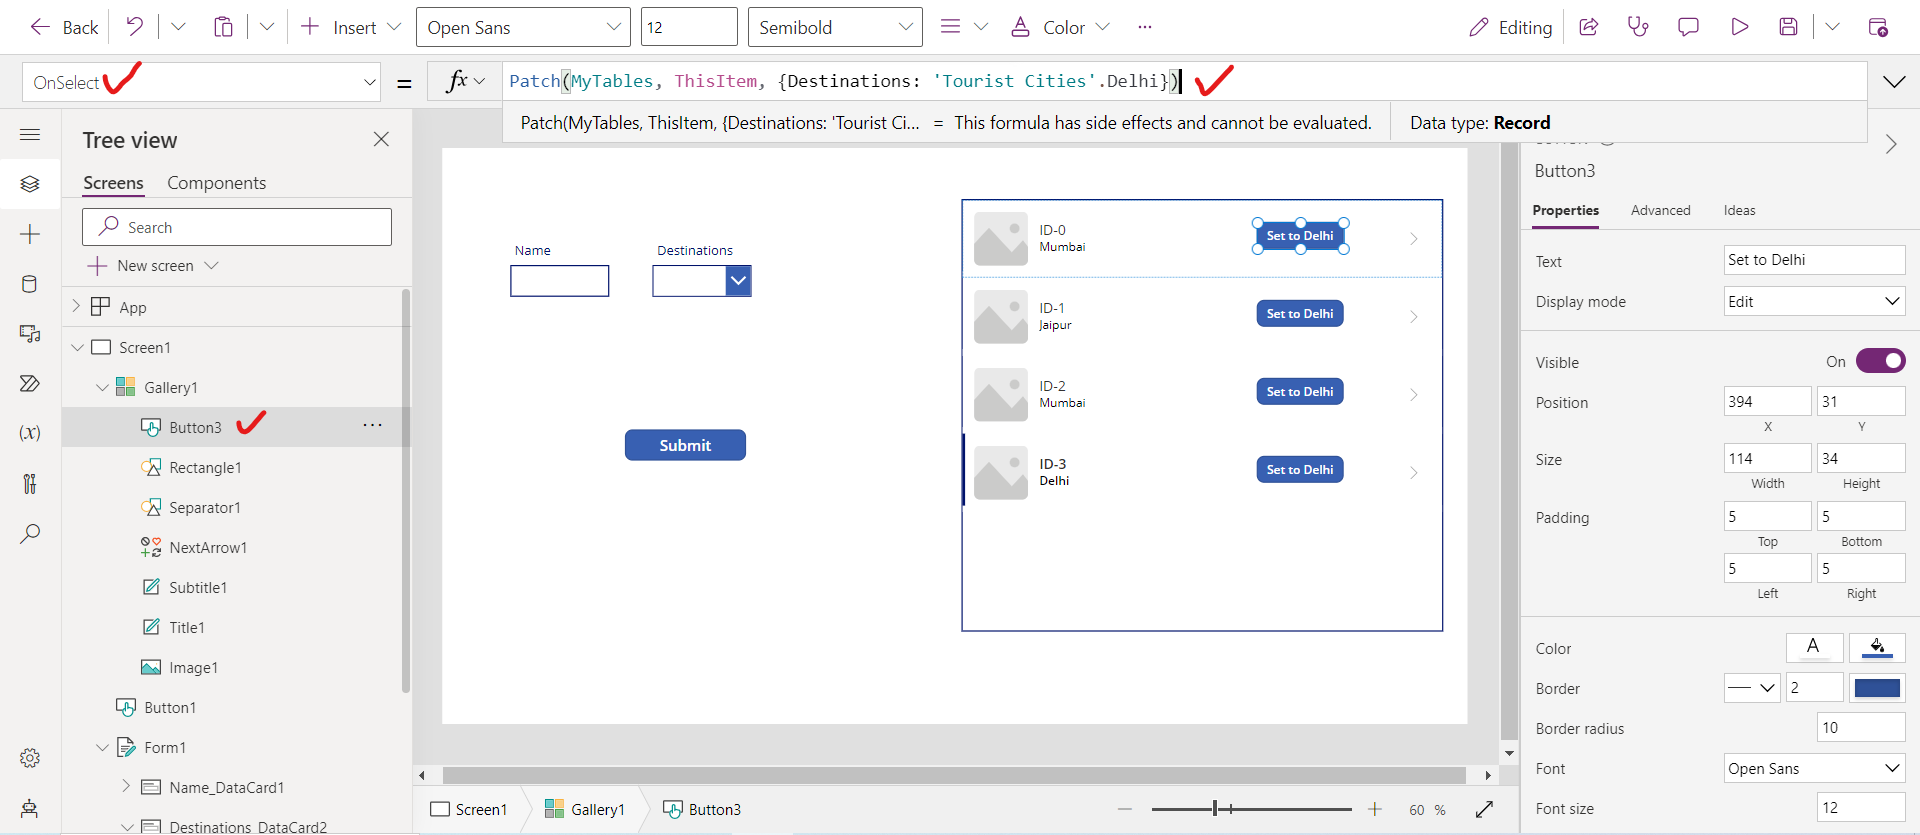
If our table column uses a Choice set, when we use Patch, we will need to prefix our value with the Choice set name, else we will get an 'OptionSetValue' error.
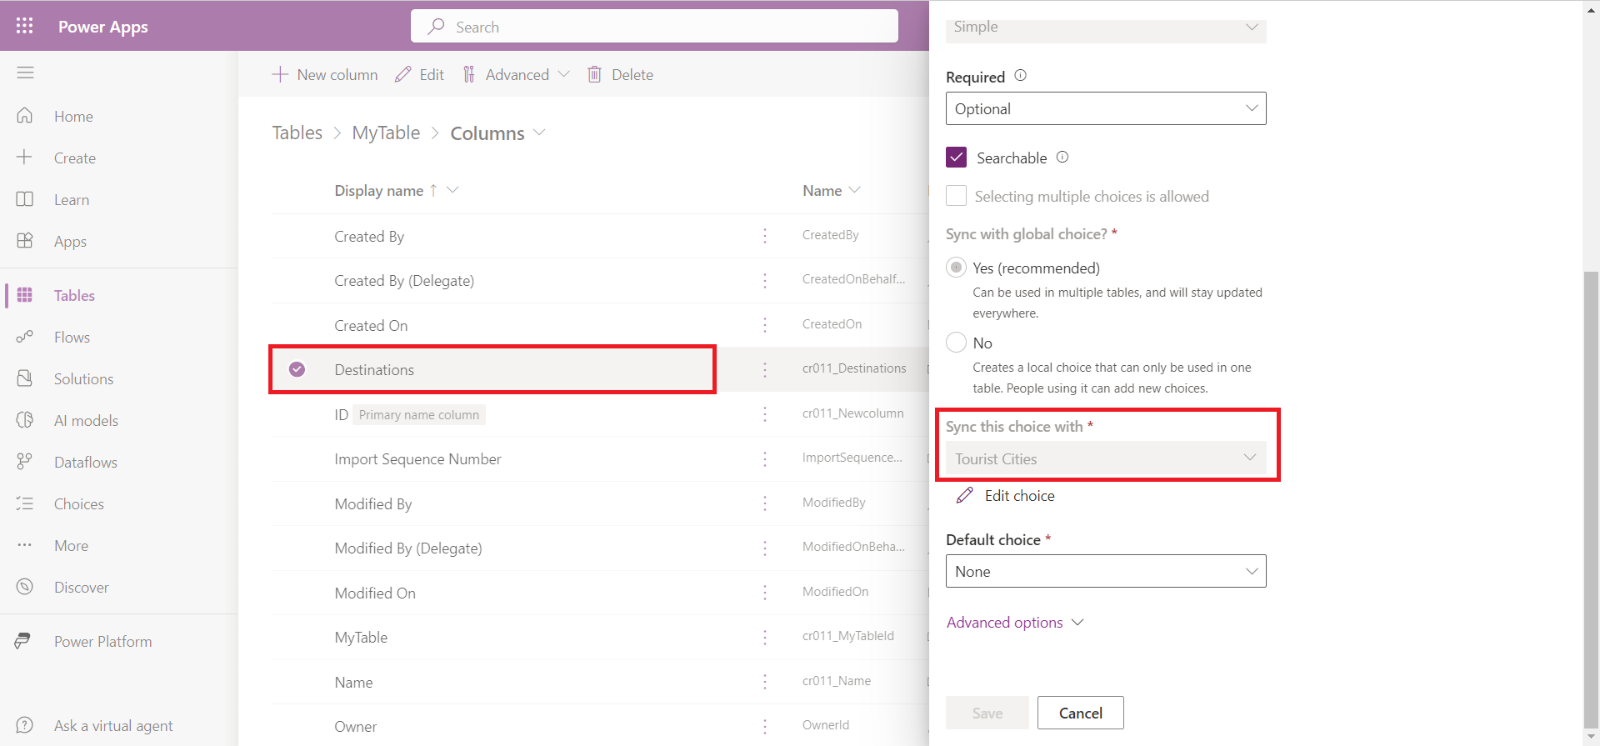
We can find our choice set name is by going to our Table in Dataverse, selecting that column in Edit mode, and looking for the field Sync this choice with. Just below that column will be the name of the Choice set.
Clear values
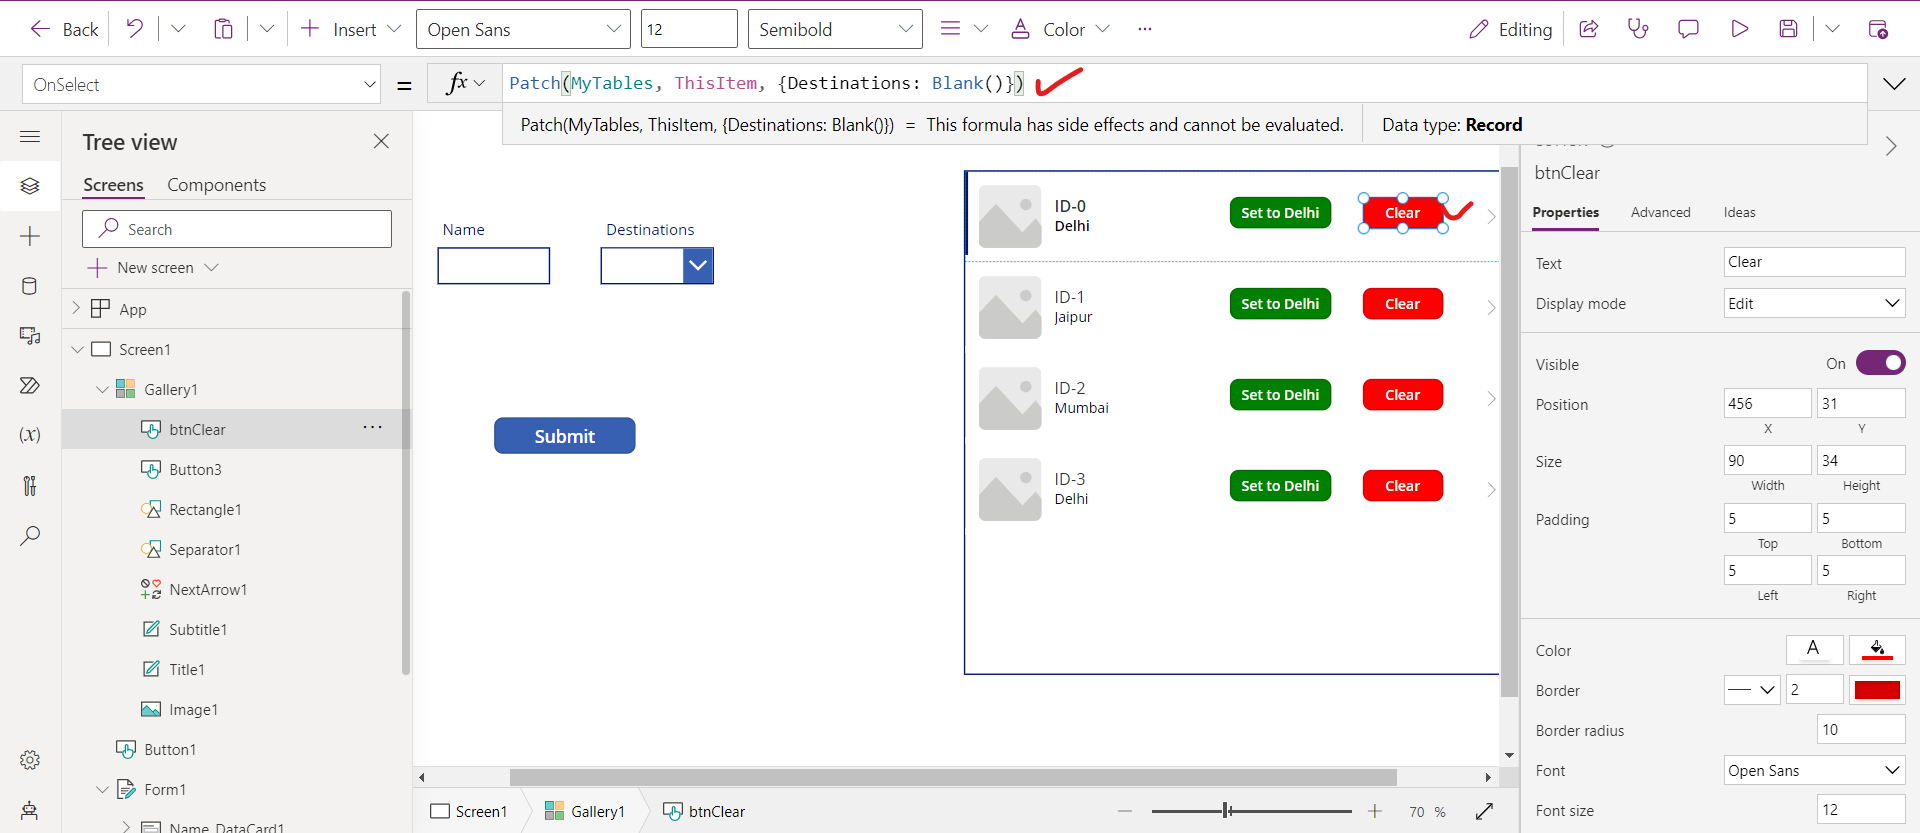
We can use the Patch() function to clear existing values from a choice column by using the Blank() function.
For example, the following formula would reset the Destinations column choice field on the current item in a gallery.
PowerApps Formula Patch(MyTables, ThisItem, {Destinations: Blank()})
What happened when a choice is deleted from the choice set?
The following image specifies the table in which we are using our Choice set values.
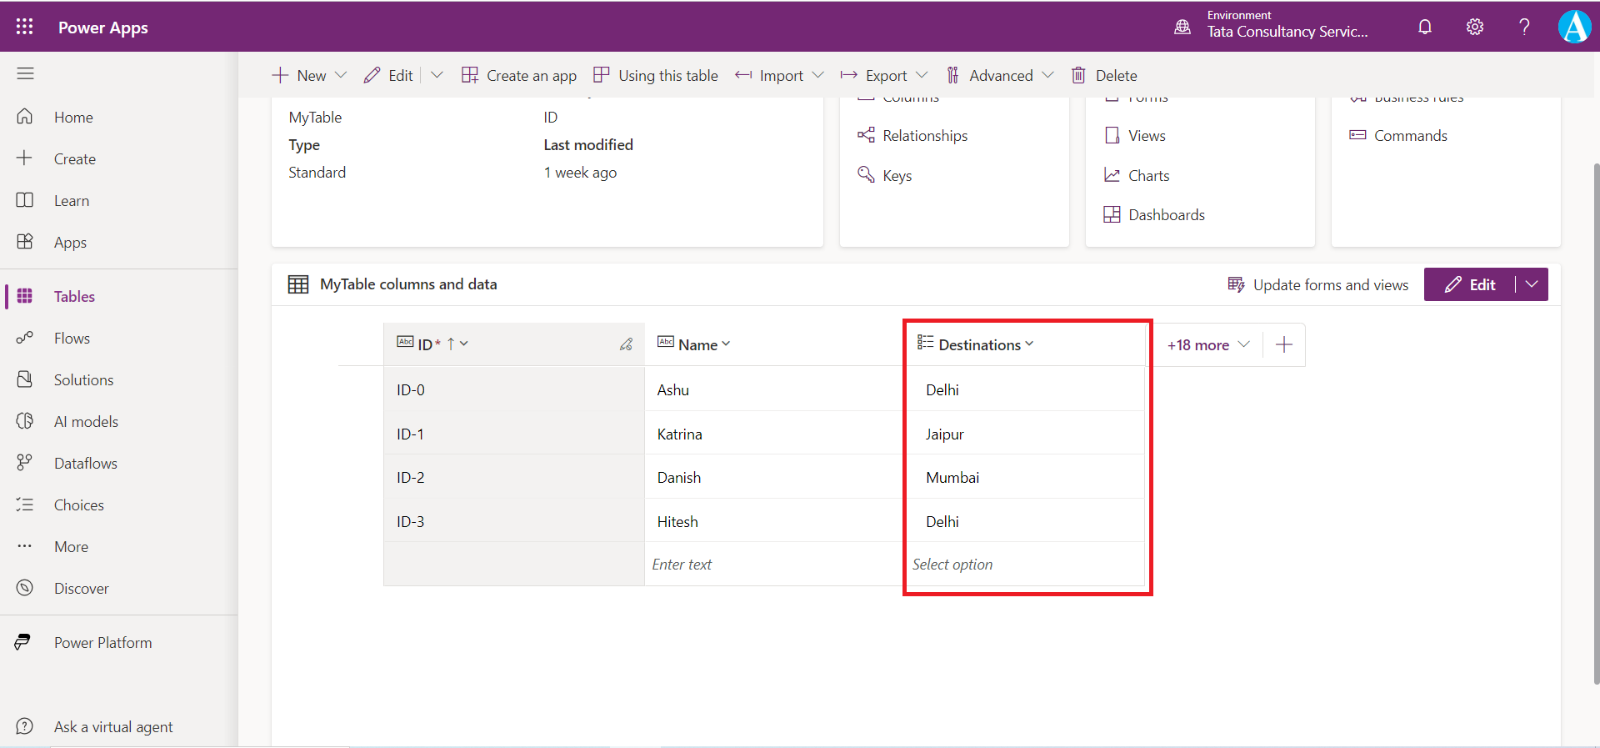
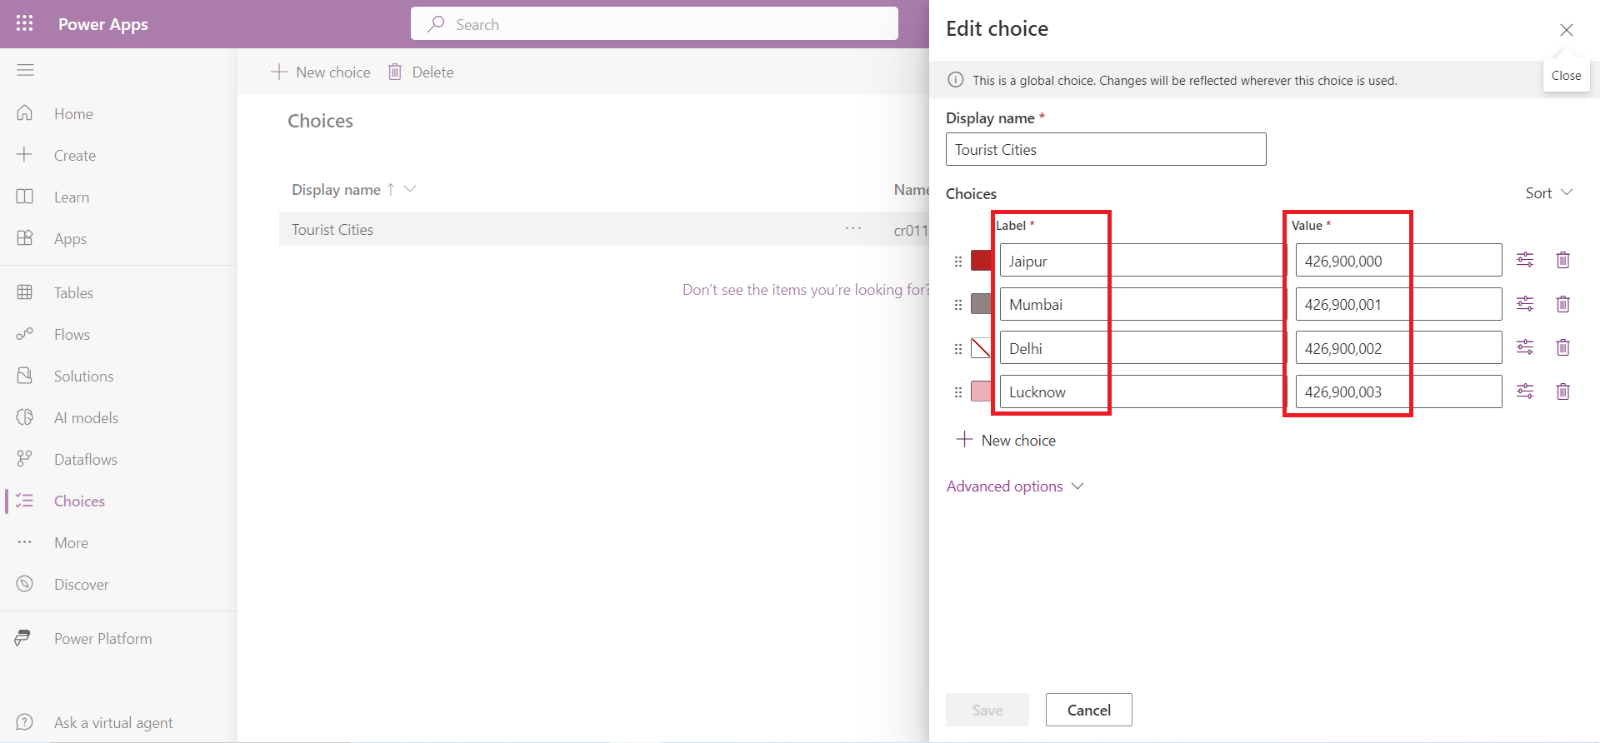
In the following image we can see our Choice set named Tourist Cities with some Labels and their corresponding Value.
Here Value plays an important role, please pay attention it.
Let us we delete the Delhi option by clicking on the trash icon and click on Save.
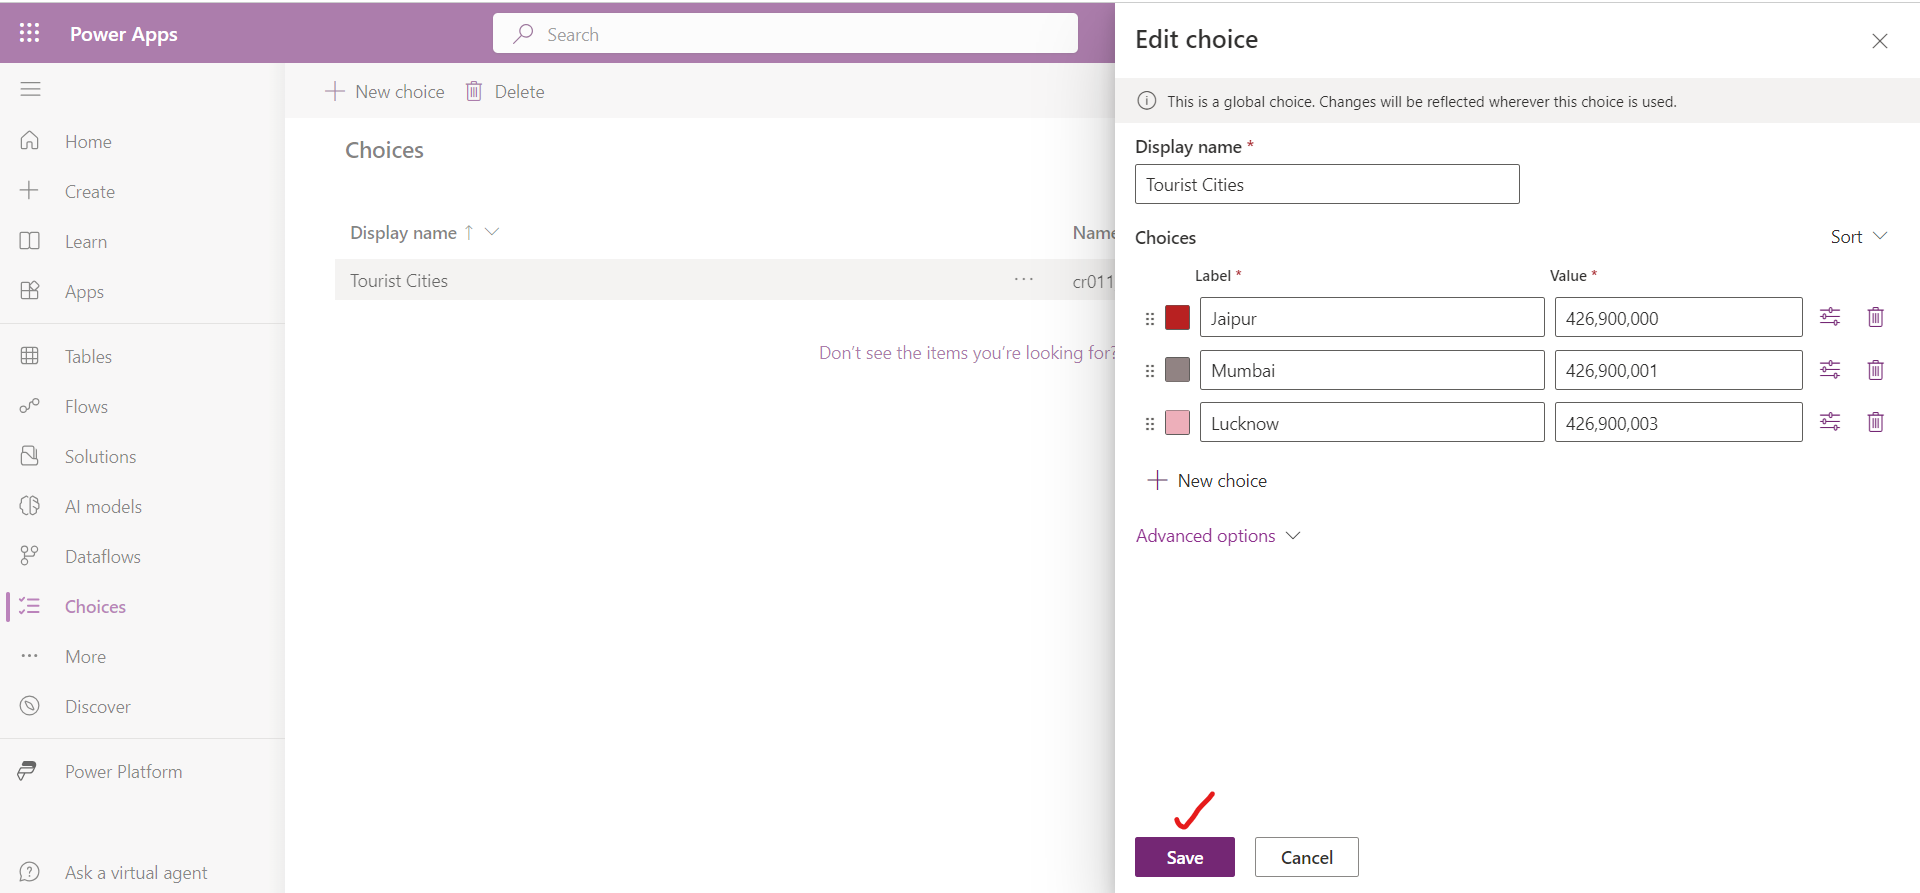
We can see that the Delhi option is not shown in the choice anymore and on behalf of that the value of Delhi label is shown in the column value of that row.
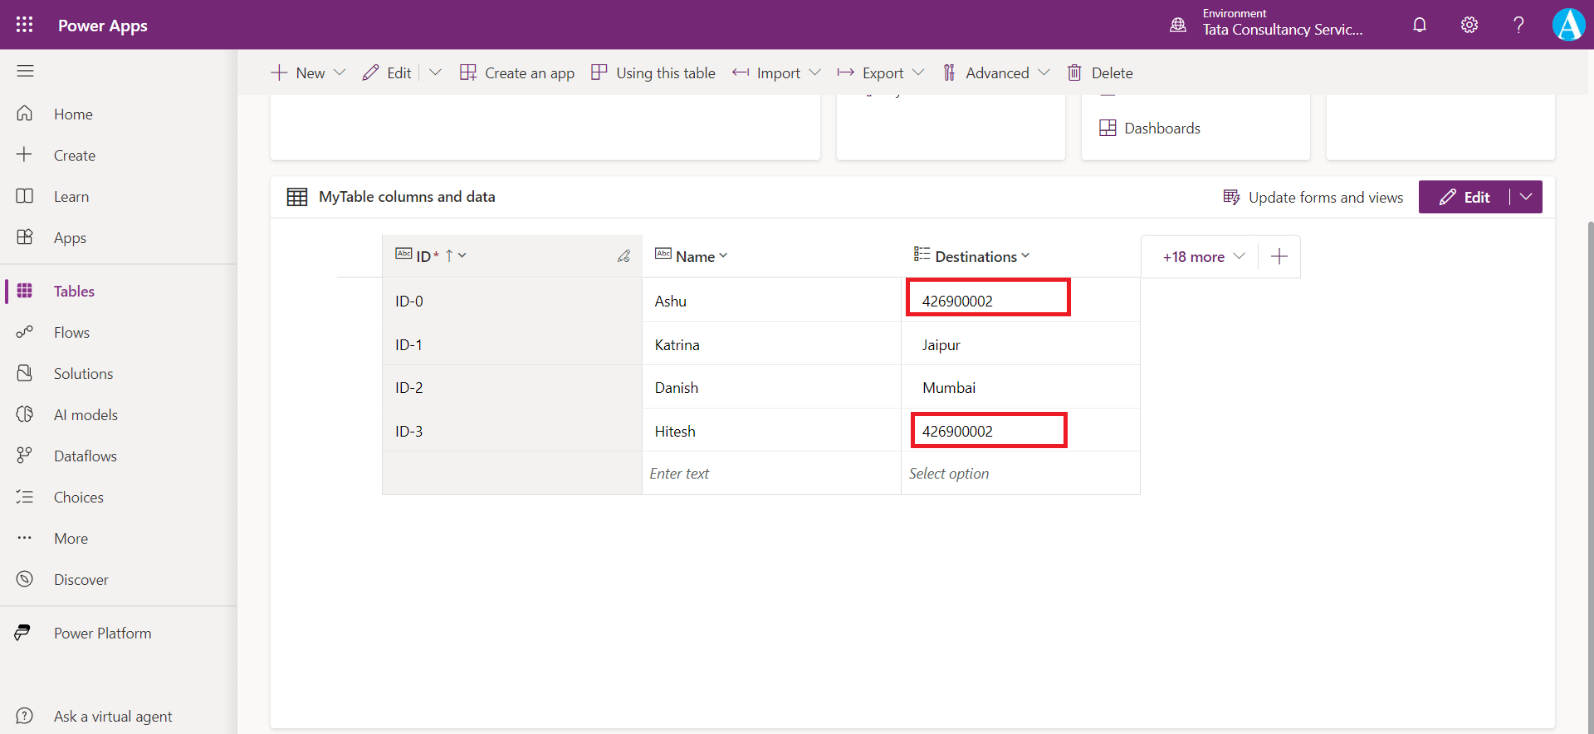
Now if we want to assign this value to some other choice or again Delhi as a choice option it is possible.
To do this,
Step 1: Open the ‘Tourist Cities’, our choice set again.
Step 2: Click on + New choice.
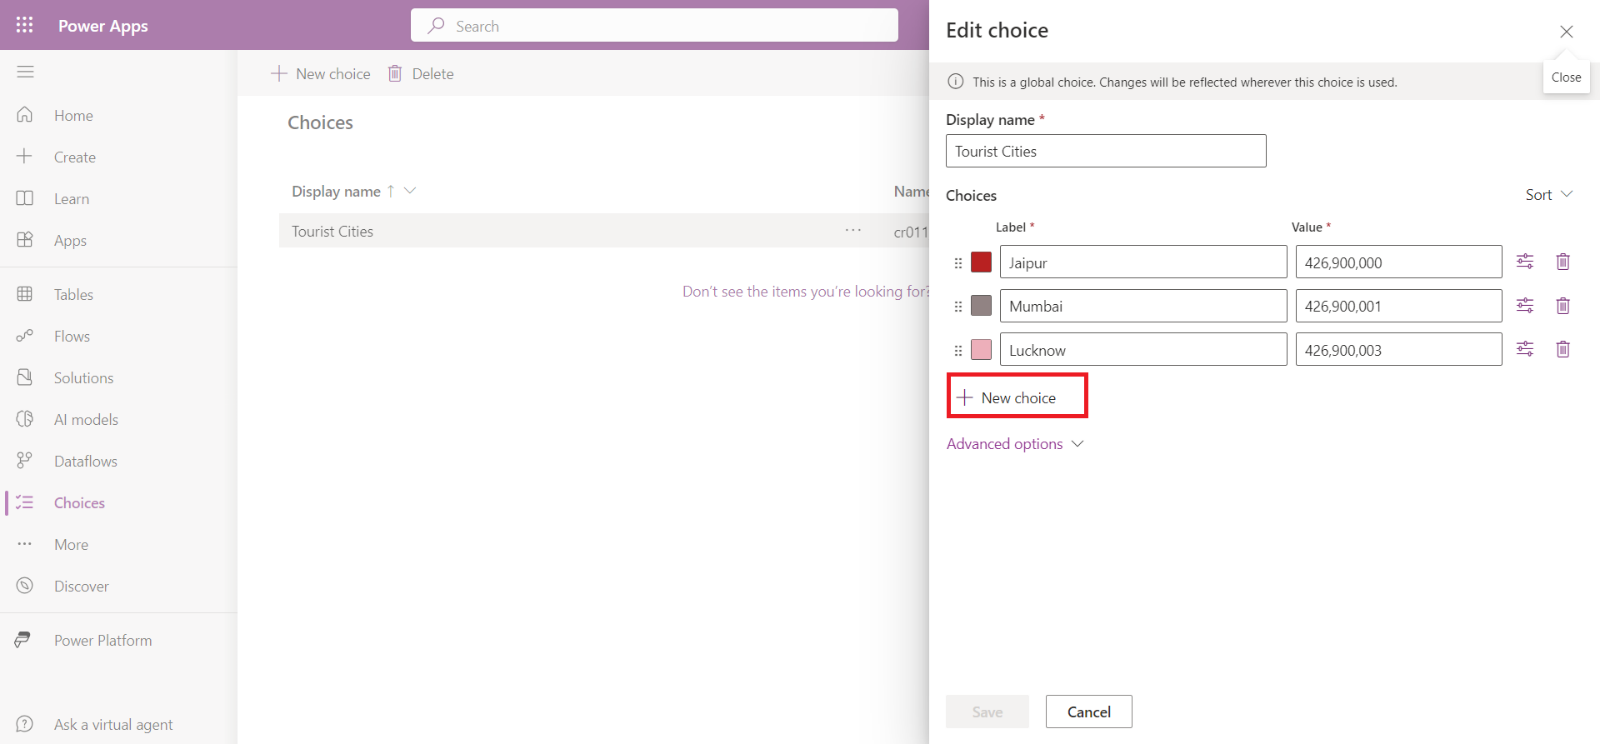
Step 3: Here, we are adding the Label Panipat and in the Value, we can write 426900002 which is the value which is given to the Delhi previously.
Step 4: Click on Save to save the changes.
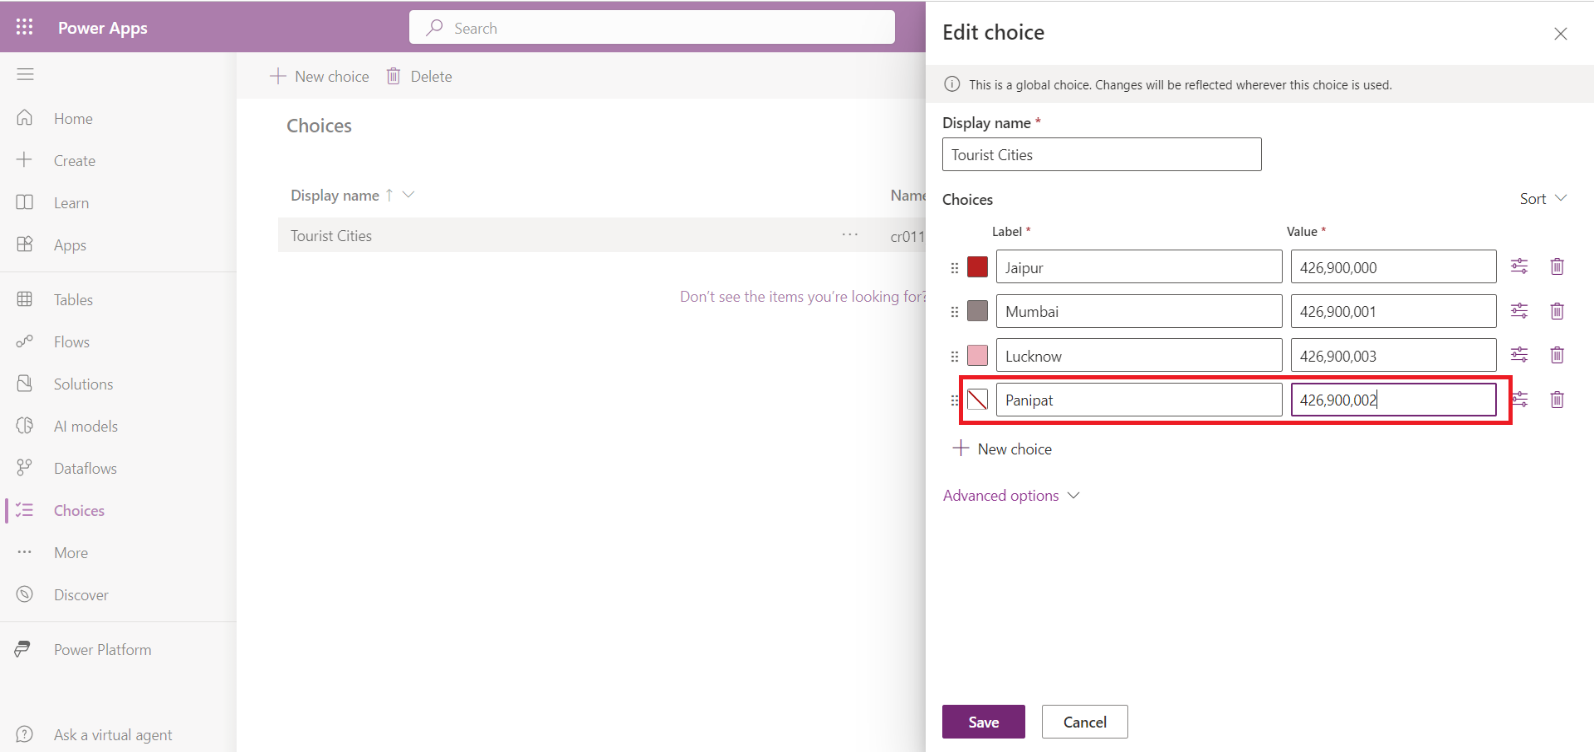
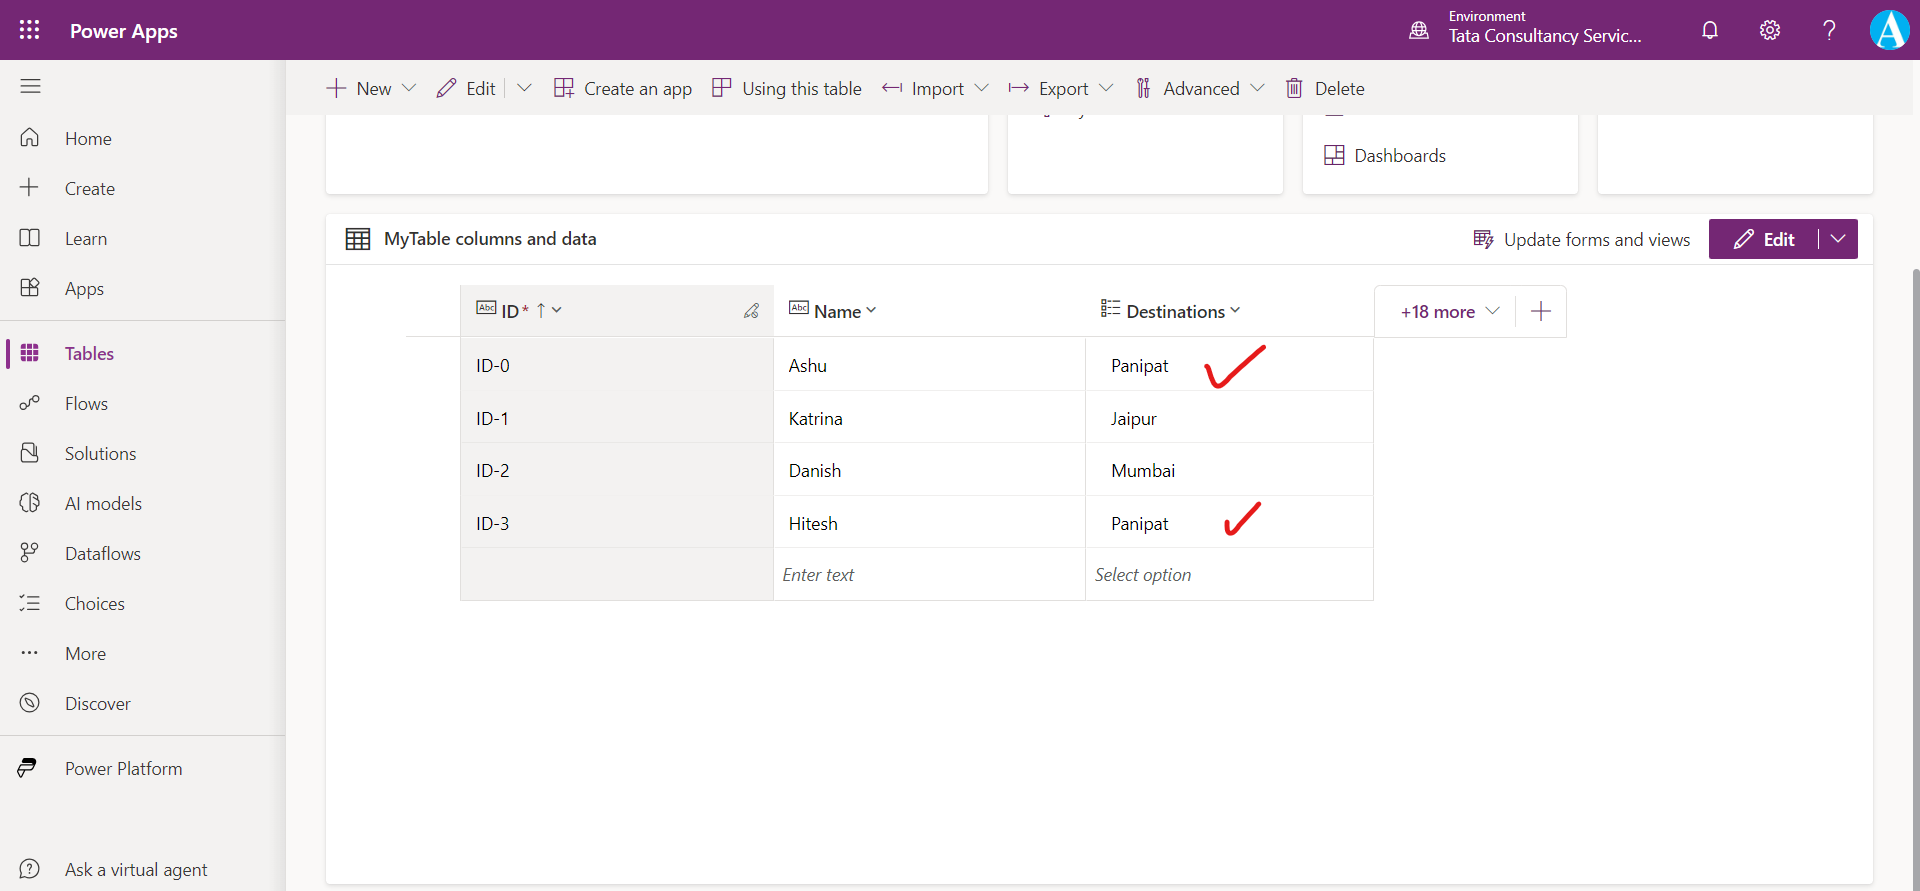
Now all the values that are tagged to Delhi previously are now tagged to Panipat automatically.
Now refresh the table, we can see the change as shown in the image below:
Create a Local Choice and use in Power Apps
Create a new column, with a display name Sports Played, with Data type Choice.
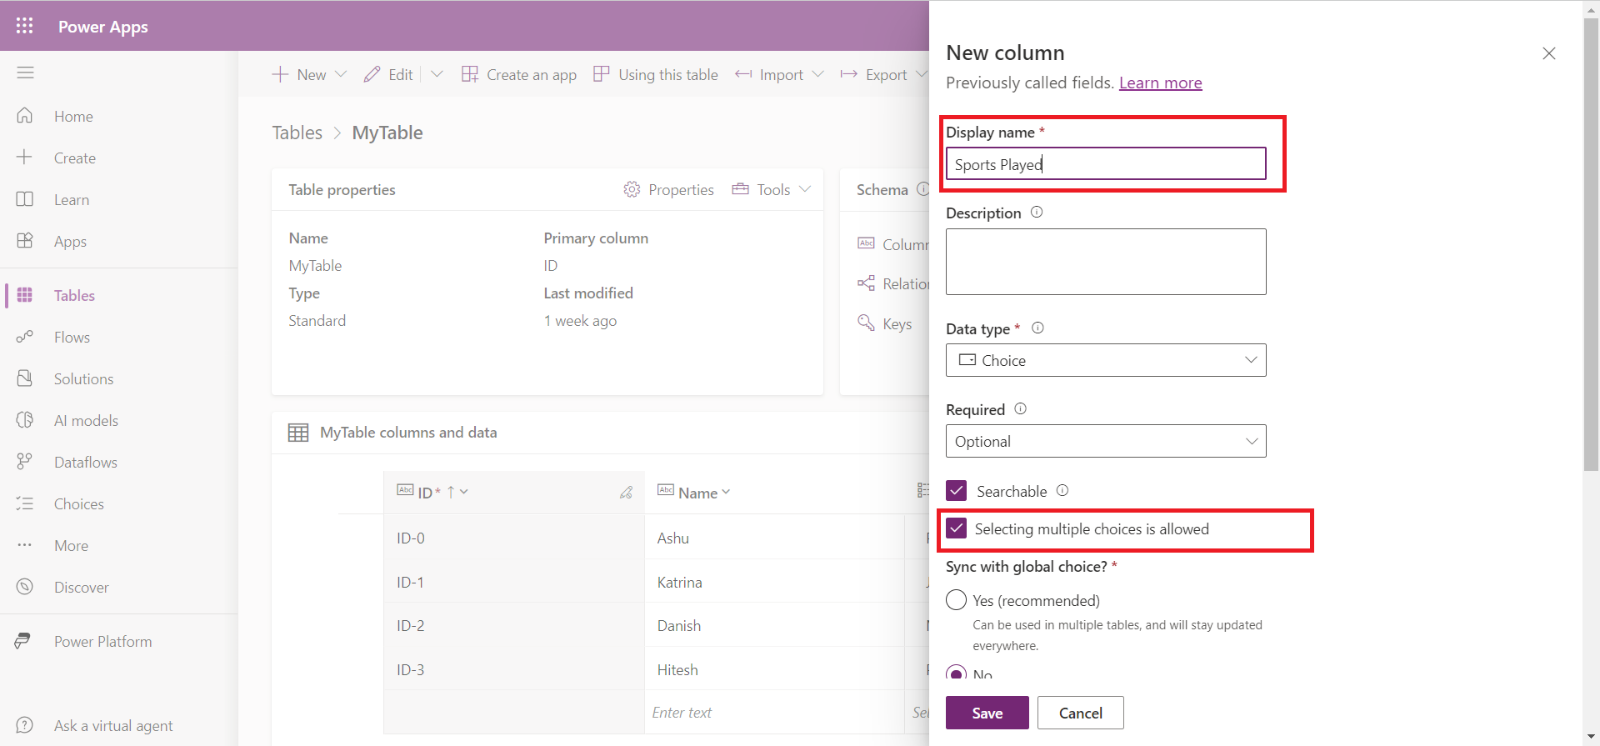
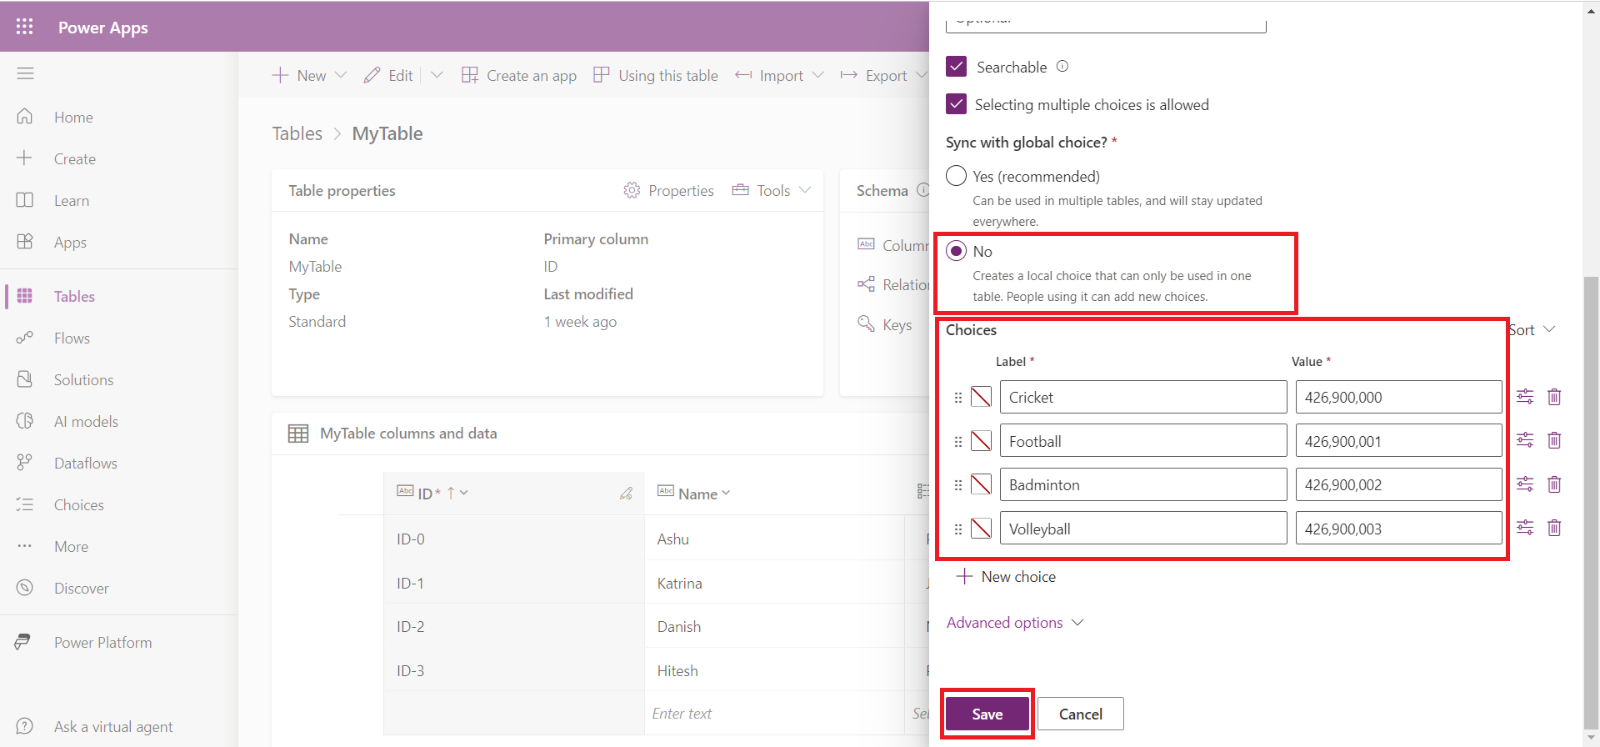
Select the checkbox “Selecting multiple choices is allowed”. Add the local choices and click on Save.
In the canvas app, add the field “Sports Played” to the form and then select the values.
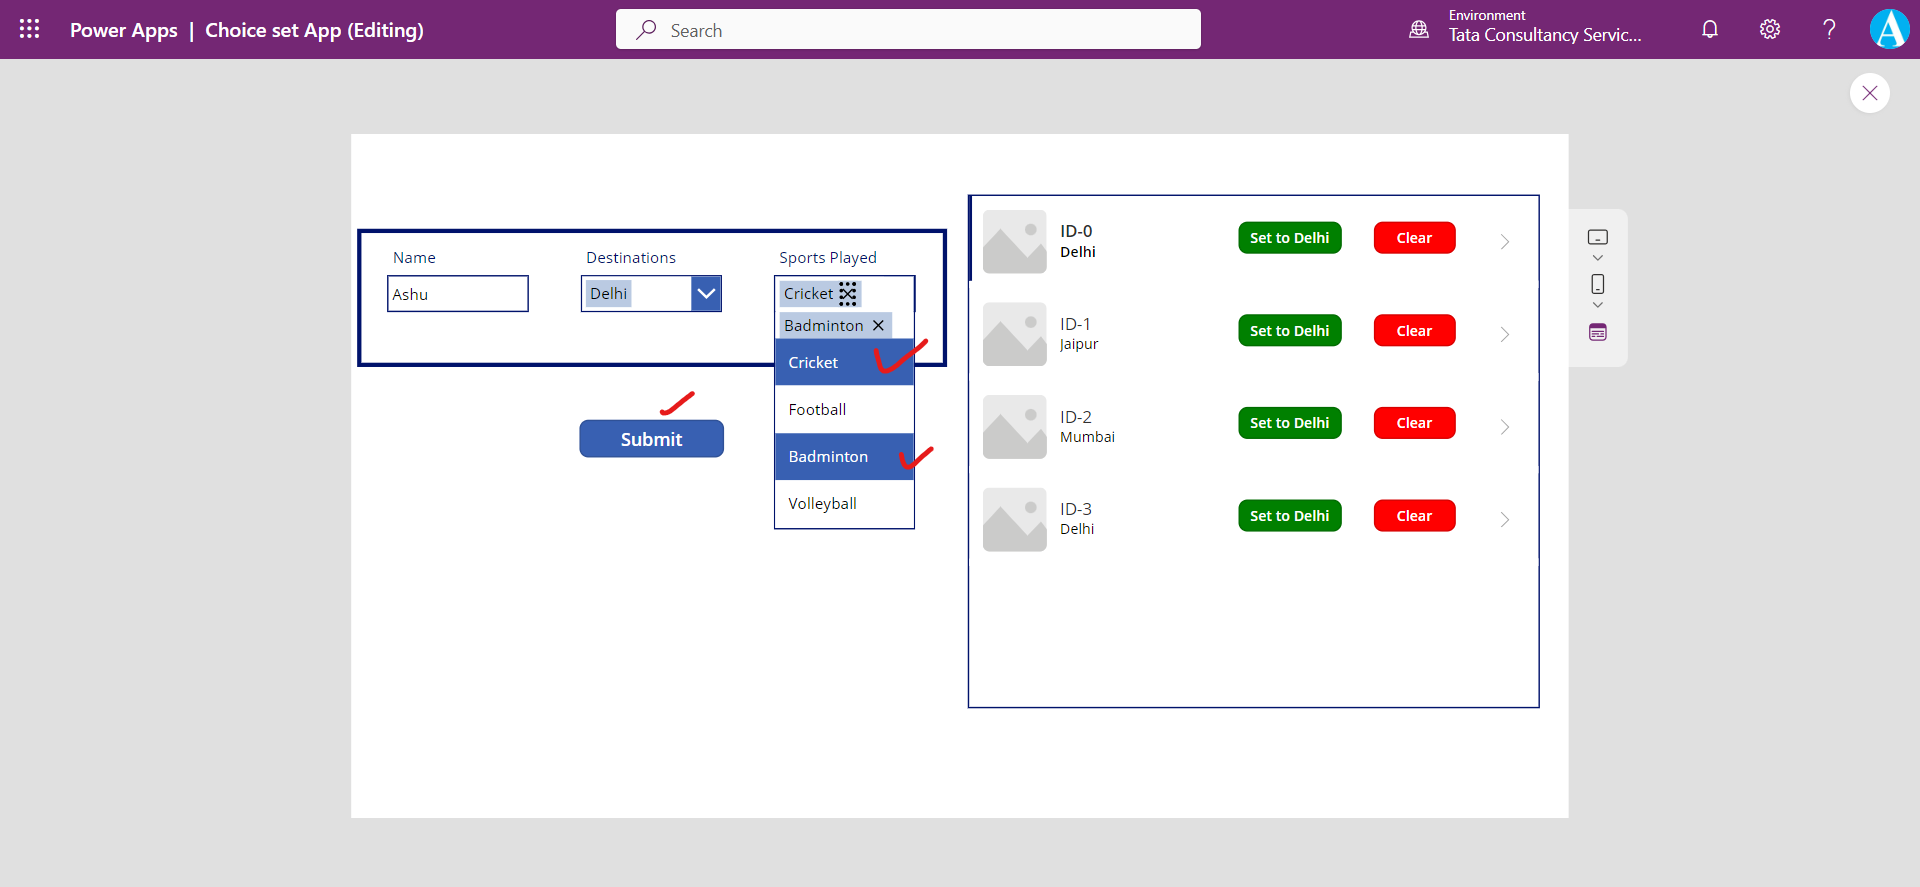
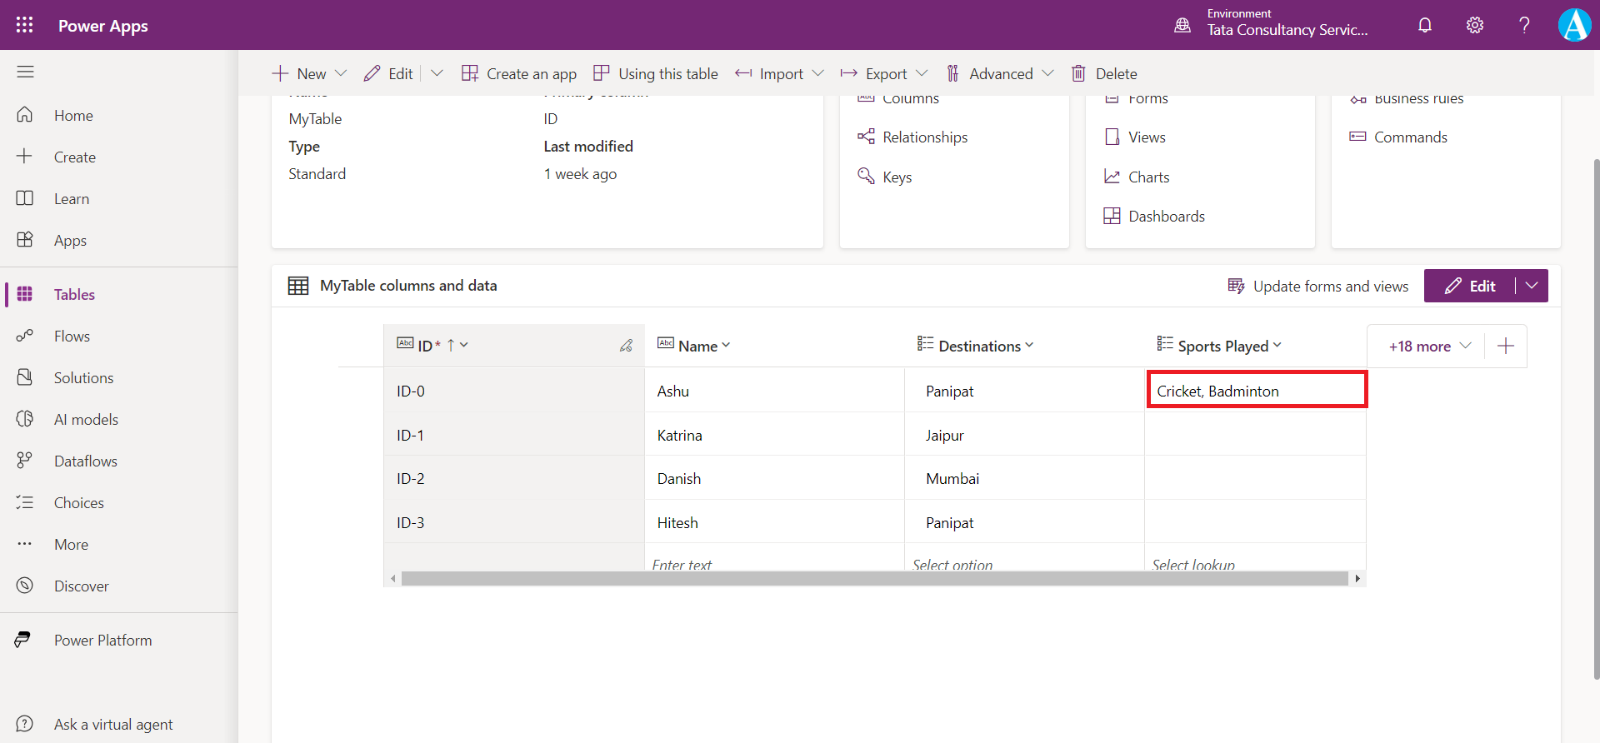
We can select multiple values, and the multiple values are saved in the dataverse as the comma separated format.
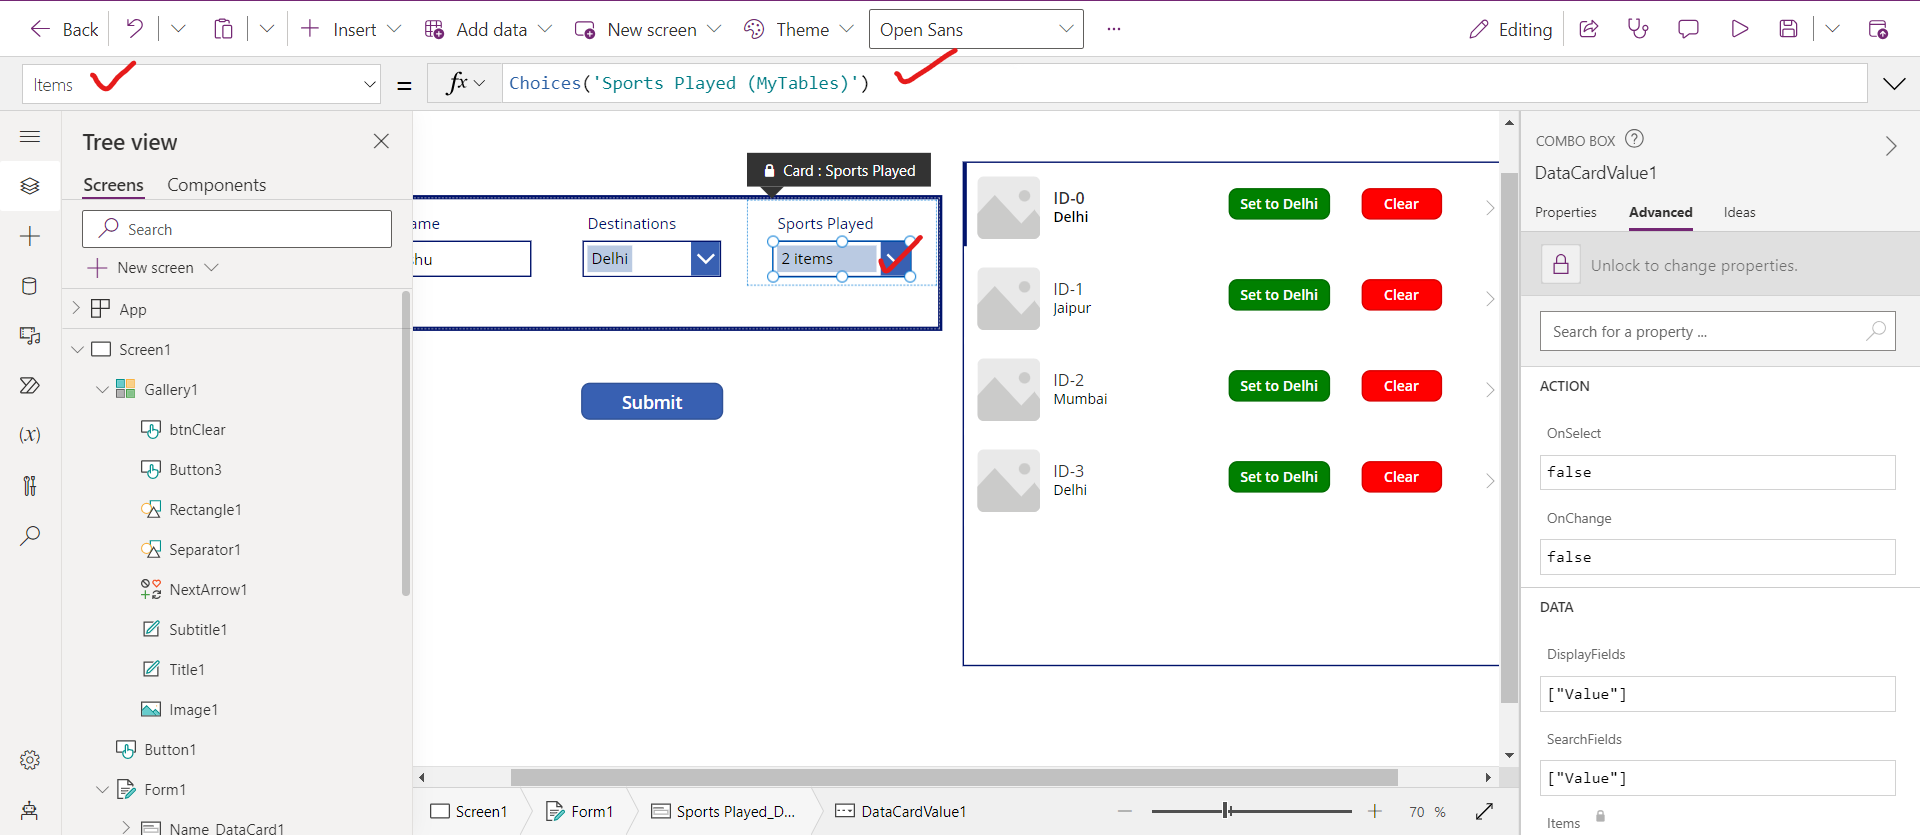
As it’s a local choice then we must write the choice column name with the name of the table. We can see the following power apps formula on the Items property of the combo box control.
Power Apps Formula Choices('Sports Played (MyTables)')
Here,
• Sports Played is the name of the Choice column.
• MyTables is the name of the table.
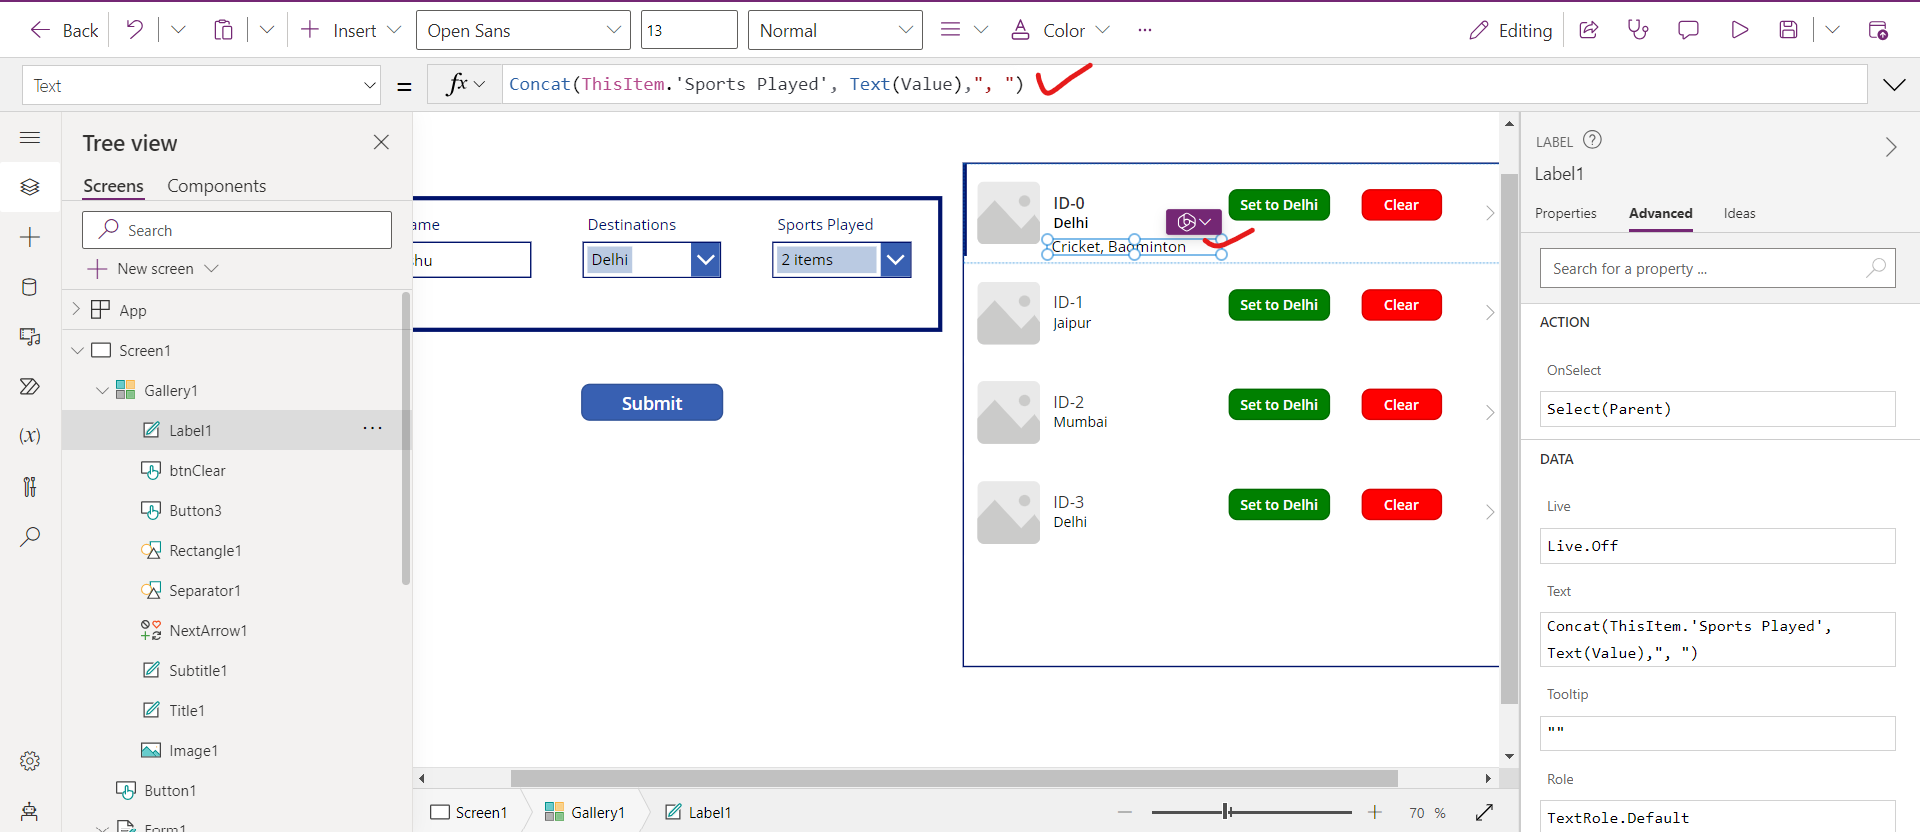
Power Apps Formula Concat(ThisItem.'Sports Played', Text(Value),", ")
Display Choice column values
To display values in a control, such as a label, is different for single and multiple-choice values.
a) For a Single choice value
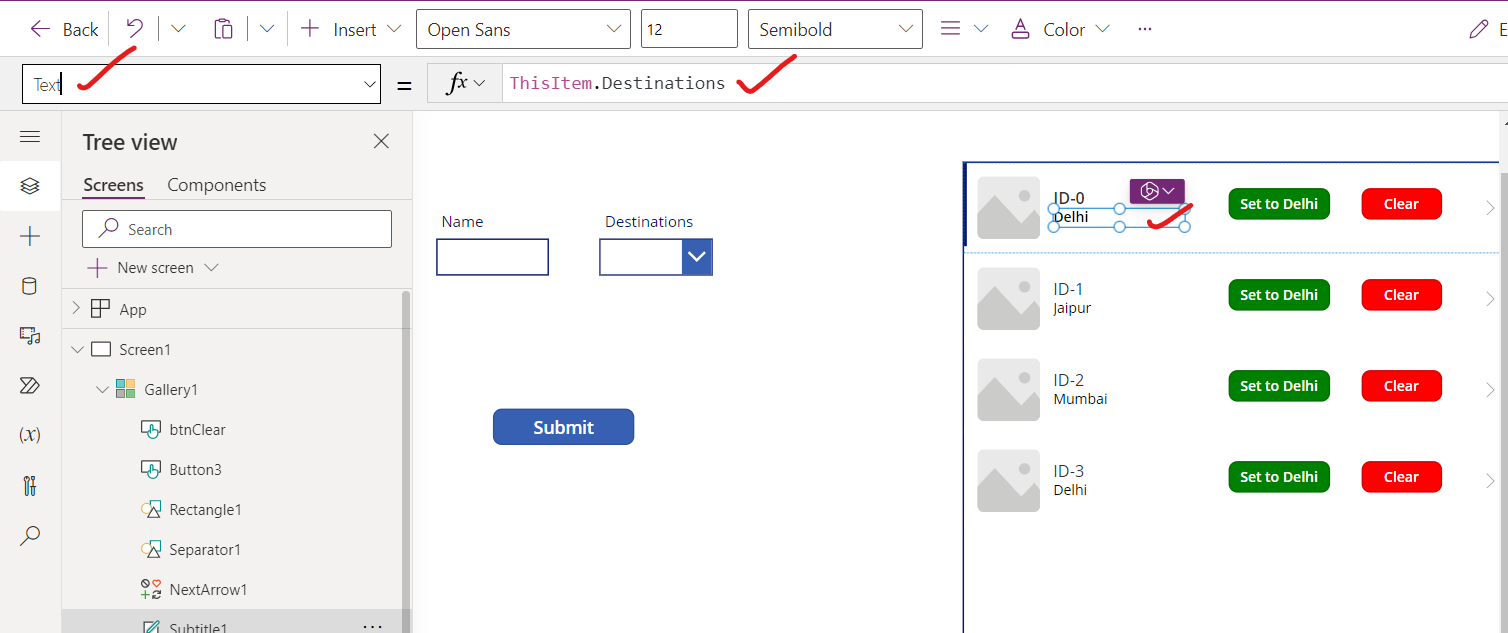
If we have a Destinations choice field. We can display the choice value in a label by using the following power apps formula.
Power Apps Formula ThisItem.Destinations
b) For multiple choice value For multiple choices columns, the property on the record is of type Table. It's a single column table with a value column, with each row representing a selected value. To display a user-friendly, comma-separated list of text values, some preprocessing is required.
For example, if we have a Sports Played column that allowed users to choose one or more sports played by the person.
The following power apps formula on the Text property of a label.
Power Apps Formula Concat(ThisItem.'Sports Played', Text(Value),", ")
