Environment, Business Units, and Security concepts in Microsoft Dataverse
An environment is a container for apps and other resources, such as data connections and flows from Power Automate. It's a way to group items based on business requirements.
Environments are used to store, manage, and share our organization's business data, apps, and flows in Microsoft Power Platform. Each environment allows us to provision one Microsoft Dataverse database for use within that environment. Microsoft Dataverse environments allow us to manage user access, security settings, and the storage that is associated with that database.
We can create more than one environment to manage solution development and data storage by setting up one environment for development, another for testing, and another for production use. Also, we can set up an environment based on a geographical location. For example, we might set up an environment for Europe and another for Asia. Each of these environments will have zero or only one instance of Microsoft Dataverse.
Additionally, an environment allows you to install applications that you build with Power Apps or flows that you create with Power Automate into that environment.
Each environment is created under a Microsoft Azure Active Directory (Azure AD) tenant, and its resources can only be accessed by users within that tenant. An environment is also bound to a geographic location, like the United States. When we create a Dataverse database in an environment, that database is created within datacenters in that geographic location. Any items that we create in that environment (including connections, gateways, flows that are using Microsoft Flow, and more) are also bound to their environment's location.
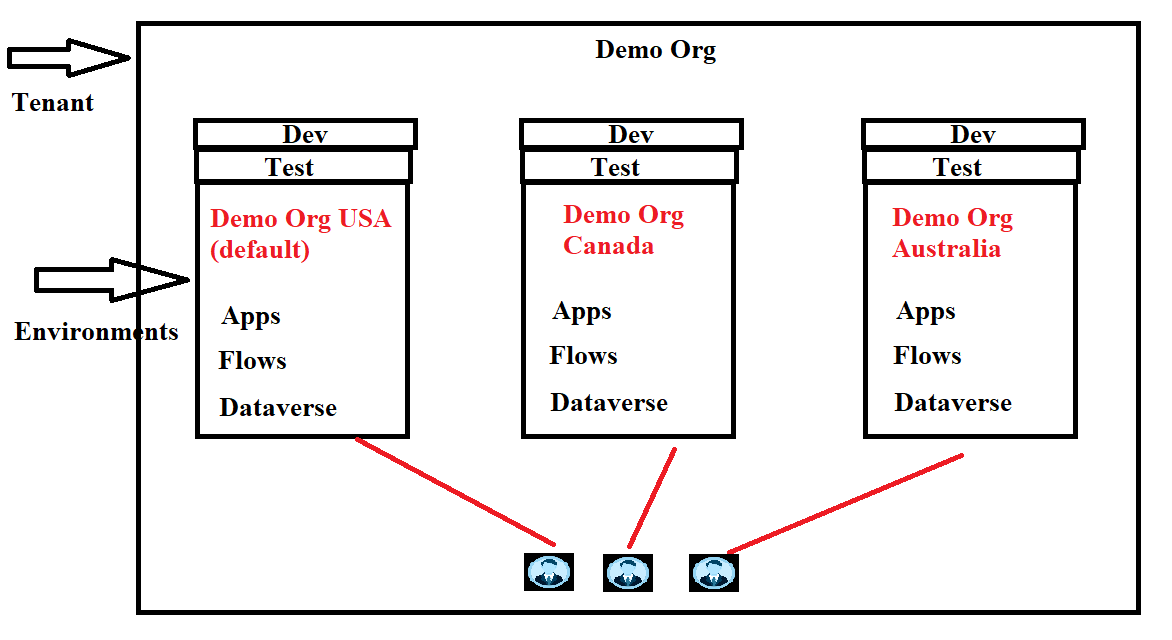
We can create more than one environment to manage solution development and data storage by setting up one environment for development, another for testing, and another for production use. Also, you can set up an environment based on a geographical location. For example, you might set up an environment for Europe and another for Asia. Each of these environments will have zero or only one instance of Microsoft Dataverse.
Note: An environment can contain apps, flows, and a single Dataverse database.
Security roles are used for limiting access to data, restricting access to an environment, and restricting actions that users can perform on data. Basic user, Environment Maker, and Delegate security roles are valid options in Dataverse.
The default environment
A single default environment is automatically created by Power Apps for each tenant and shared by all users in that tenant. Whenever a new user signs up for Power Apps, they're automatically added to the Maker role of the default environment. No users will be automatically added to the Environment Admin role of the default environment. The default environment is created in the region closest to the default region of the Azure AD tenant, and is named as follows: "{Azure AD tenant name} (default)".
We can't delete the default environment. We can't manually back up the default environment; system backups are done continuously.
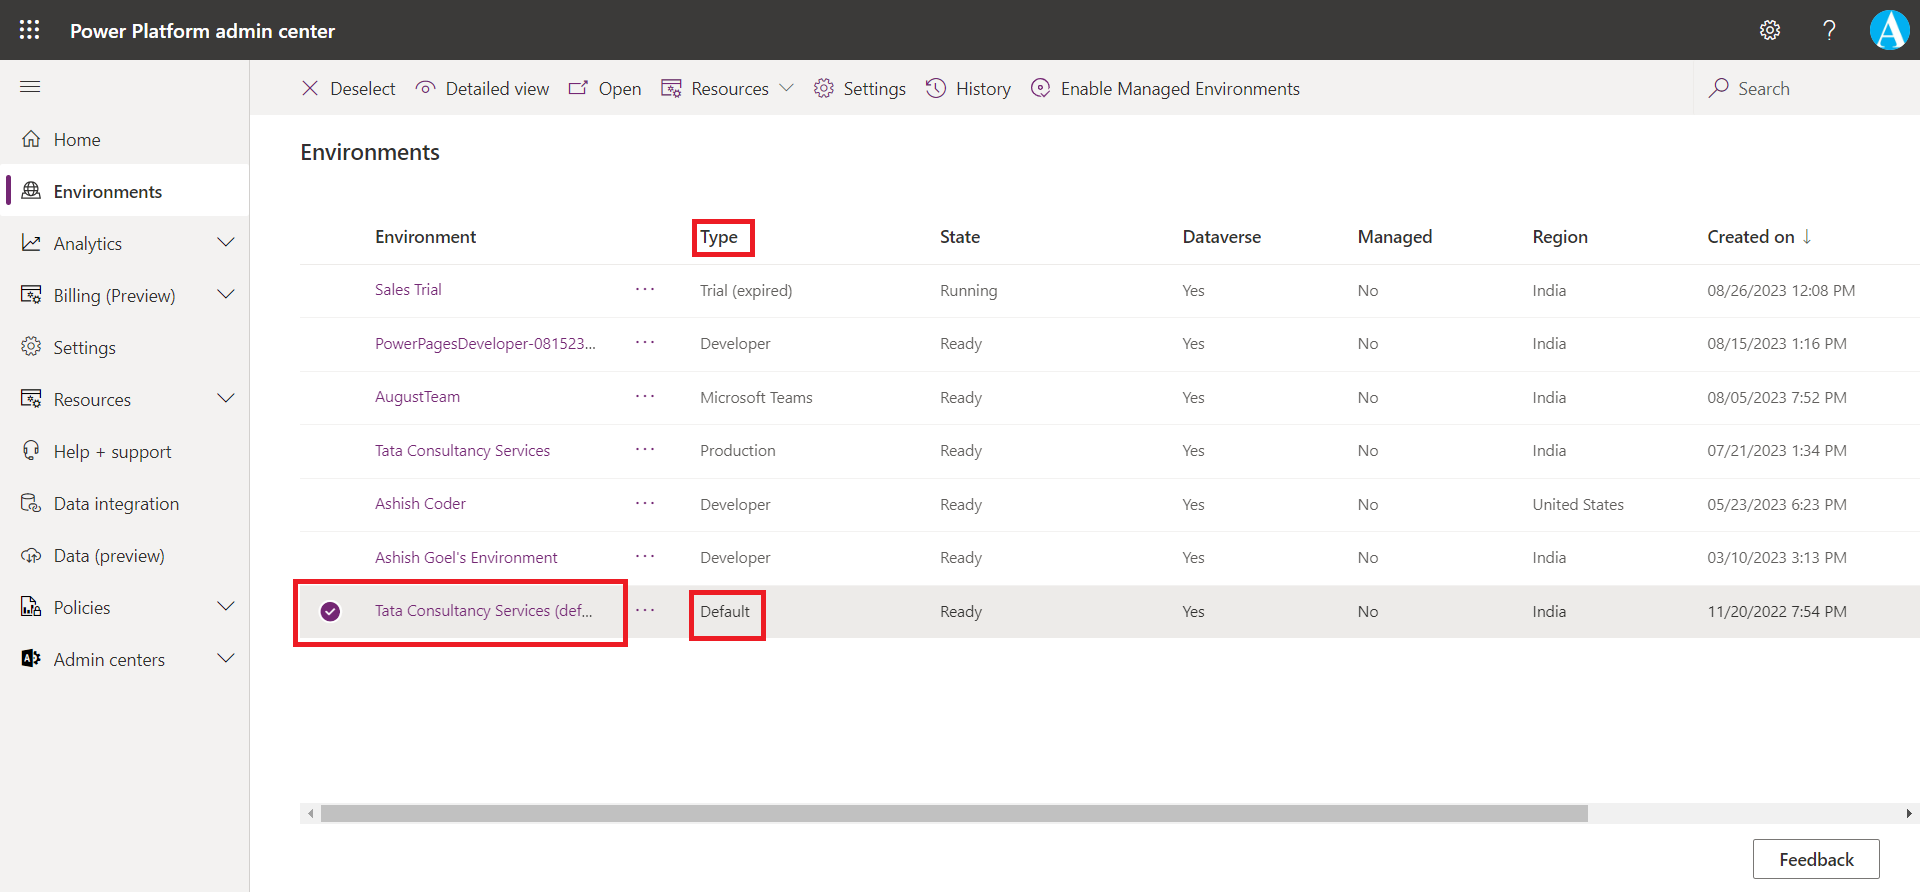
We can even change the name of the default environment but we can still identify it from the Power Platform admin center as the only environment with the environment Type of Default.
Create an environment
Only an admin can create environments. Follow the following steps to create an environment:
Step 1: Go to Power Platform admin center.
Step 2: In Microsoft Power Platform admin center, select Environments option on the left-hand side of the Portal.
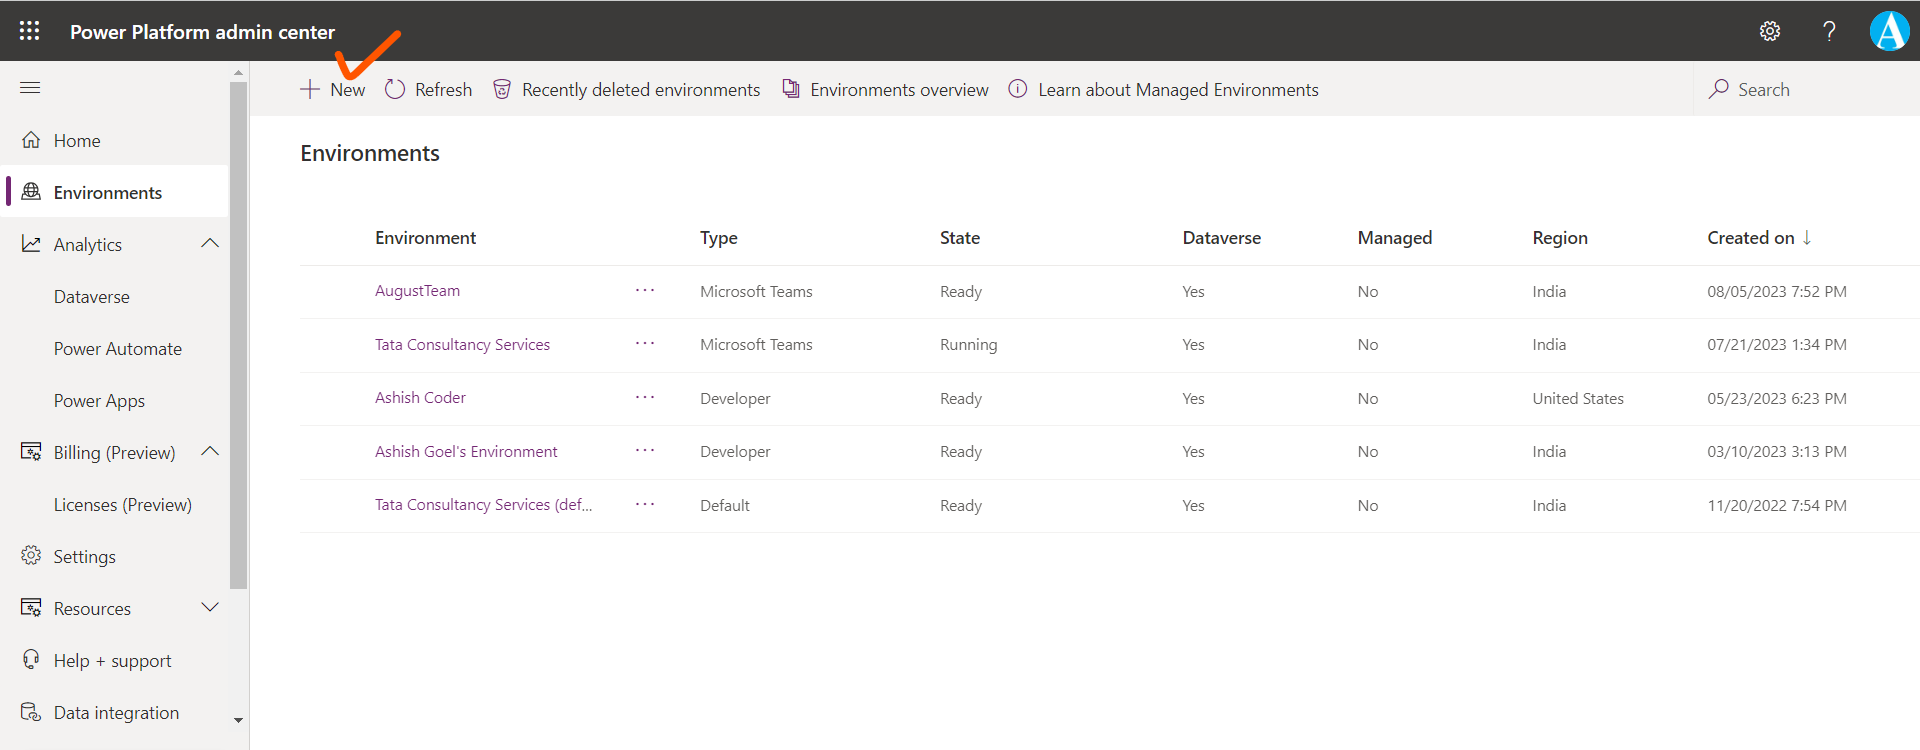
Step 3: Select the + New button from the top left side of the command bar, as shown in the following image.
Step 4: In the New environment dialog box, enter a name for the environment and then select a Region and select the Type of the environment.
Note: We cannot change the Region after the creation of the environment.
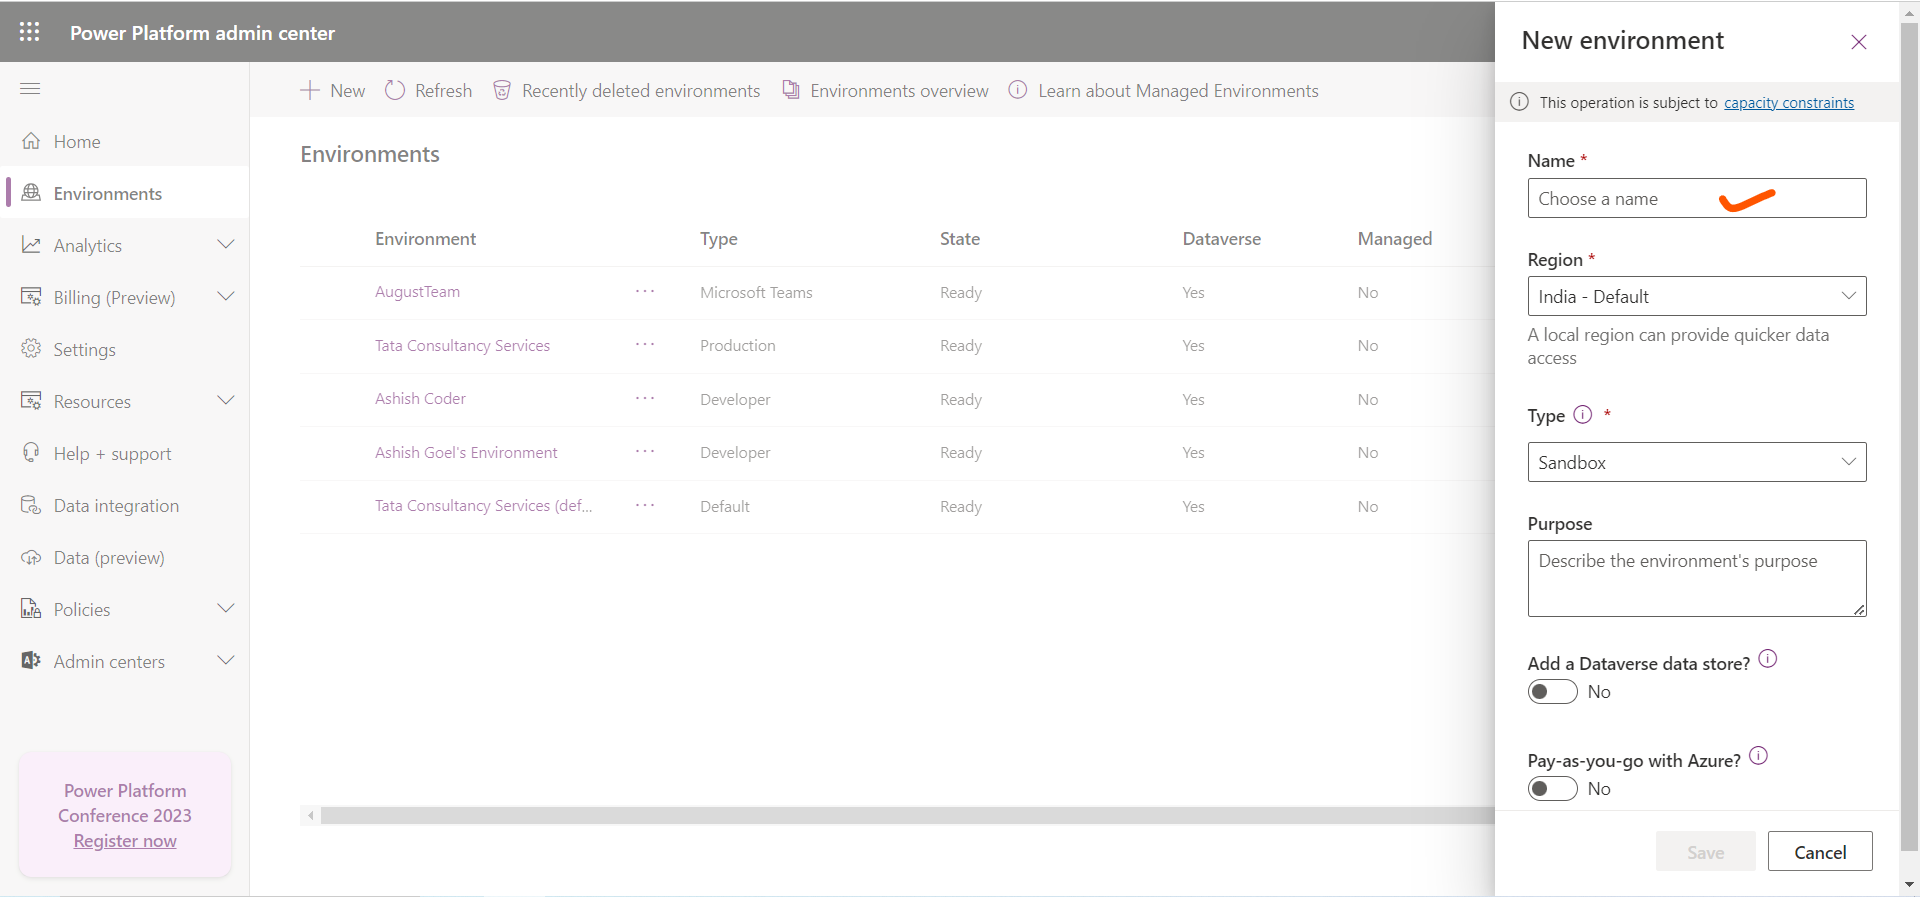
Step 5: To add the dataverse, set the Add a Dataverse data store? toggle to Yes.
Note: Notice the Add a Dataverse data store option. It shows that the Dataverse must always be added for the selected type when we select the Trial (Subscription-based) or Developer environment types.
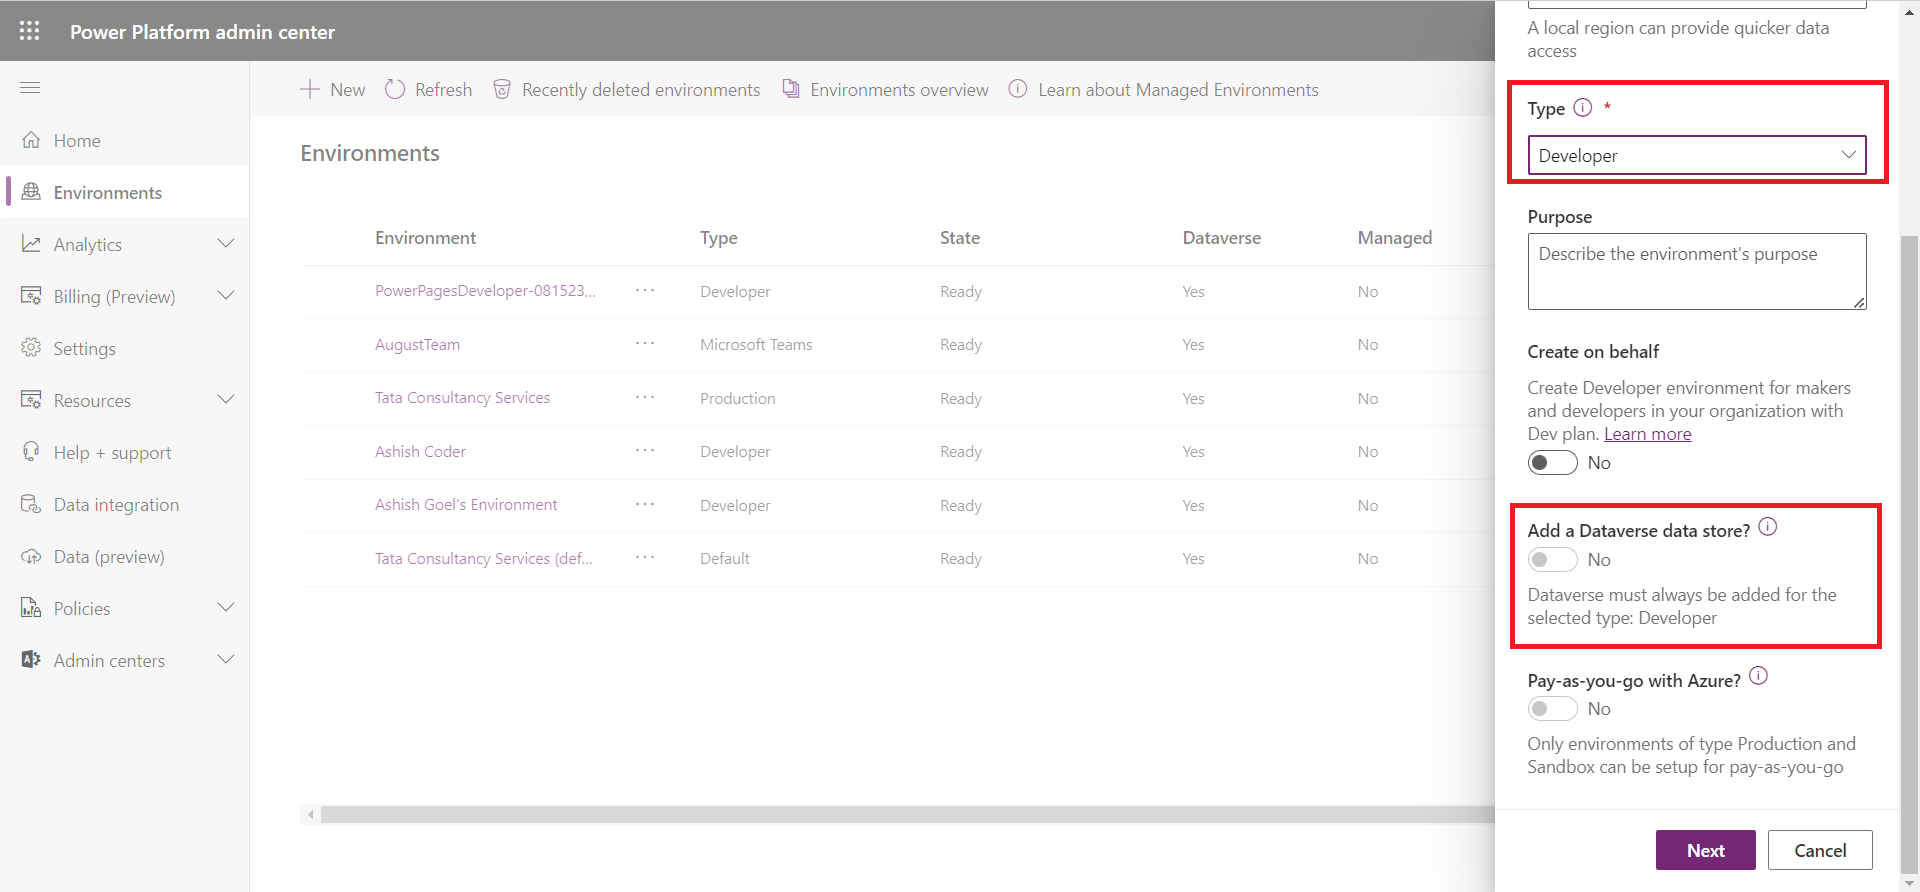
Step 6: When we select Trial (Subscription-based) or Developer environment type we have the option of clicking Next. Select Next.
Step 7: Select the Currency and Language for the data that is stored in the database. We cannot change the currency or language after the database is created.
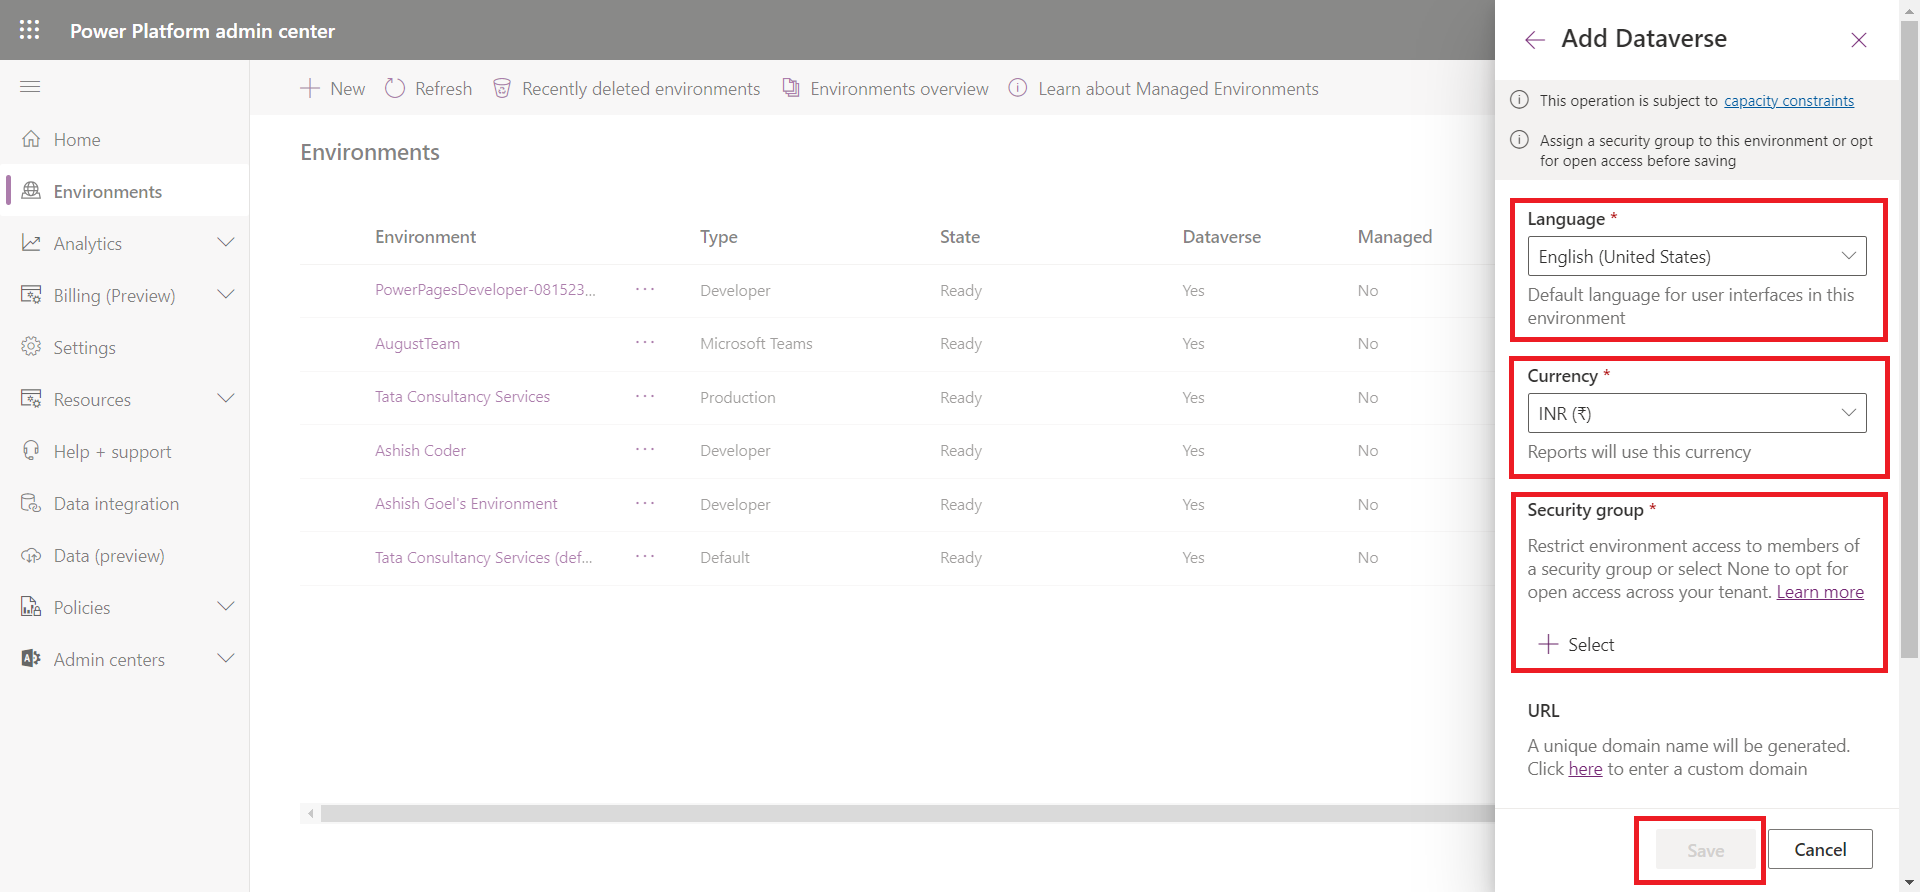
Step 8: Select Save.
It might take several minutes to create the database on Dataverse. After the database is created, the new environment appears in the list of environments on the Environments page.
Tip
1. If we create an environment, we will be added automatically to the Environment Admin role for that environment. There is no limit on the number of environments that we can participate in as a member of the Environment Admin or Environment Maker roles.
2. Each environment requires 1GB of storage space from your Tenant. You can't create a new environment otherwise. If you don't have that space, you need to either purchase or create more space in your tenant. You can learn more about Dataverse storage capacity if required.
Create an instance of a Microsoft Dataverse database
This exercise is based on creating a dataverse instance in an already existing environments that don't include Dataverse. It could be that you created an environment that didn't initially have Dataverse, and now you need that capability. For any environment that doesn't include Dataverse, you can use the following steps add it:
Step 1: Go to Power Platform admin center.
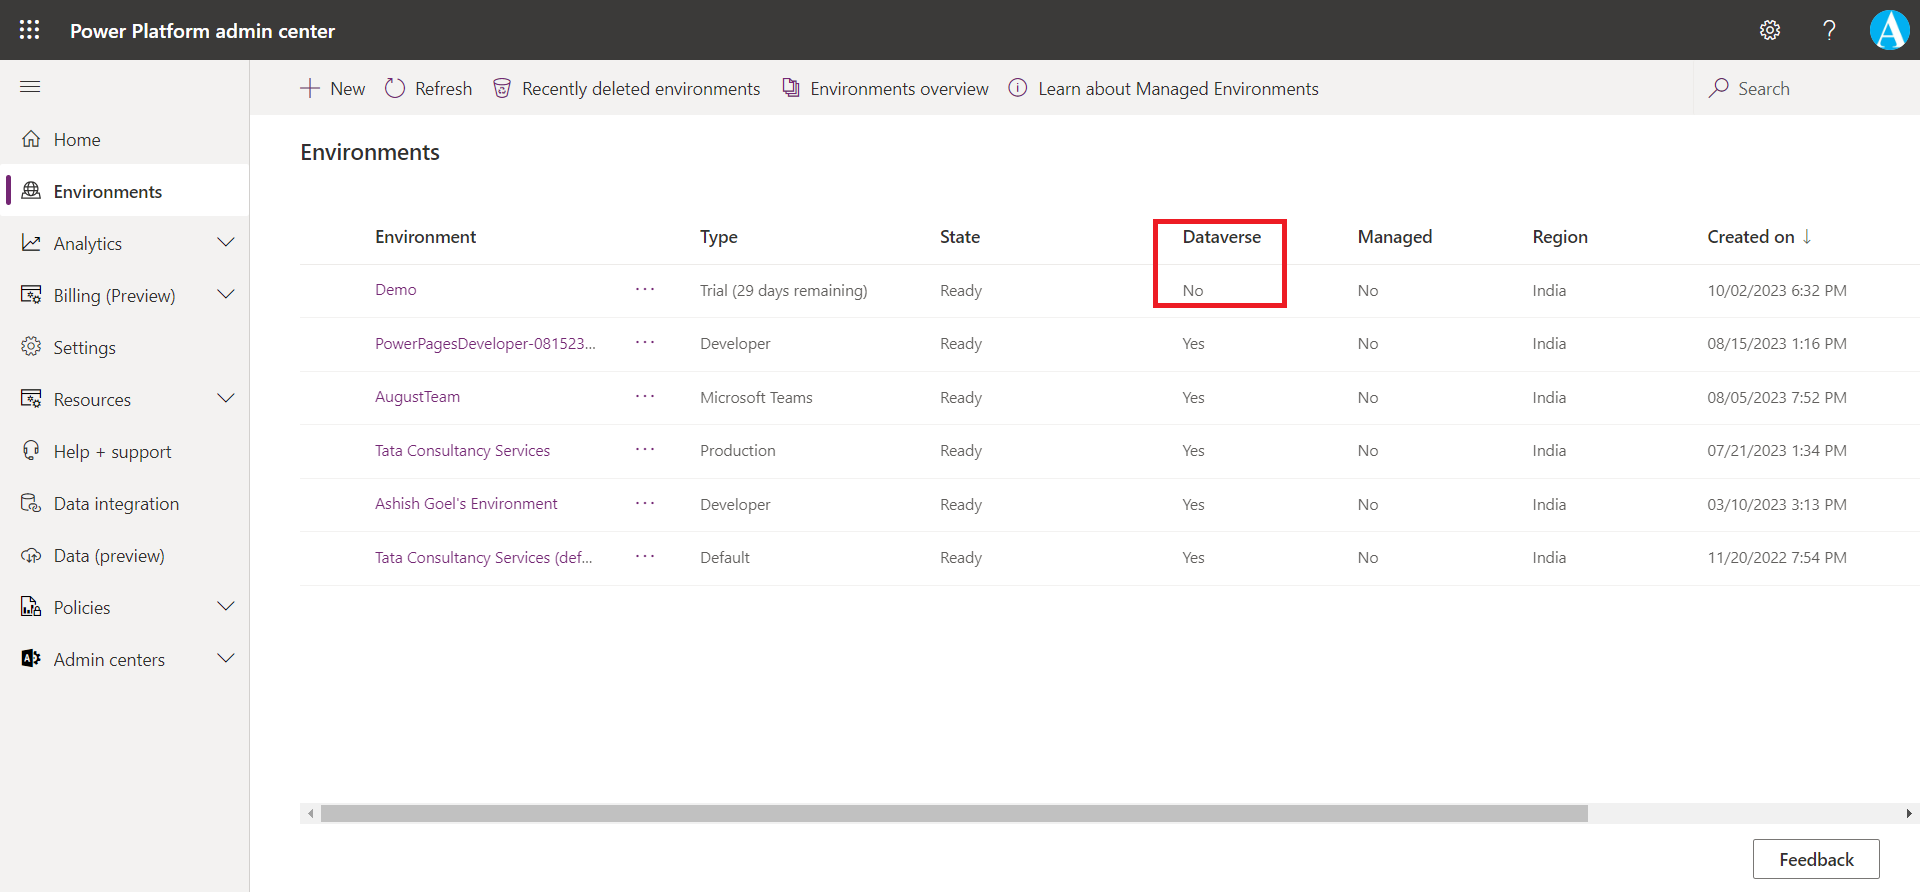
Step 2: Select the Environments from the left navigation. In the list of environments notice on the Dataverse column. Select the environment in which the dataverse column value is No (It specifies the environment does not have the dataverse instance).
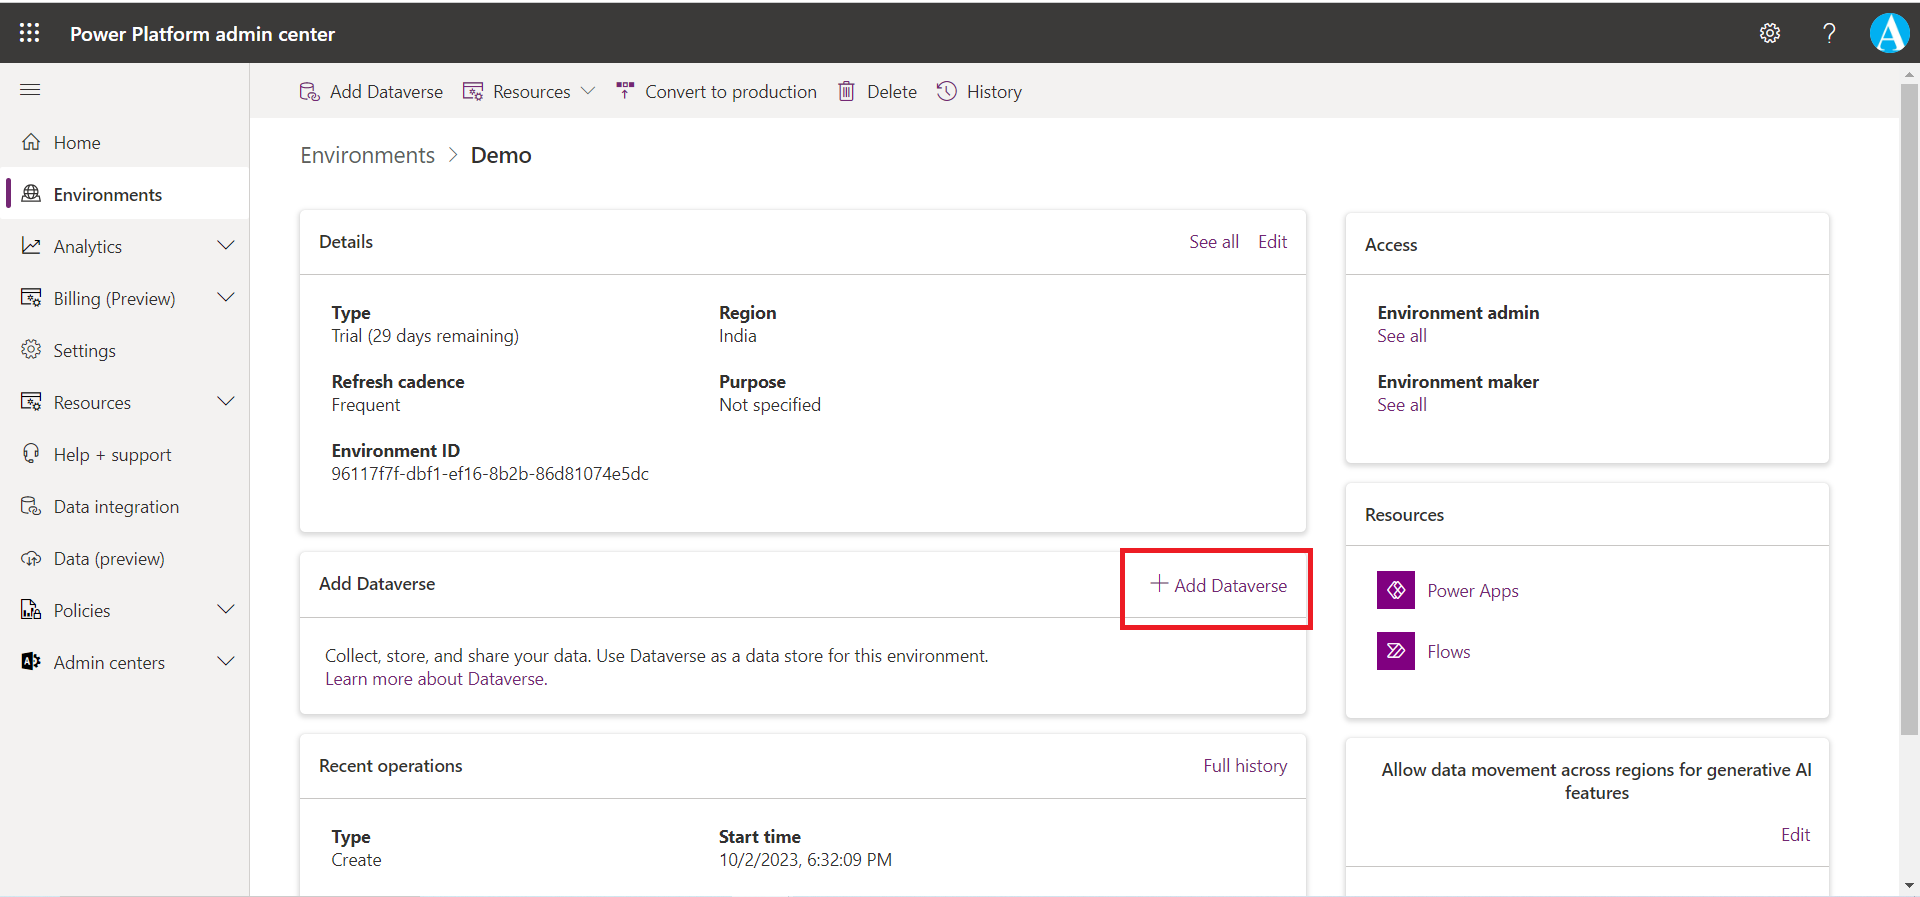
Step 3: In the Environment details screen, notice that there's an Add Dataverse panel in the center of the screen. Select Add Dataverse.
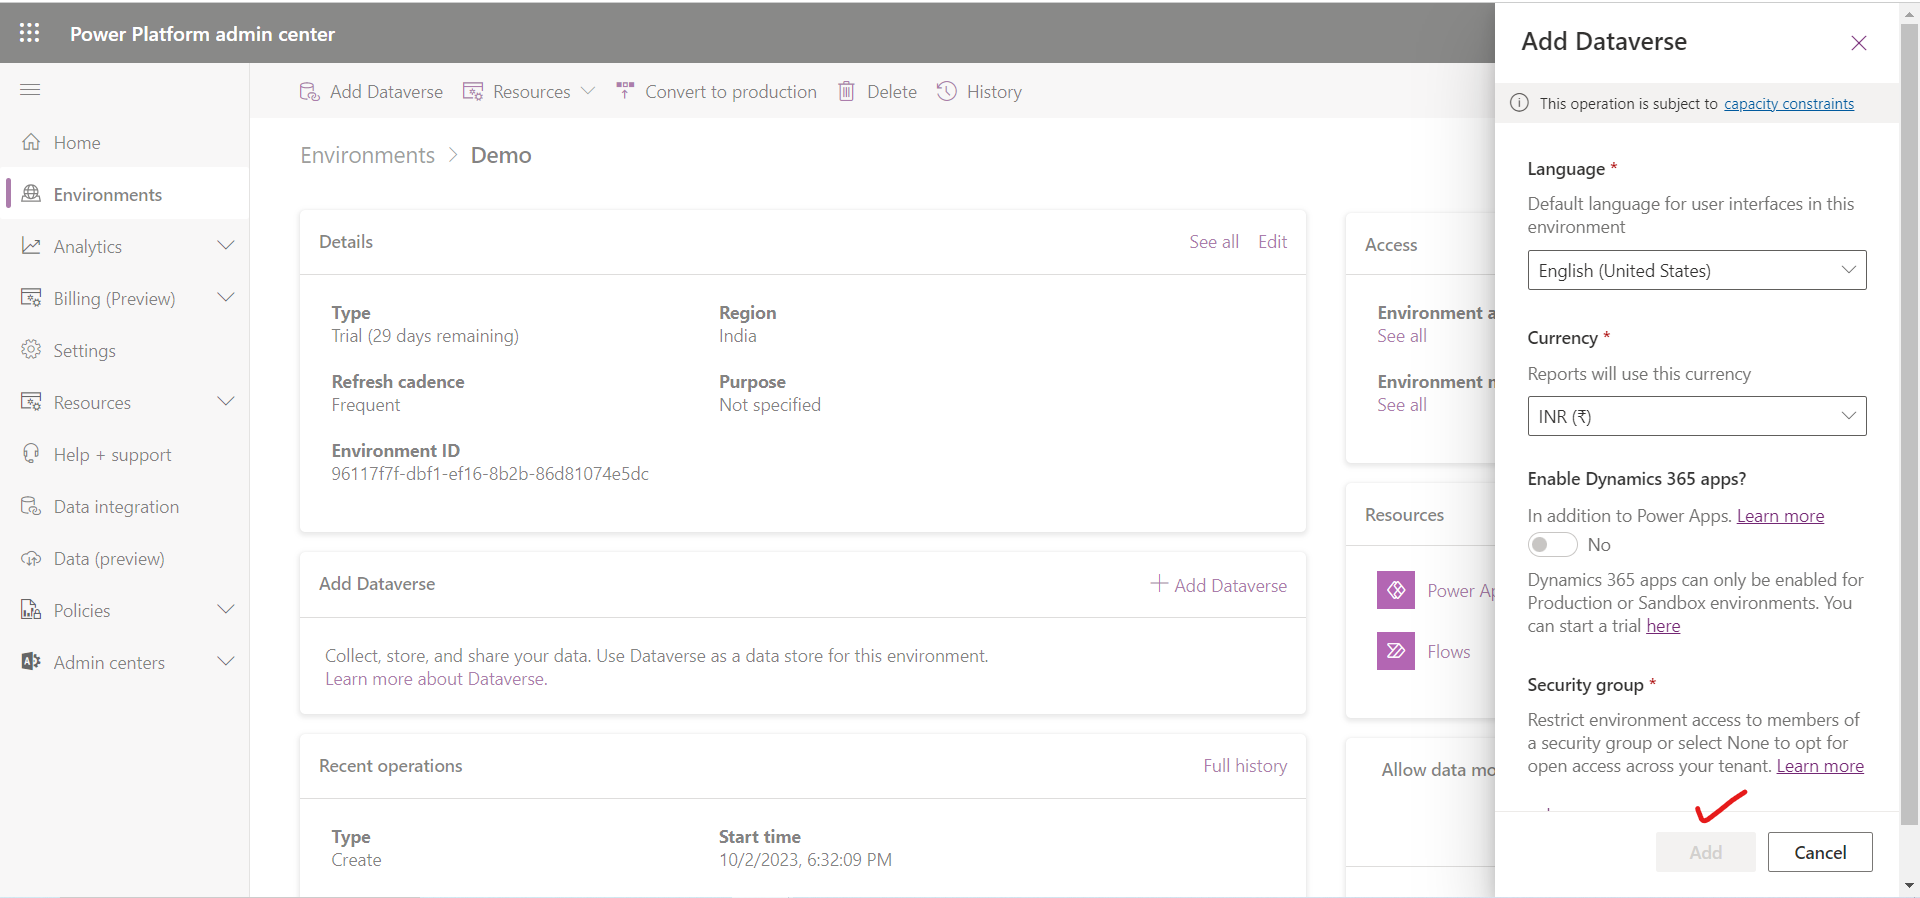
Step 4: Notice that the Add Dataverse tab that appears on the right side of the screen. Confirm your selections for the following inputs, and then select Add.
Manage settings in an environment
We can monitor the usage and service health of your environments by going to the Power Platform admin center. Use the following steps to monitor any environment that is associated with an instance of Dataverse.
Step 1: Sign in to Power Platform admin center.
Step 2: Select Environments in the left-hand pane.
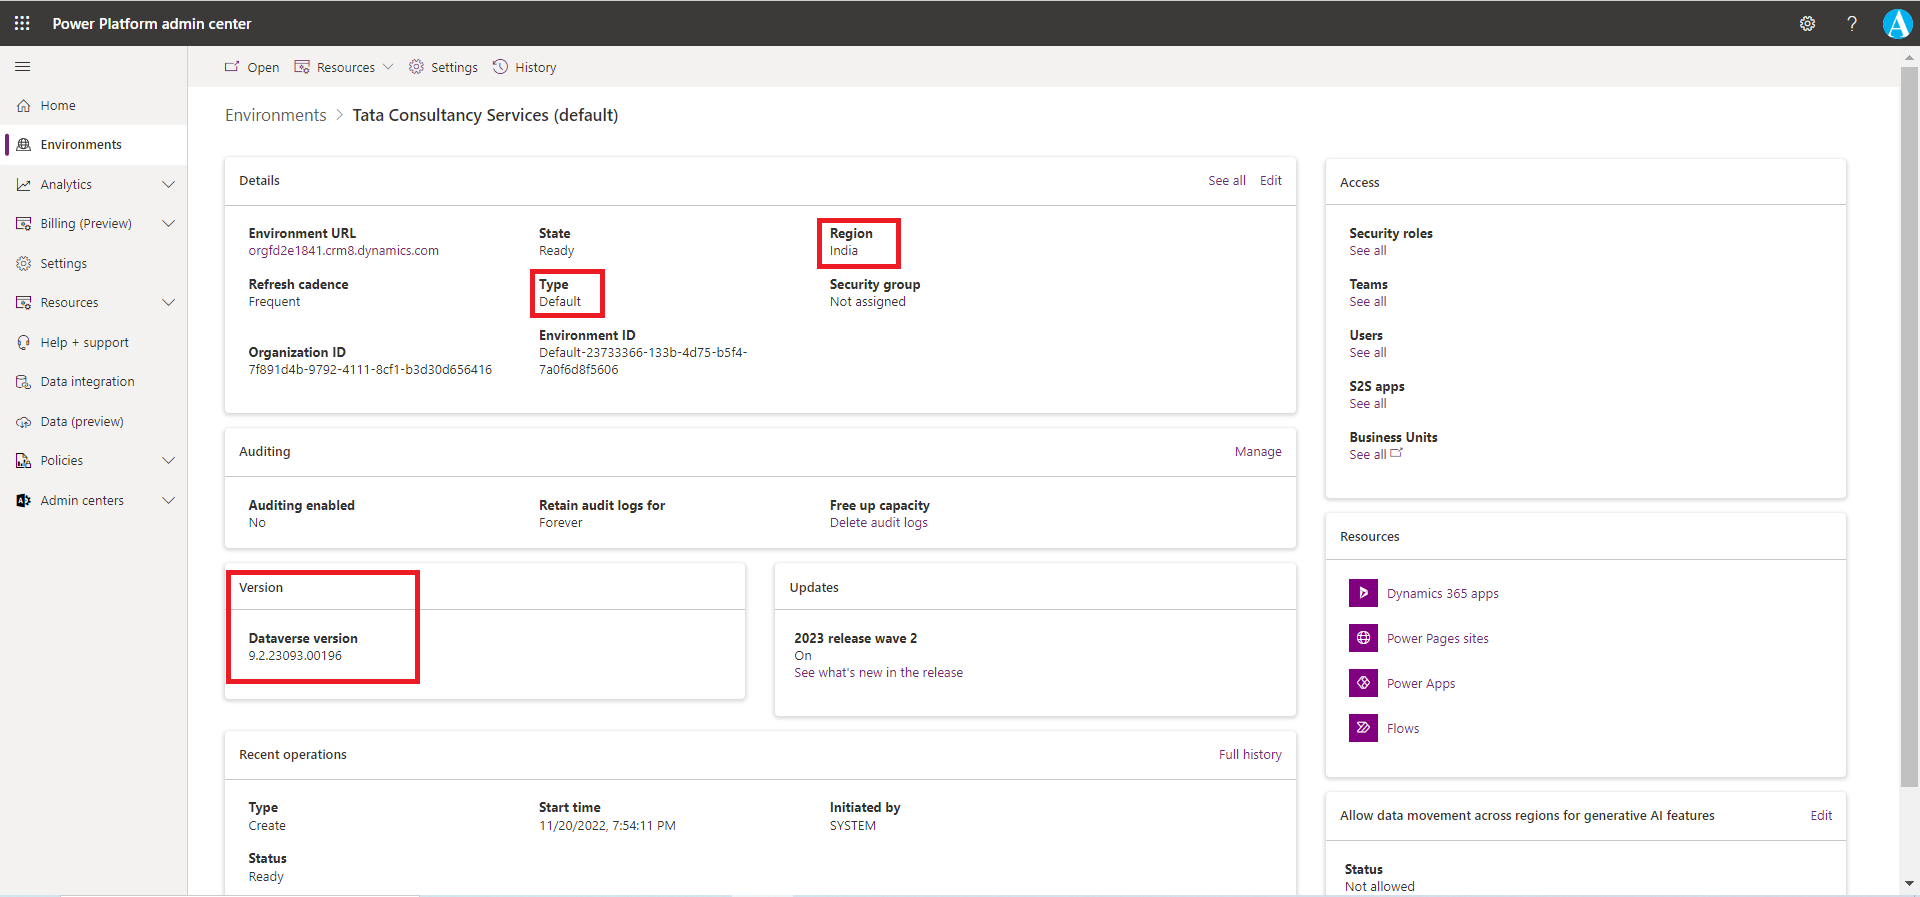
Step 3: Select an environment that has Dataverse in it. We can see the Environment’s dashboard where we can see more information about the environment. For example, the Version section describes the current version of the dataverse instance.
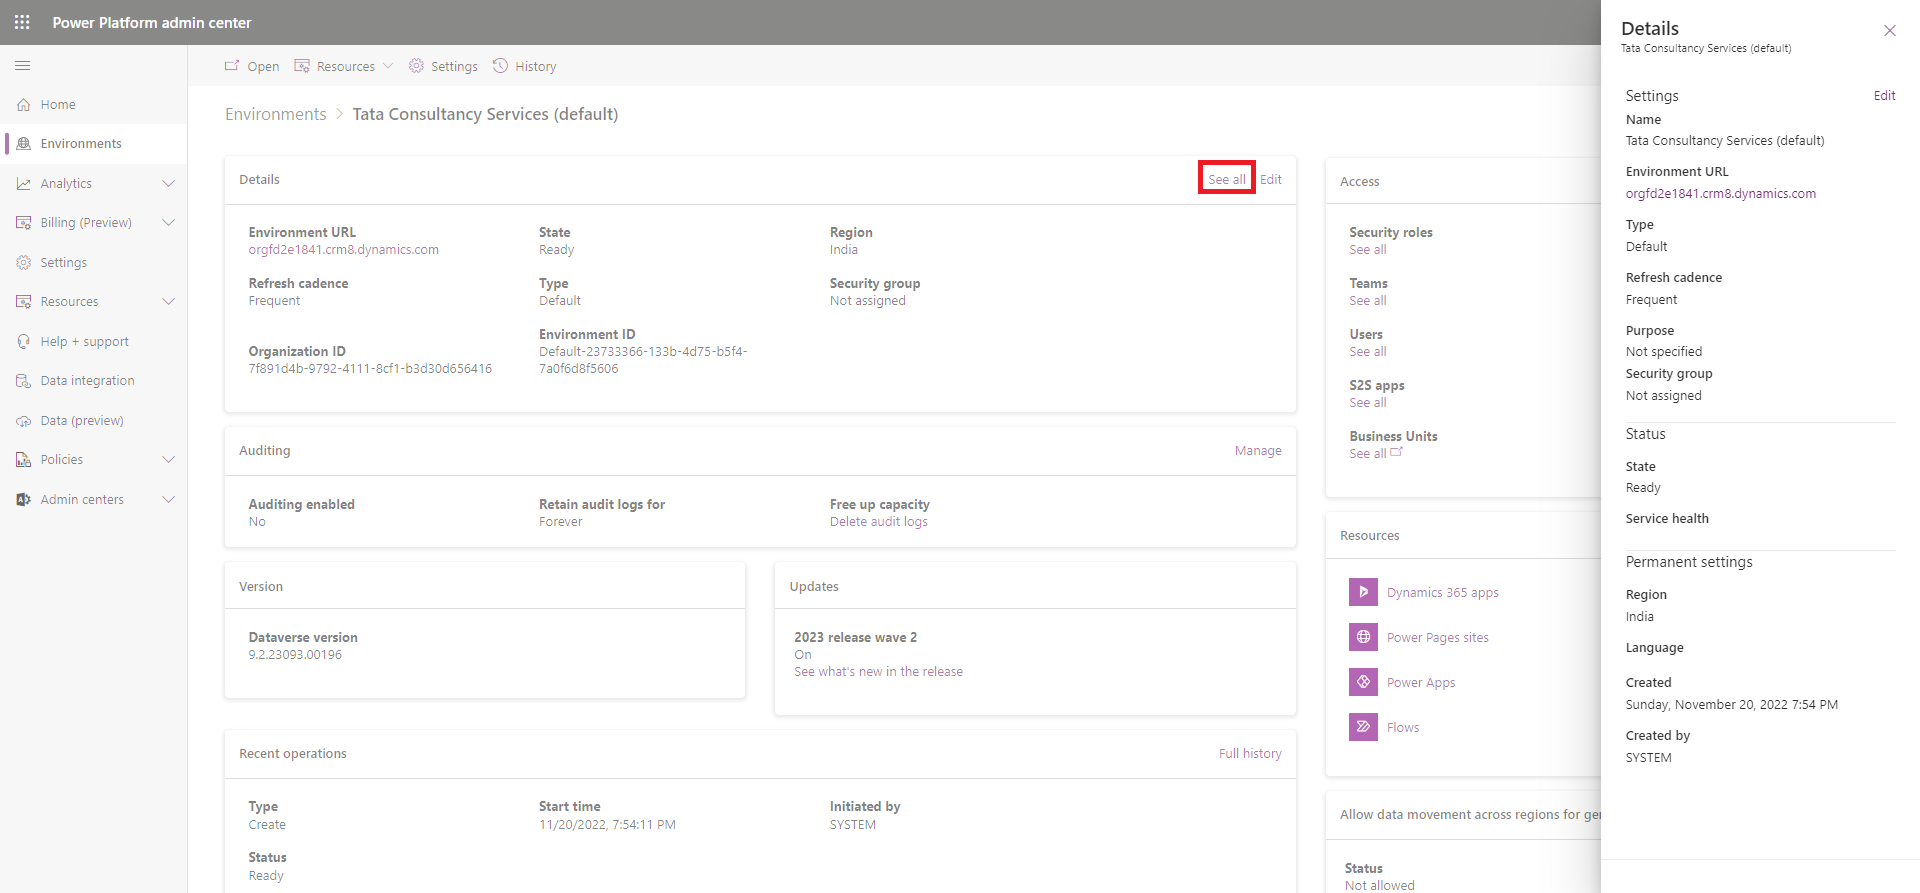
Step 4: If we select See all, we see a Details pane appear on the right side of the screen that can show us even more information, and even allow you to update portions of it. Other panes describe other information about the environment, such as what Power Apps are in the environment, etc.
Associate a security group with an environment
Step 1: Sign in to Power Platform admin center as an admin (Dynamics 365 admin, Global admin, or Microsoft Power Platform admin).
Step 2: In the navigation pane, select Environments.
Step 3: Select the name of the environment. Select Edit.
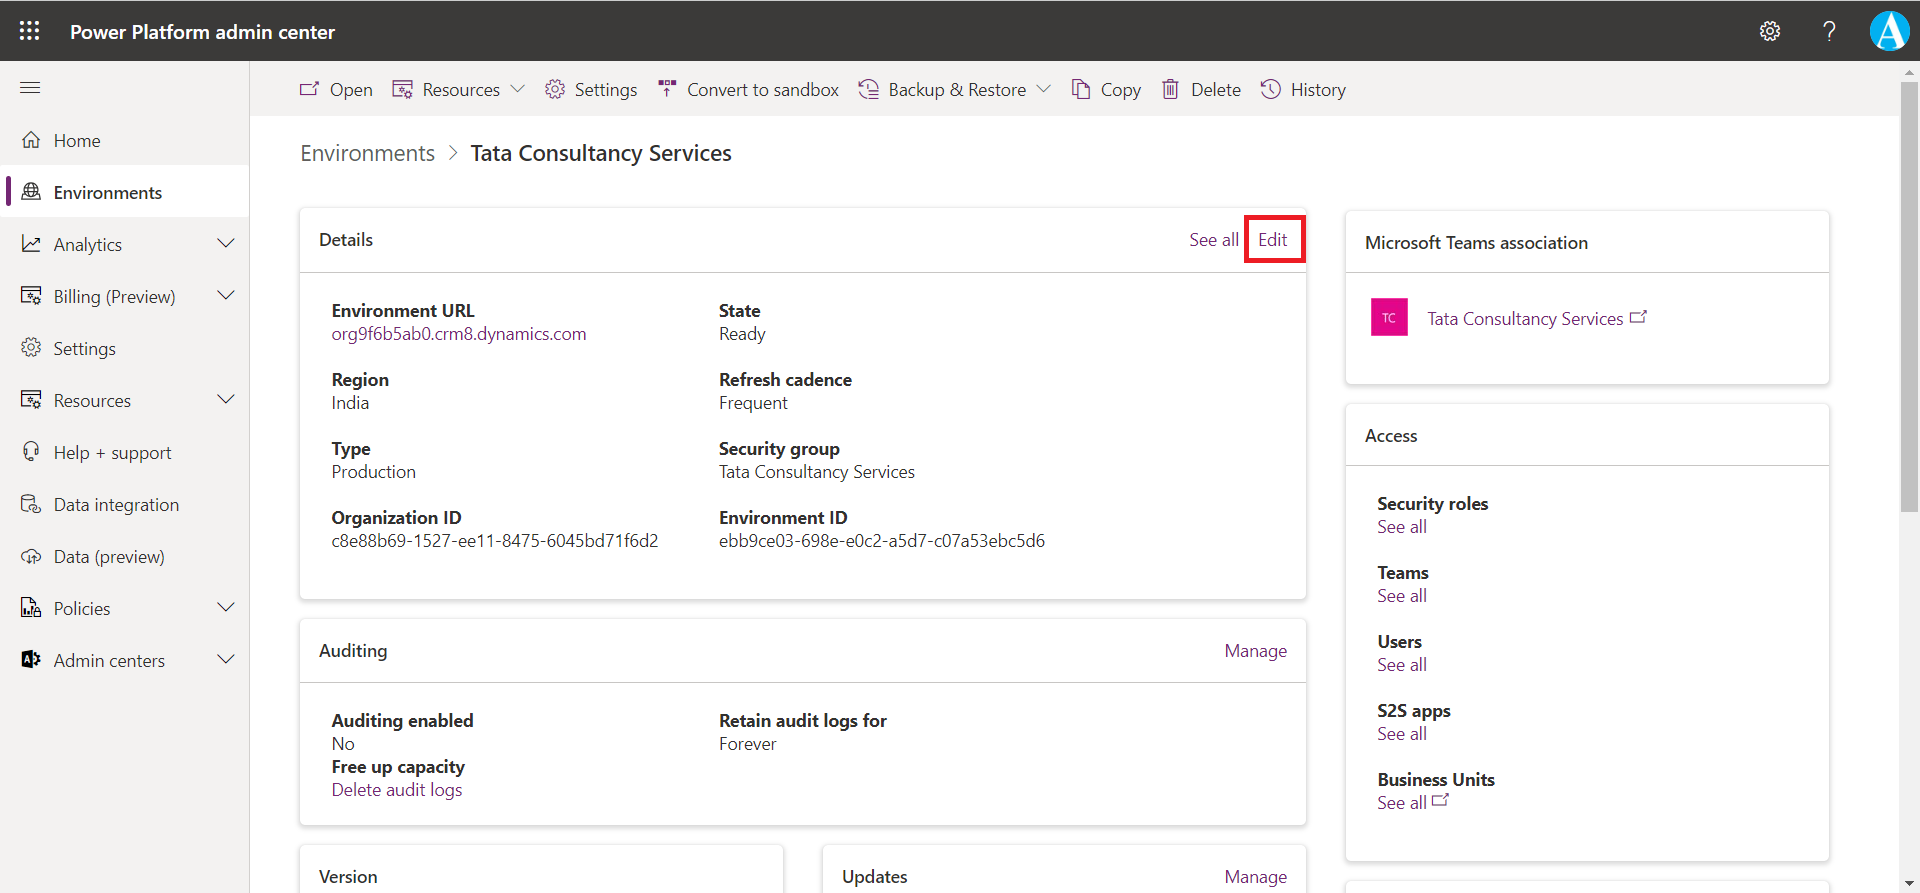
Step 4: In the Edit details pane, select the Edit icon in the Security group area.
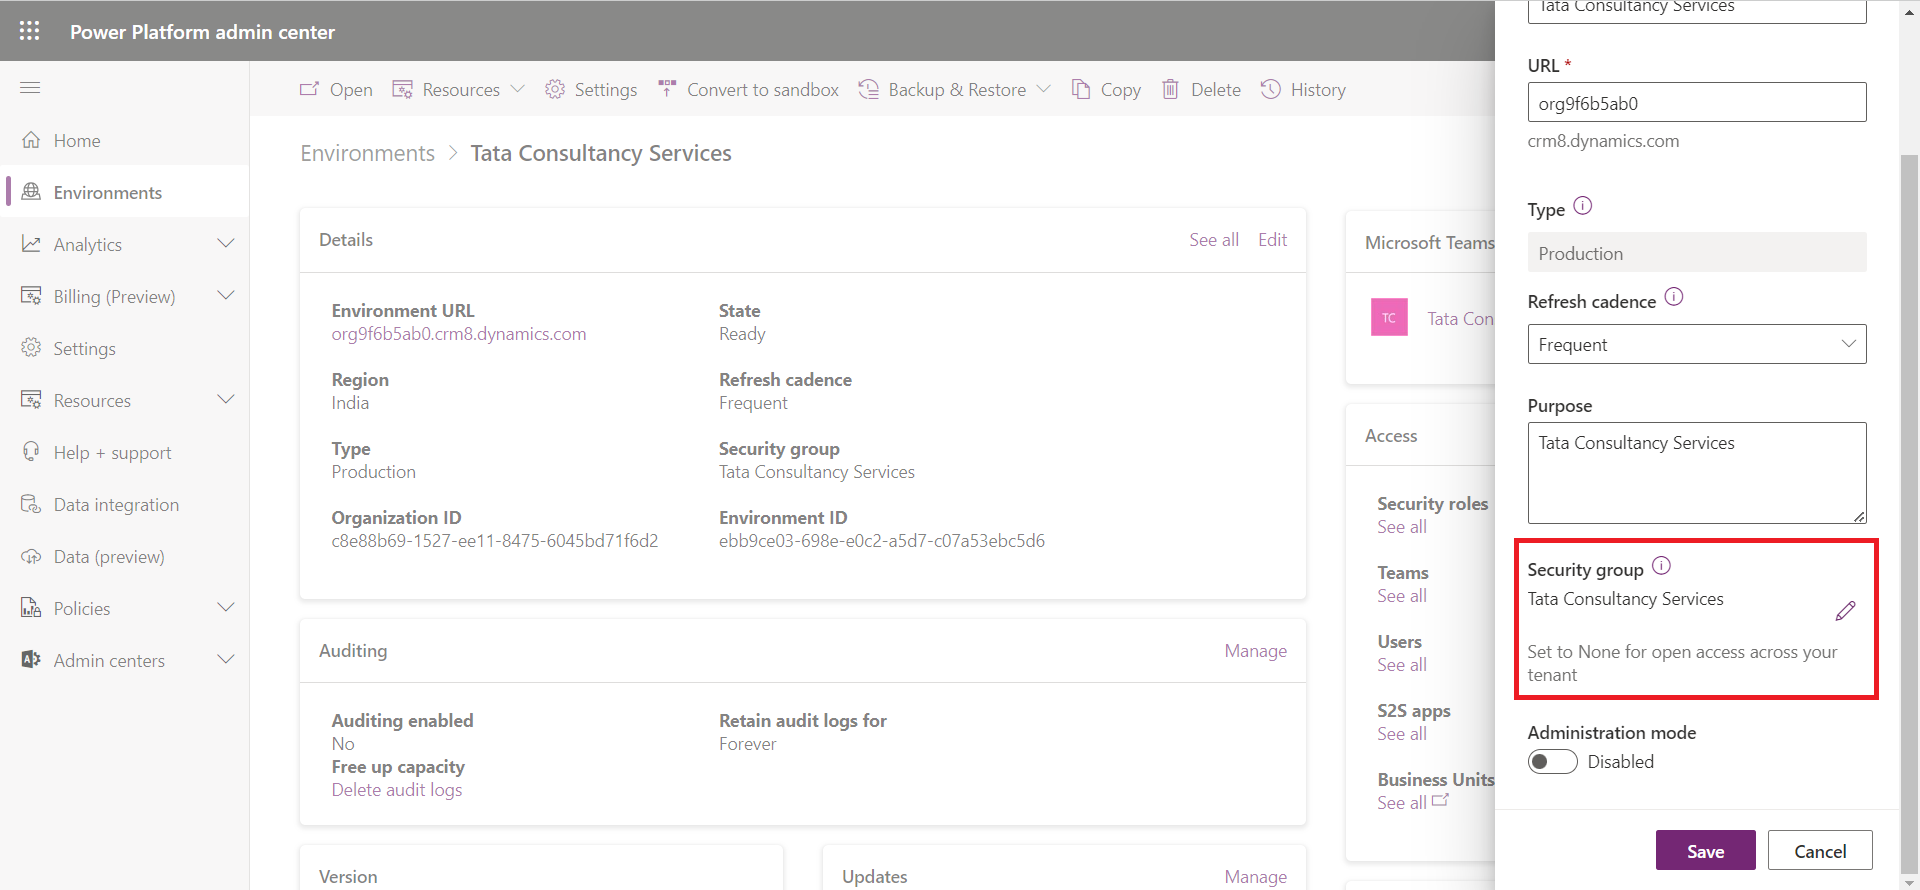
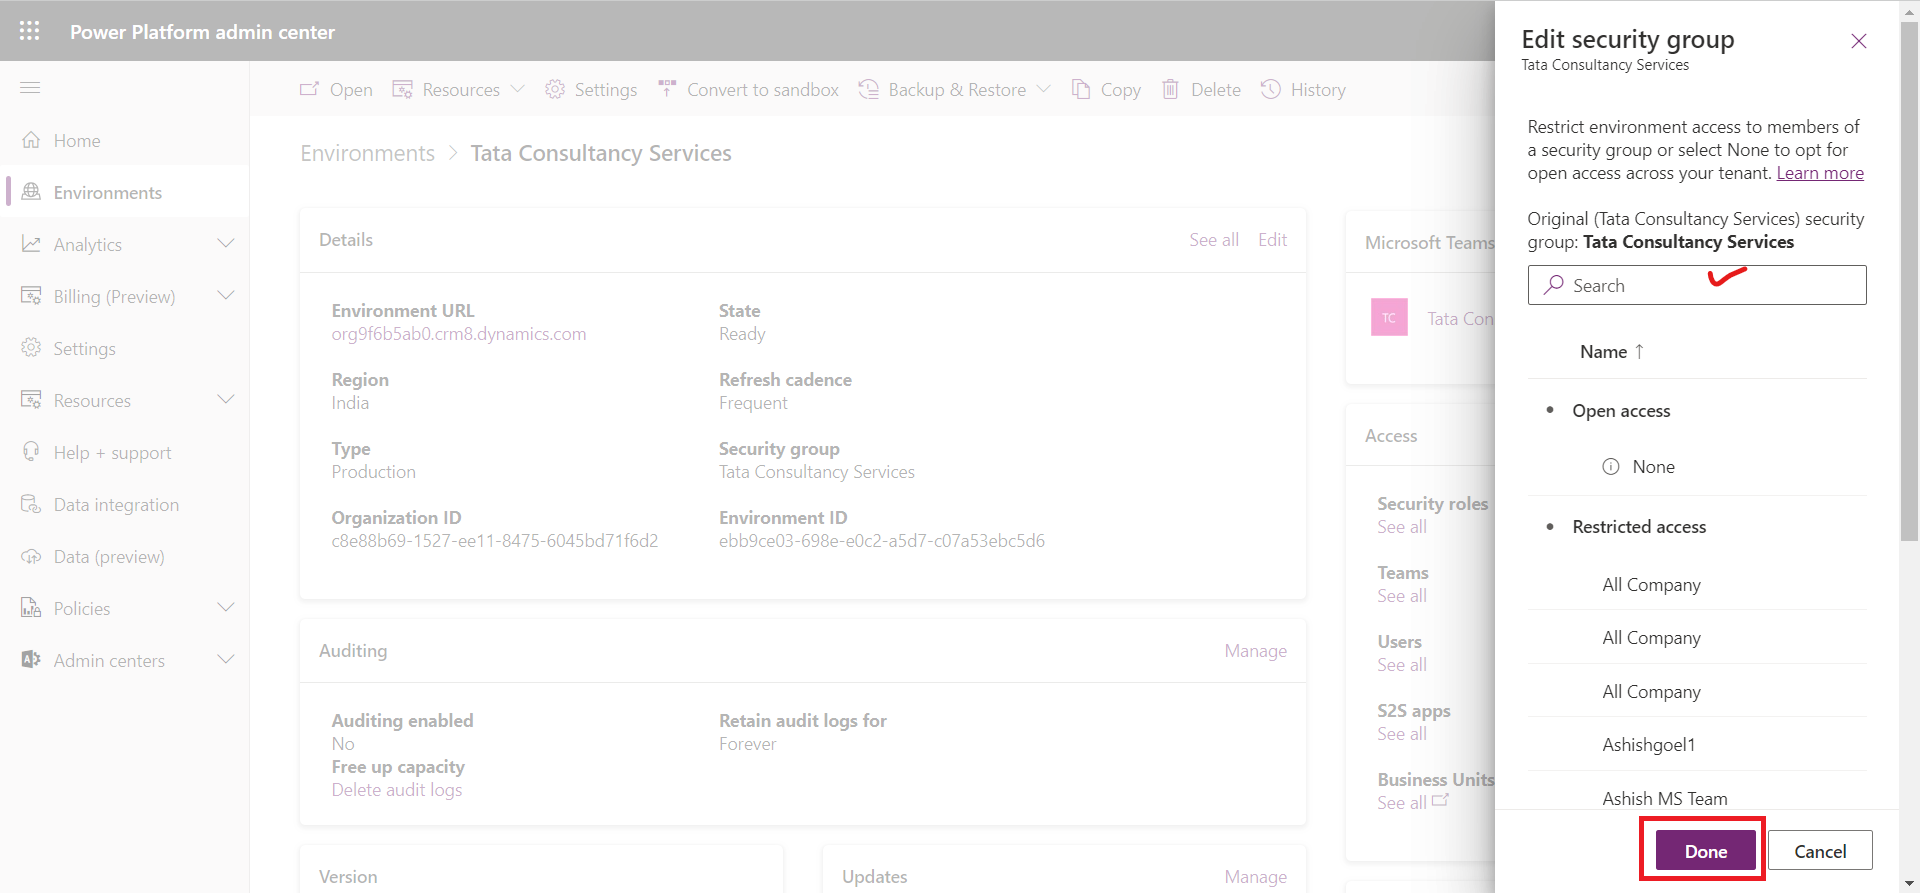
Only the first 200 security groups will be returned. Use Search to look for a specific security group. Select a security group, select Done, and then select Save. The security group is associated with the environment.
The following are points noted for the security groups:
• When users are added to the security group, they are added to the environment.
• When users are removed from the group, they are disabled in the environment.
• When a security group is associated with an existing environment with users, all users in the environment that are not members of the group will be disabled.
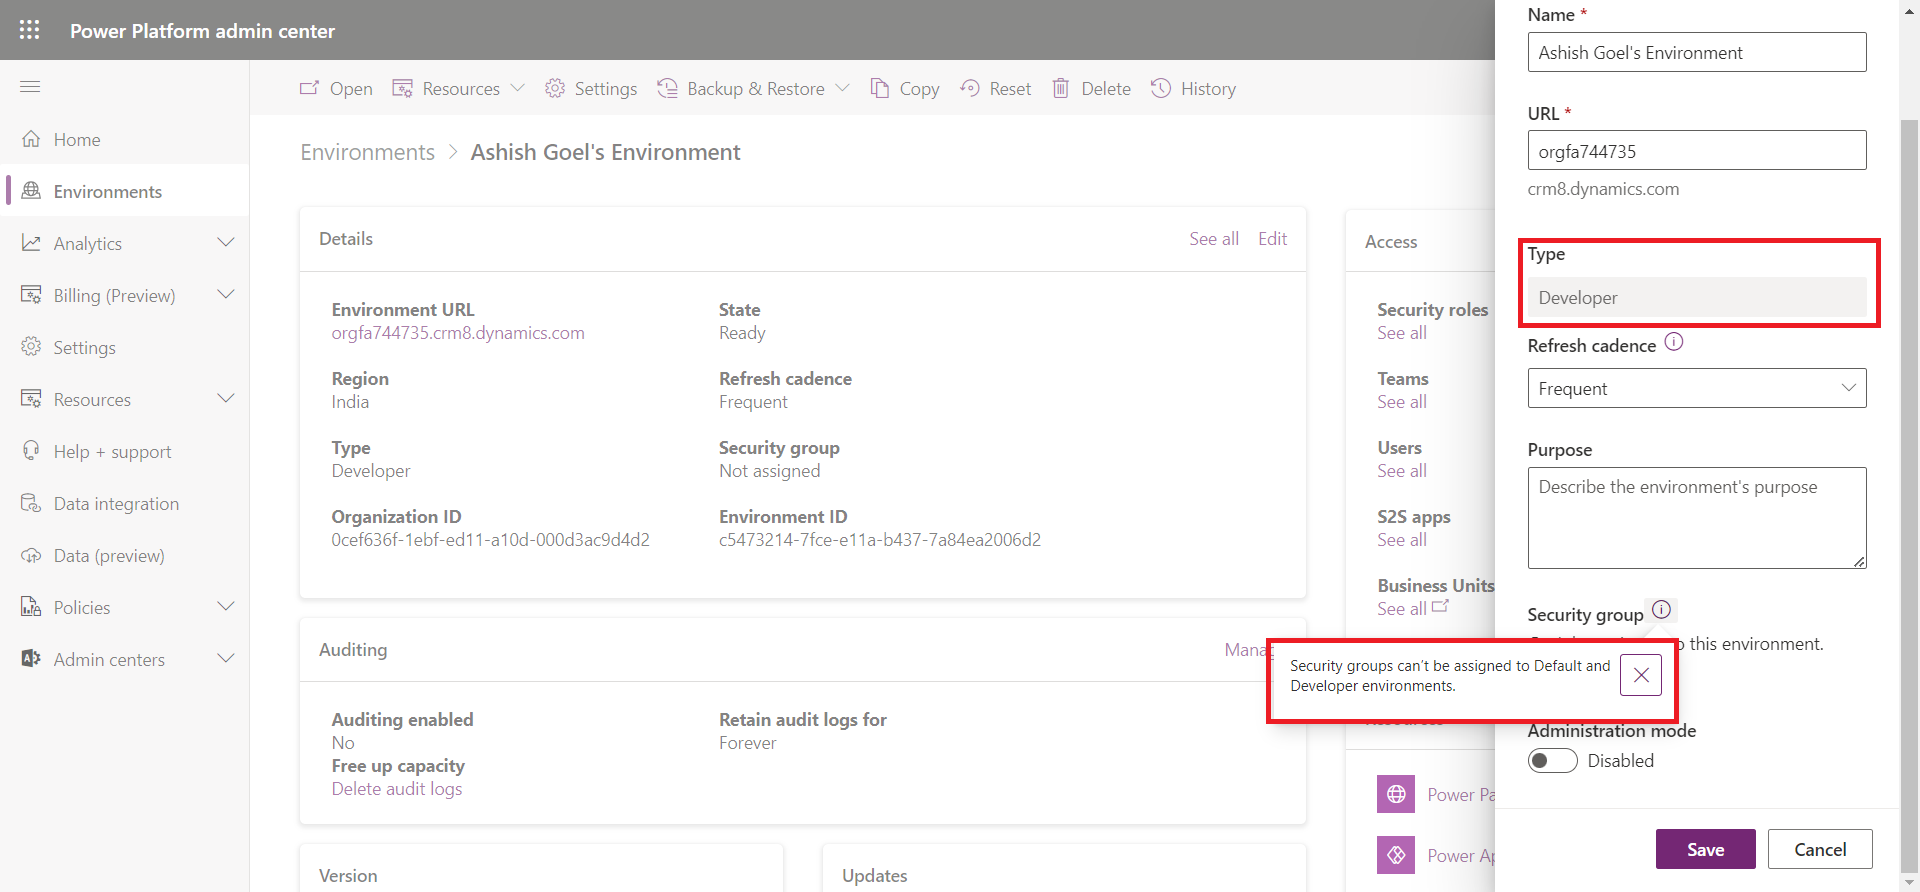
• We cannot assign the security group to the Default and Developer environment types. If you've already assigned a security group to your default or developer environment, we recommend removing it since the default environment is intended to be shared with all users in the tenant and the developer environment is intended for use by only the owner of the environment.
• Users running canvas apps when a security group is associated with the environment of the app must be members of the security group to be able to run the canvas app, regardless of whether the app has been shared with them. Otherwise, users will see this error message: "You can't open apps in this environment. You are not a member of the environment's security group."
• If a user isn't part of the assigned security group to the environment but has the Azure tenant Global Administrator role, the user will still show as an active user and will be able to sign in.
Delete environment
We can delete an environment to recover storage space and to remove Personally Identifiable Information (PII).
Step 1: Sign in to Power Platform admin center.
Step 2: Select an environment and then select Delete from the command bar.
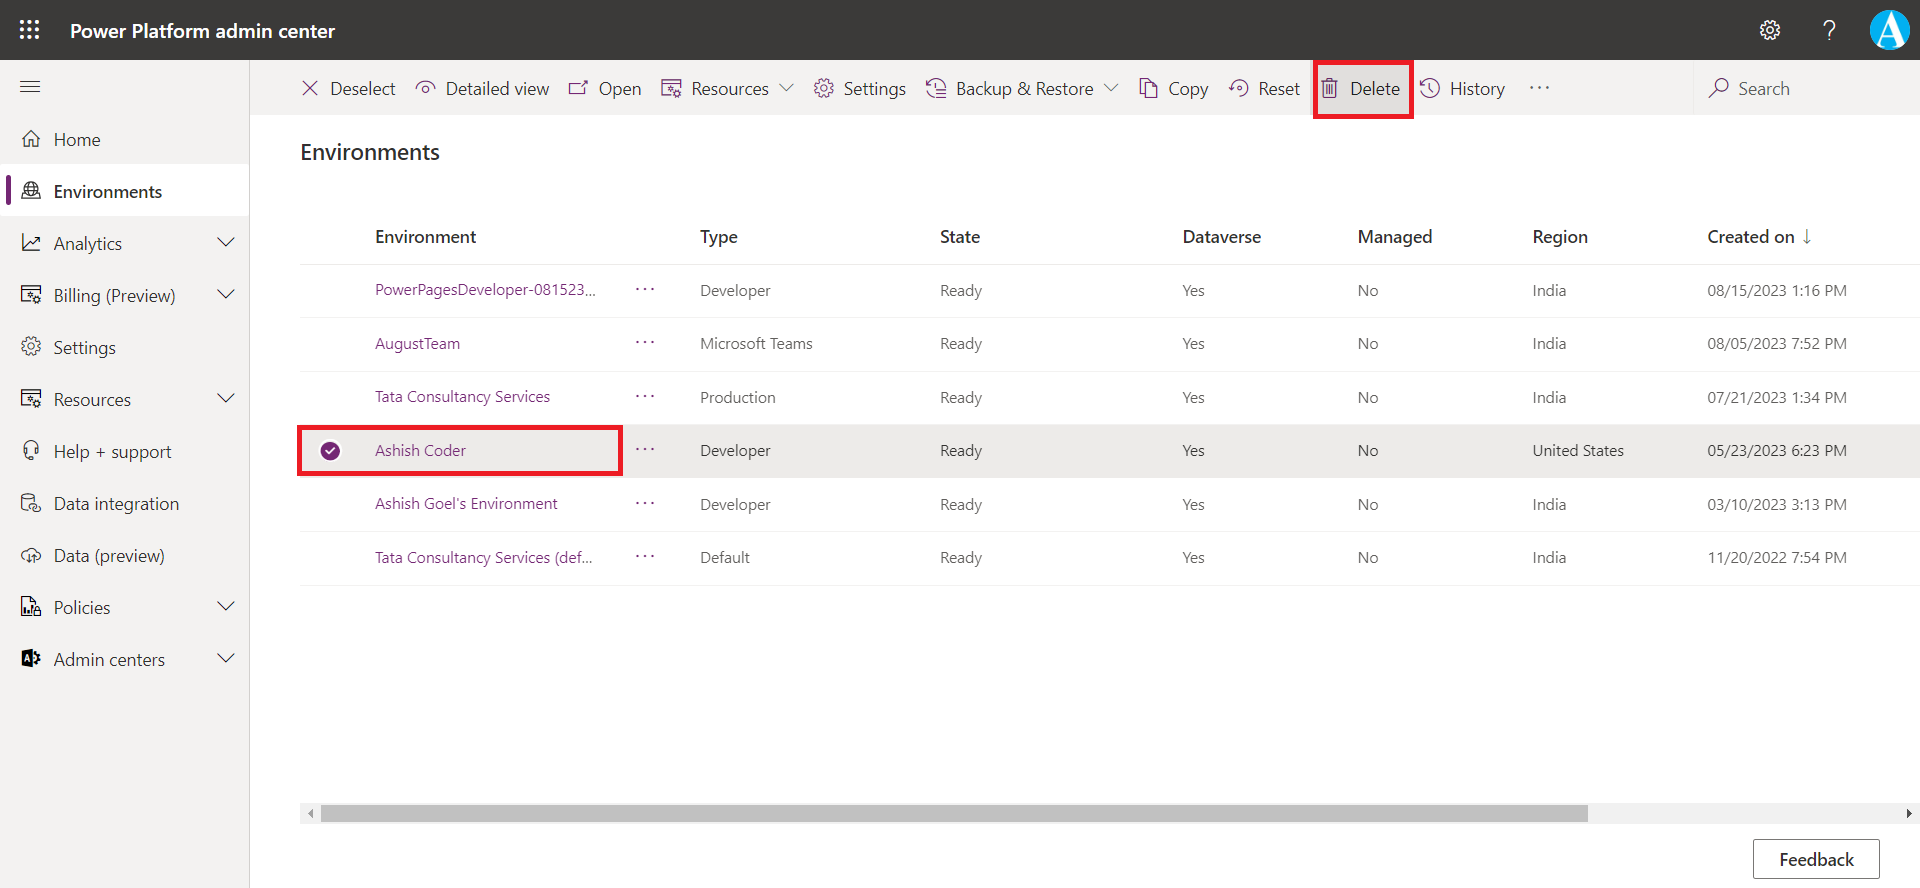
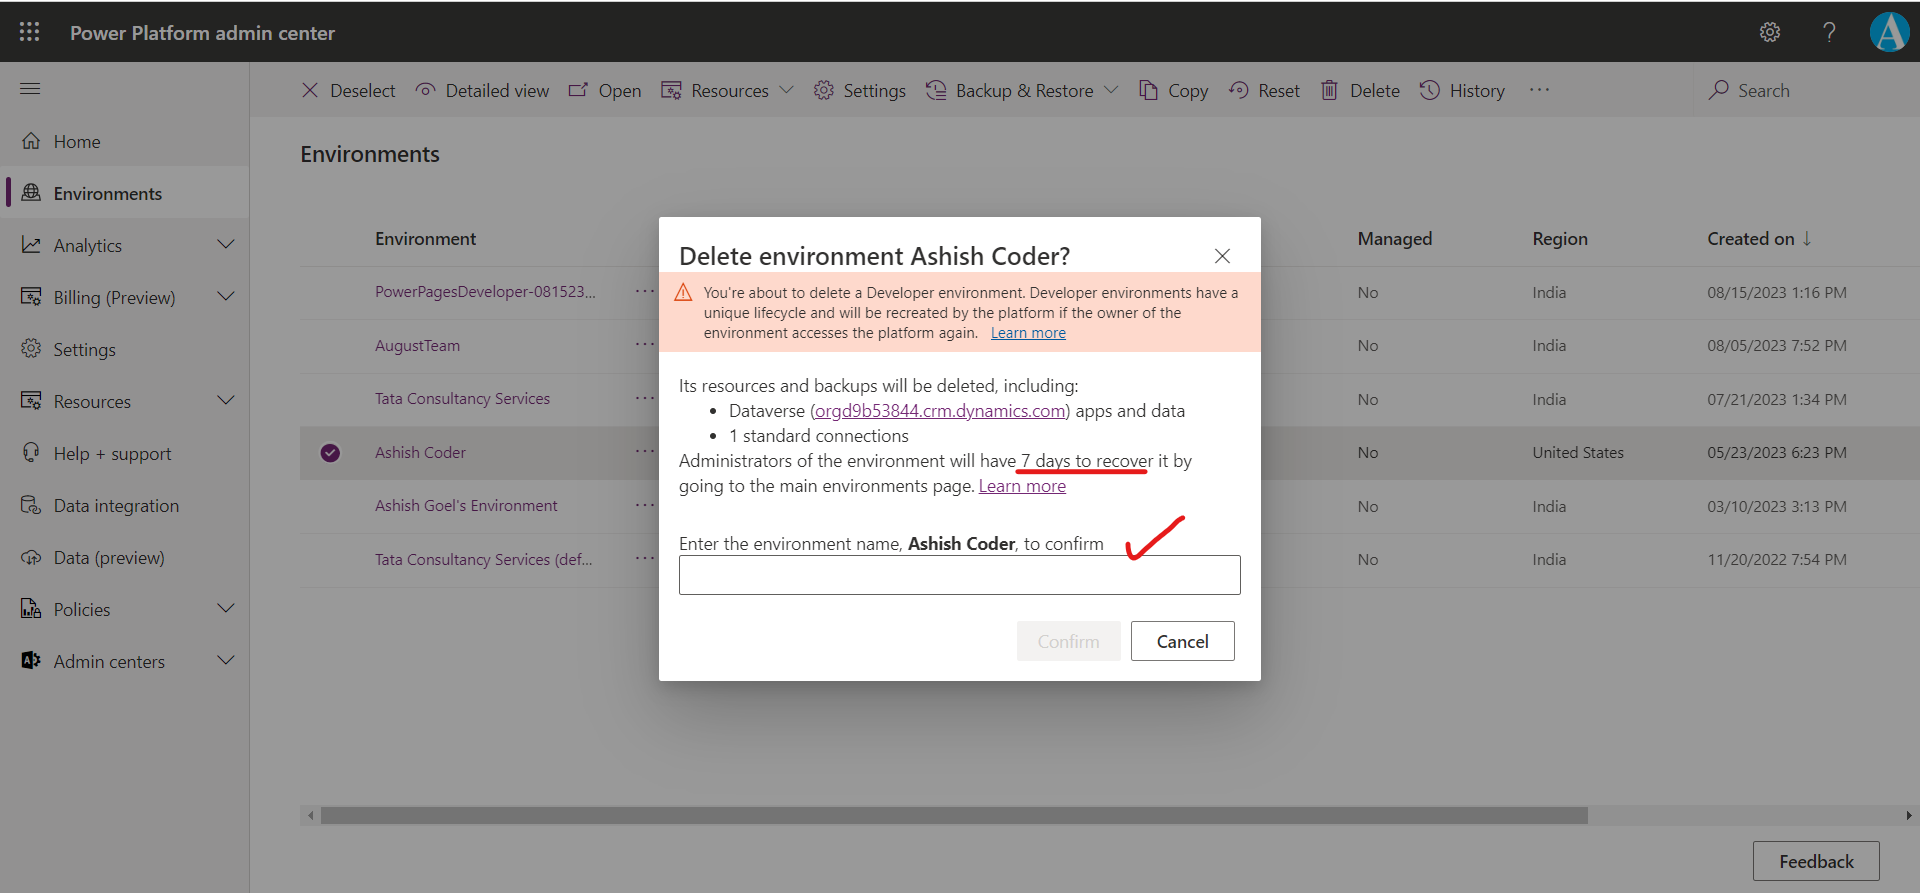
Step 3: Enter the name of the environment to confirm the deletion and then select Confirm.
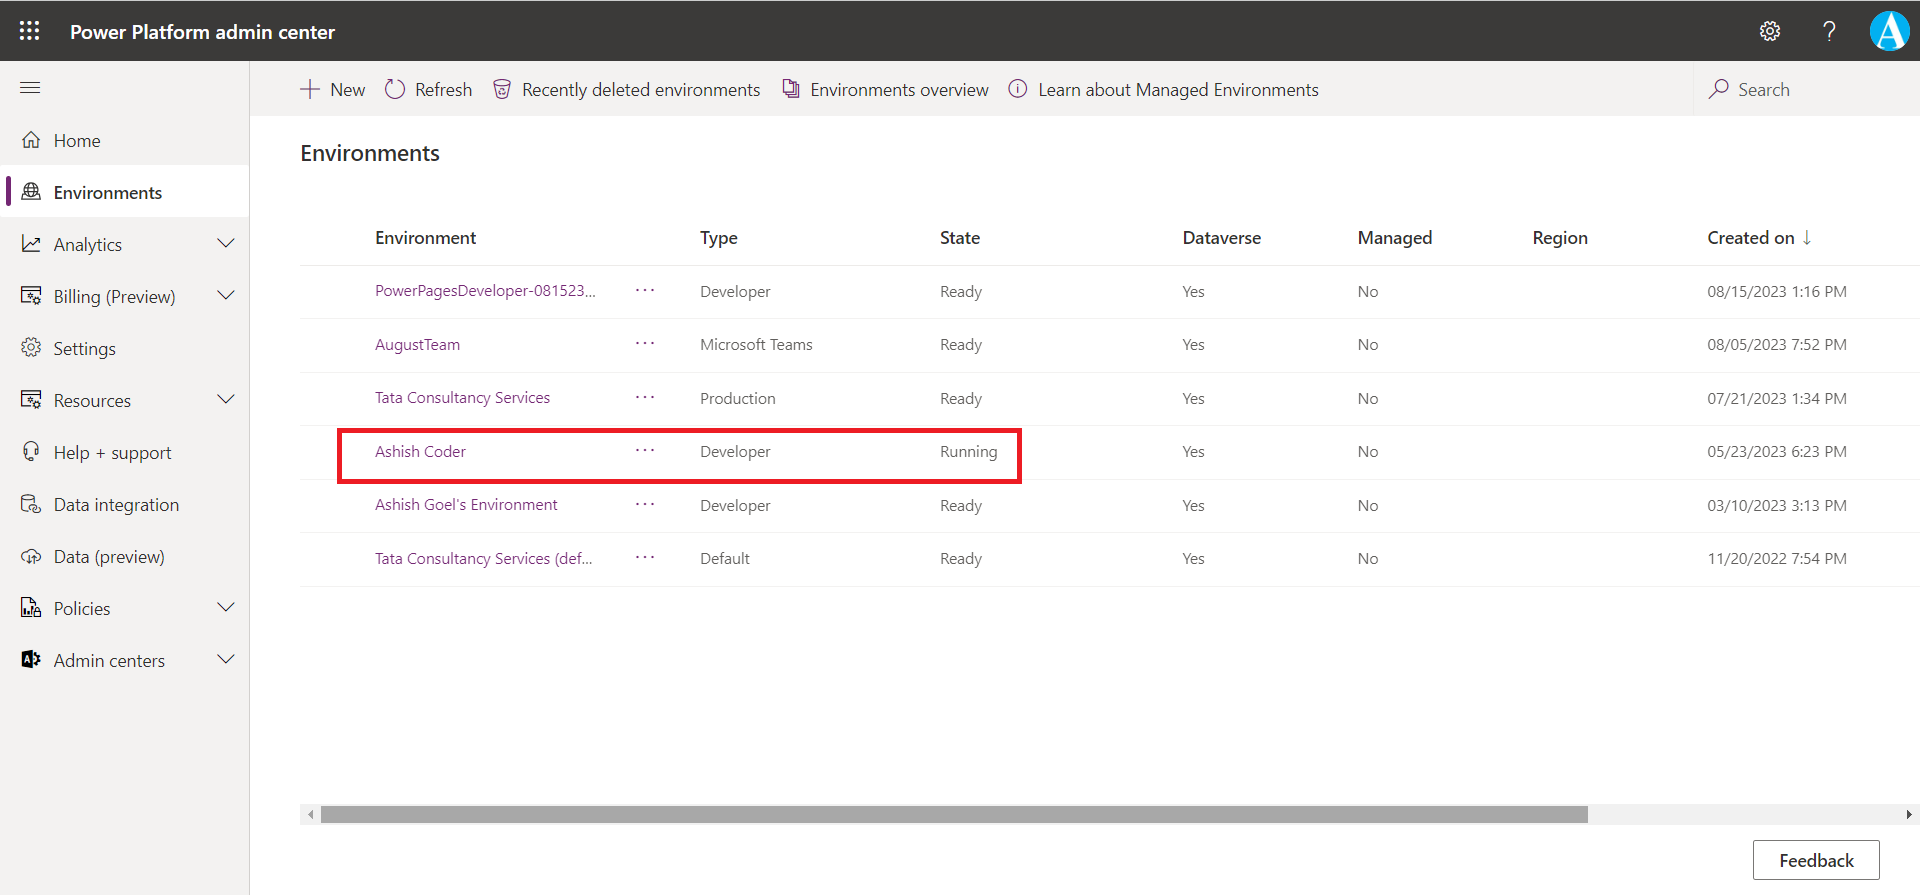
It may take several minutes to delete the environment till then the environment is shown here and its State is set to Running.
Recover environment
The Administrators of the environment can recover a recently deleted environment (within 7 days of deletion), by using the Microsoft Power Platform admin center.
Step 1: Sign in to Power Platform admin center as an admin (Dynamics 365 admin, Global admin, or Power Platform admin).
Step 2: In the navigation pane, select Environments, and then select Recently deleted environments.
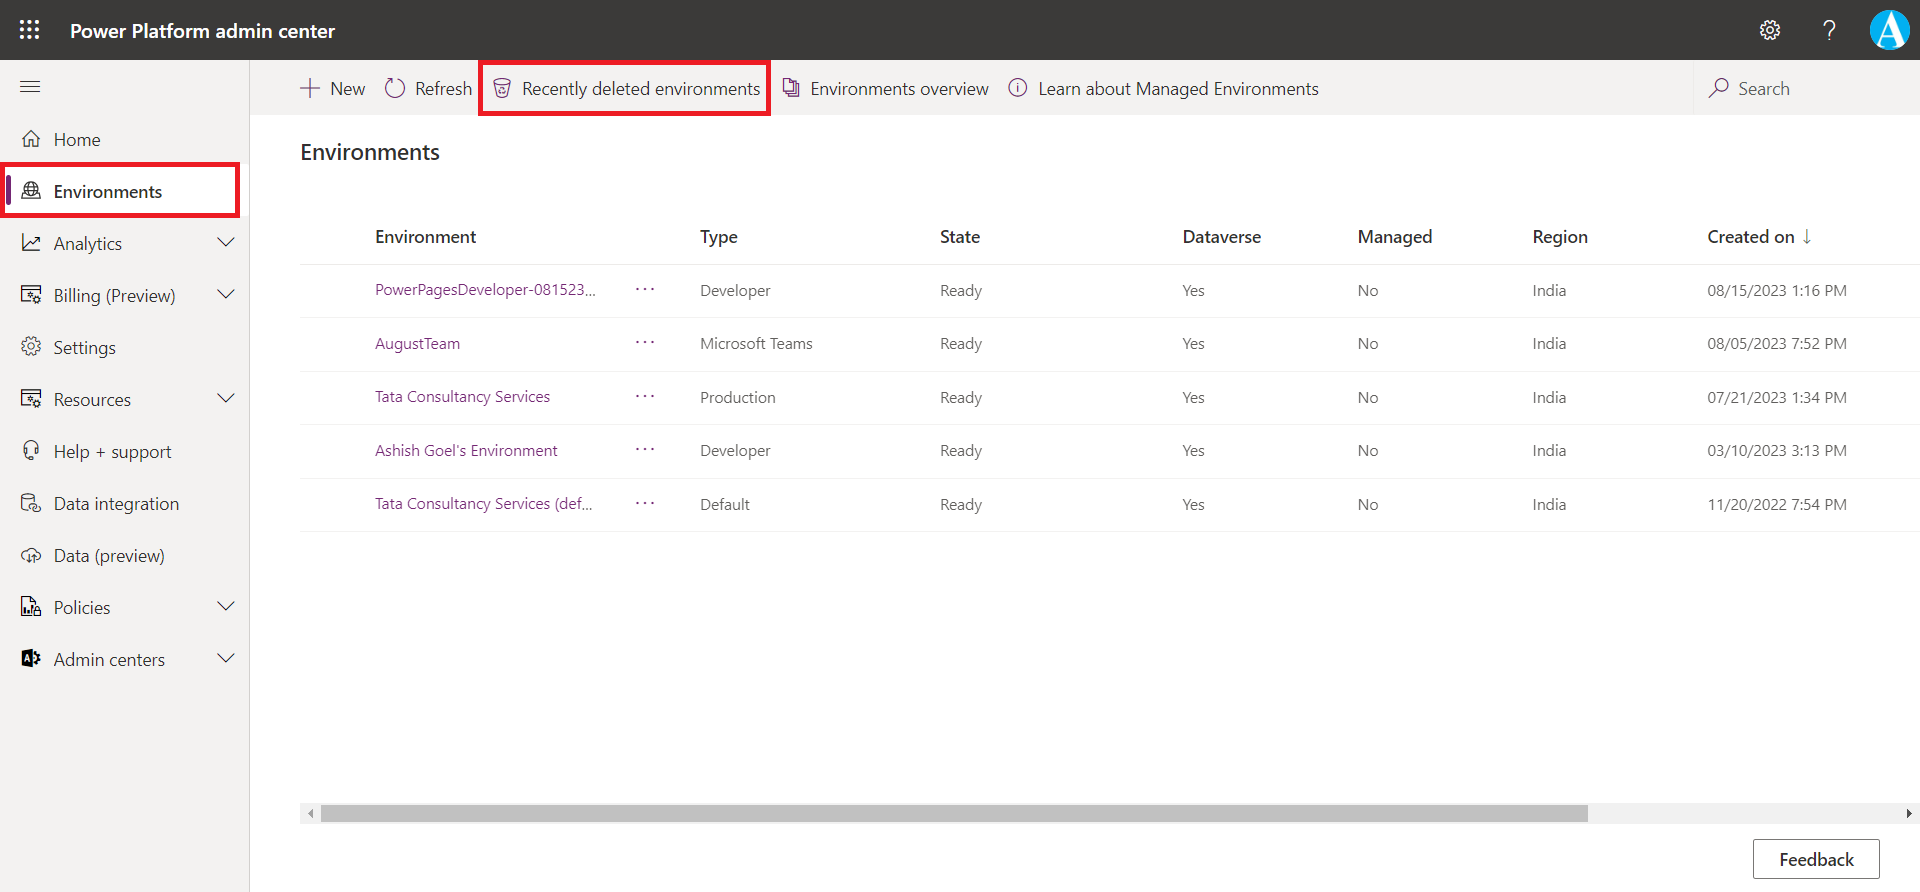
Step 3: Select an environment to recover, and then select Recover.
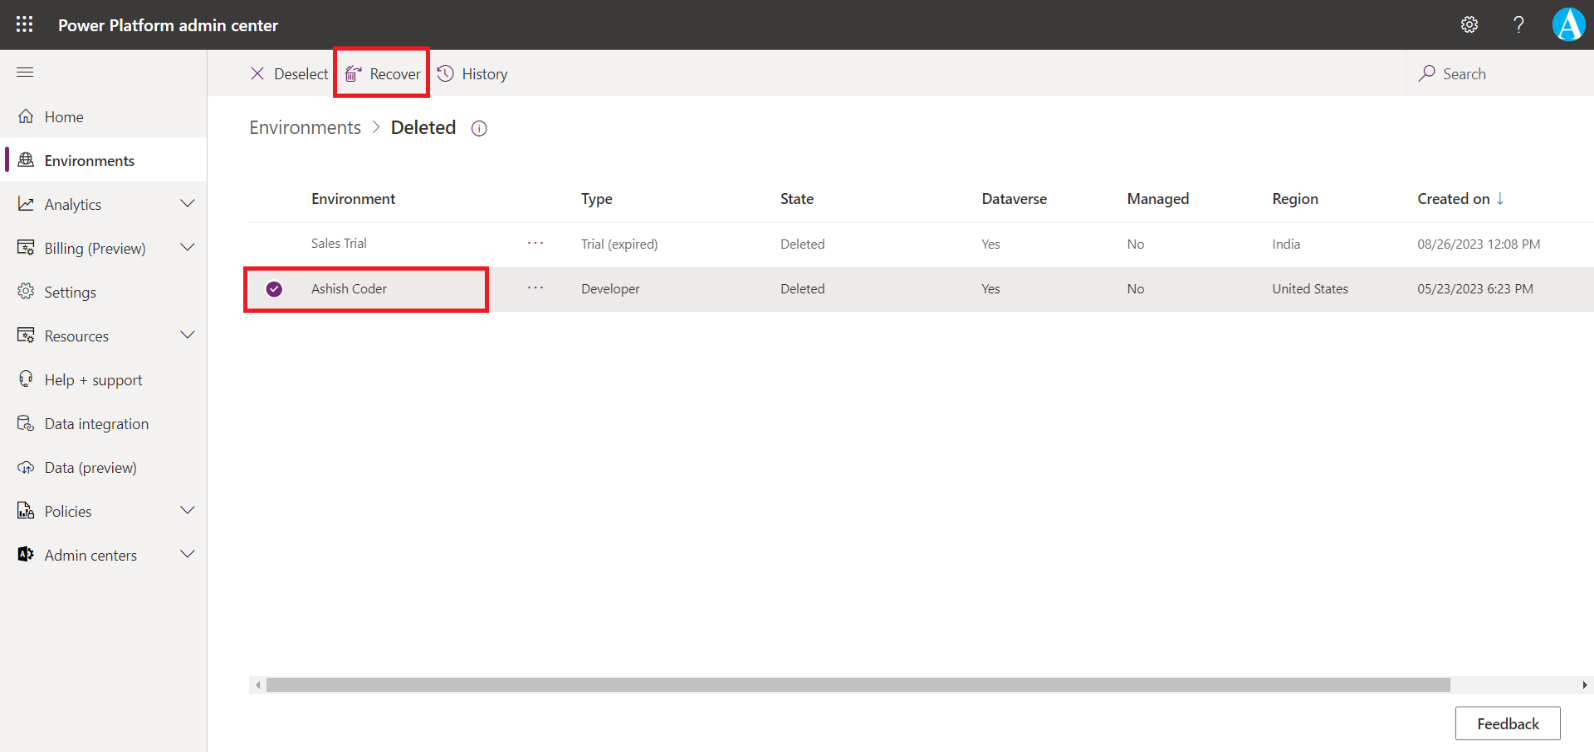
Step 4: Select Continue to confirm the recovery in the Recover environment {Name of the environment} dialog box.
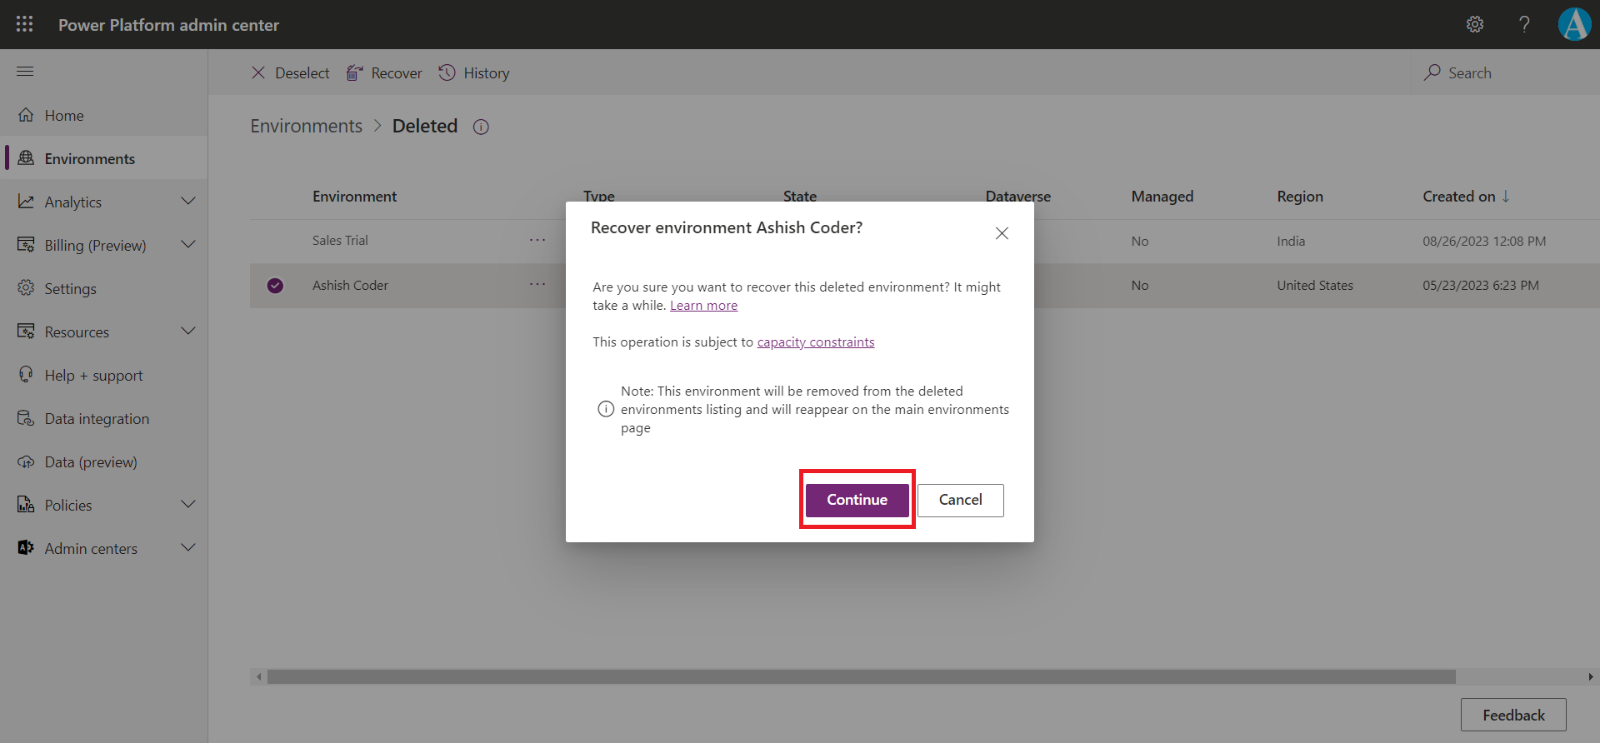
It could take several hours for the environment to be recovered. During this period, the environment to be recovered will continue to show in the list of deleted environments. Once recovered, we will see the environment in the Environments page.
Adding a user to an environment
We can add users to any environment. To add the new users or groups to the environment and security roles within that environment we must have the System administrator role (Environment that has dataverse instance).
The following steps will help us add users from our tenant to an environment.
Step 1: Sign in to Power Platform admin center as an admin.
Or,
Sign in to Power Apps. And then select the gear icon (Settings) in the ribbon and select the Admin Center option.
Step 2: Select Environments from the side ribbon and select an environment that we want to administer.
Step 3: In the Access pane in the top right of the chosen environment's dashboard, verify that a user already exists in the environment by selecting See all under Users.
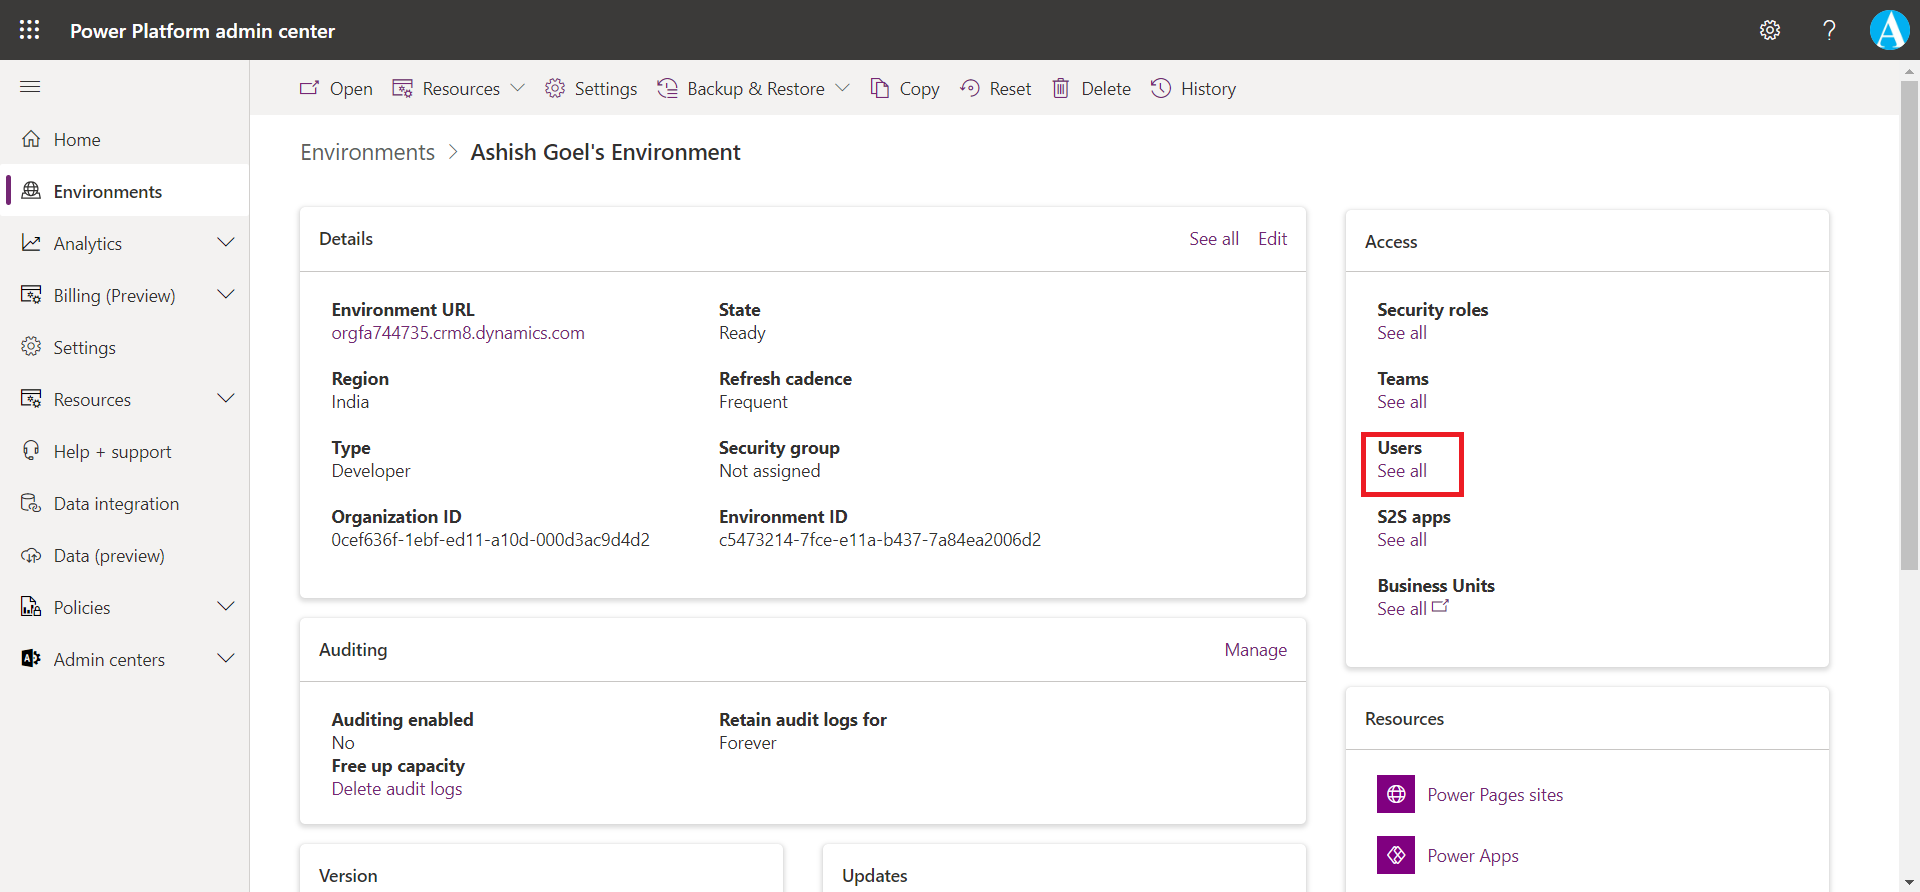
Step 4: Here we can see our Users list. We can find our users by scrolling through the list or filter the list by entering a user's name in the top right filter field.

Step 5: If an existing user needs to be added to the environment, we can add the user here in the Microsoft Power Platform admin center. Add the single user by selecting the + Add user button and then entering the user’s name or email address, and select Add.
As we begin to type, the search box narrows and autosuggests options until we find the one, we are looking for. Note the User access requirements as we begin our selection.
• If you have enabled the user in Azure Active Directory,
• given them an active license, and
• they're already a member of the environment's security group,
then their name appears as an option to add to this environment. (Else you may see them, but can't add them.)
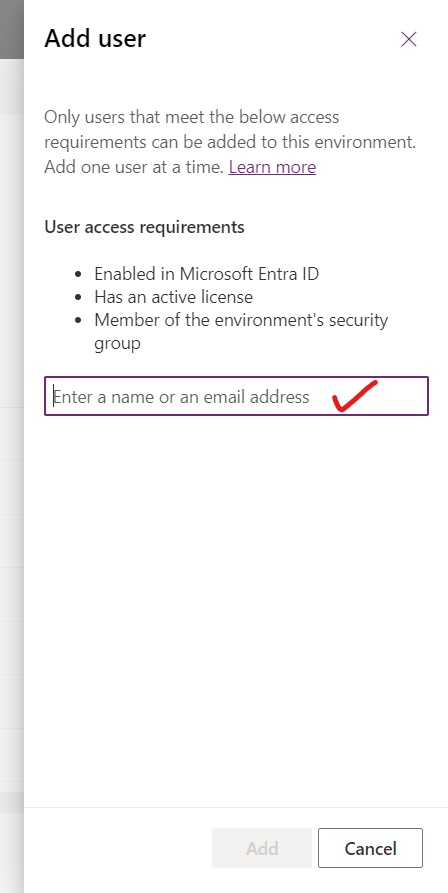
Step 6: The user is added to the environment but in order to access the data we need to assign the user to some role(s) from the Manage security roles popup pane. We may select multiple roles. Once we have the desired roles selected, select Save.
Once we save our changes, we receive a confirmation at the top of our Users screen that the user has been added and security roles have been updated for that user.
Step 7: We can refresh our Users screen by selecting the Refresh button in the admin center command bar.
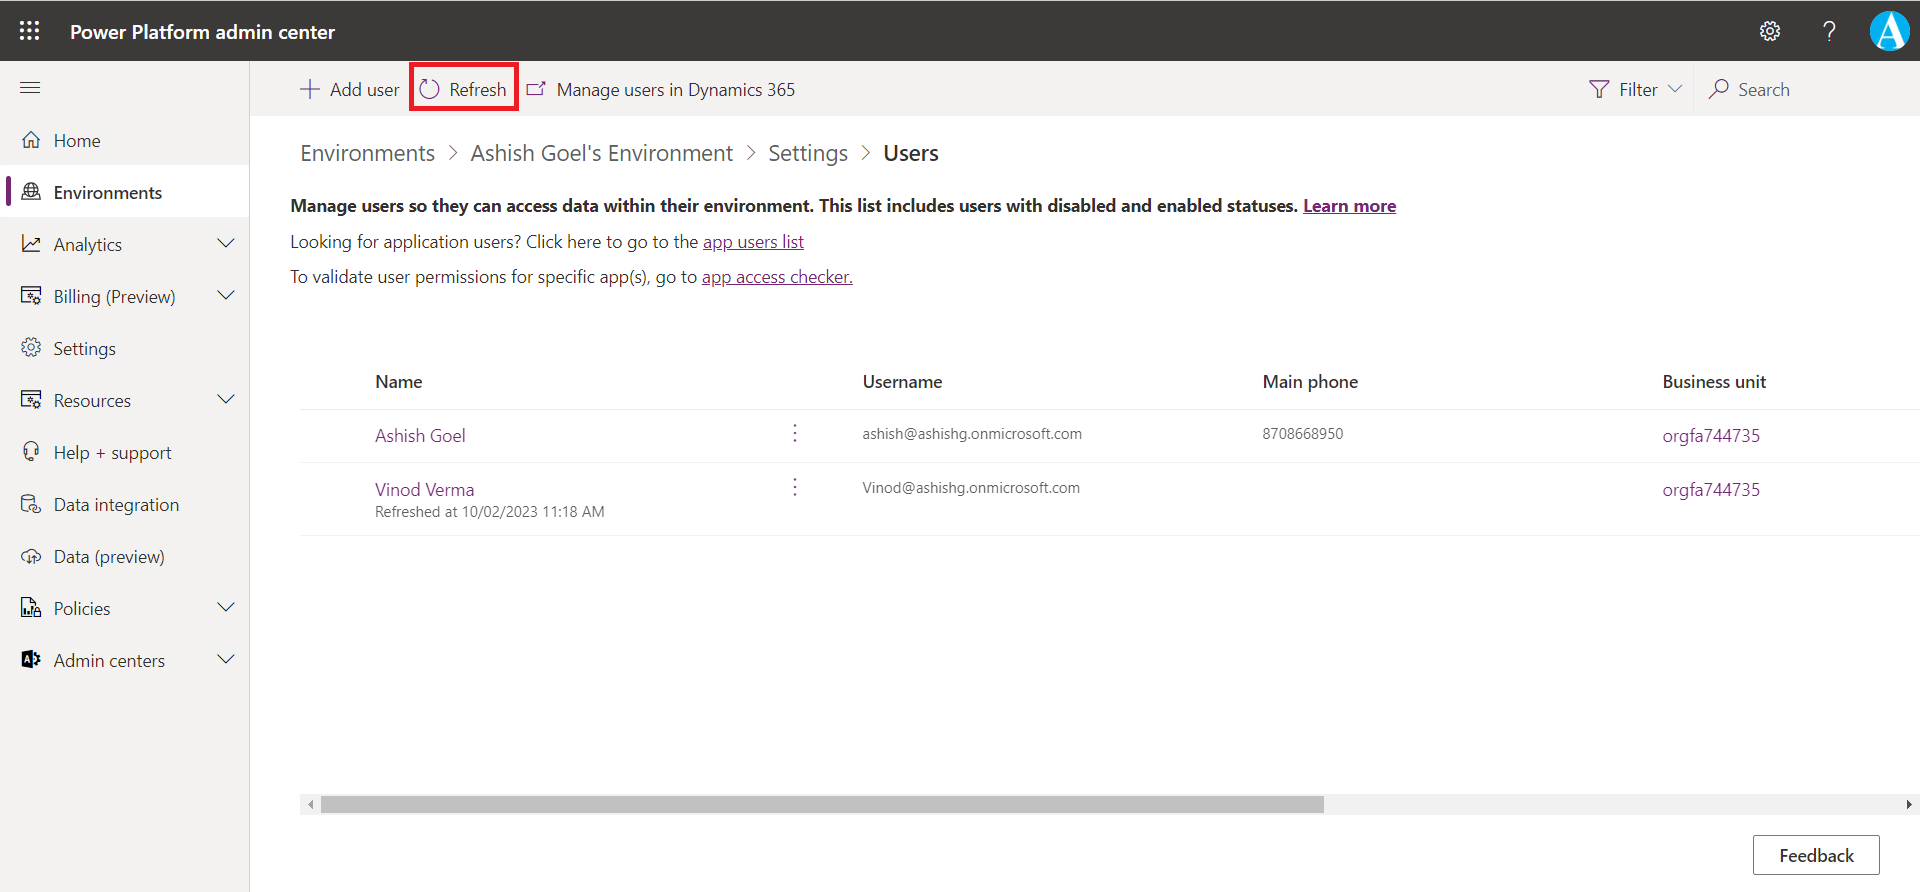
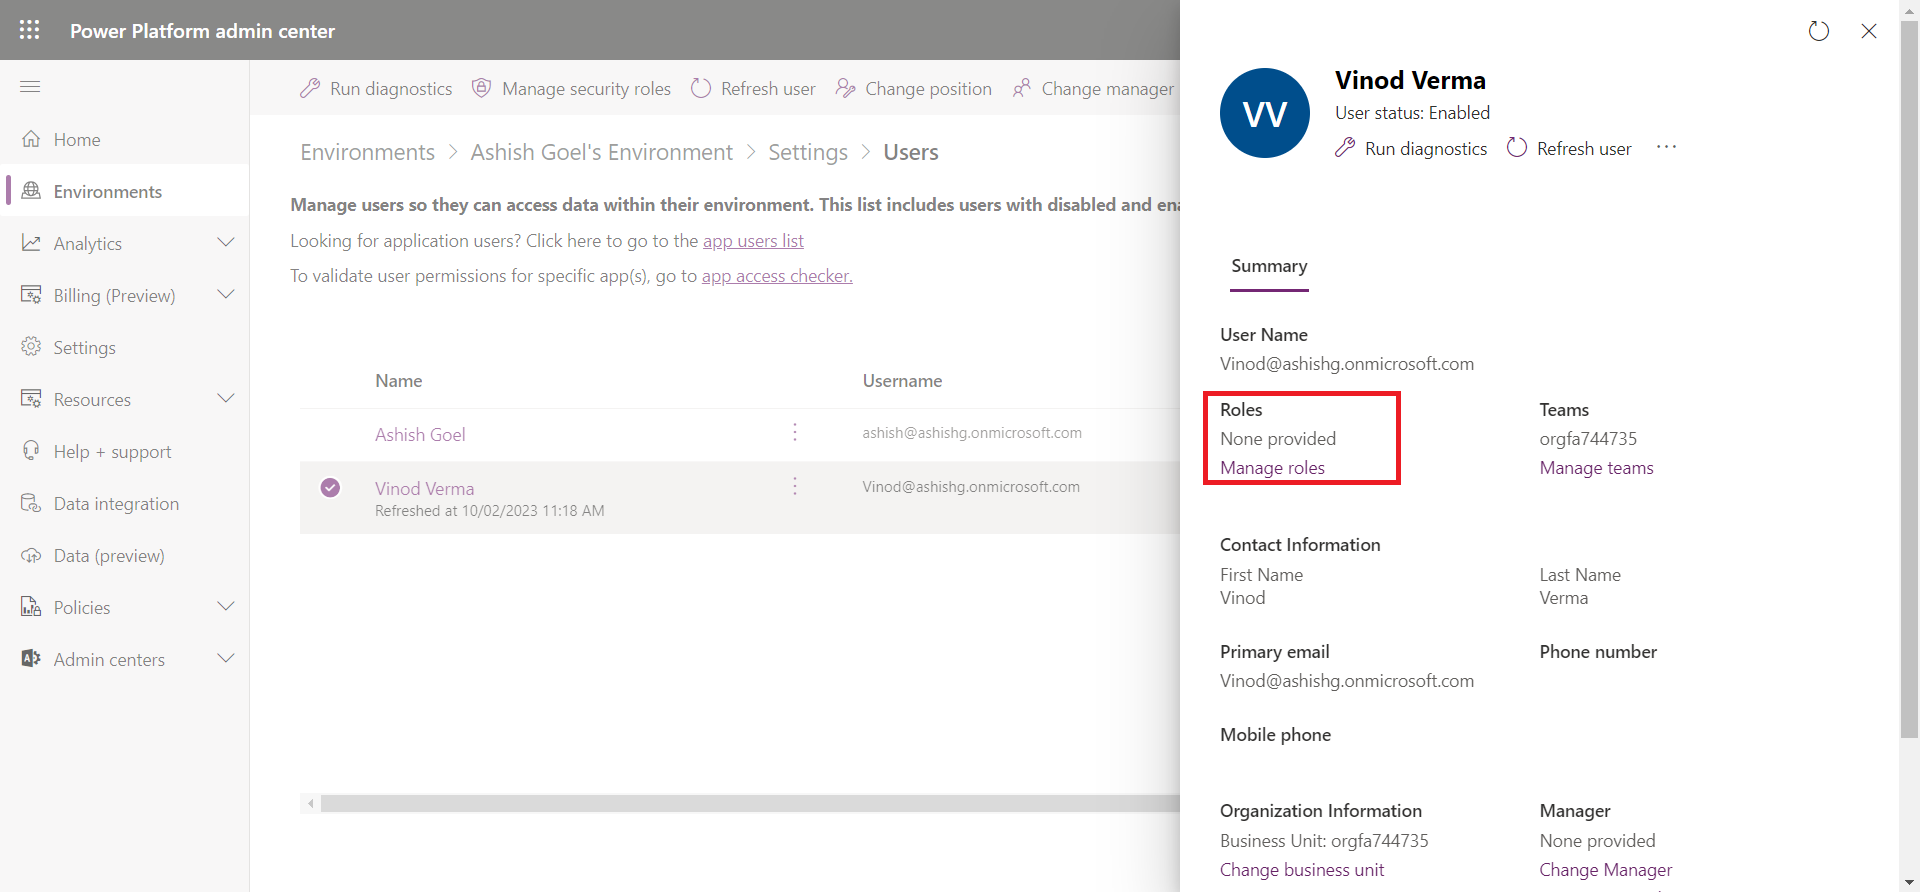
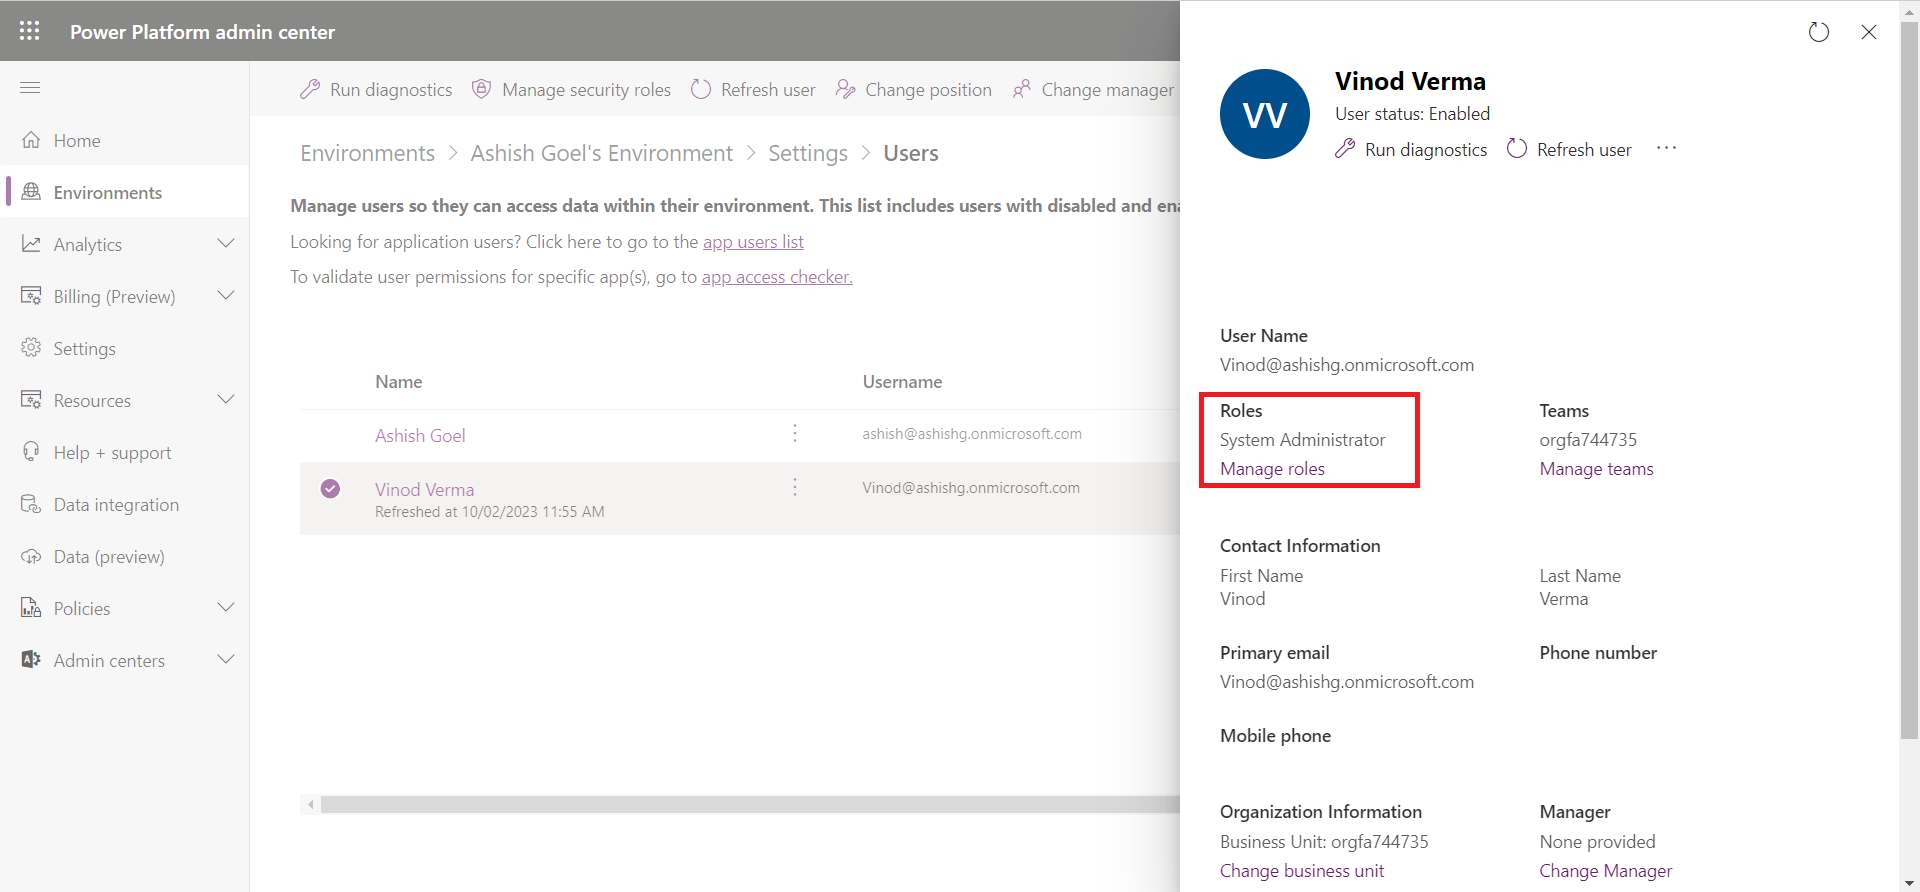
Step 8: We can assign the security roles to the user after adding the users also. Select the user's name from the list of users in the environment. A tab opens on the right side of the screen with the details of that user account. We can see the Roles listed below the User Name.
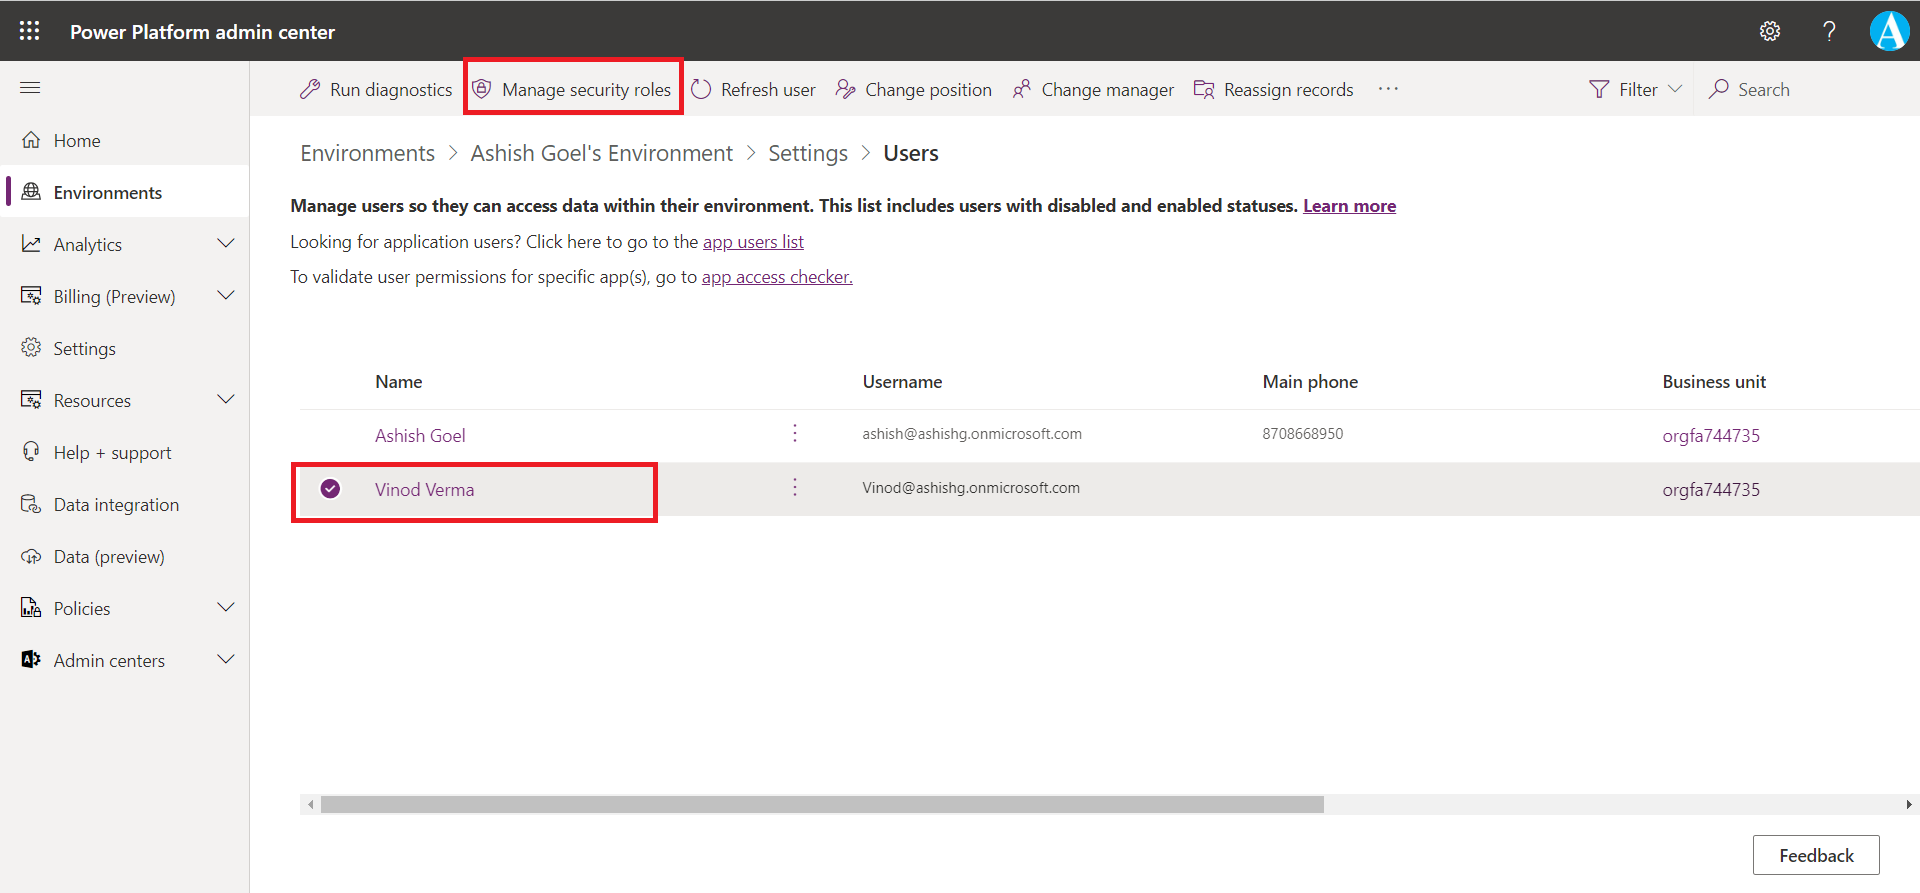
Or select the user and click on Manage security roles.
Step 9: If we wish to change the role(s) select Manage roles under Roles. The same Manage security roles panel appears on the right side of the screen. Modify what role(s) is/are assigned to this user, by selecting and deselecting the checkmarks next to the name.
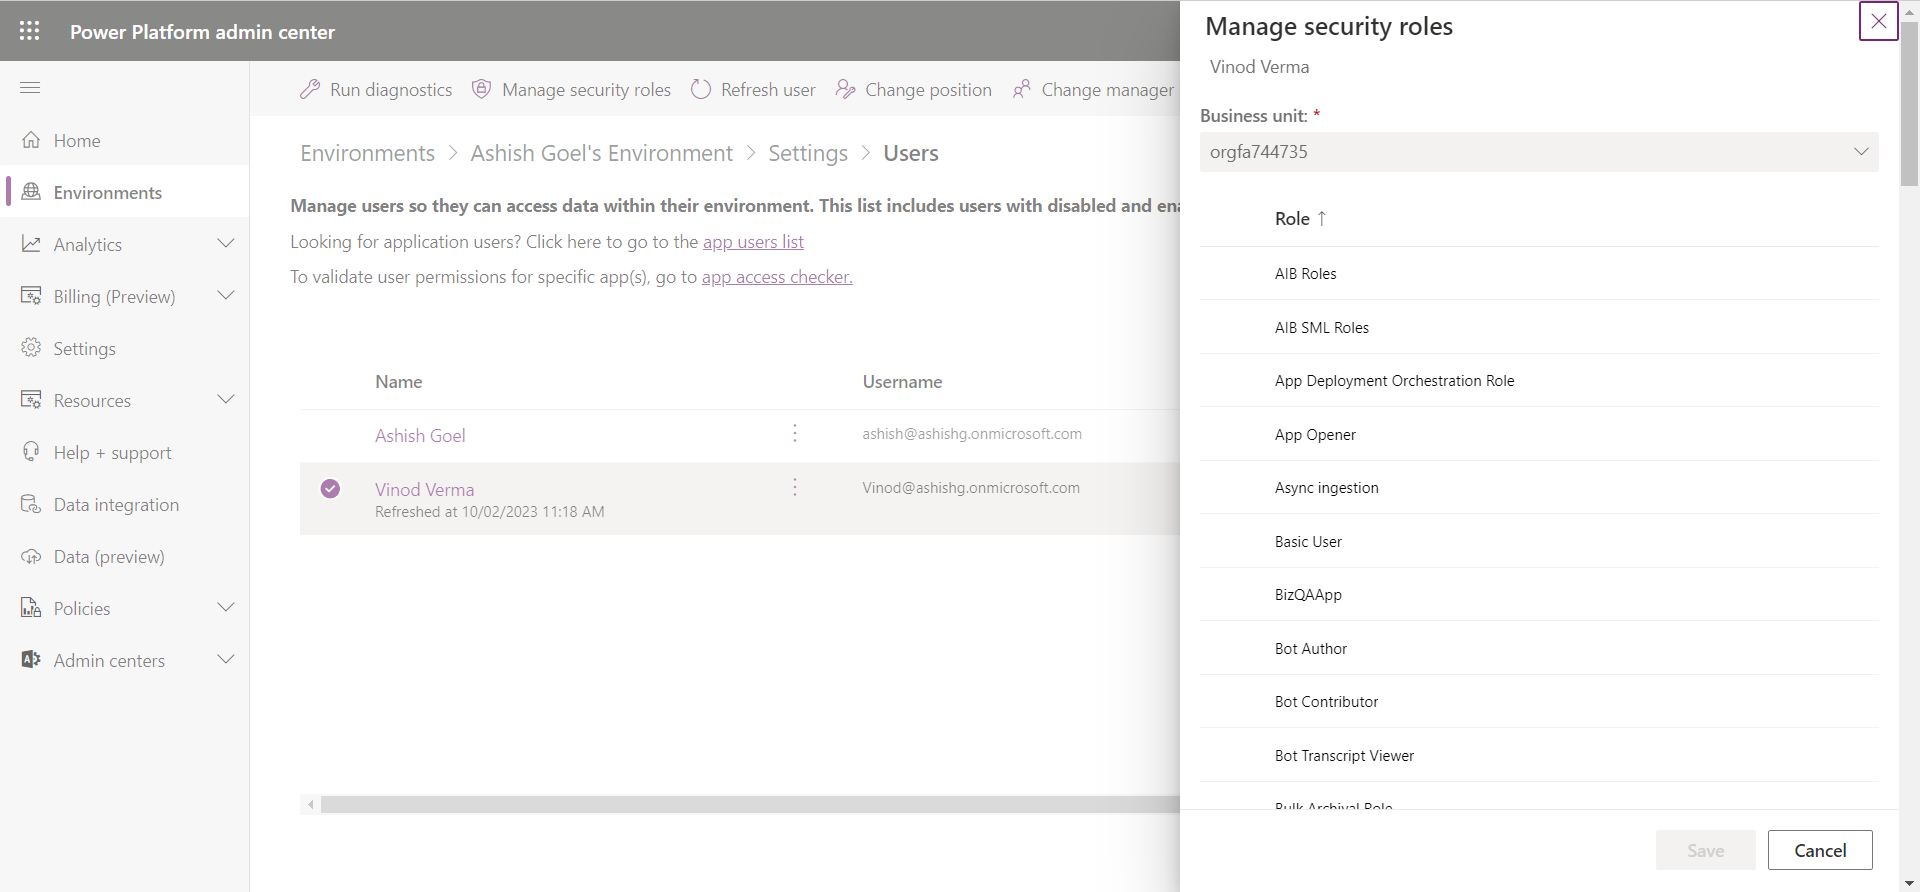
Let’s suppose we assign the System Administrator role to the user and then click on Save. We can see that the role is added underneath the Roles.
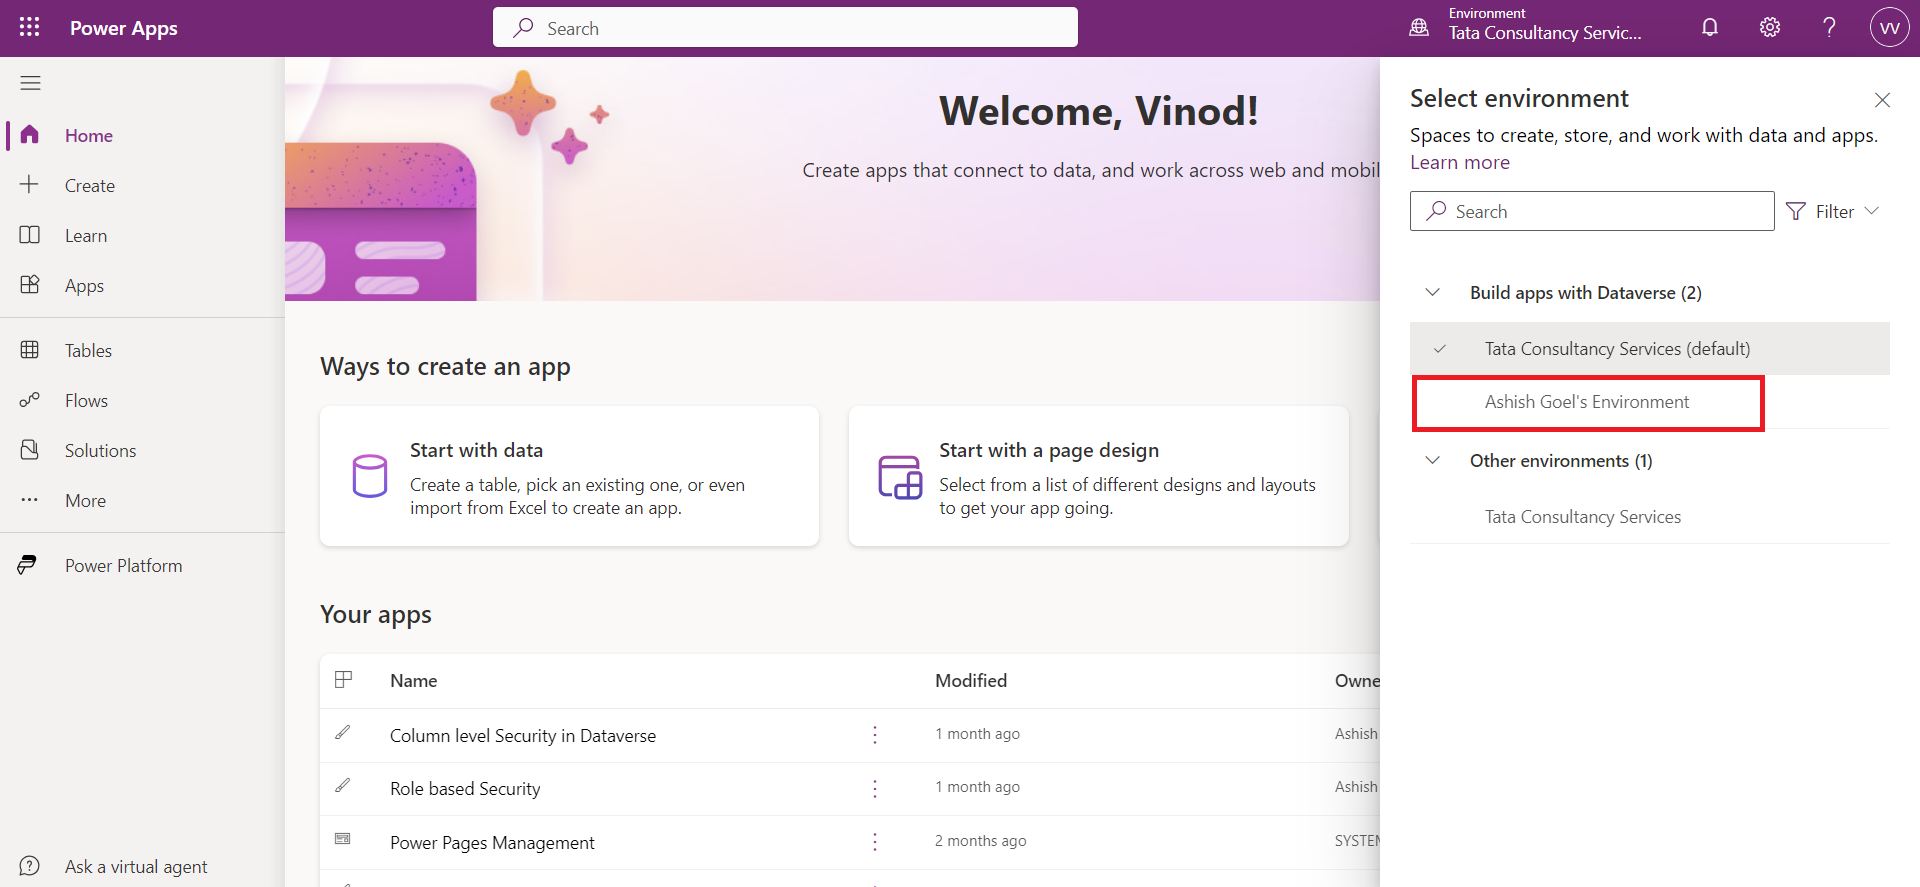
When we login with the Vinod account we can see this environments name on his list of environments. It can take some time to reflect.
2. Business units
Business units work with security roles to determine the effective security that a user has. Business units are a security modeling building block that helps in managing users and the data they can access. Business units define a security boundary. Every Dataverse database has a single root business unit.
Create a new business unit
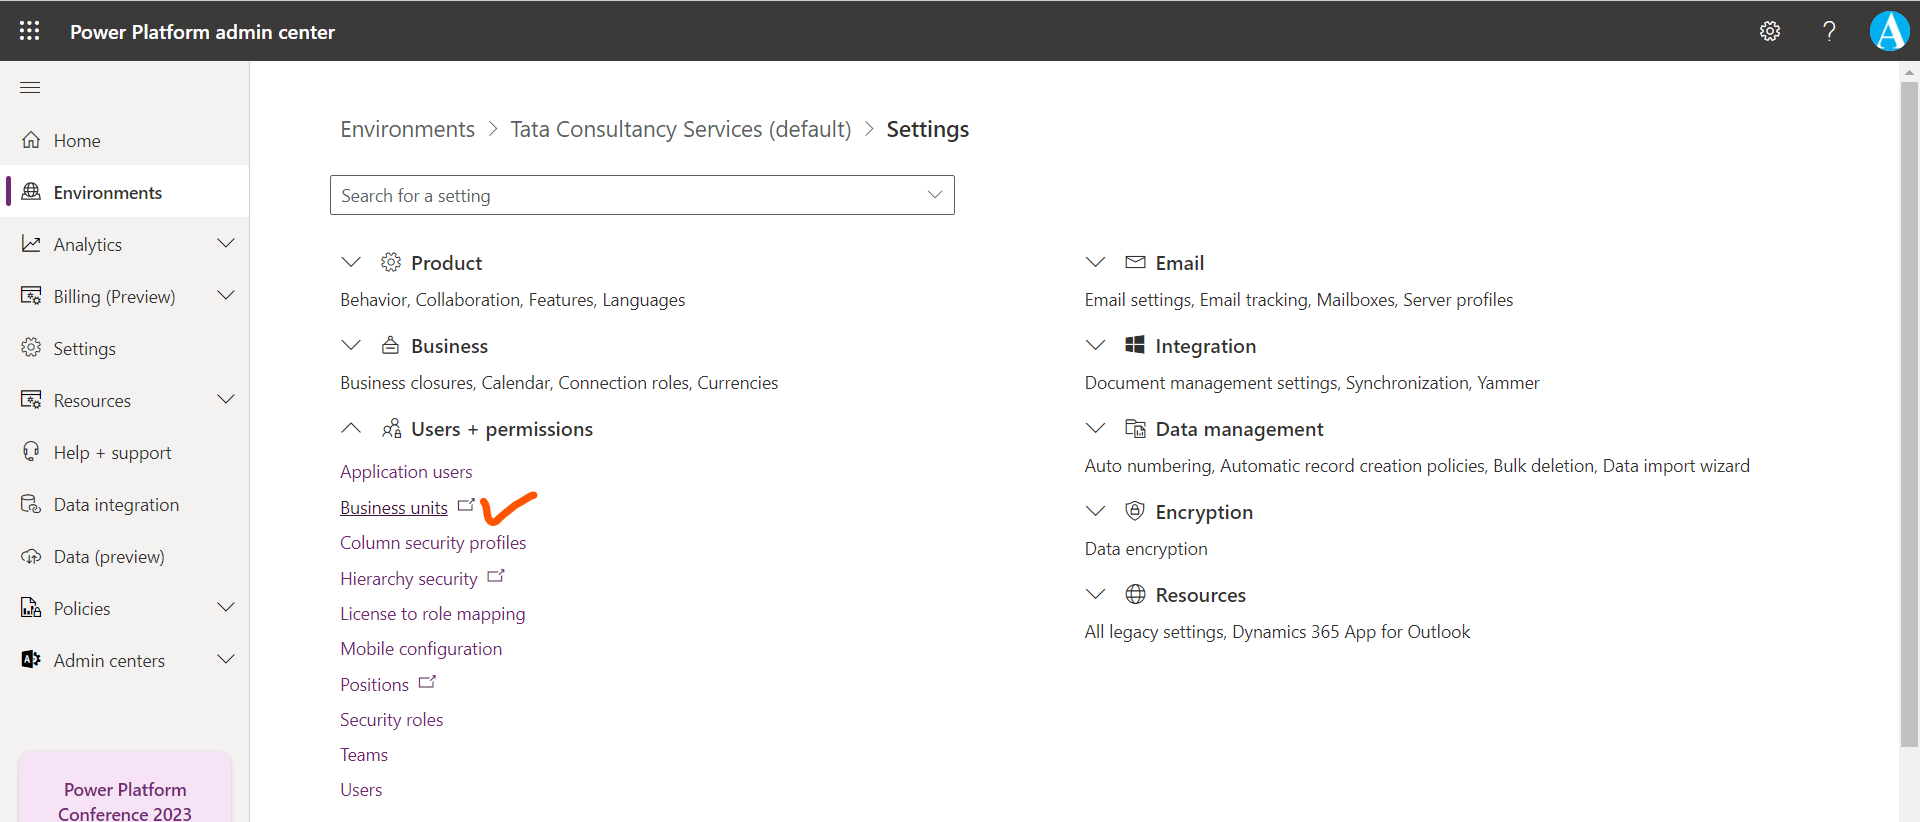
These settings can be found in the Microsoft Power Platform admin center by going to Environments > [select an environment] >Settings >Users + permissions >Business units.
Note: Make sure we have the System Administrator permission to update the setting.
3. Column-level security to control access
Record-level permissions are granted at the table level, but you may have certain columns associated with a table that contain data that is more sensitive than the other columns. For these situations, we use column-level security to control access to specific columns. Column-level security lets us set which columns users can see or edit.
Step 1: Sign in to Power Apps with the organizational account.
Step 2: Select Tables and then select the ‘My Students table’ table.
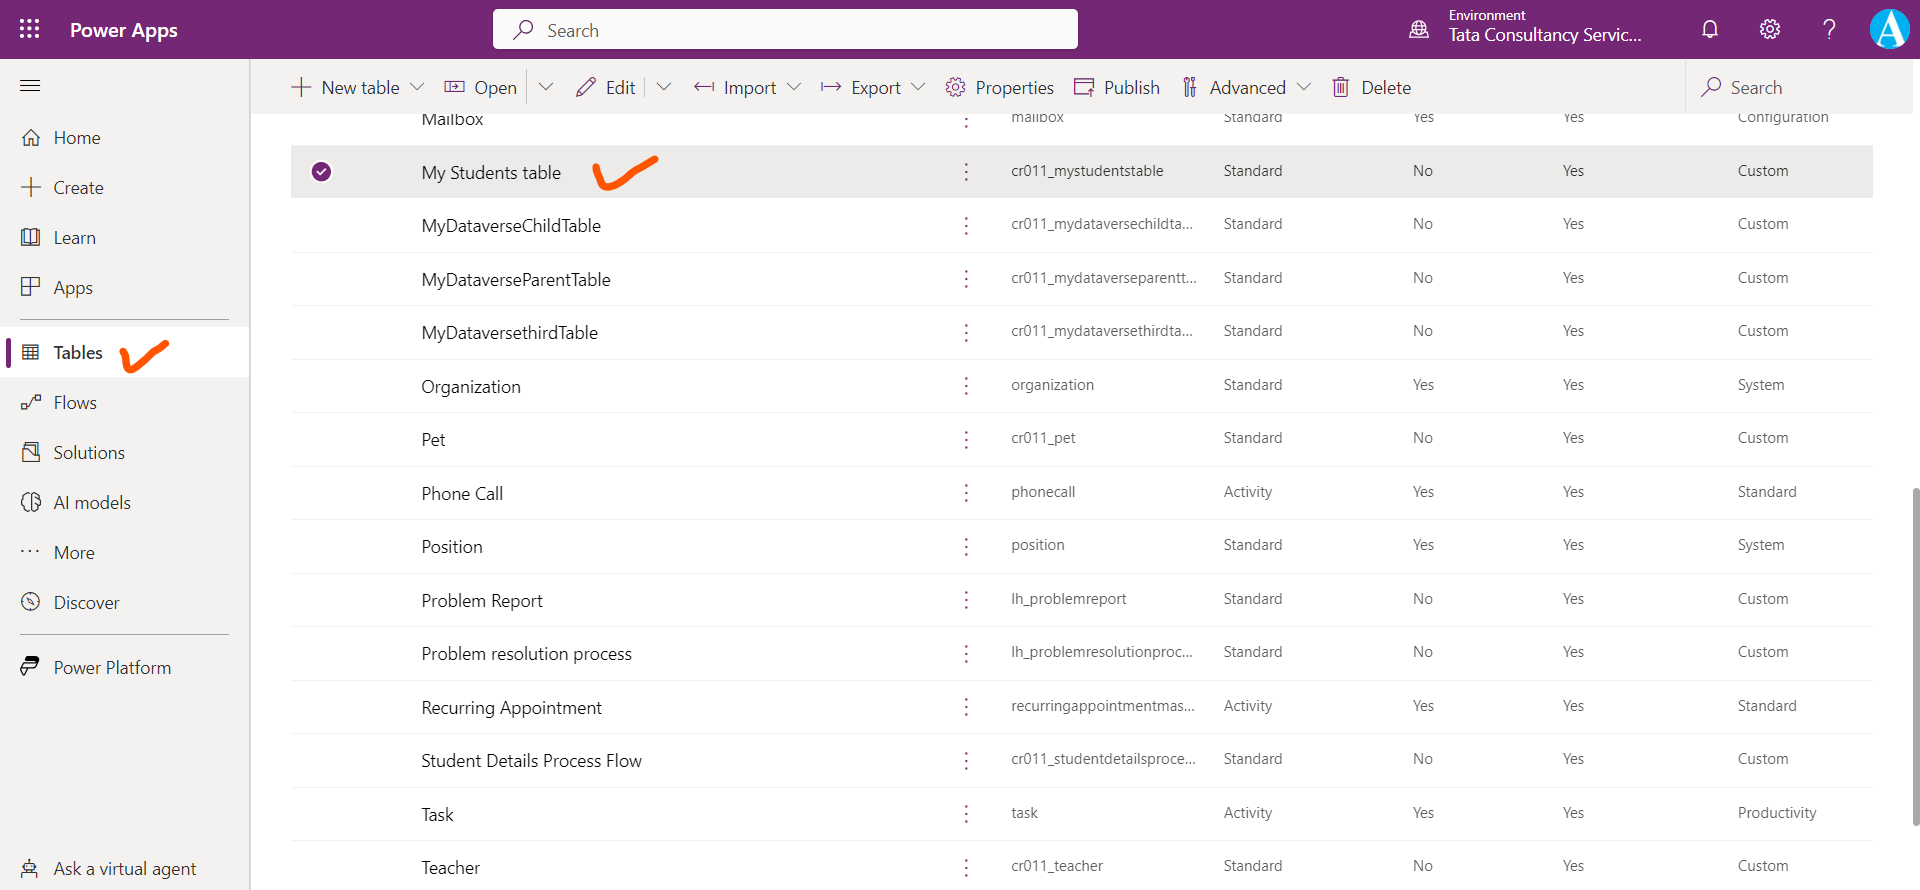
Step 3: Under Schema, select Columns.
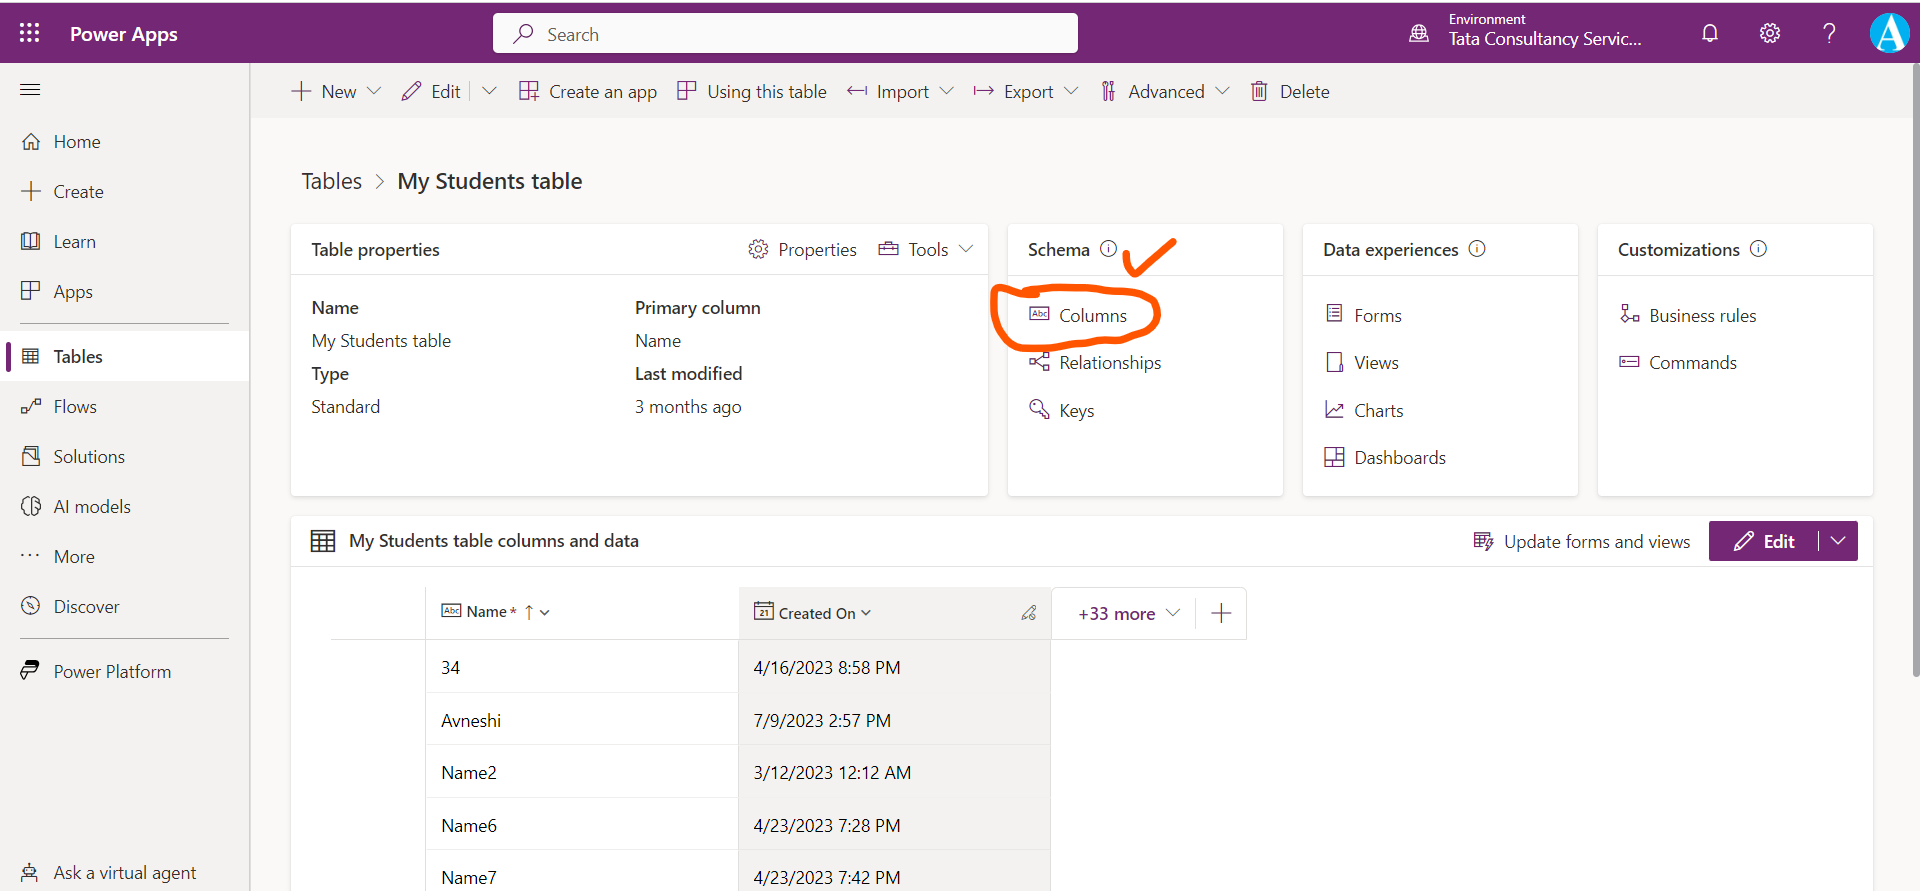
Step 4: Scroll down in the Columns list and open City column.
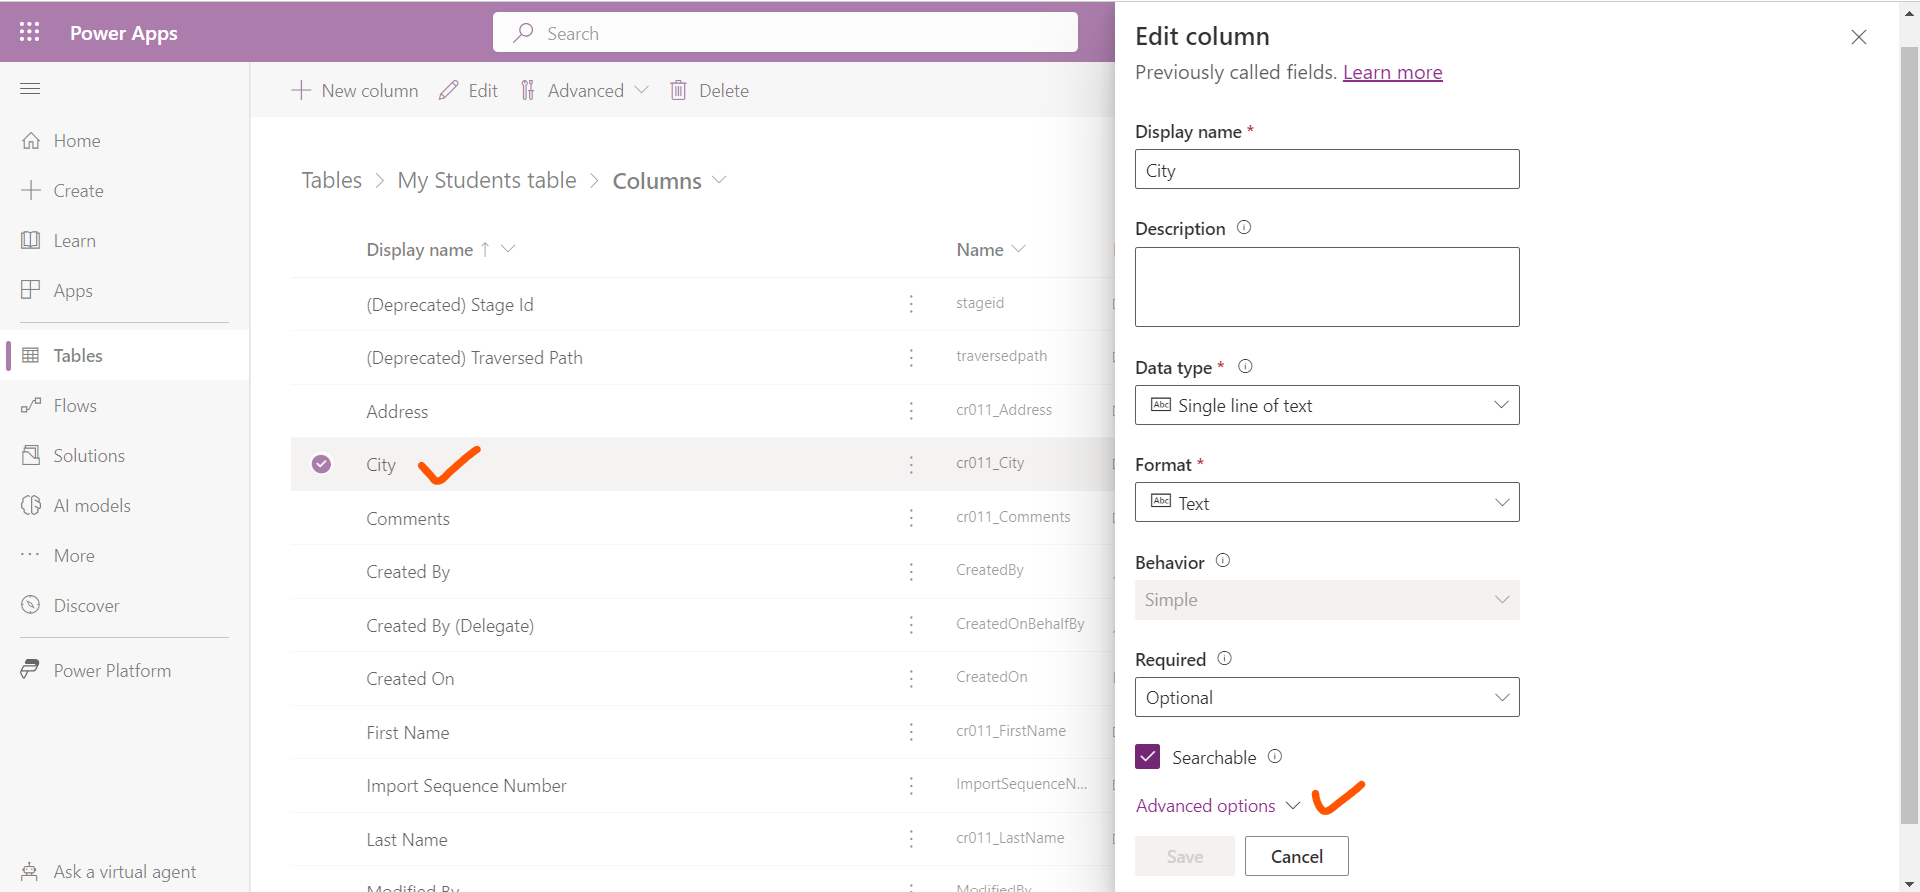
Step 5: Expand Advanced options, and then under General, select the checkbox to Enable column security.
Note: Every column in the system contains a setting for whether column security is allowed.
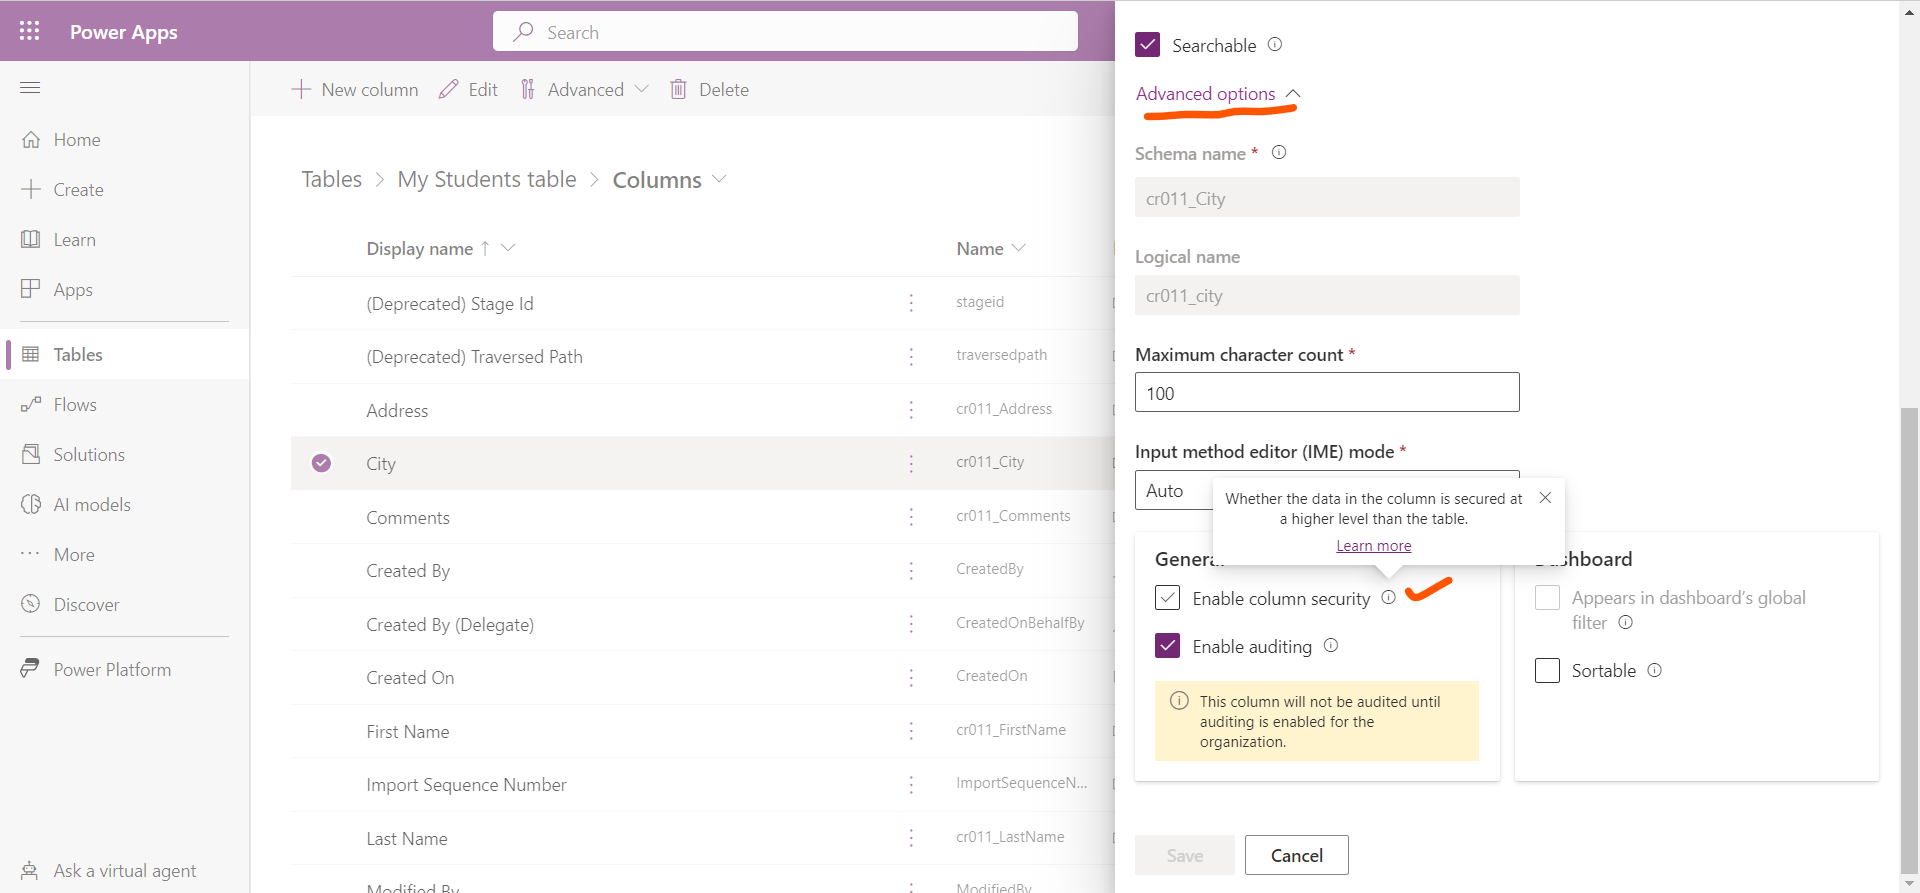
By default it is not checked.
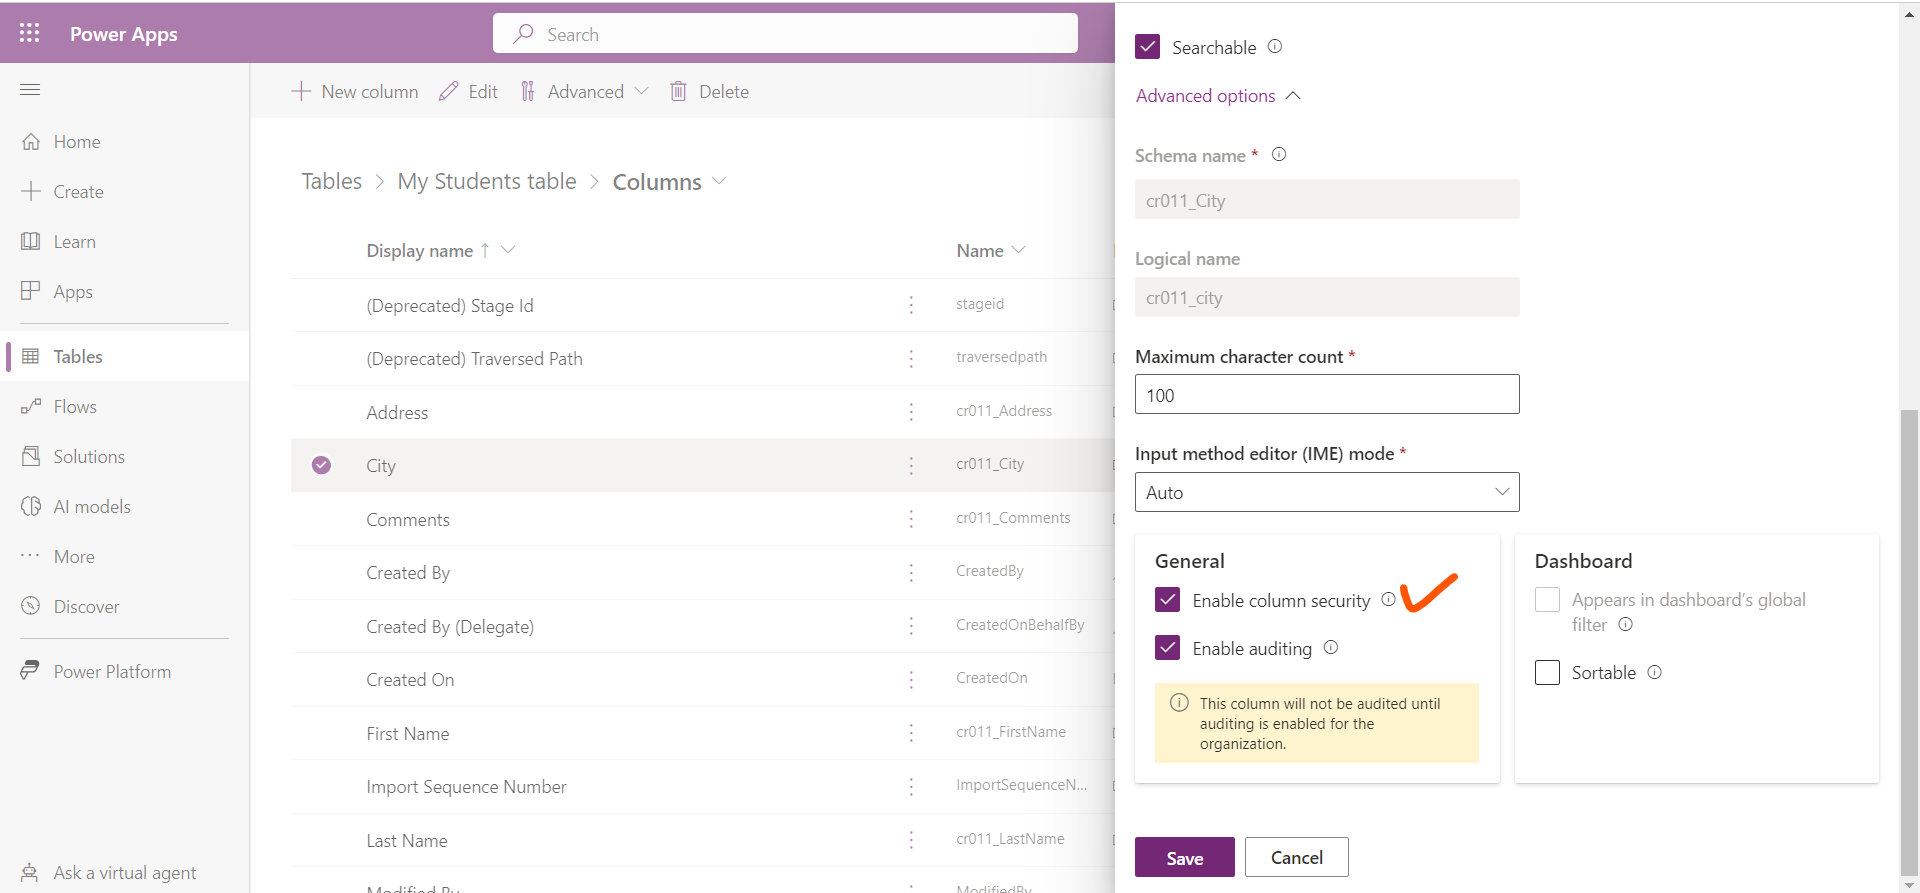
Step 6: Select Save to save the changes.
Step 7: Now it’s time to configure the security profiles and set permissions.
Step 8: Select Environments from the left navigation and then select environment to configure security profiles for. Select Settings >Users + permissions >Column security profiles.
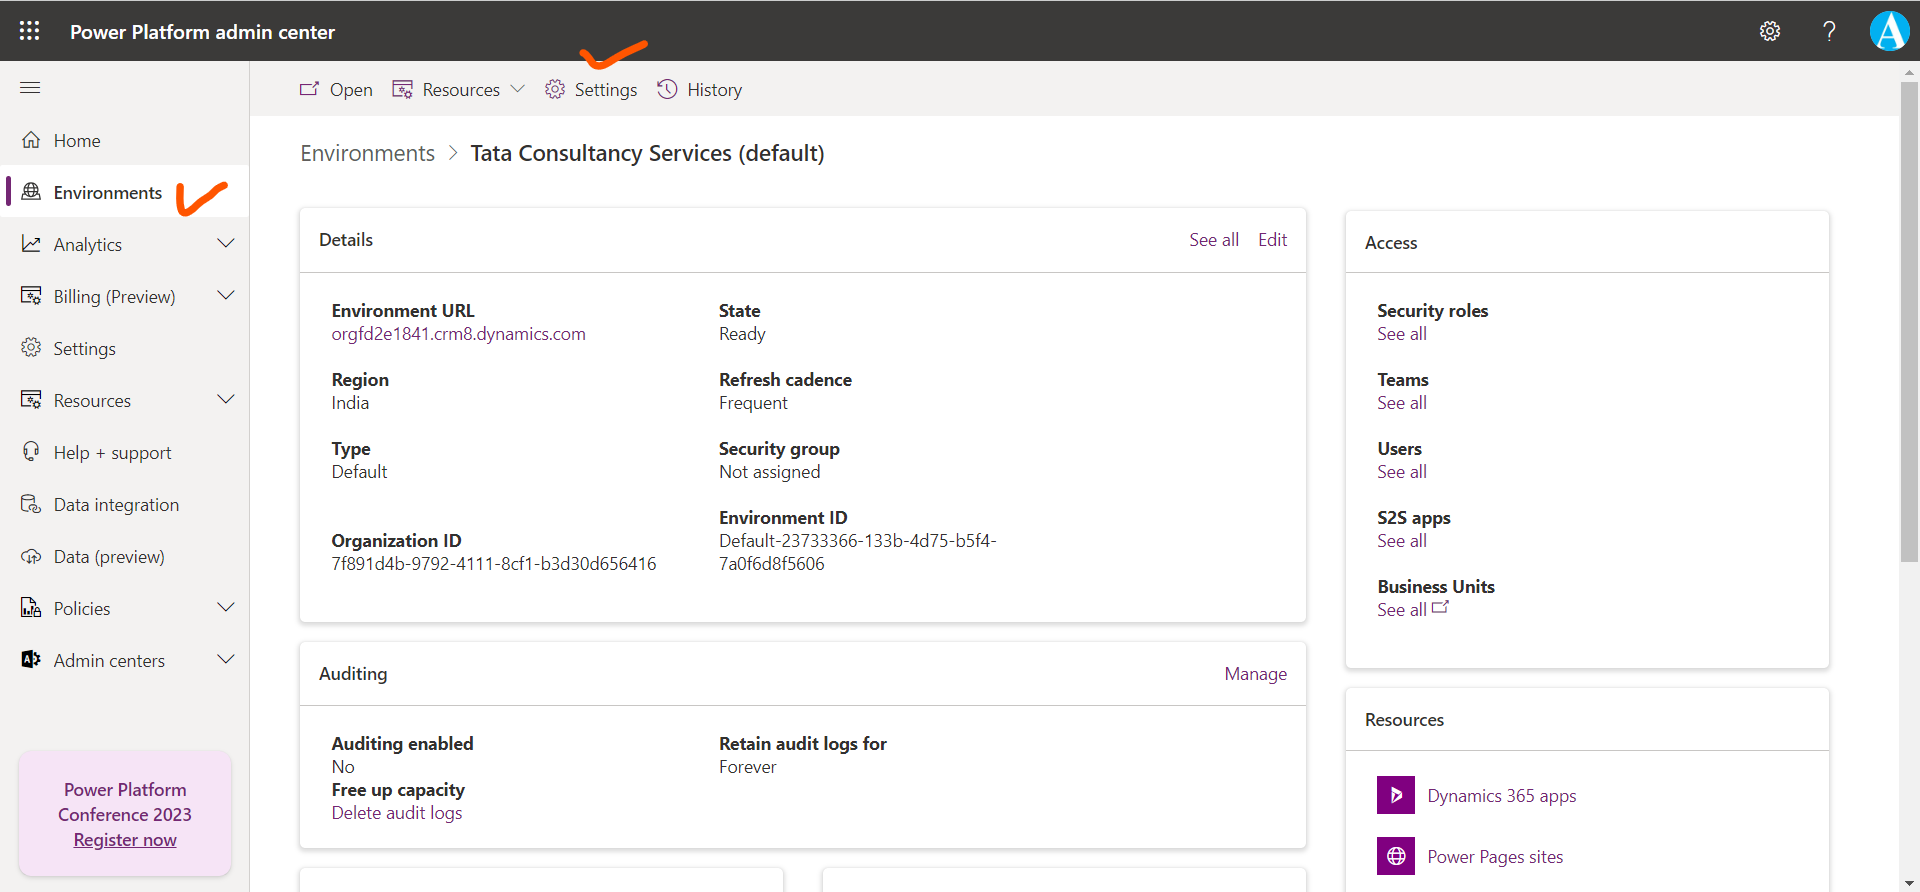
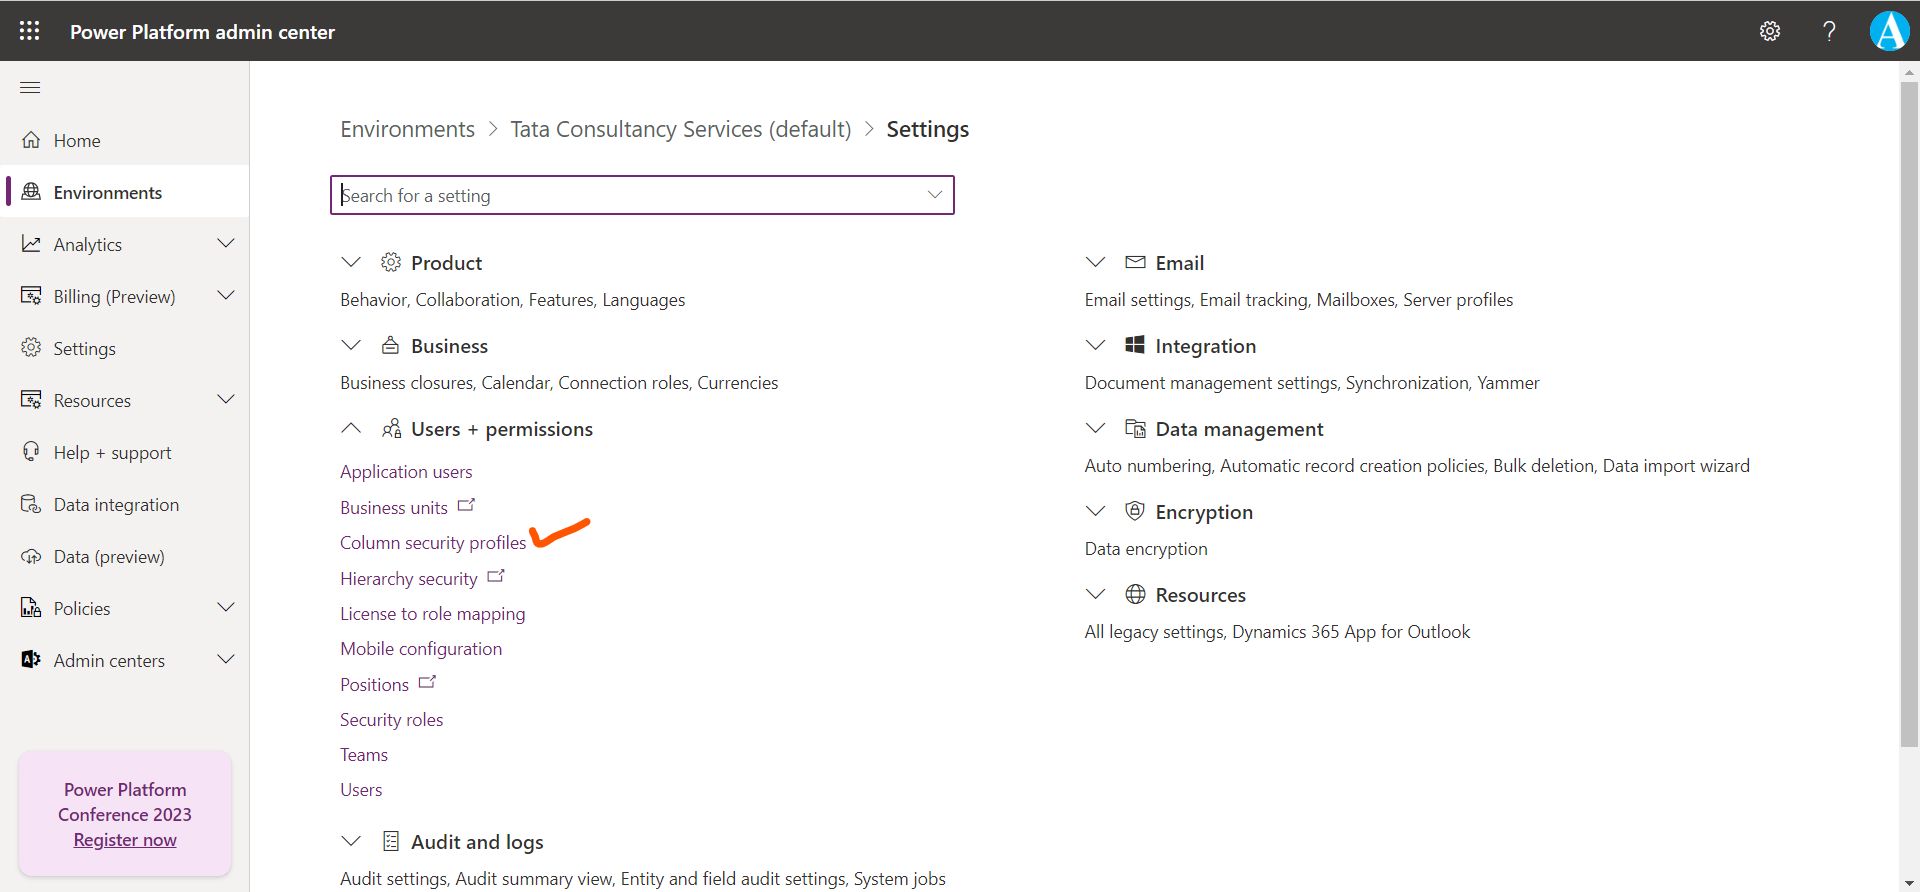
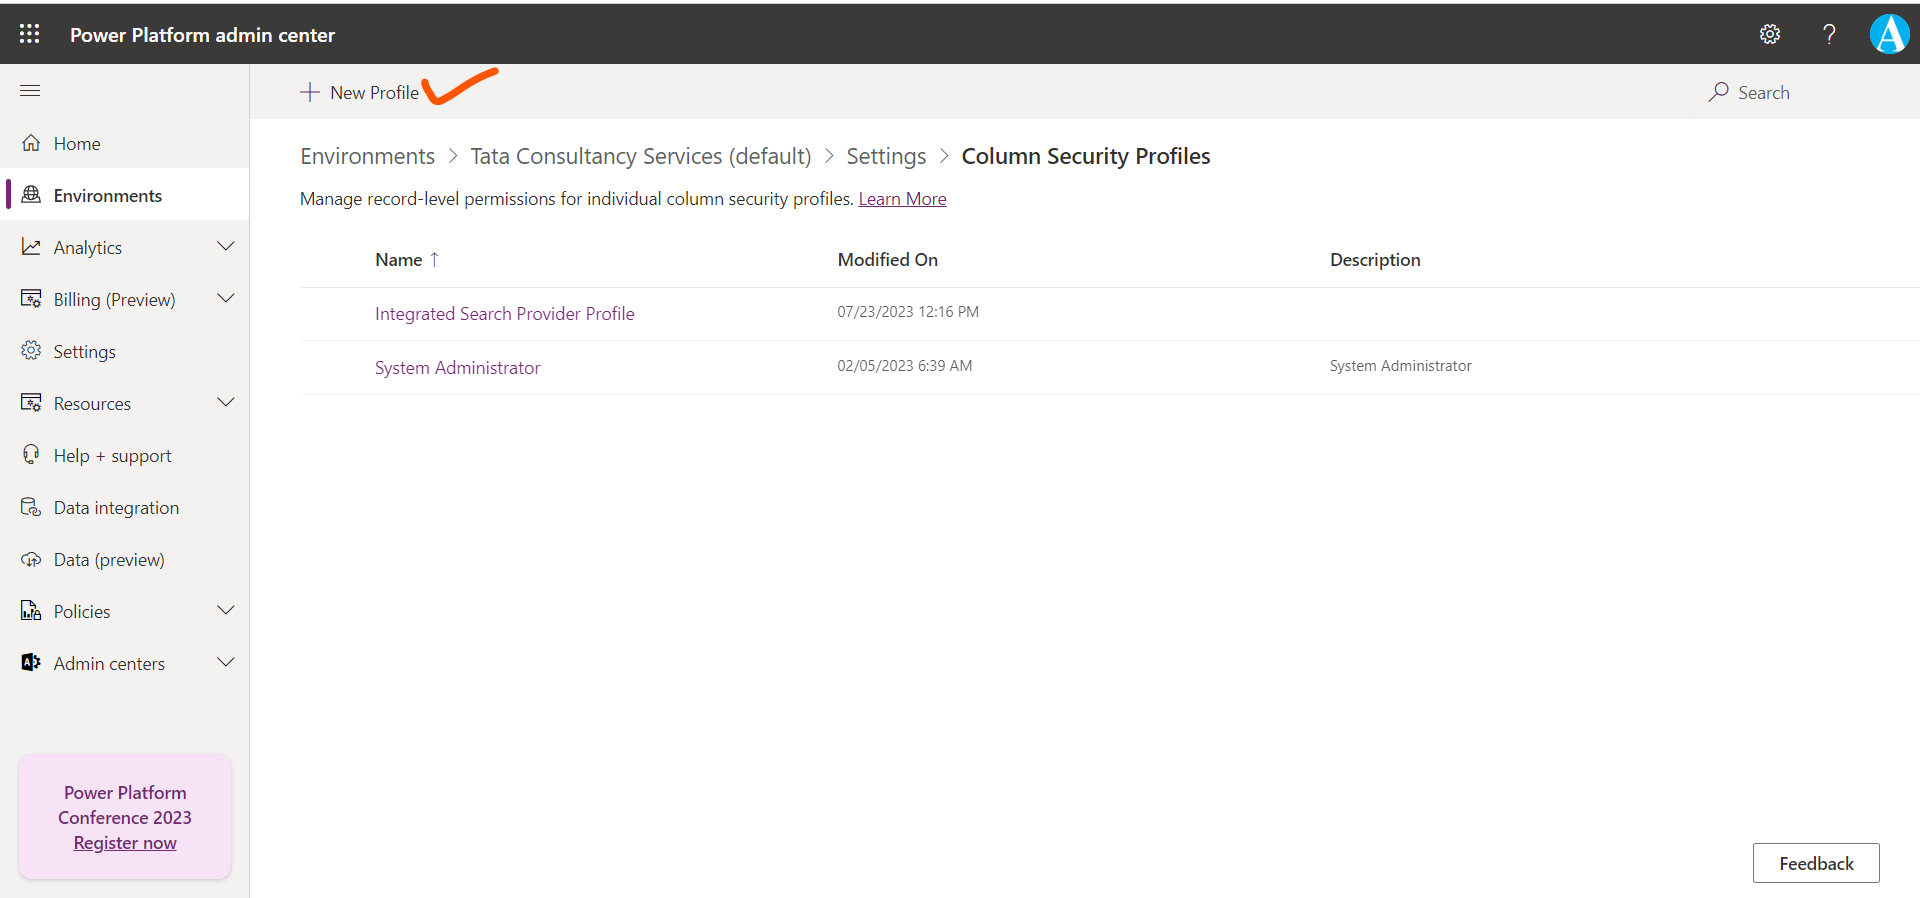
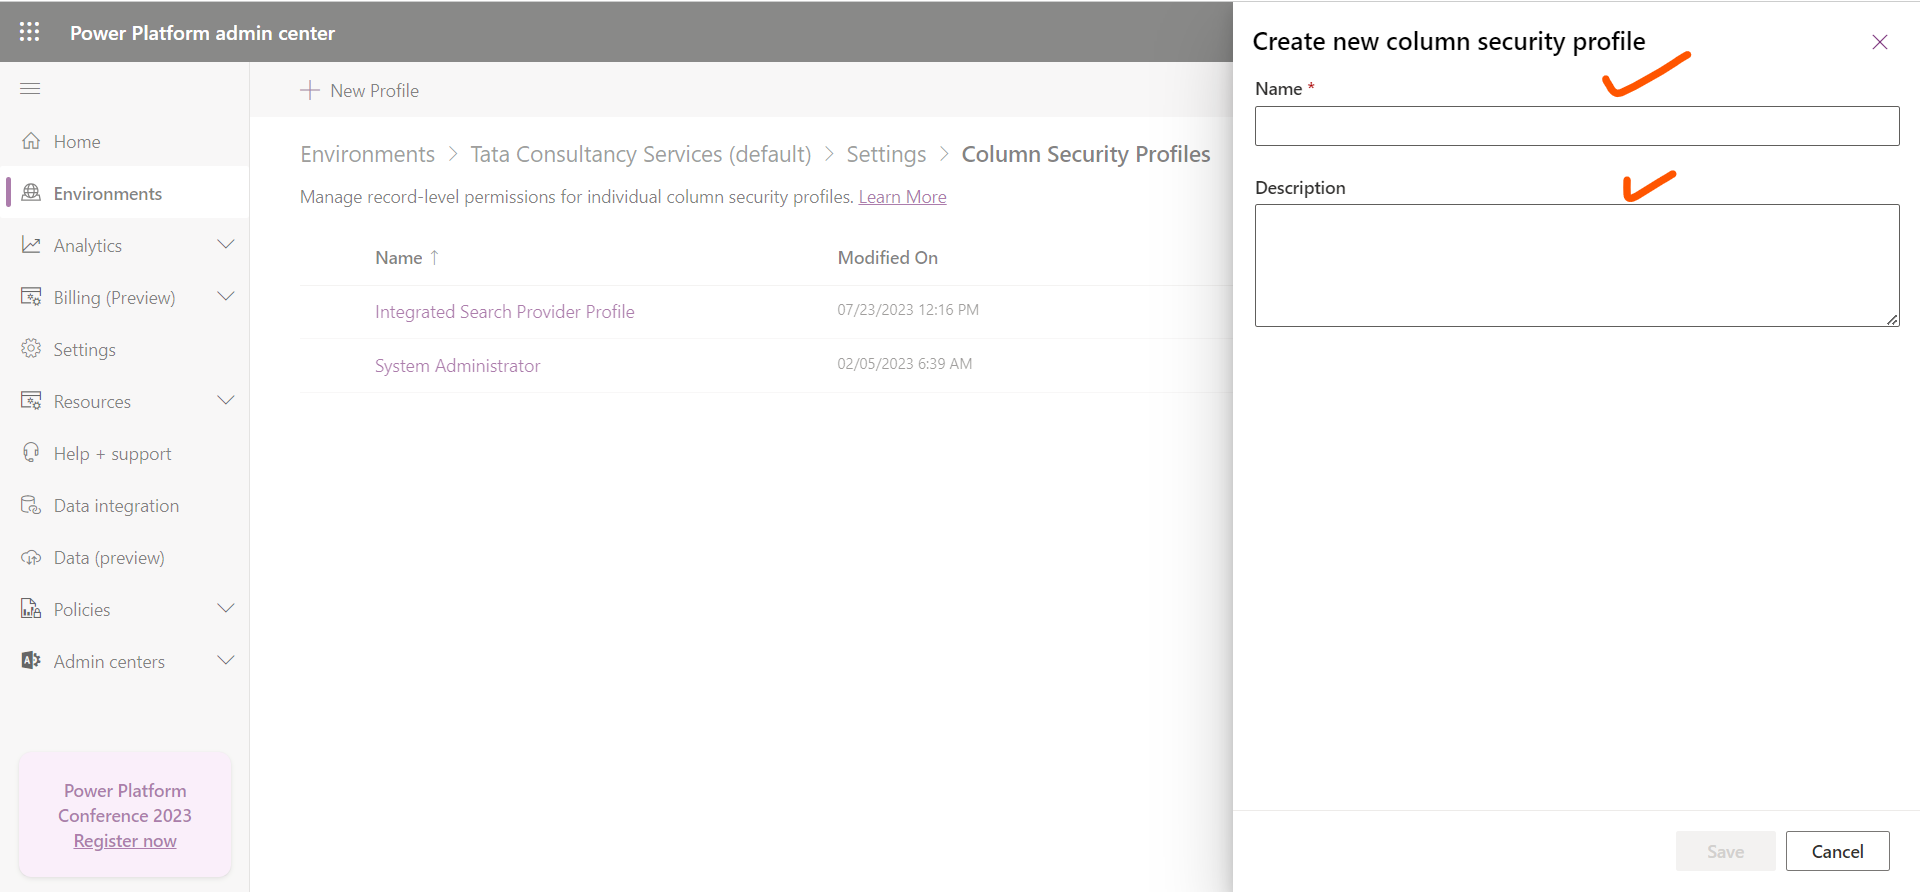
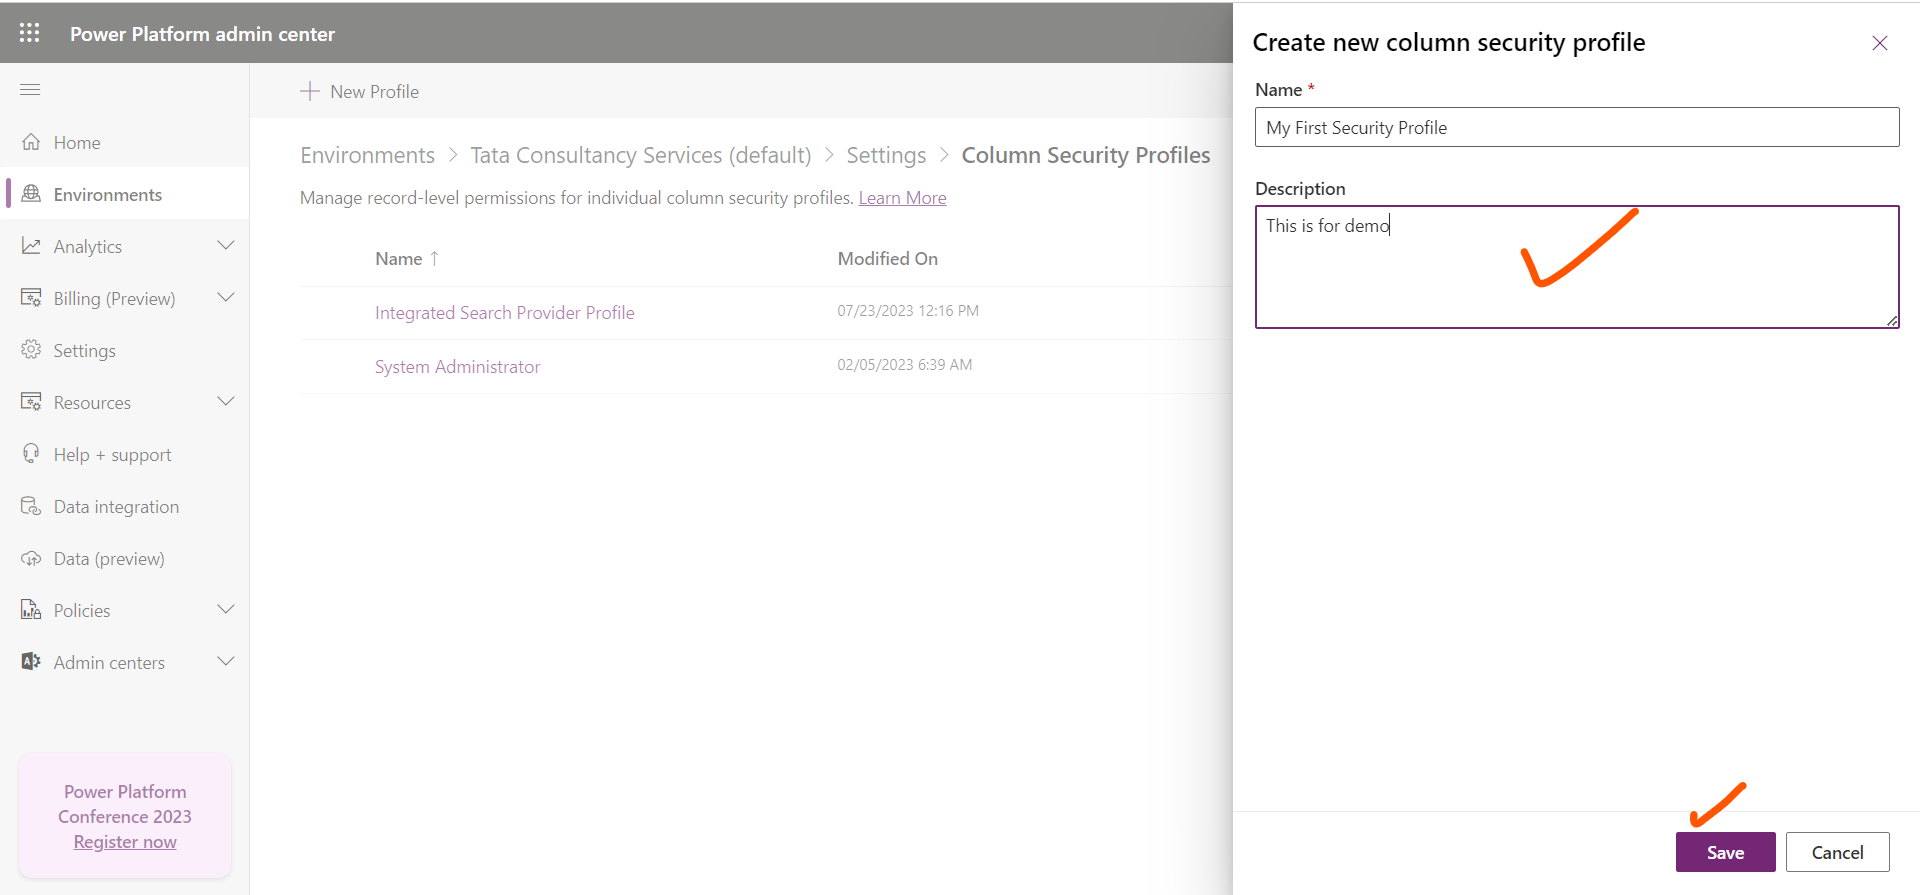
Step 9: Select an existing profile, or select + New Profile, enter a name, enter a description, and then select Save.
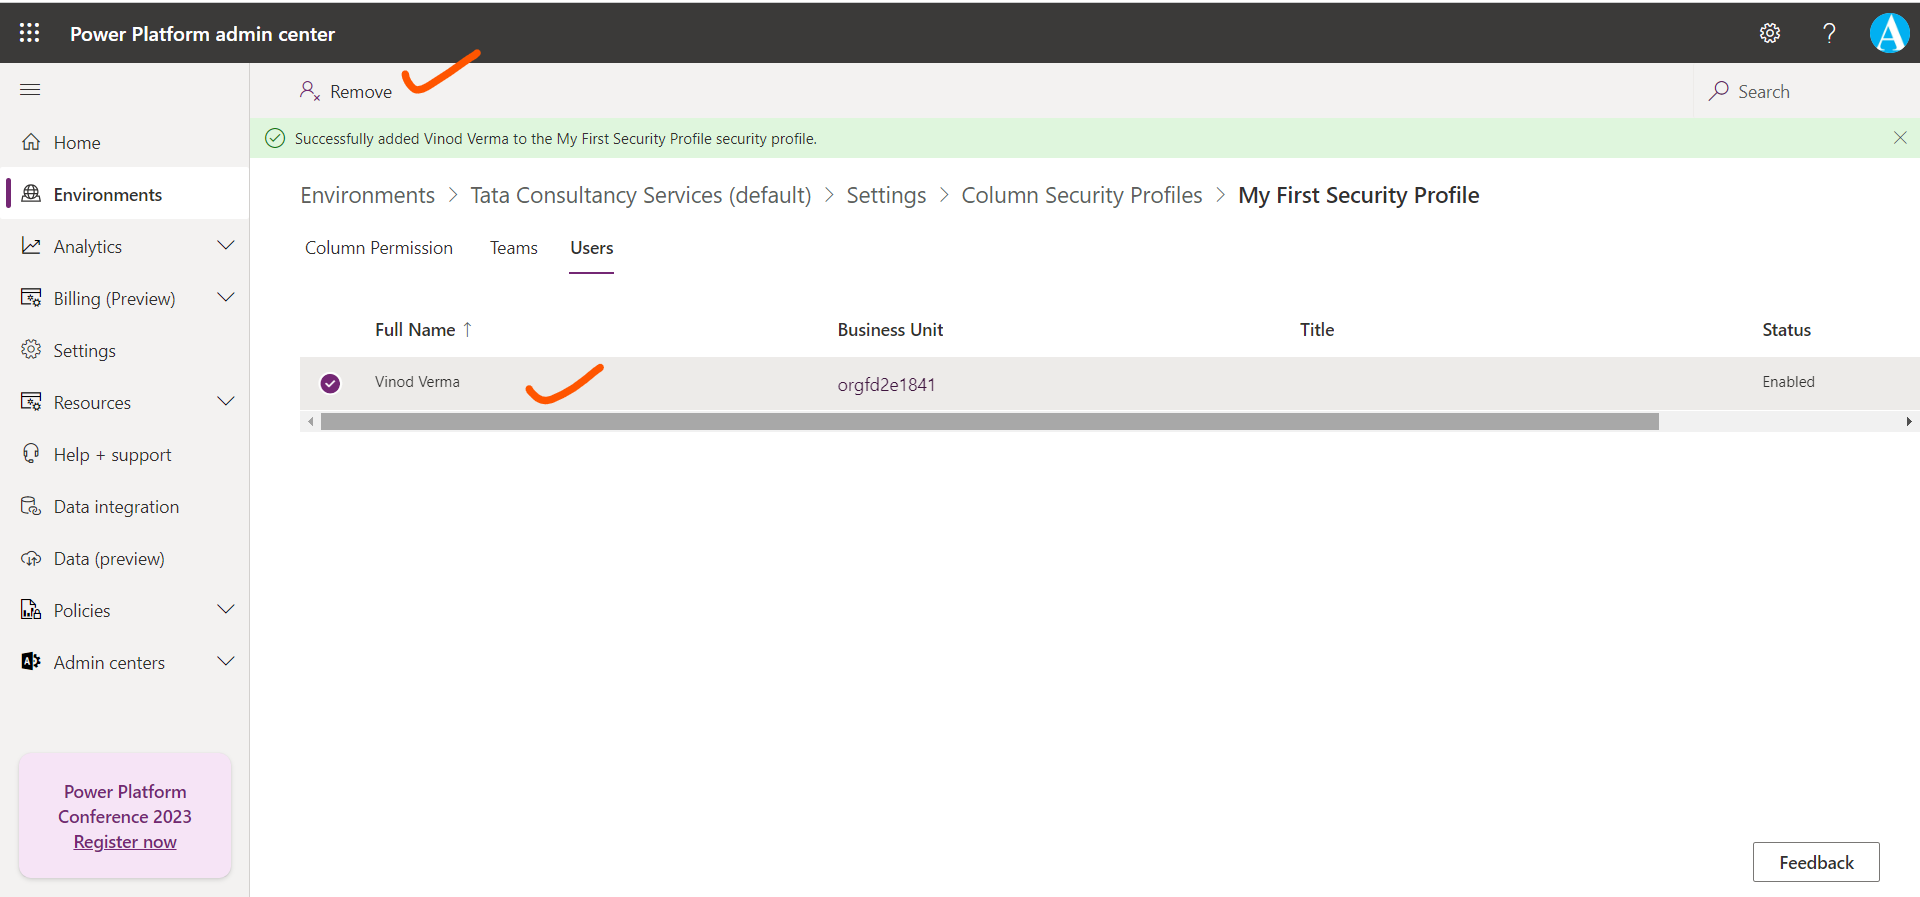
Step 10: Select the Users tab, select + Add Users, select the users that you want to control access, and then select Add.
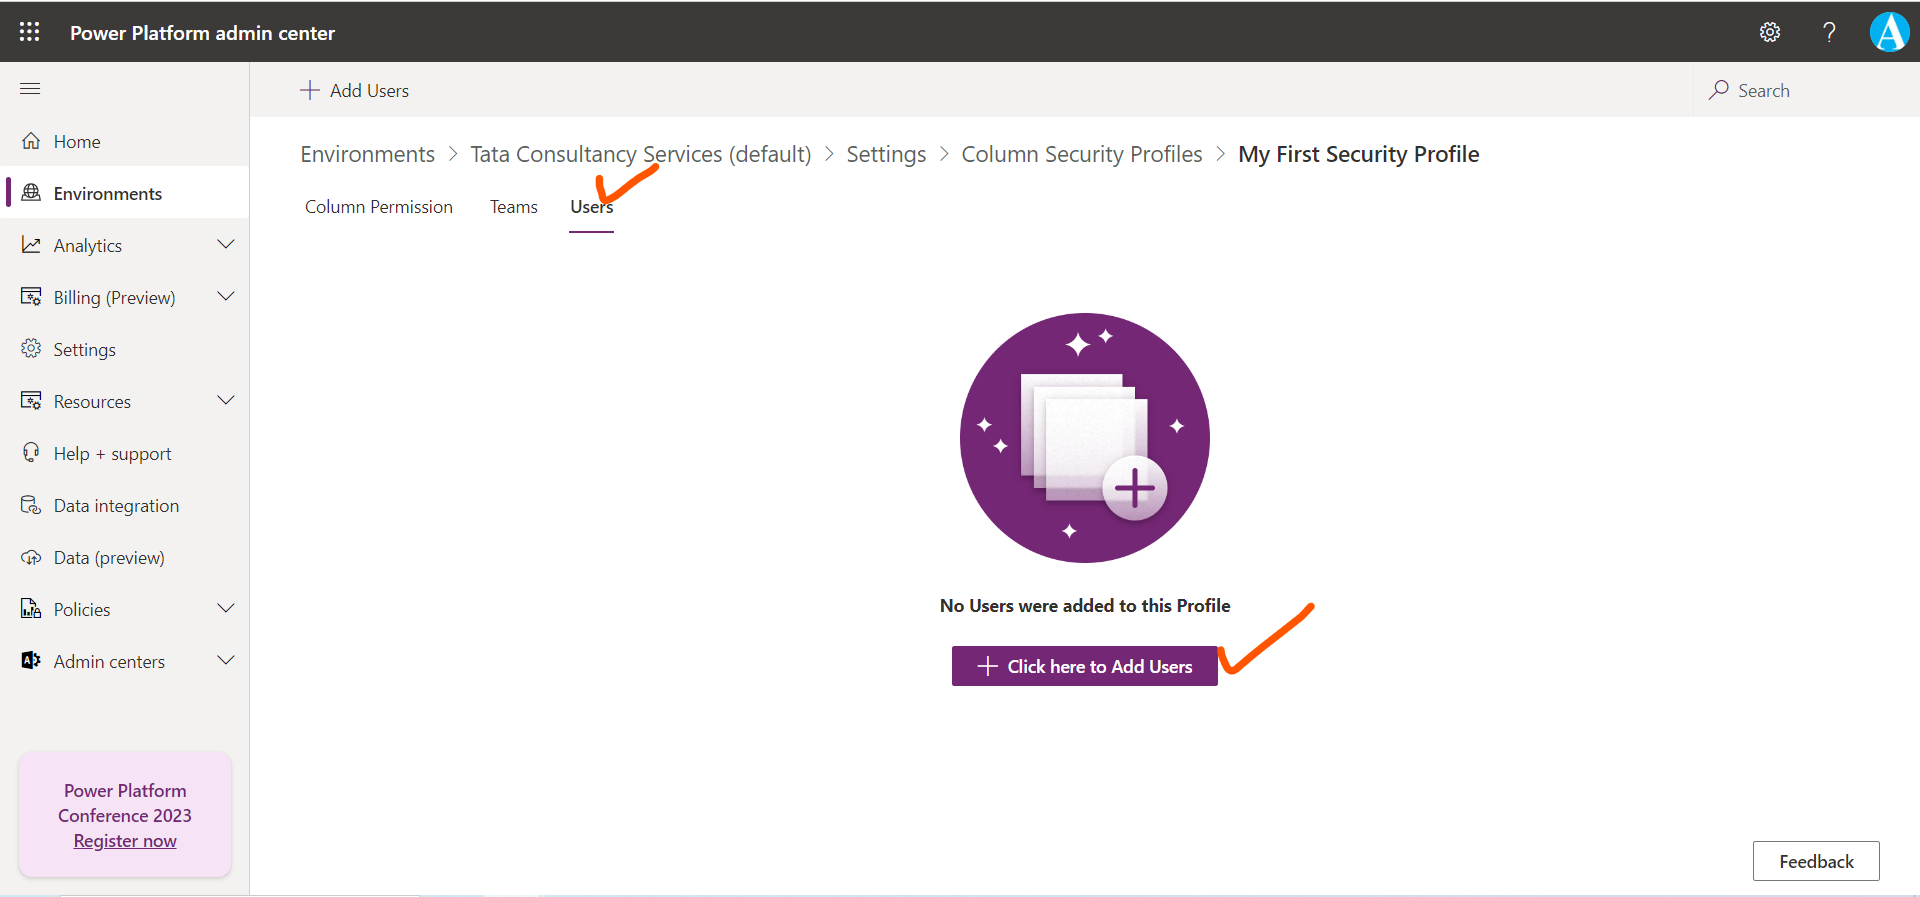
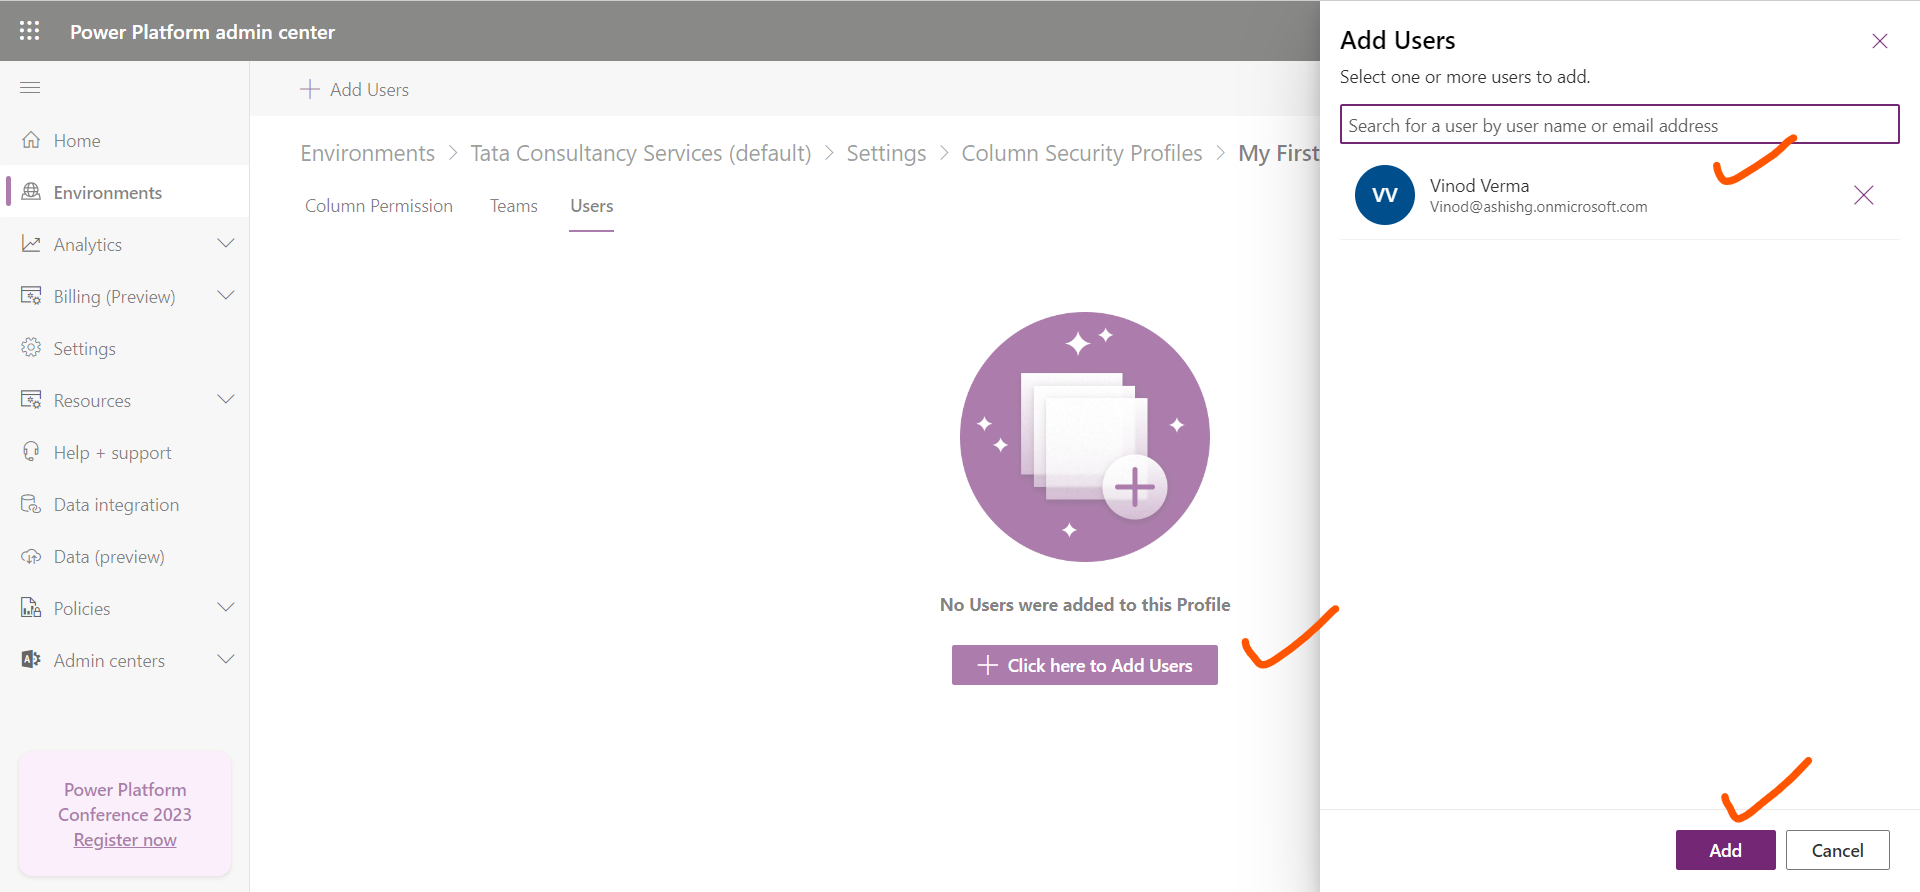
Tip Instead of adding each user, create one or more teams that include all users that you want to grant access.
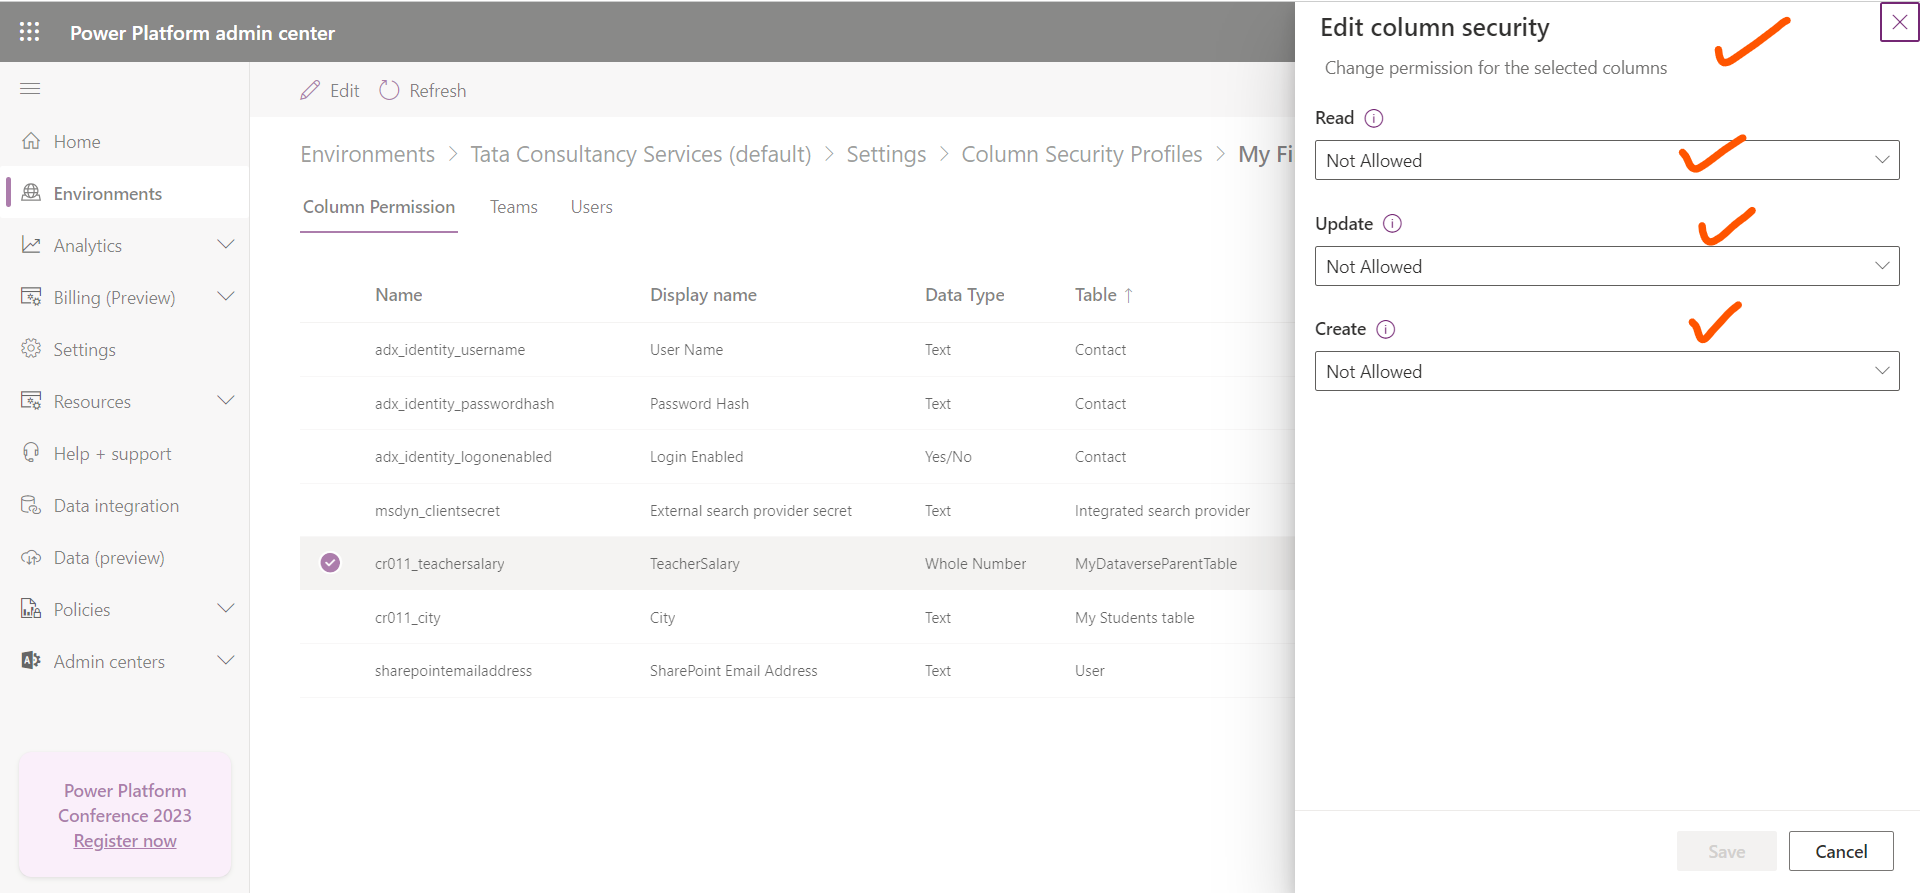
Step 11: Select the Column Permission tab, in the Name column select one or more columns, and then select Edit.
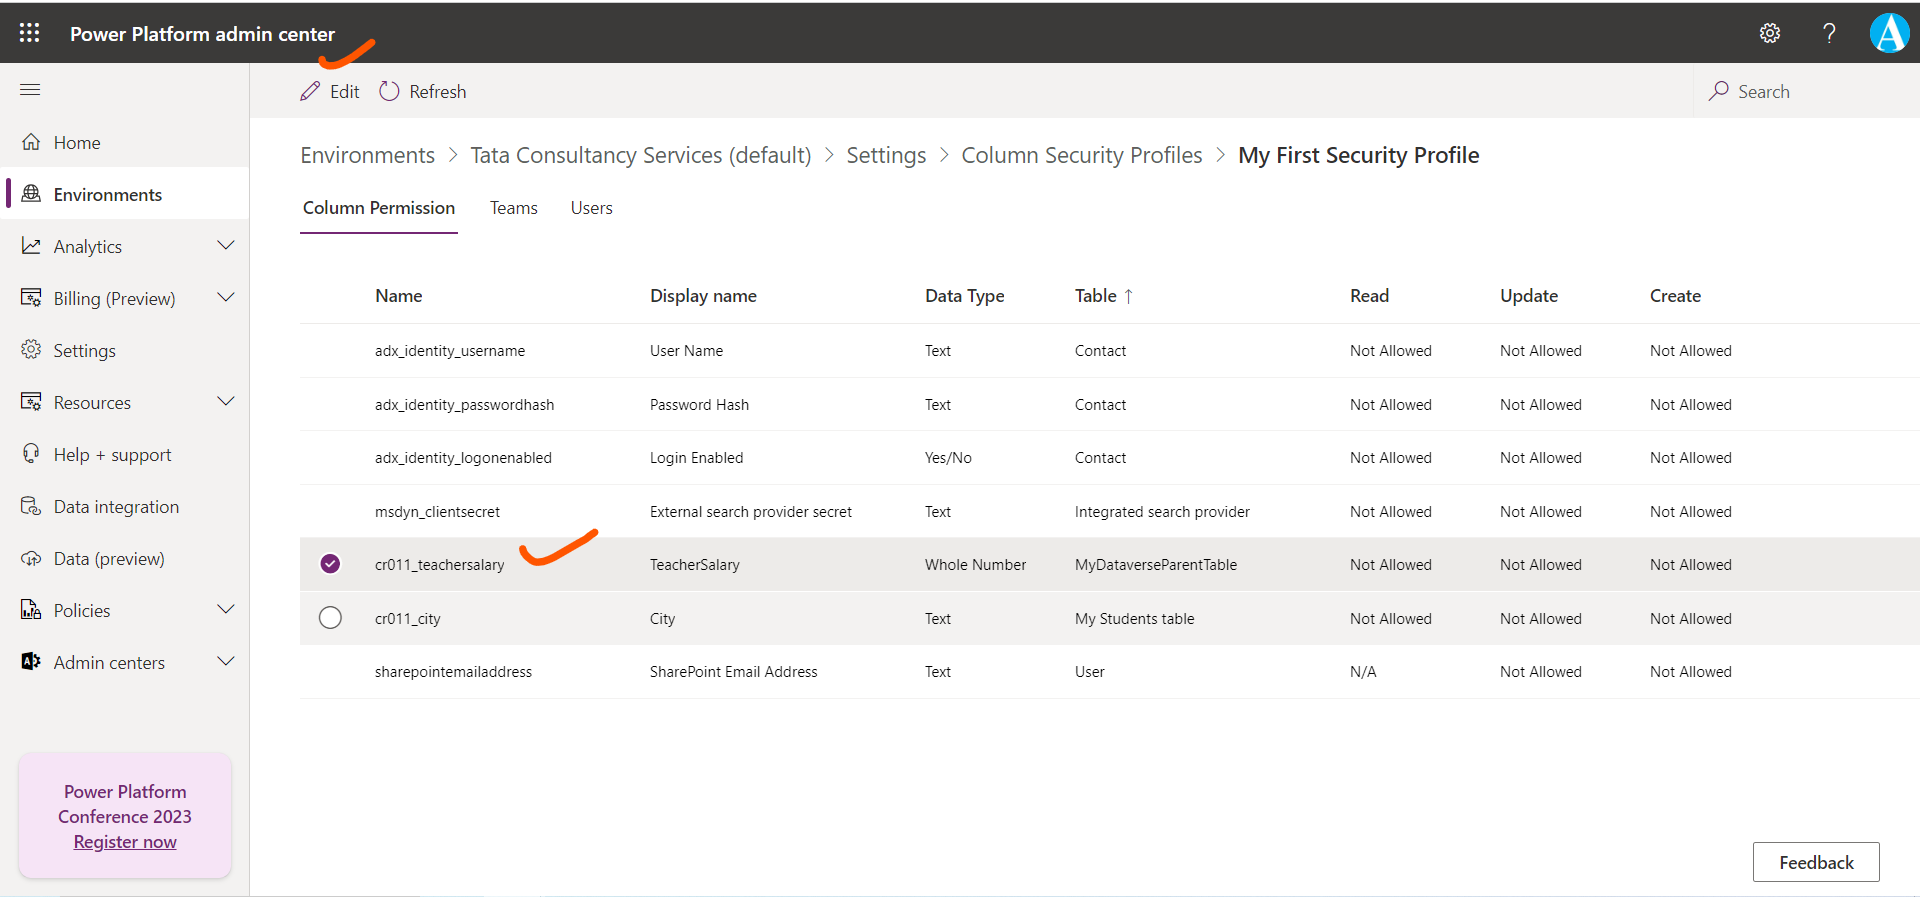
Edit the permissions and then select Save.
Any users not defined in the previously created column security profiles won't have access to the mobile phone column on contact forms or views. The column value displays ********, indicating that the column is secured.
Remove a User If we want to remove a user, select the user, and click on Remove.
