Form Control in PowerApps
1. Form Control in Power Apps
The Form control is used to work with an individual record from a data source. Forms can be used to view, edit, and create records.
There are two types of form controls: Edit Form and Display Form.
a) Edit Form: The Edit Form has the View, Edit, and New form modes. By using the Edit Form control, we can view or edit an existing record or add a new record to a datasource.
b) Display Form: The Display Form only has the View form mode. If we only want to view a record, the Display Form control can be used, although it has less customization options.
Note: When we add a Form control to our canvas, a panel helps us add our data source, modify the view, choose the columns to be displayed, and more. Note, forms work with all tabular data sources except collections.
2. Different modes of a Form control
The Edit Form control has three different display modes: View, Edit, and New. Each mode has some difference in the functionality available and affects the form's behavior.
• View mode -- In this mode, the form will present the information for the record, but the columns will not be editable.
• Edit mode -- In this mode, the form will present the information for the record, and all the editable columns will be editable. Remember, a form can have a mixture of editable and non-editable columns.
• New mode -- In this mode, the form will present all of the columns for a record, but the columns will be blank. The user will enter new data and create a new record.
Control the mode of the form control
A Form control has a default mode. We set the default mode using the Edit panel. The form mode can also be changed dynamically using a series of Power Apps functions. Each function is responsible for setting the mode to a specific value.
• ViewForm(Name_of_the_Form) – This function puts the form in view mode.
• EditForm(Name_of_the_Form) – This function puts the form in edit mode. The EditForm function changes the Form control's mode to FormMode.Edit. In this mode, the contents of the Form control's Item property are used to populate the form. If the SubmitForm function runs when the form is in this mode, a record is changed, not created. FormMode.Edit is the default for the Form control.
• NewForm(Name_of_the_Form) – This function puts the form in new mode (FormMode.New). In this mode, the contents of the Form control's Item property are ignored, and the default values of the Form's DataSource property populate the form. If the SubmitForm function runs when the form is in this mode, a record is created, not changed.
3. Adding and customizing an Edit form control
To add a form control to the screen in the Power apps studio, follow the following steps:
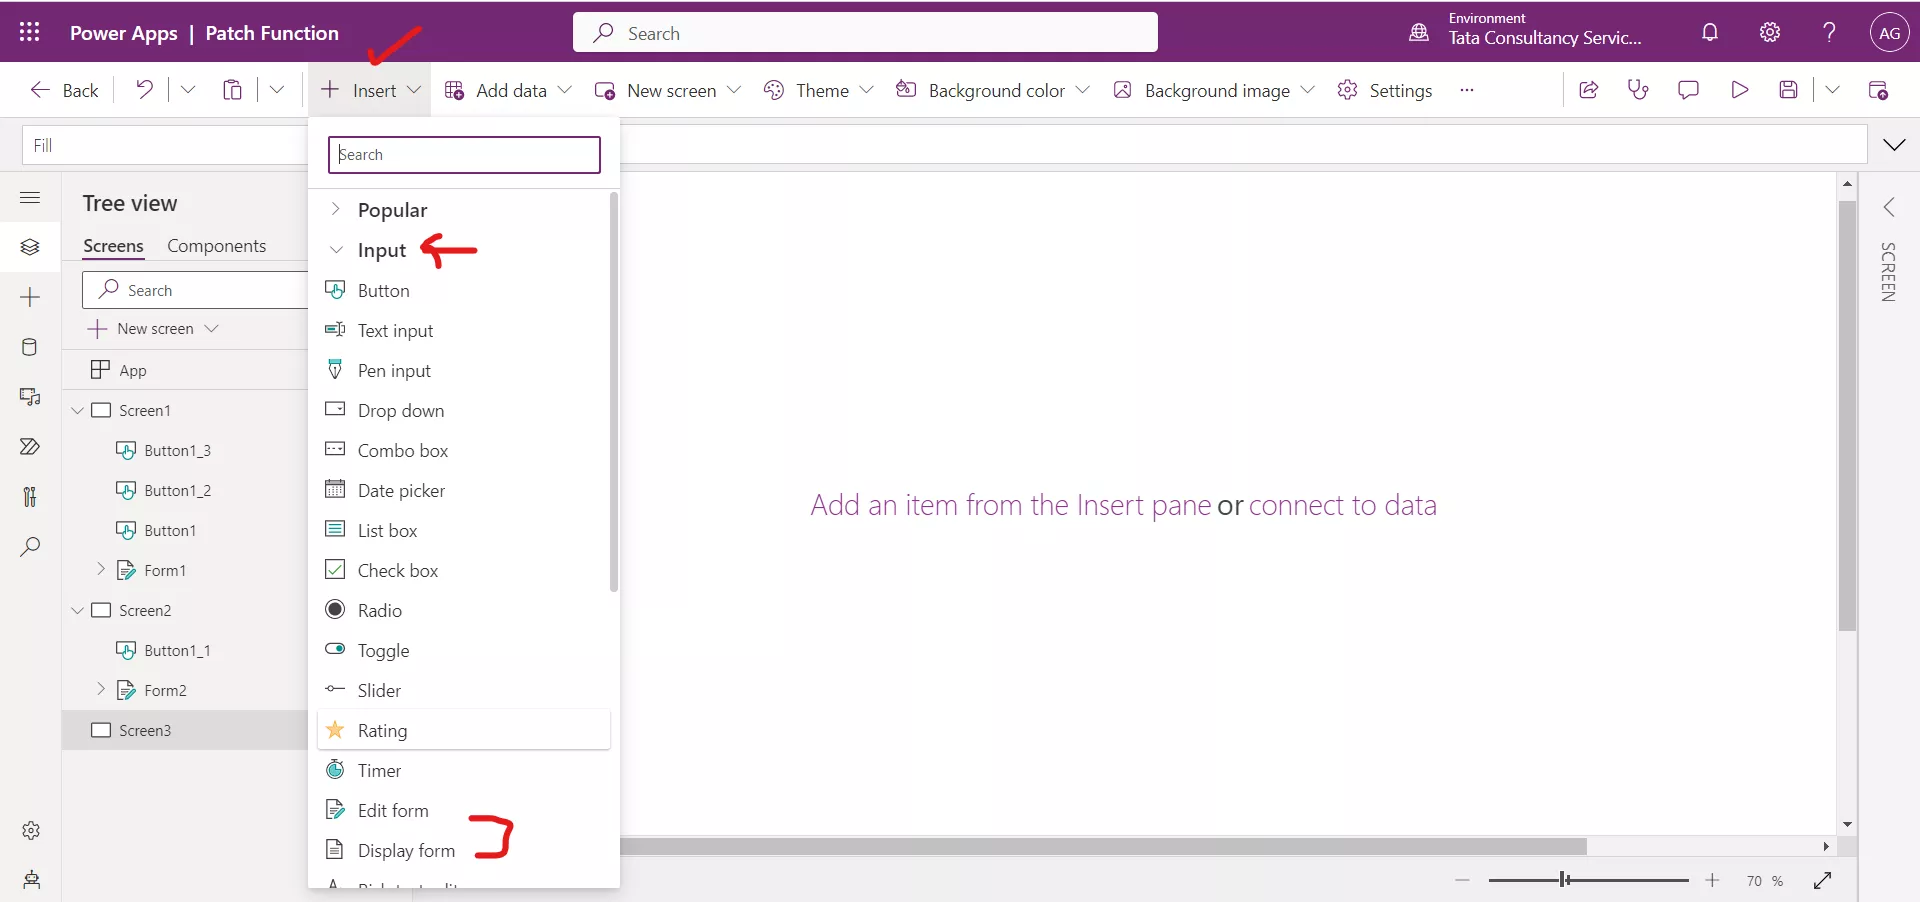
Step 1: Go to the Insert menu, and select Input category. We can choose from an Edit or Display form. Choose the form control which is needed if do not know then always choose Edit form control because it can also work as the Display form, and has more customization options than Display form.
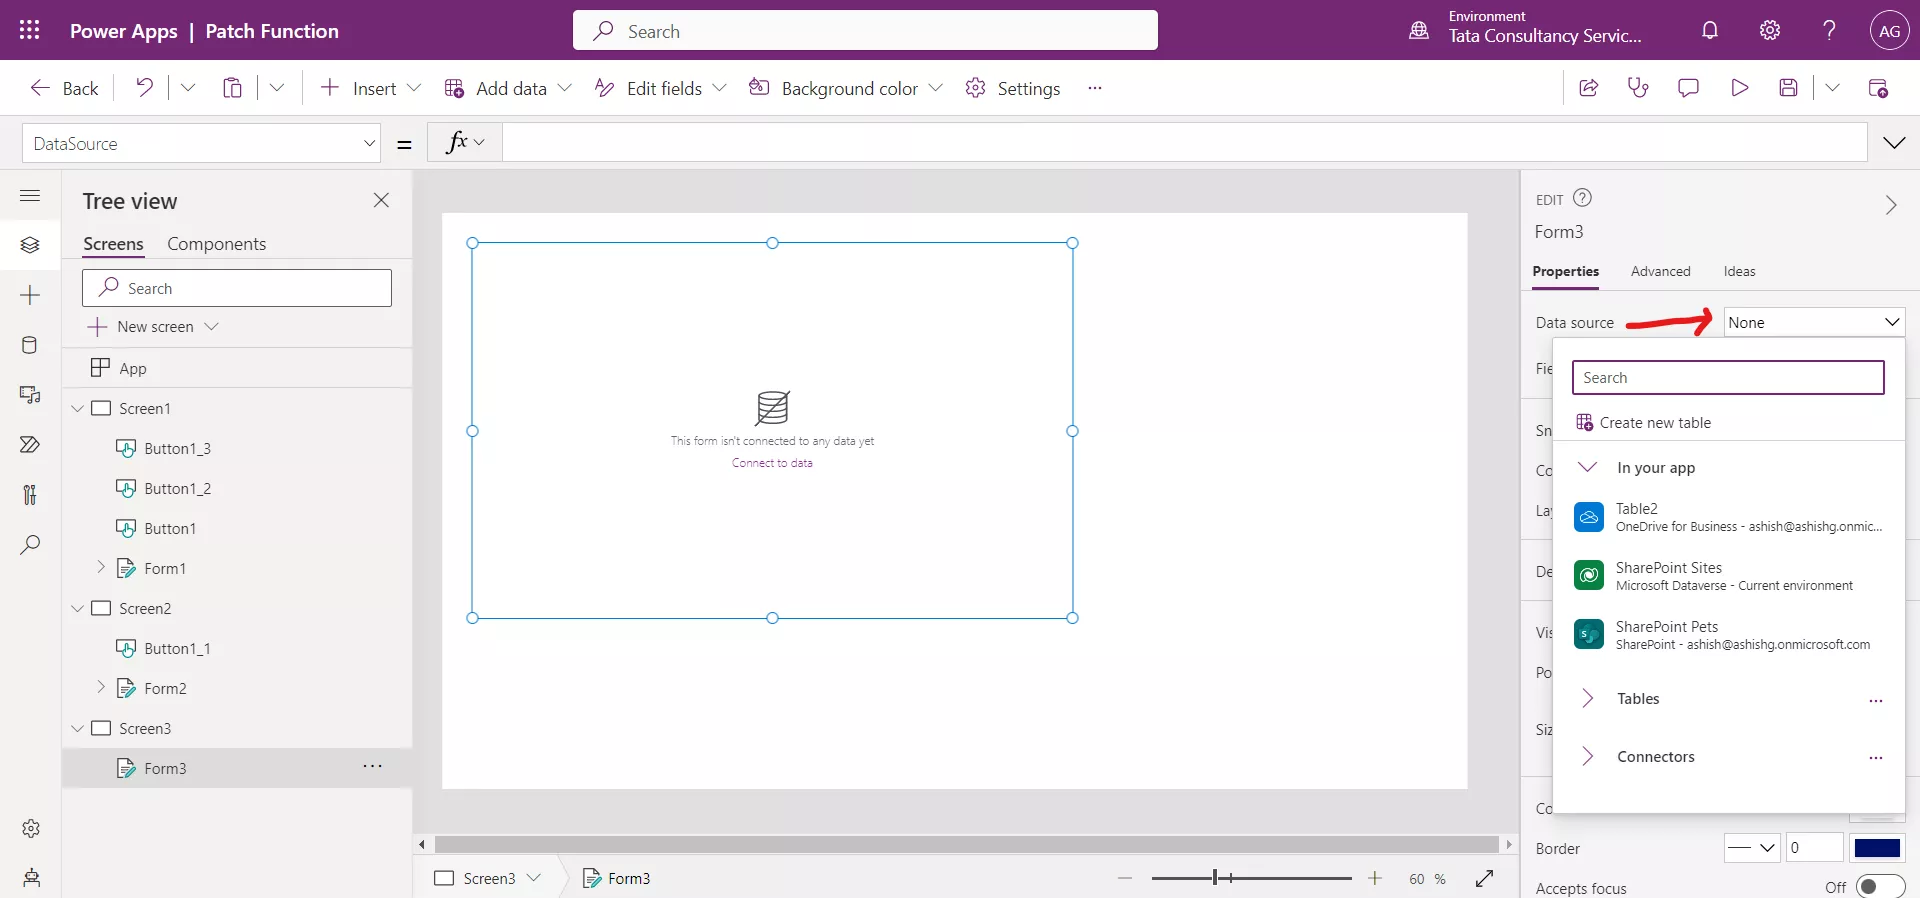
Step 2: After adding an Edit Form control to the canvas, the panel on the right side of the screen is available to configure the Form control.
The first step is to choose a data source. In the drop-down menu labeled None, we can choose from an existing data source or add a data source in the Power Apps.
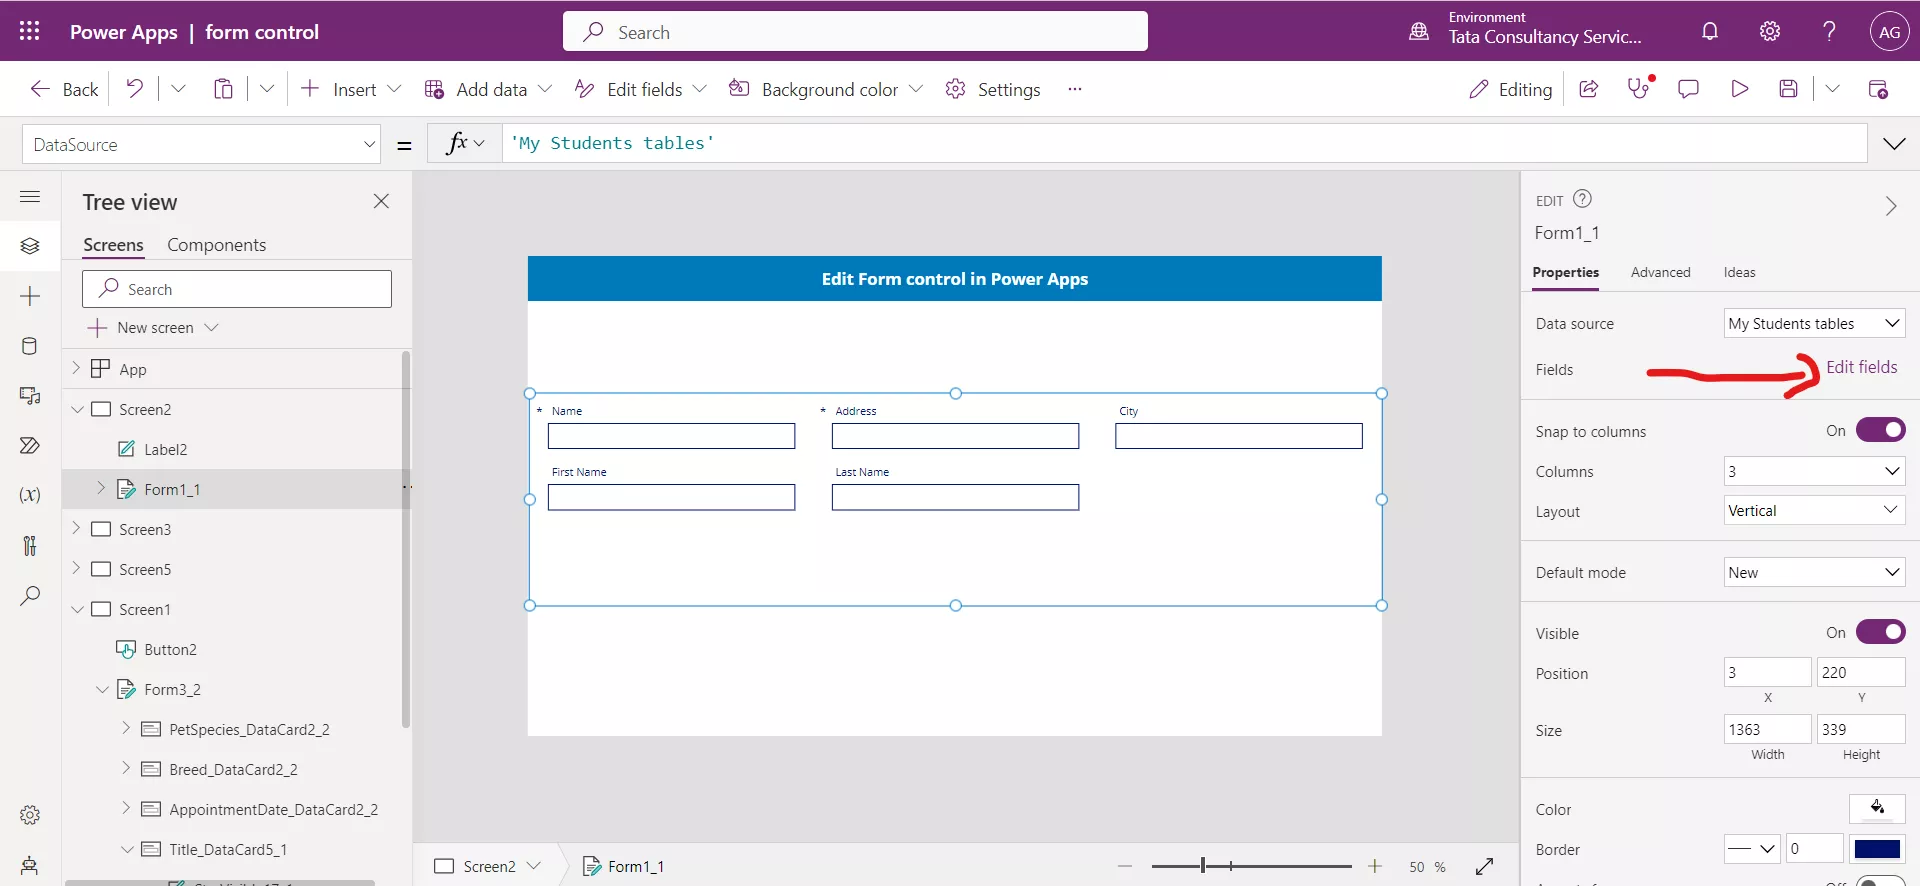
Step 3: After adding the data source some fields of the data source are automatically added to the form control. To control the number of fields in the form control, click on Edit fields and + Add field to select which columns we would like to display on the form. Select the checkbox in front of the columns and click on Add.
Let us suppose need to add “Comments” and “Created On” columns.
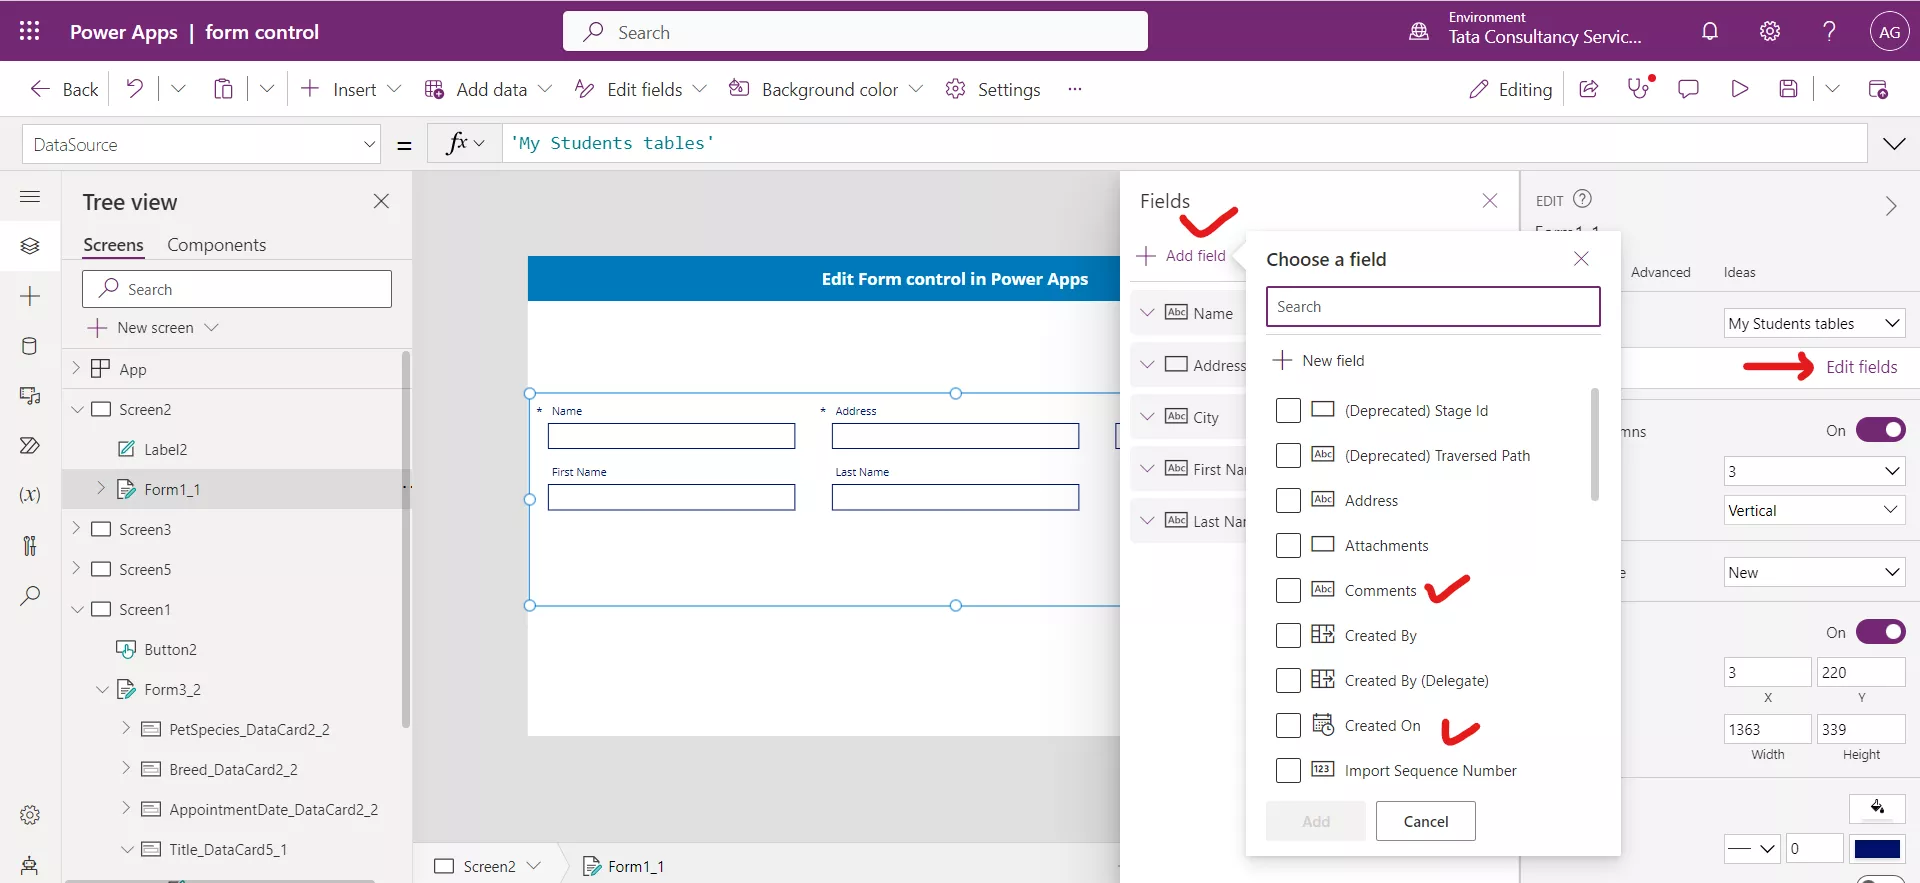
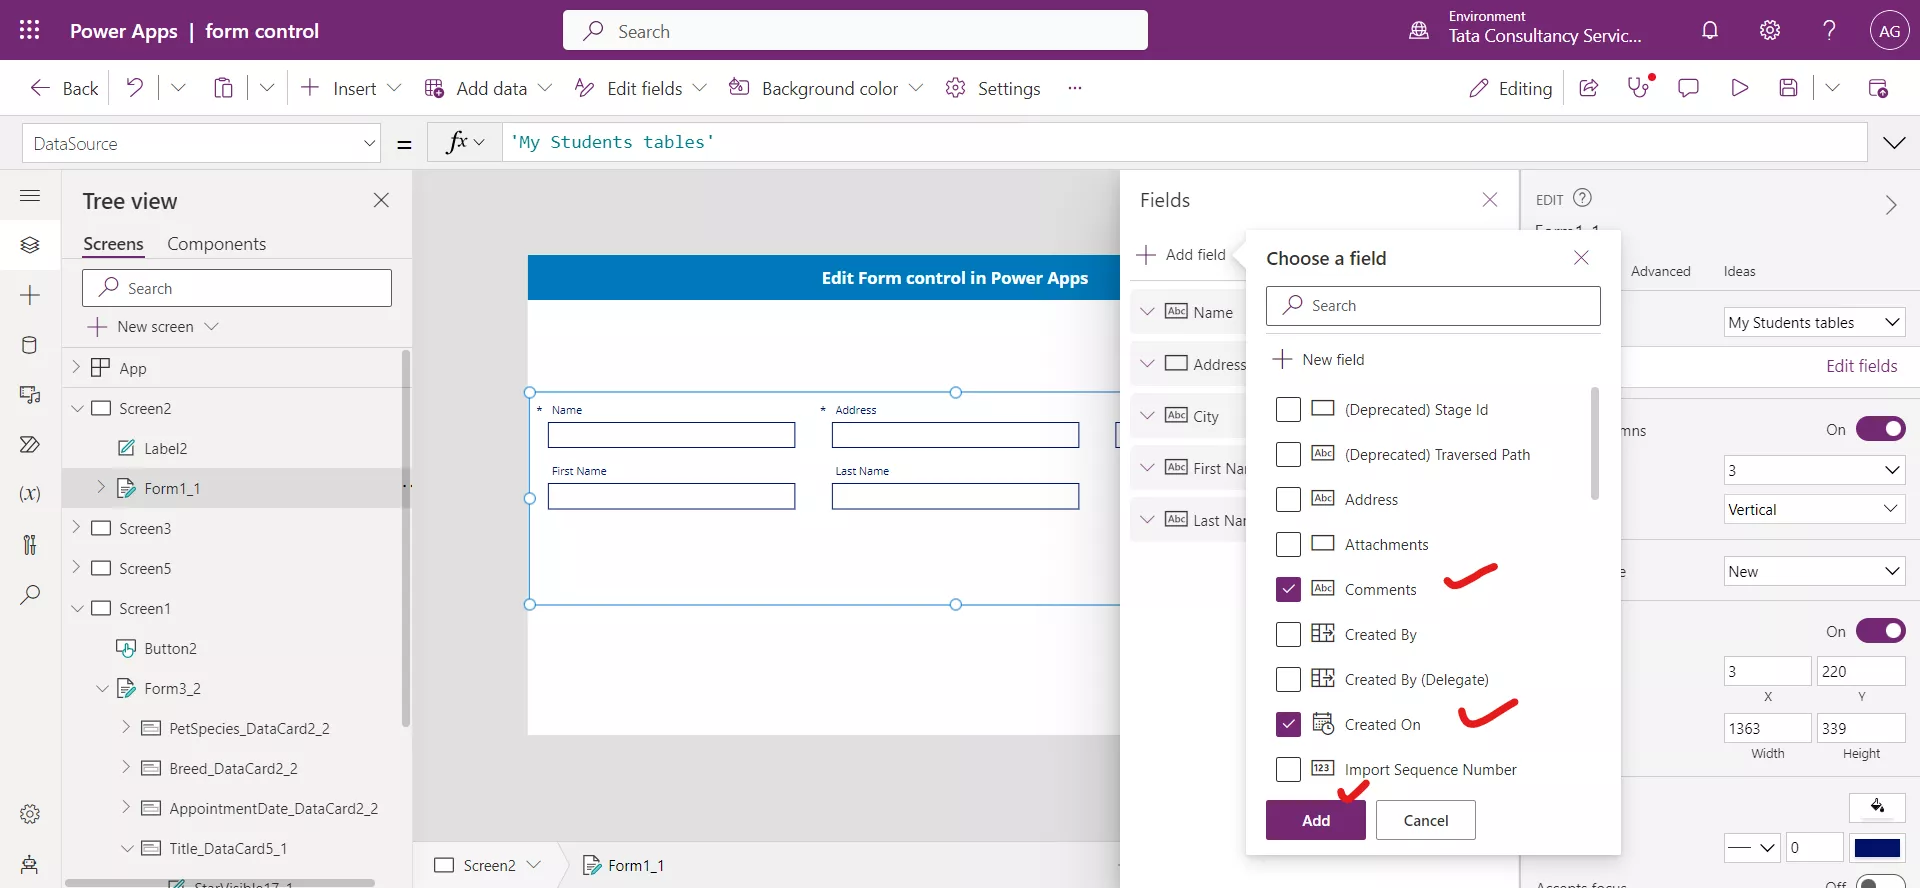
Check the boxes in front of these of columns and click on Add.
Both columns are added in the form, as shown in the following image.
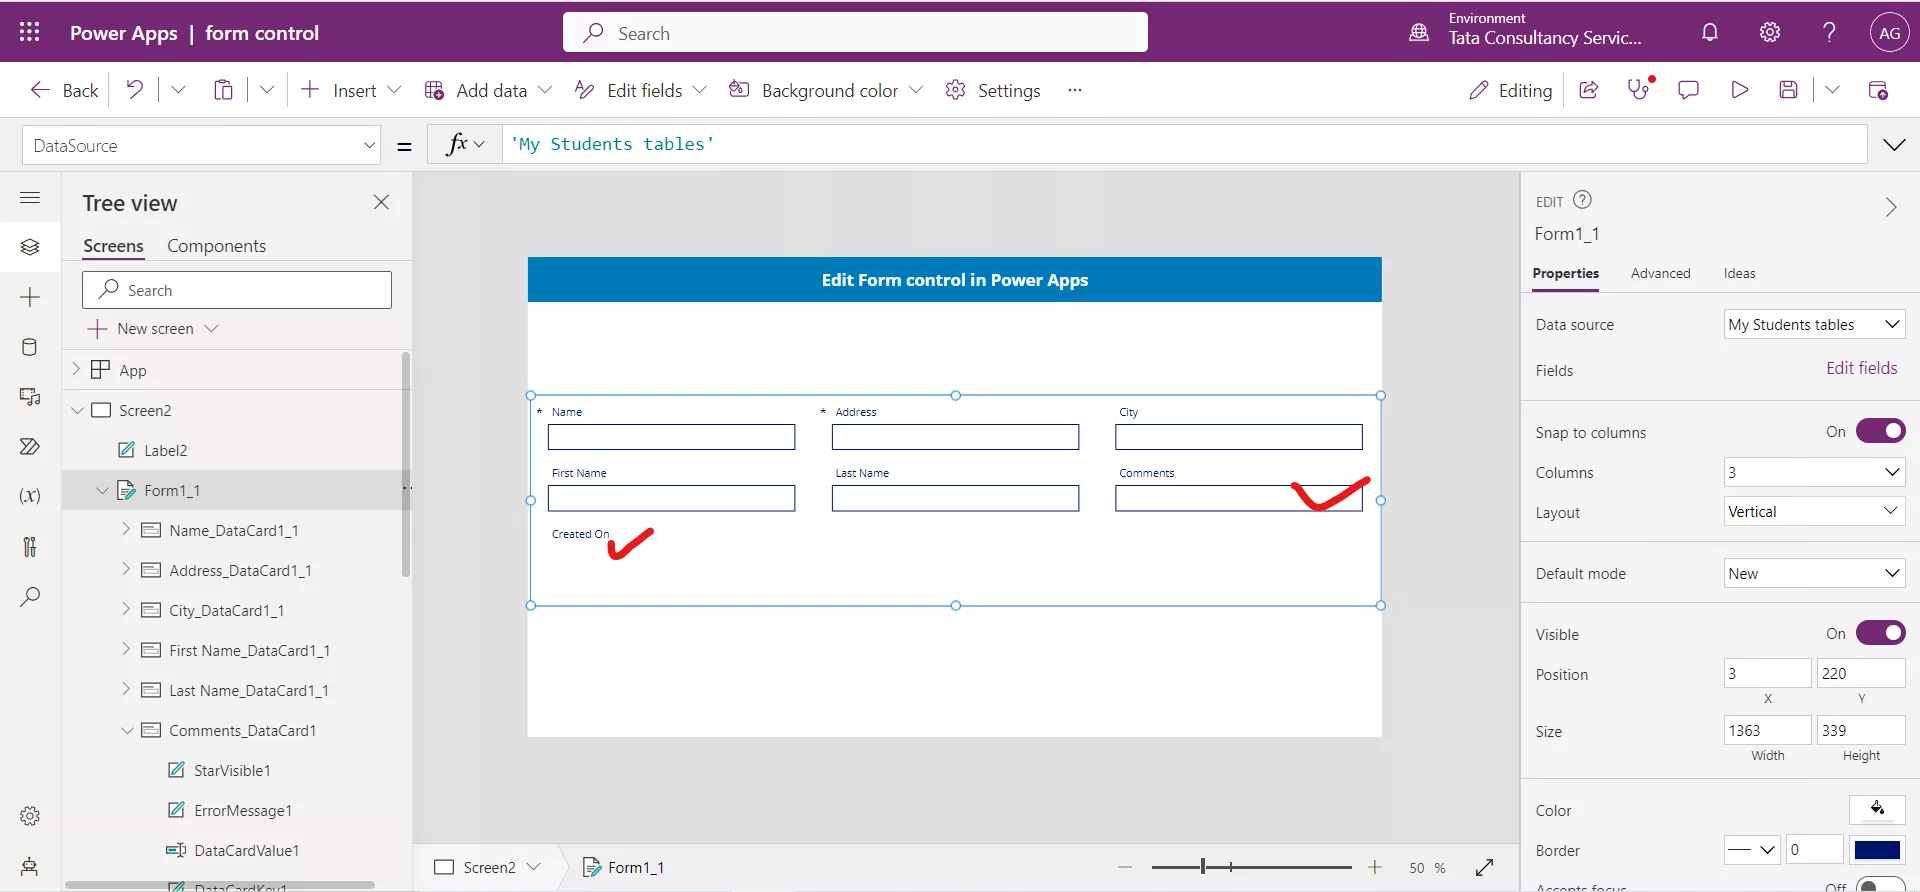
By selecting one or more of the columns, the Form control will add a data card for each column. Each card will be configured with a label to display the column name, an input control for working with the data, and other controls for handling error messages and required columns.
The Form control will automatically select the input control based on our column type. For many columns, there are multiple options available. We can change the Control type by clicking the drop-down menu for the column's card and selecting one of the other options.
For that again select the form control and click on Edit fields.
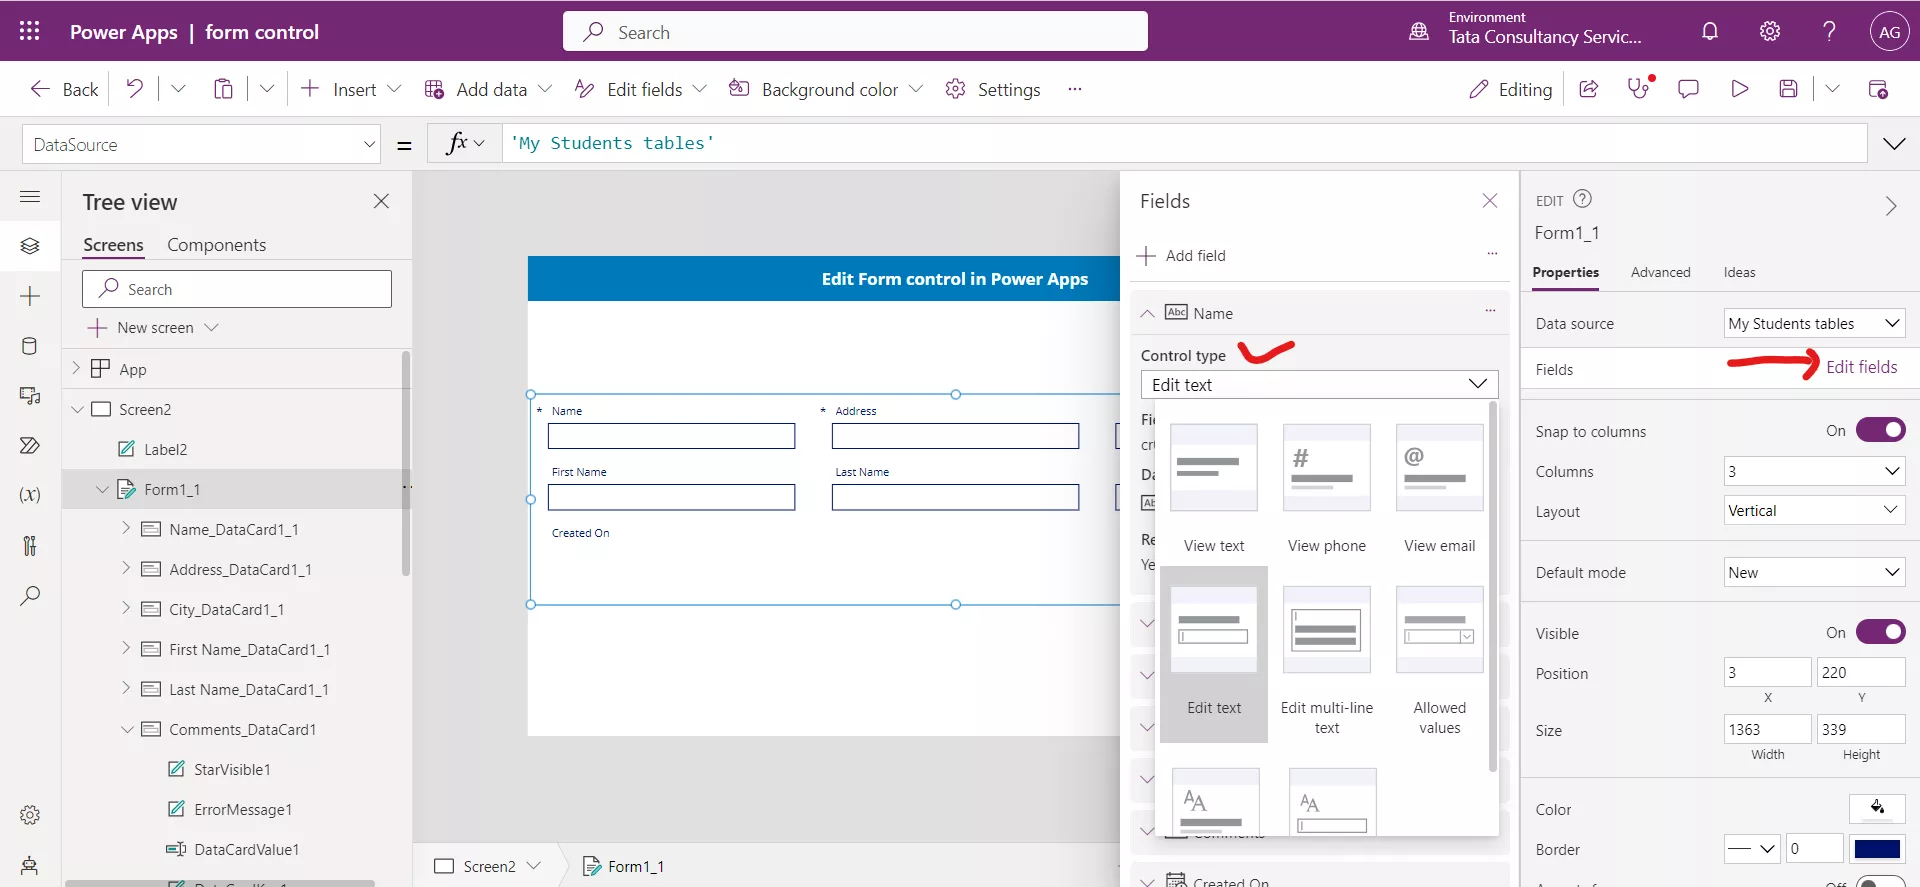
When changing control types, another configuration may be required. For example, if we change a Text column from the Edit text control type to Allowed Values we might need to configure the values in the drop-down list. Before we can customize the drop-down control inside the card, we will need to unlock the card.
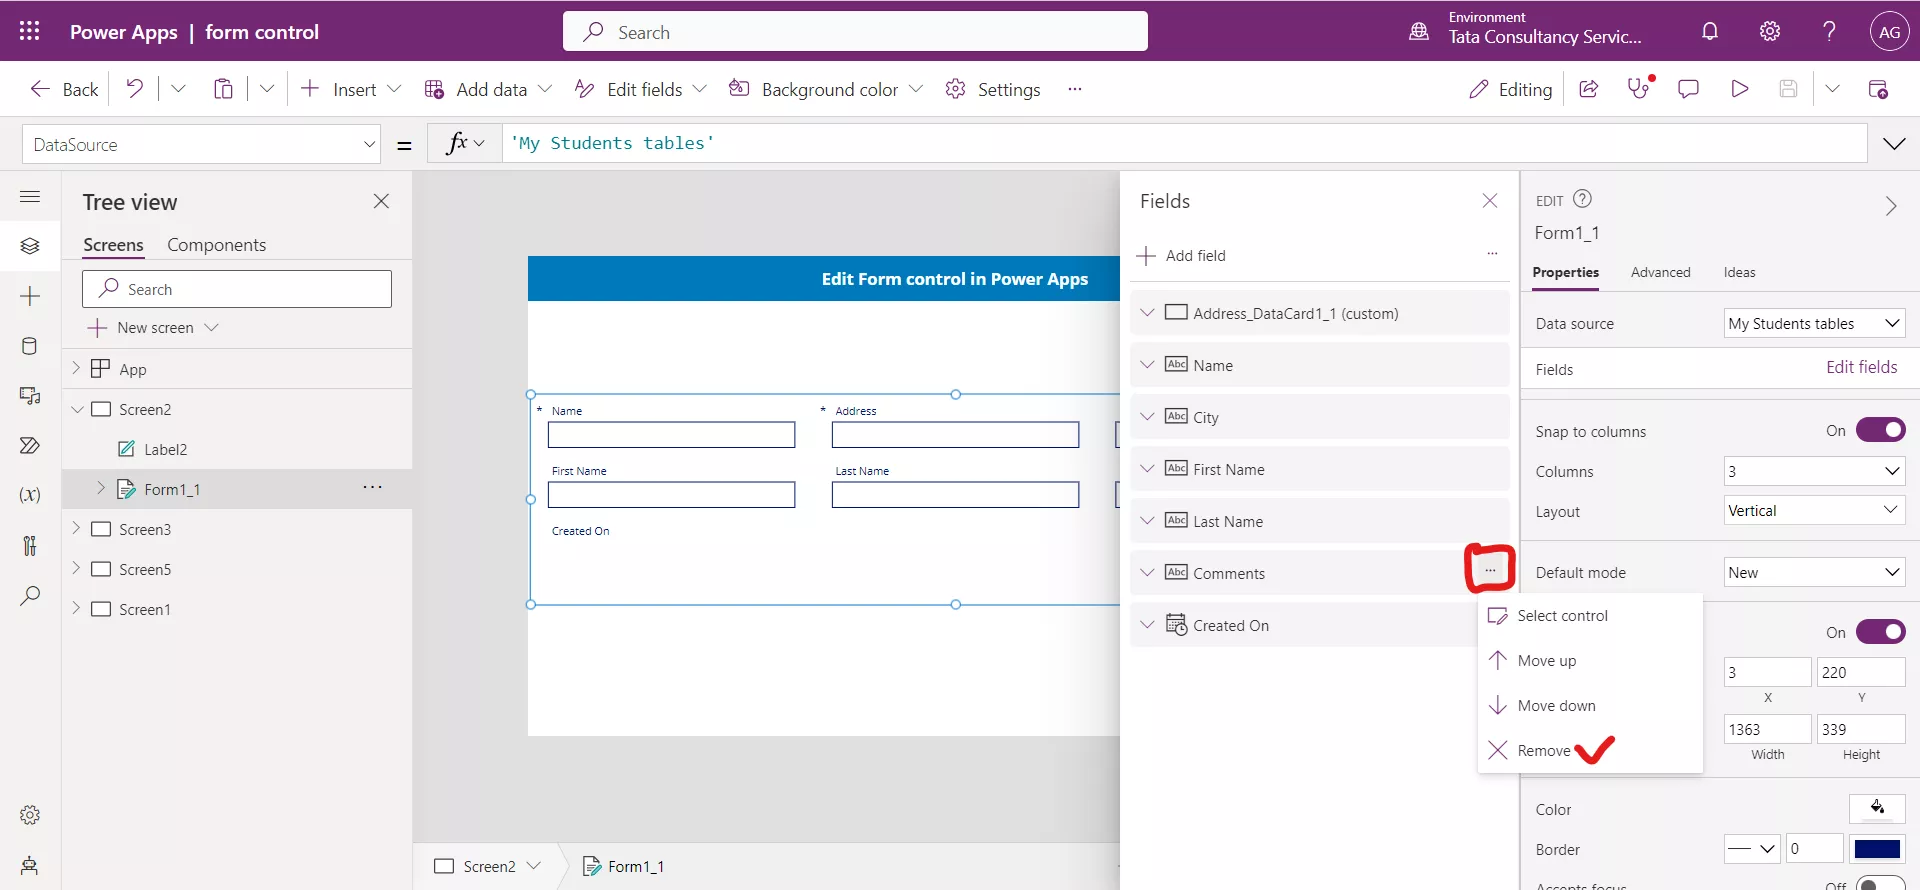
Step 4: We can also remove the fields from the form control, by selecting the form control, and then click on Edit fields. Right click on the three dots of the columns which we want to remove and click on Remove.
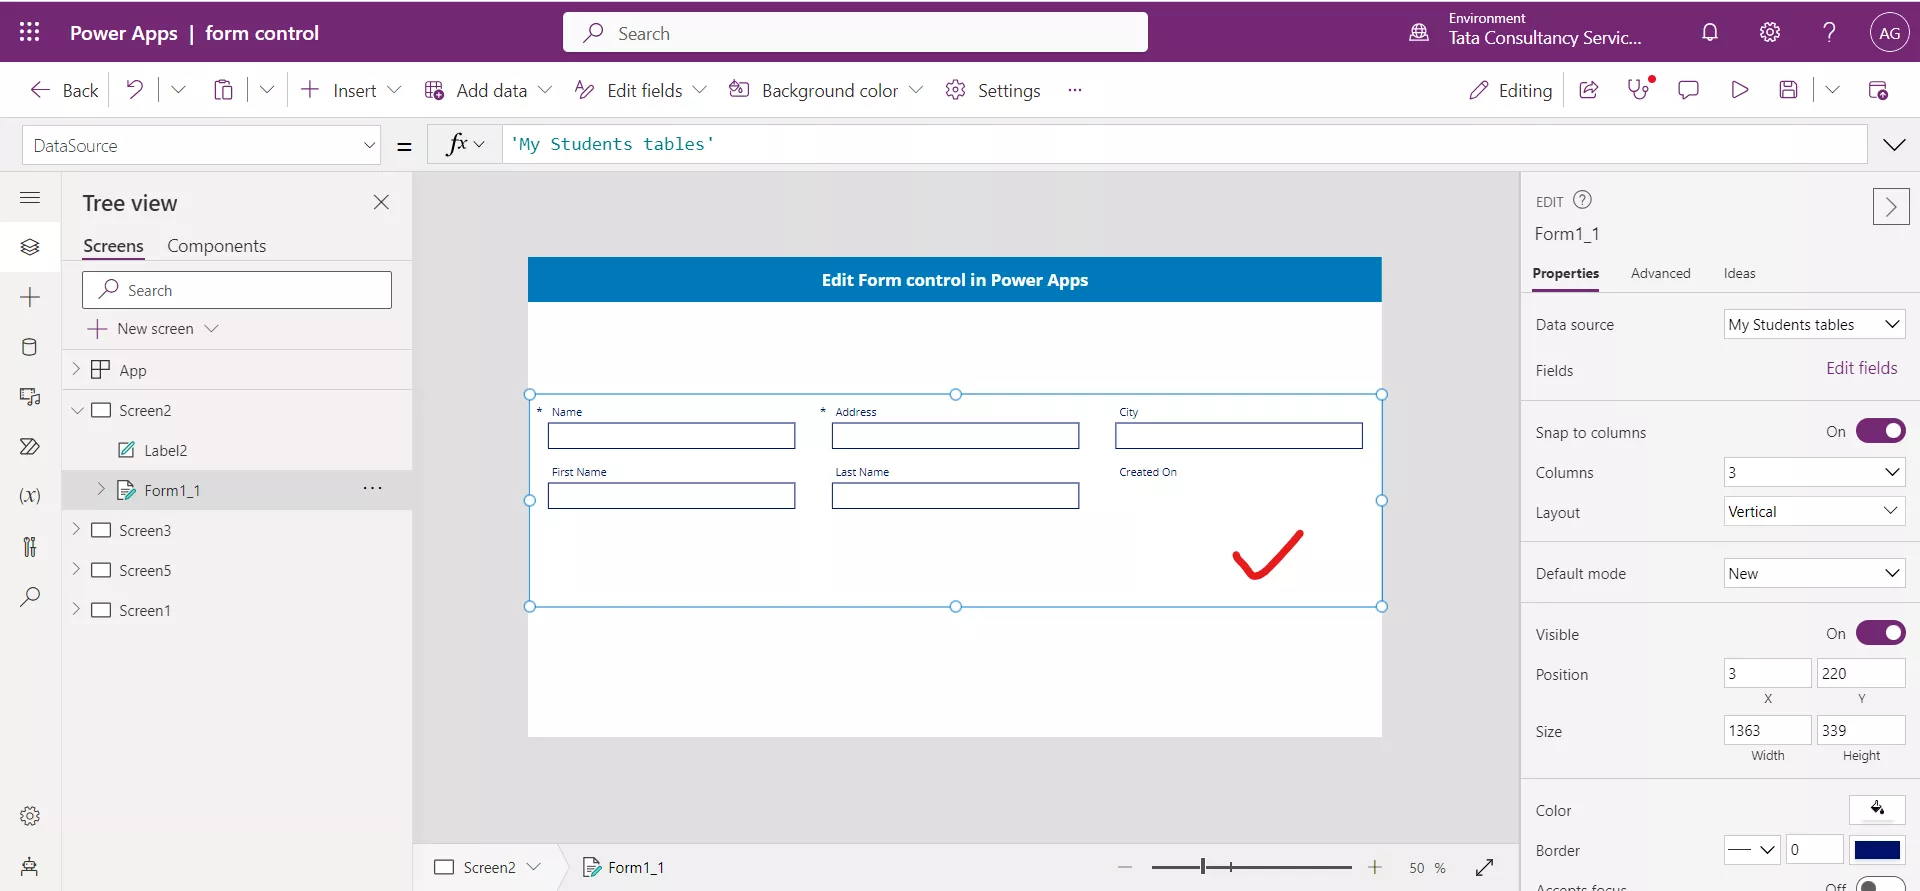
The Comments column is removed from the form control.
4. Unsaved Property of a Form control The Unsaved property is a Boolean property that is true if the Edit form control contains user changes that have not been saved. This property applies only to the Edit form control.
Use Cases
1. Use this property to warn the user before they lose any unsaved changes. To prevent the user from selecting a different record in a Gallery control before saving changes to the current record, set the gallery's Disabled property to Form.Unsaved and, likewise, disable refresh operations.
2. We can setup the back button on our app to check to see if the form was unsaved, if there is unsaved data then do not navigate.
We could use the following formula in the OnSelect property of a Button control to achieve this.
Power Apps Formula
This function would check to see if the Form control named YourFormName had false for the Unsaved property. If the property is false, then it would navigate the user to the screen named WelcomeScreen. If the property is true, then nothing would happen. In our app, we could expand upon this concept to add a warning message or even a popup box telling the user why they could not navigate away.
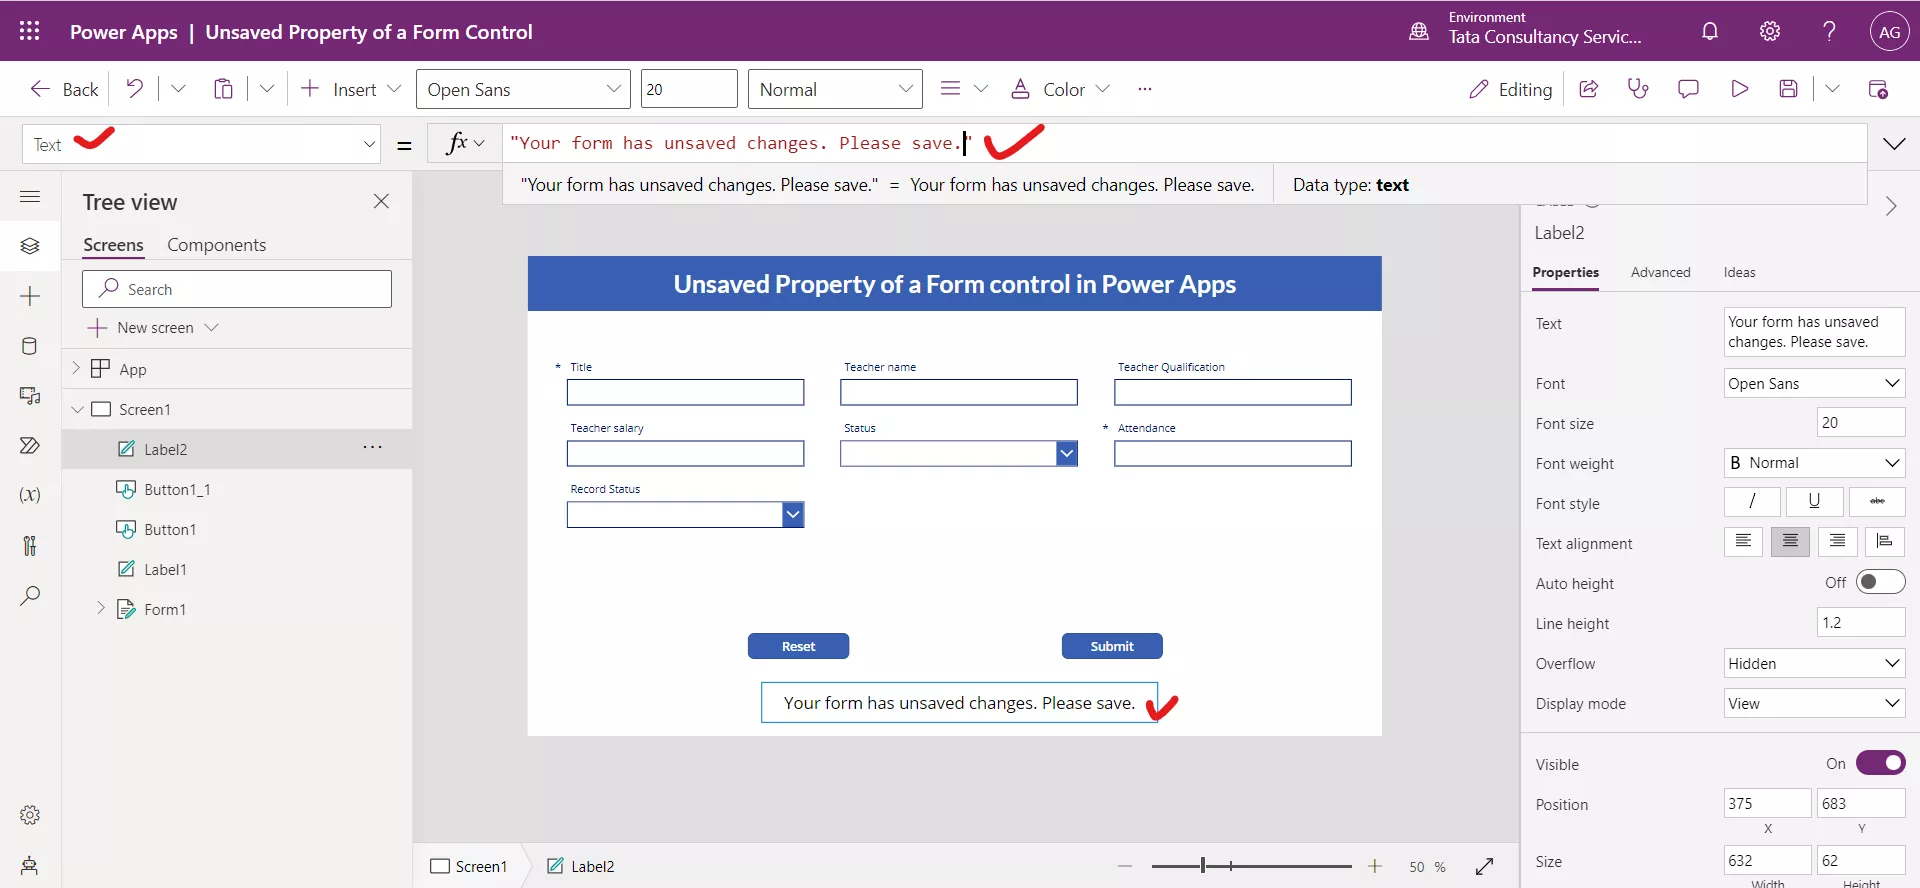
Example:Step 1: Add a Text label control. Set its Text property to the following formula.
Power Apps Formula
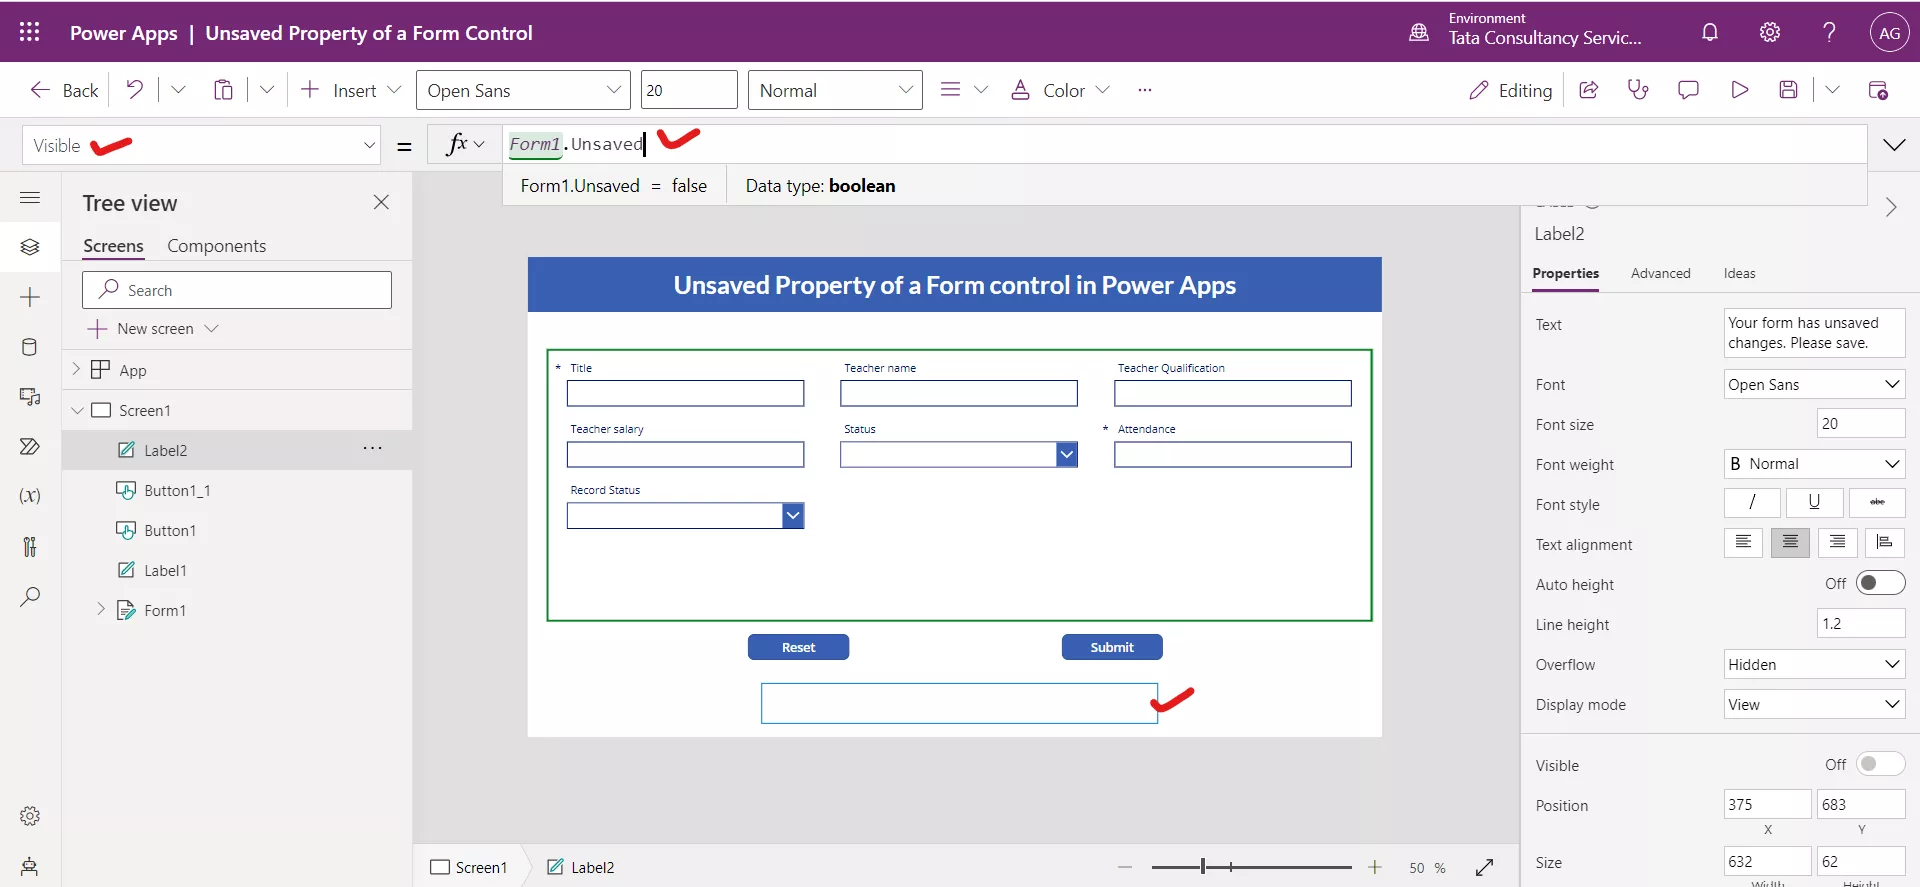
Step 2: Set the Visible property of the label control to the following formula.
PowerApps Formula
Step 3: Put the app in preview mode.
When we write something in the fields, the Text label is visible and it means Unsaved property of the form control returns true.
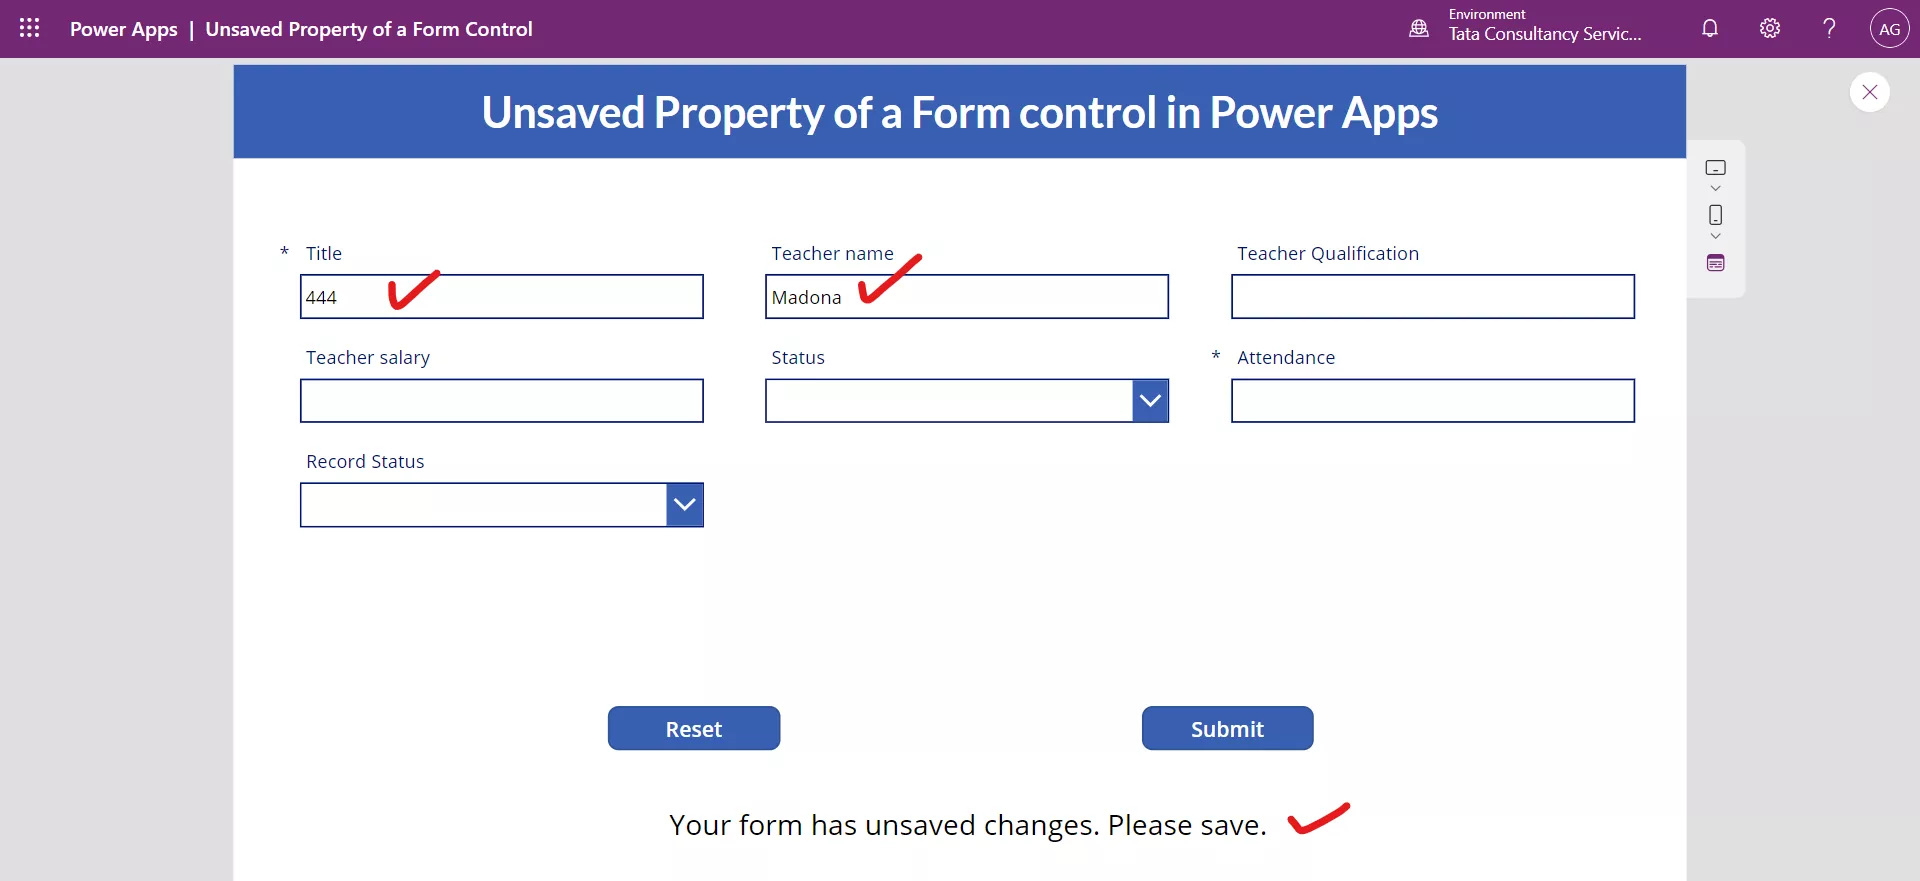
Note: • When we click on the Submit button, the form is saved to the data source and the text label is hidden again. It means after successful submission of the form the Unsaved property of the form returns to false.
• When we click on the Reset button, the form is set to its default state and the text label is hidden also. It means when the form is reset the form Unsaved property returns to false.
5. Updates property of a Form Control in Power Apps
The values to write back to the data source for a record loaded in a form control. This property applies only to the Edit form control.
Use this property to extract the field values from the cards within the control. You can then use these values to manually update the data source with a Patch function call or another method exposed by a connection. You do not need to use this property if you are using the SubmitForm function.
This property returns a record of values. For example, if the form control contains card controls for Name and Quantity fields, and the values of the Update properties for those cards return "Watches" and 20 respectively, then the Updates property for the form control would return { Name: "Watches", Quantity: 20 }.
Example: Let's say we have an Edit Form control on one screen.
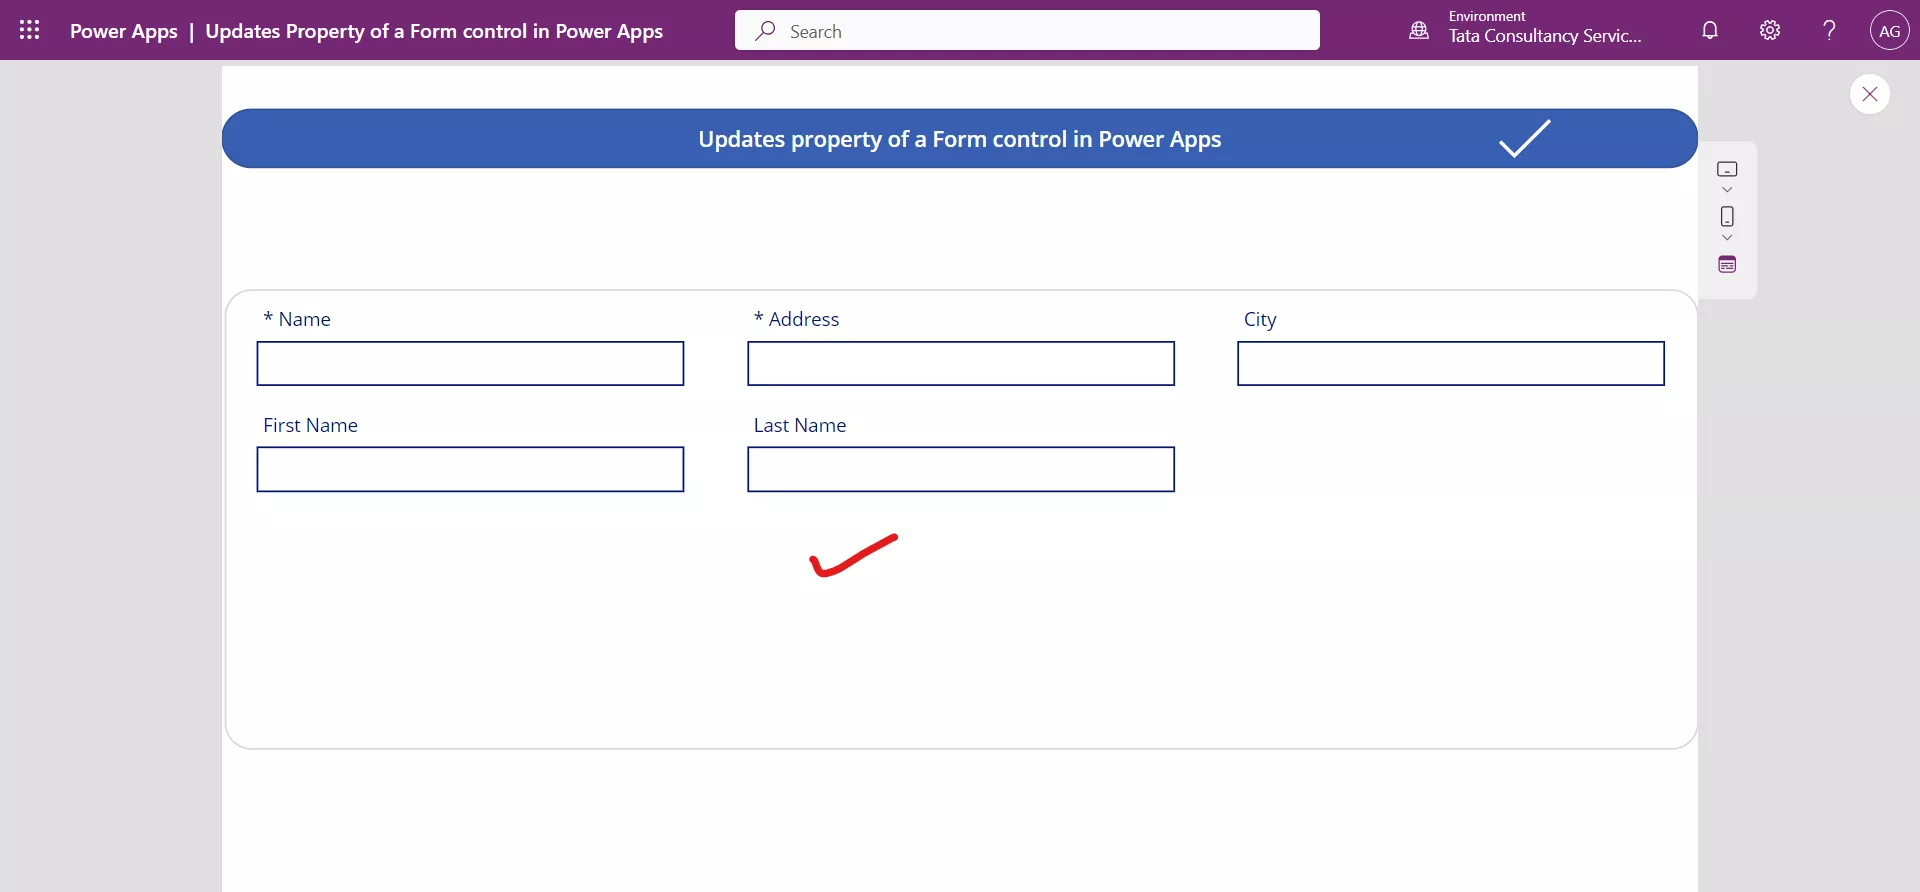
Enter the values in the form fields.
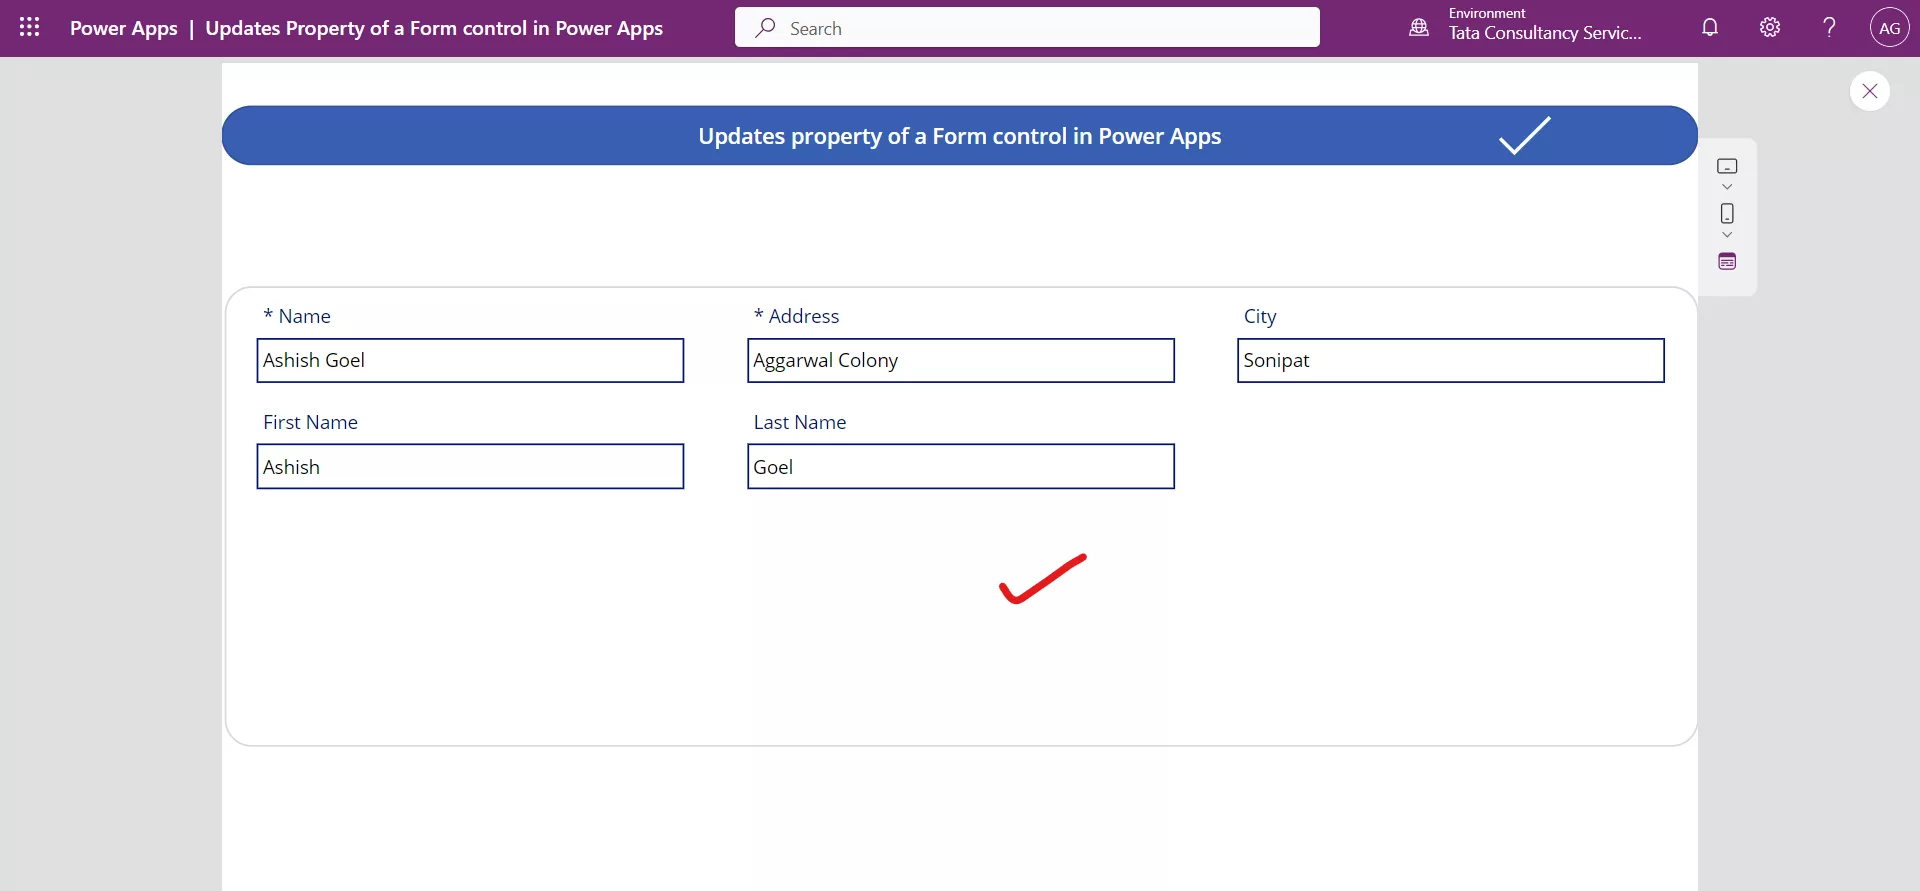
Suppose we have entered these values then move to the different screen by clicking on the check icon.
On this screen we have a Display Form control and a Button control to submit the Form.
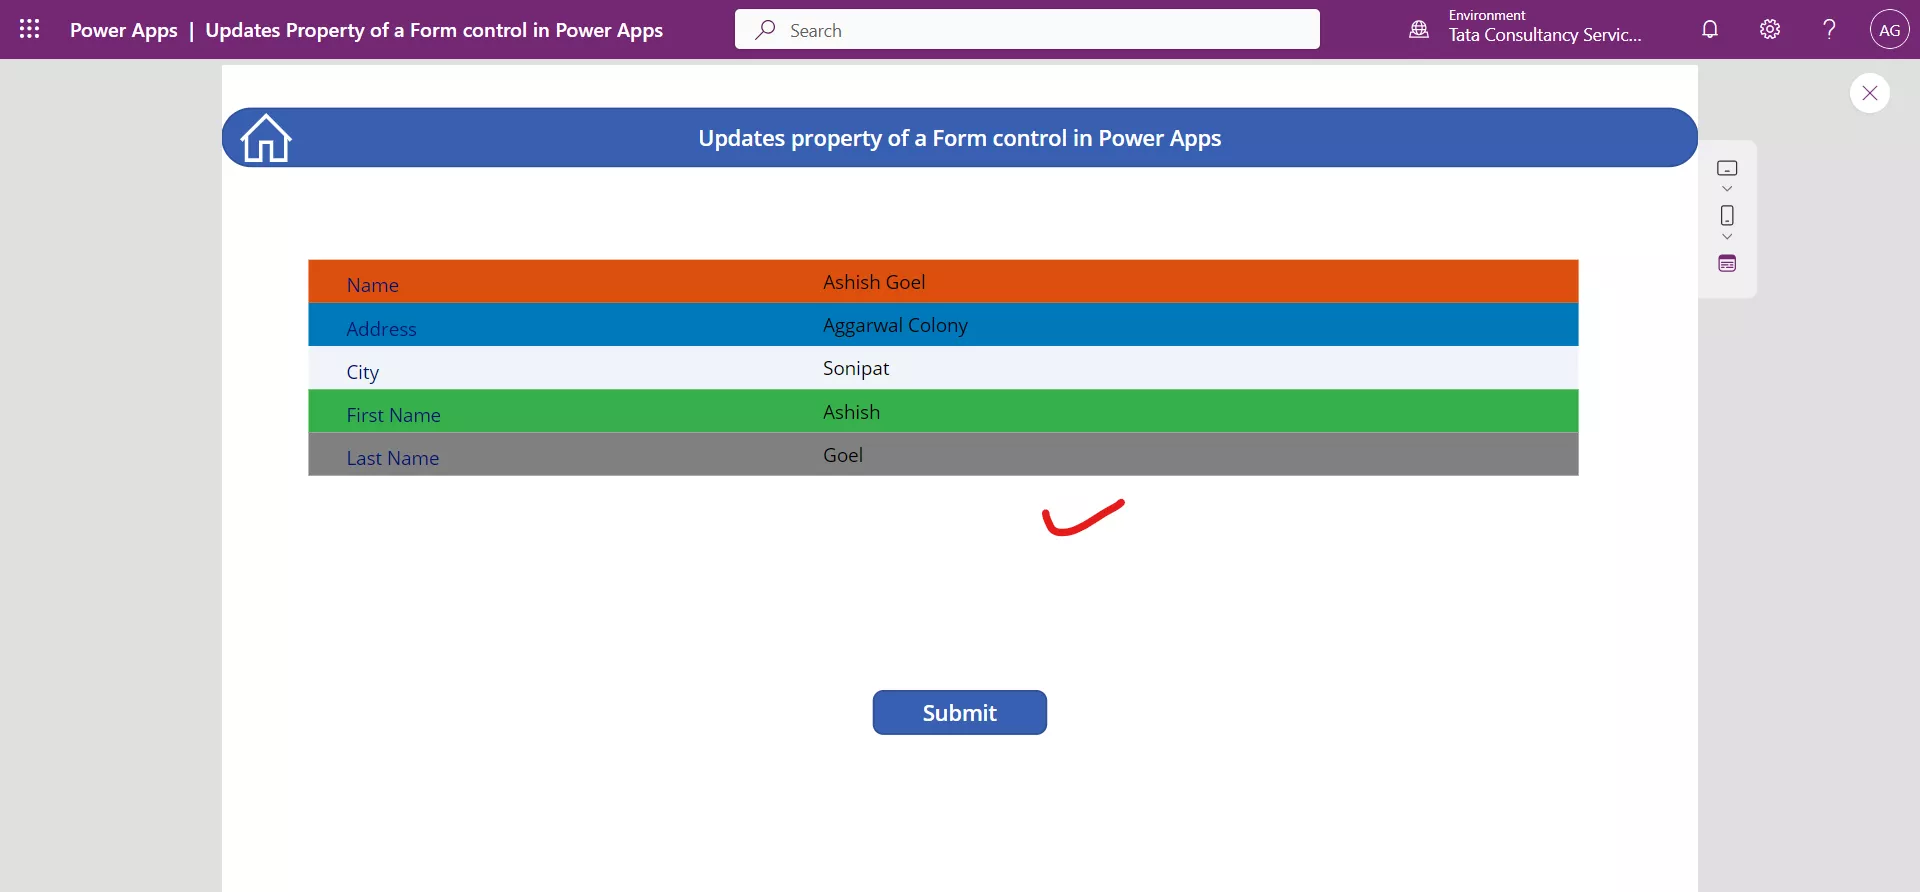
The data source for this form is same as the data source for the Edit Form control on the First Screen. The following formula is written on the Item property of the Form control.
PowerApps Formula
Here, MyForm is our name of the Edit Form control in Power Apps.
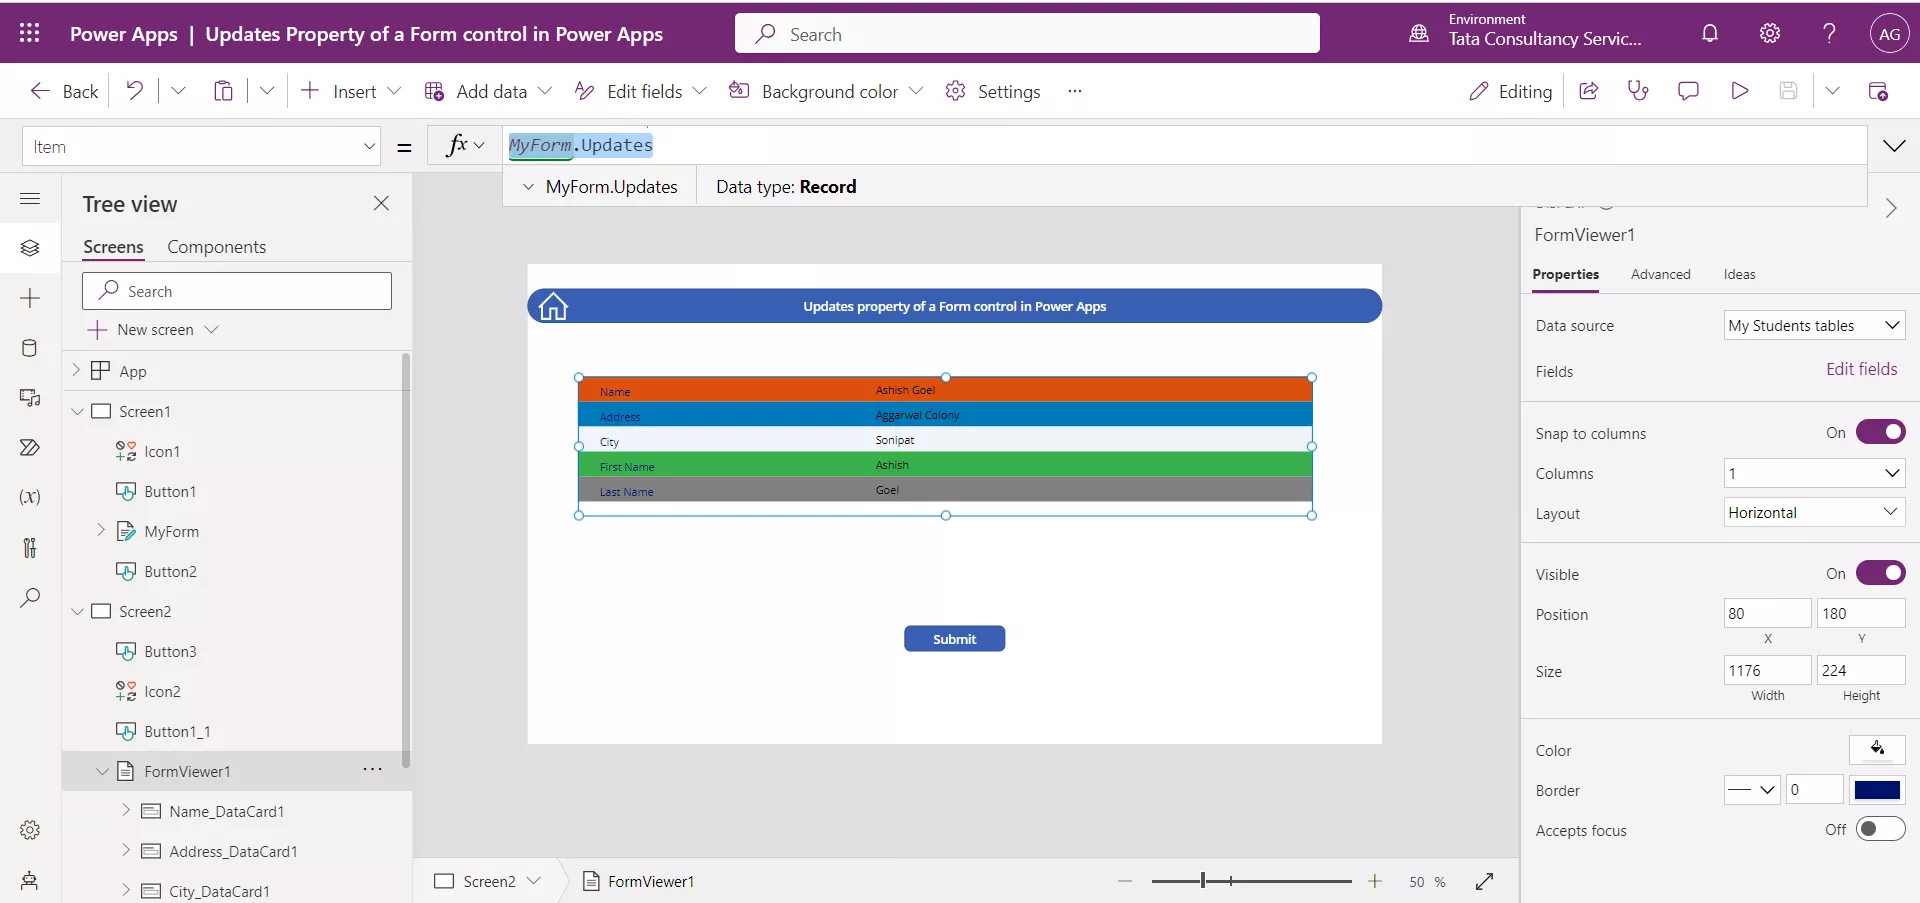
If we click on the arrow icon below the formula, we can see that formula returns the written values in the form.
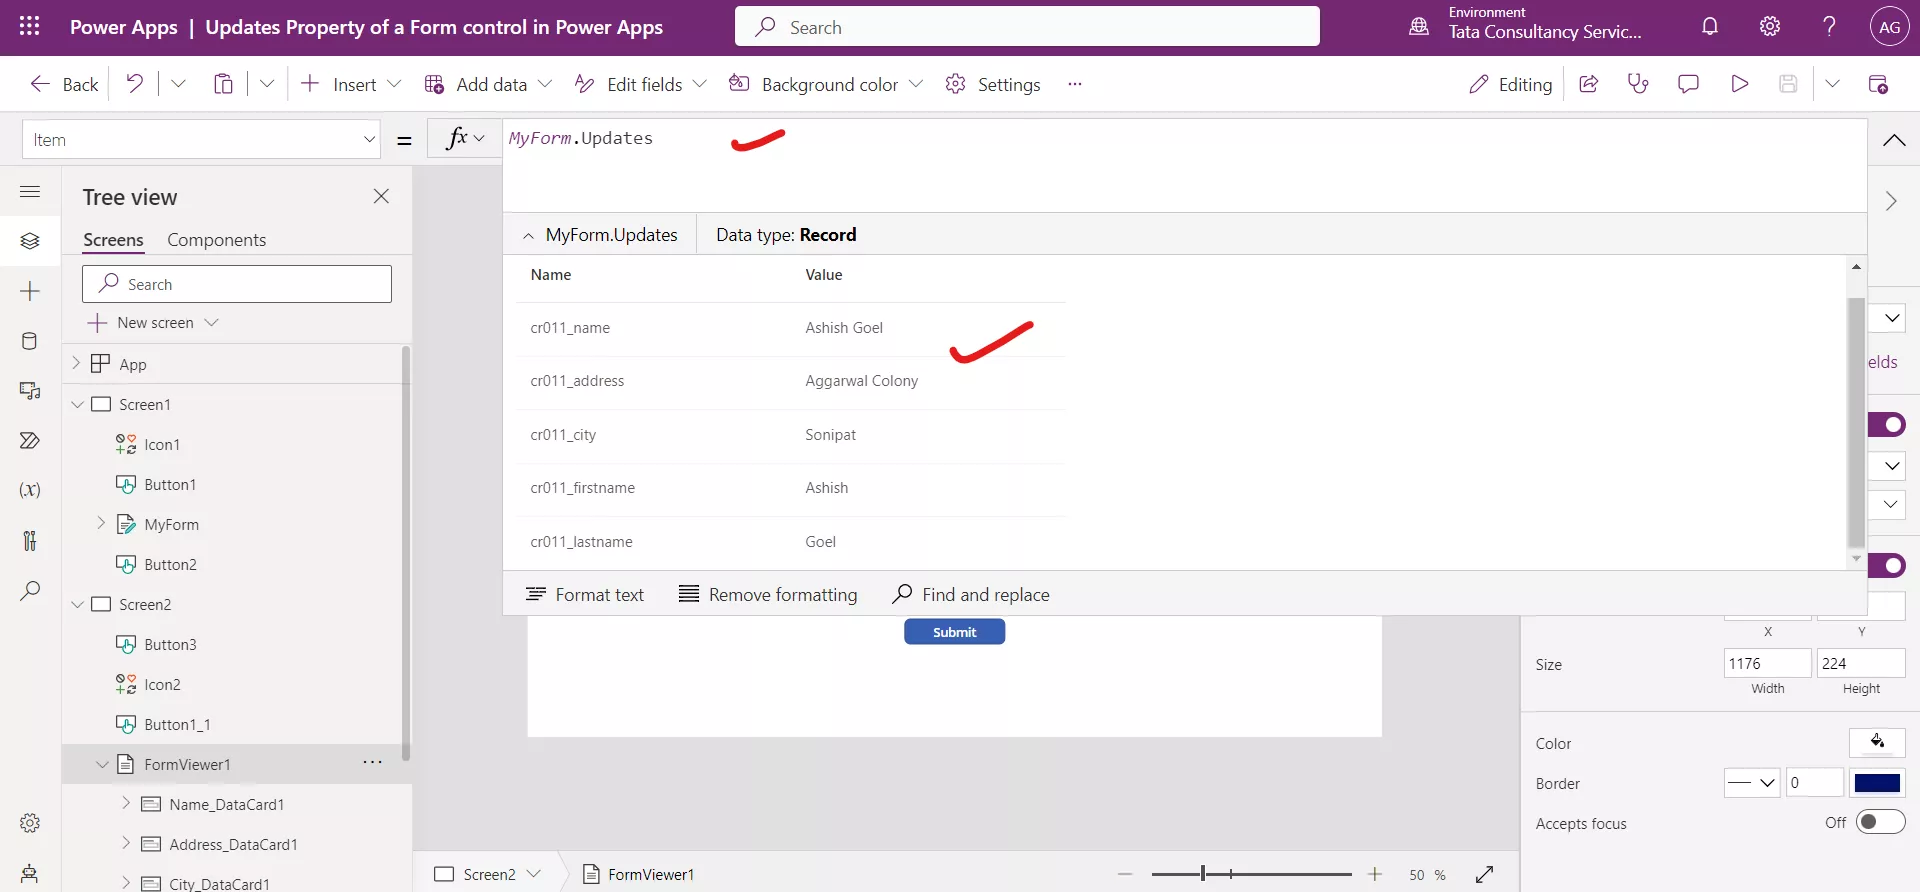
Note the form is yet to submit. After confirmation of the entered values, we can click on the submit button, so the data is loaded in our data source. The following formula is written on the Submit button.
PowerApps Formula
6. Displaying a specific record in the form
We can configure the form to display the specific record that we want to view or edit. To do this, we need to populate the Item property of the form.
The two most common ways of specifying the record are by connecting the Form control to a Gallery control's Selected property or by using a LookUp function.
a) By using Gallery’s Selected Property To use a Gallery control to specify the record, we will need to set the Gallery control to use the same data source as the Form control. We can confirm this by checking that the Items property of the Gallery control is the same as the DataSource property of the Form control. Then, set the Item property of the Form control to the following Power Apps formula.
PowerApps Formula
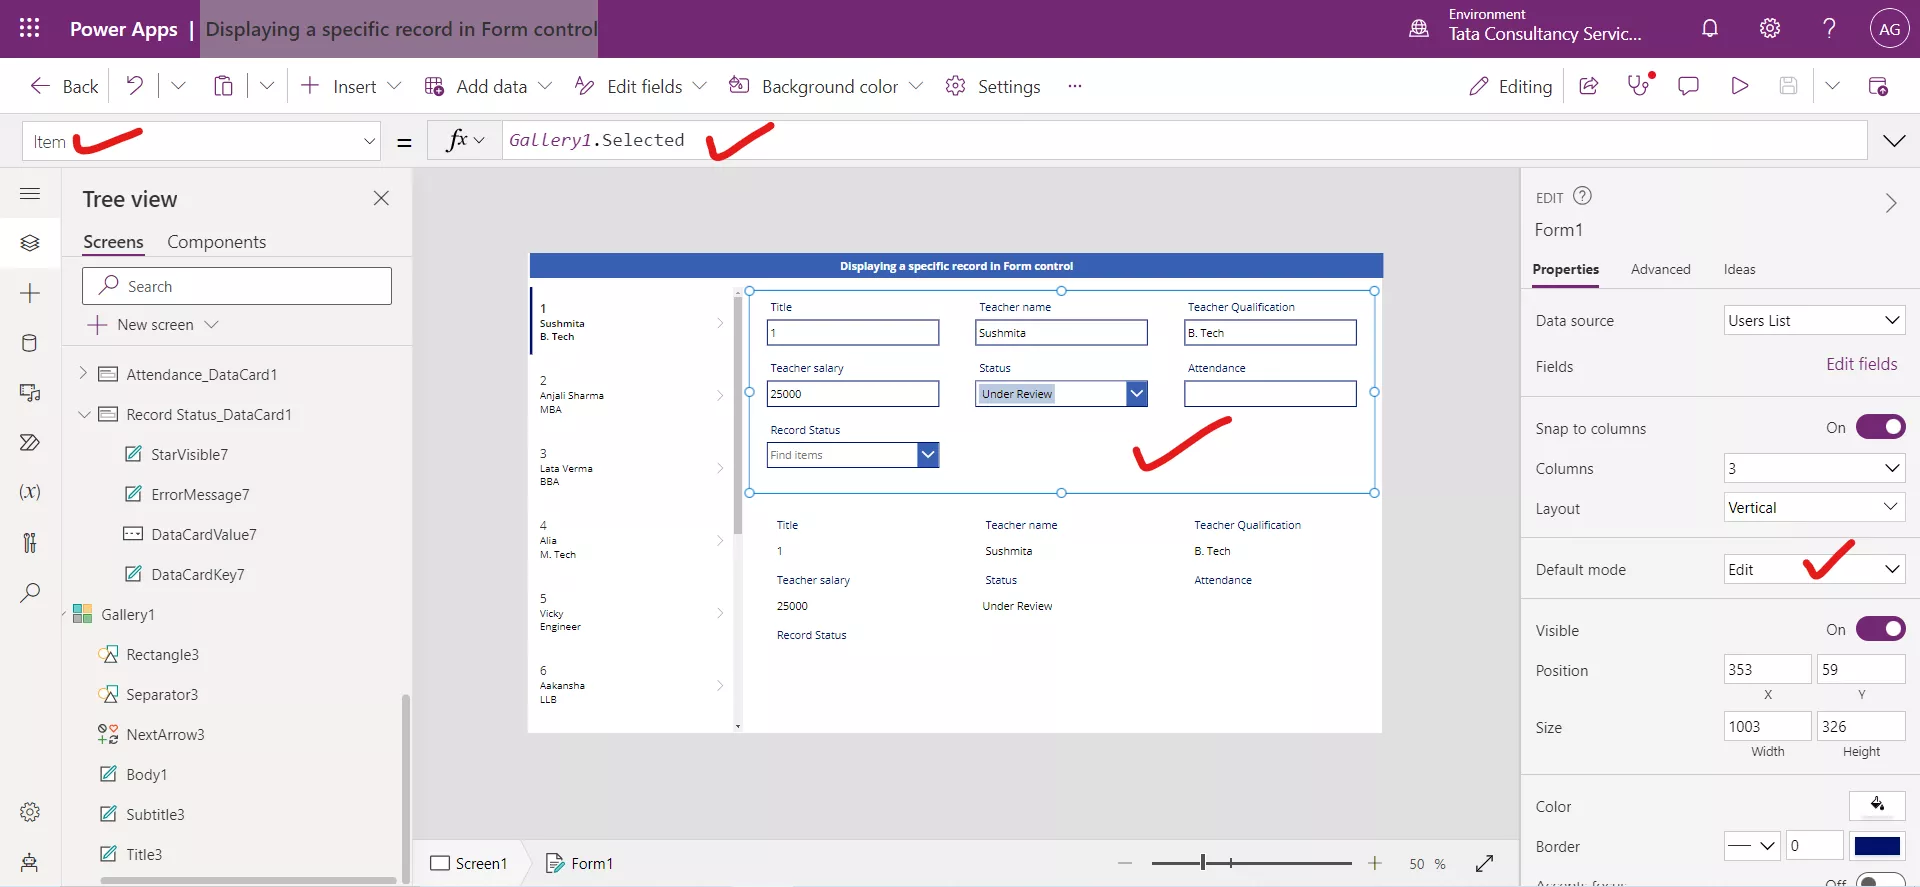
In this example, replace "GalleryName" with the name of the gallery control. Now the Power Apps will display the selected record from the Gallery control in the Form control if the Form control is in View or Edit mode.
The following image shows that the Item property is set to Gallery1.Selected, where Gallery1 is the name of the Gallery control. And the form is in Edit mode.
The following image shows that the Item property is set to Gallery1.Selected, where Gallery1 is the name of the Gallery control. And the form is in View mode.
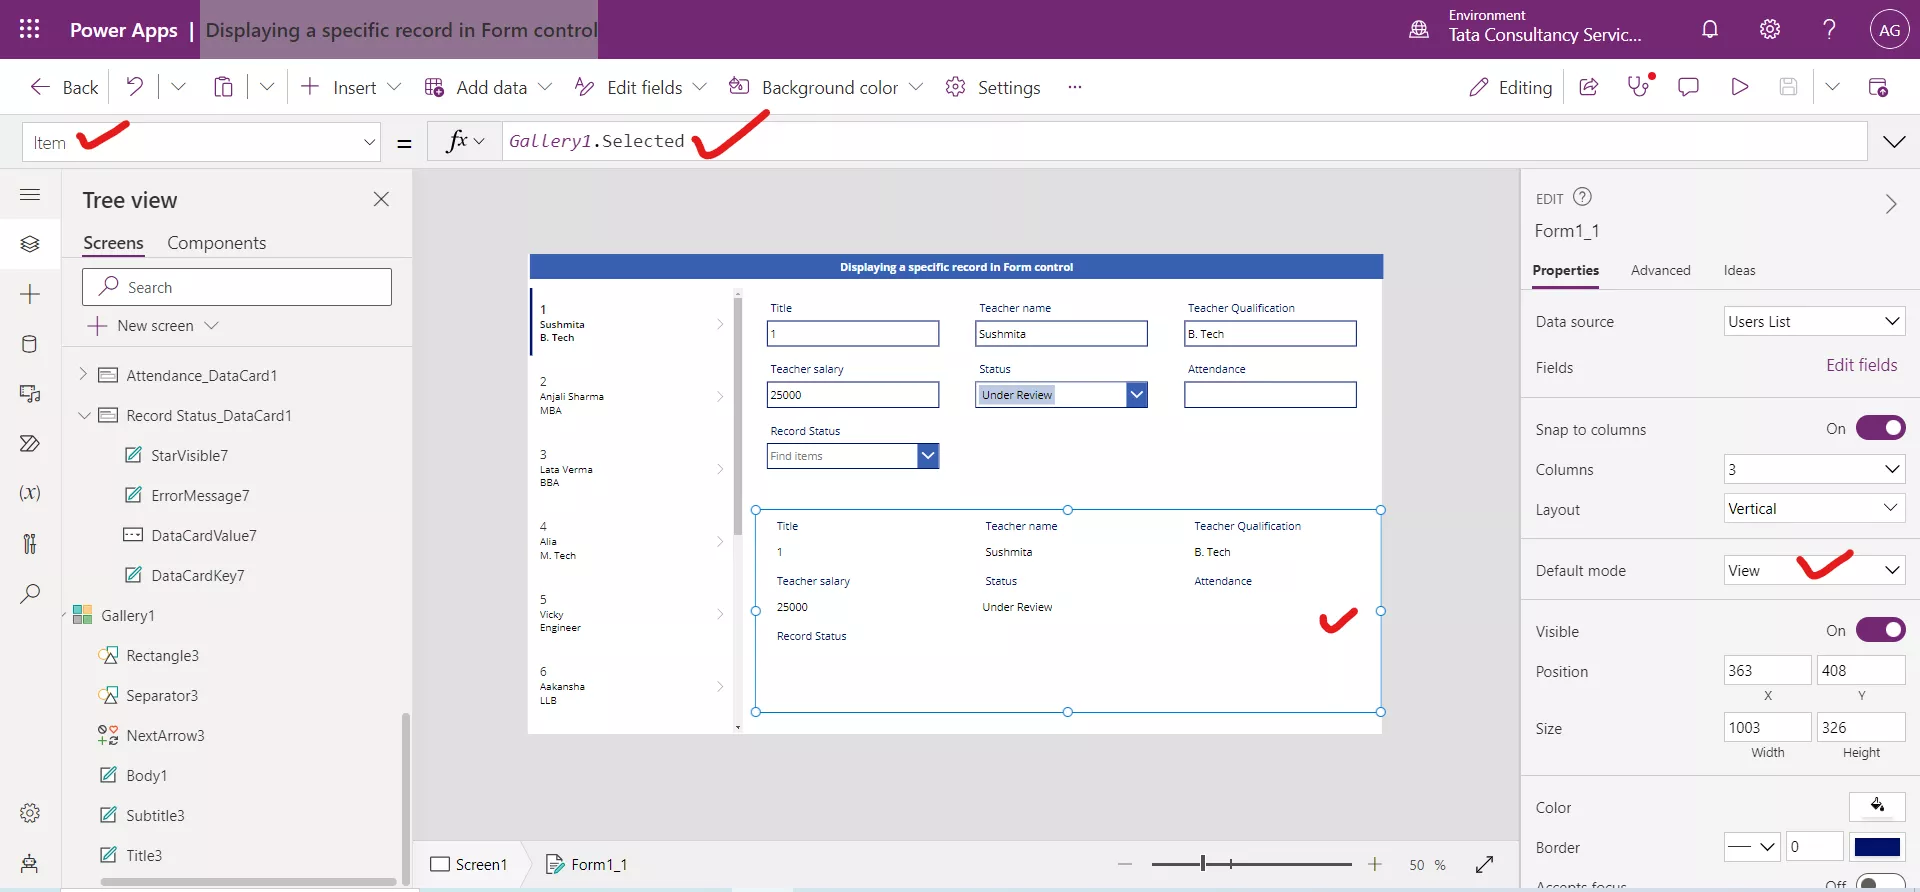
Select the different records from the gallery and try that it is automatically populated in the form control.
b) By using LookUp Function If we are not using a Gallery control to display all the records, then we can use the LookUp function to query for the record that we want to present in the form.
Example:Step 1: Add a Dropdown control and set its Items property to the following formula. The name of the dropdown control is Dropdown1.
PowerApps Formula
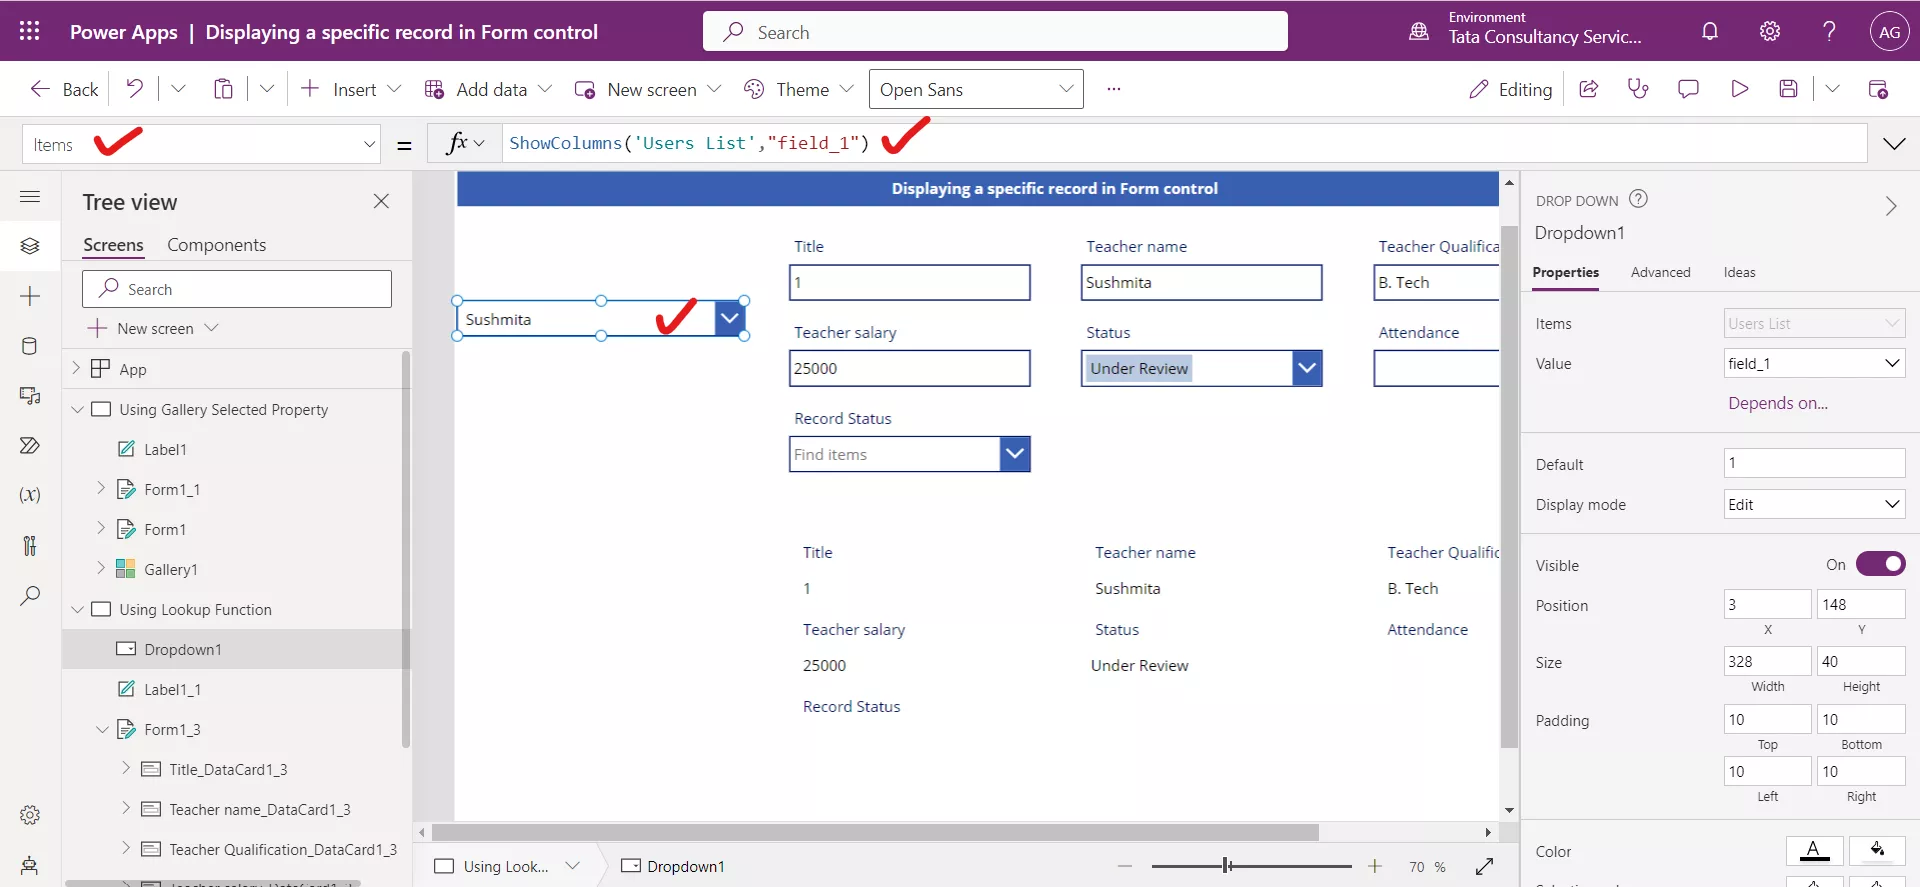
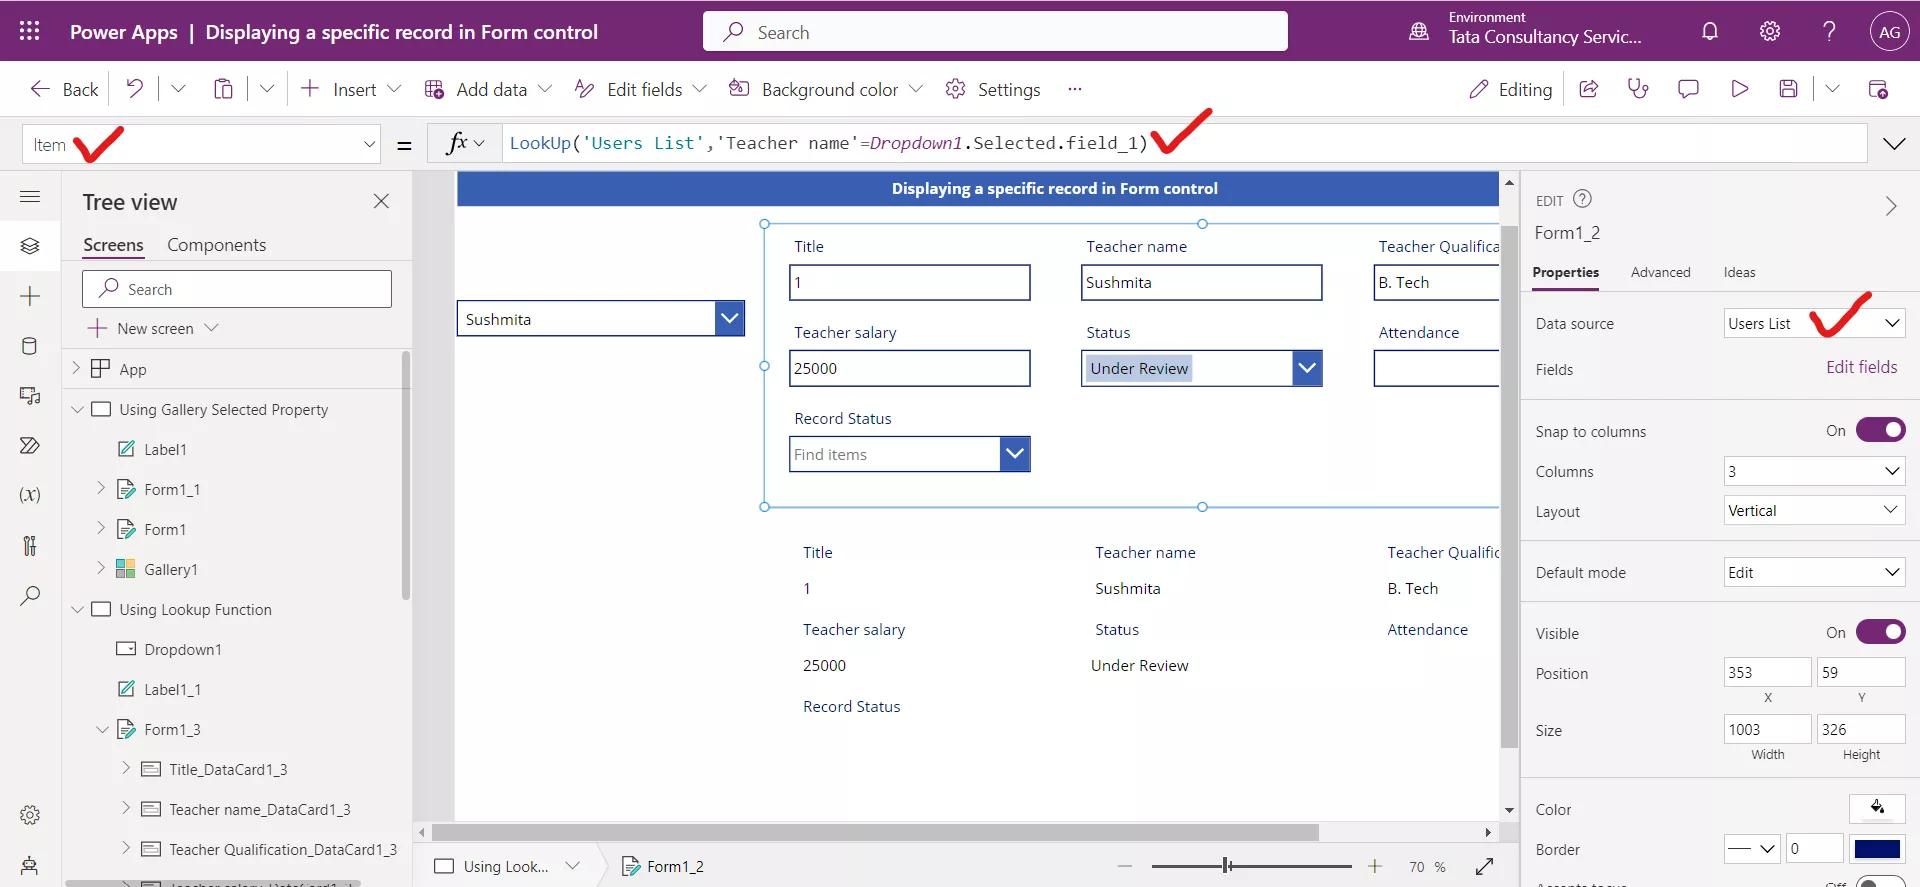
Step 2: On the Item property of the Form control we can use the following Power Apps Formula.
PowerApps Formula
Here, ‘Users List’ is the name of the data source and ‘Users List’ is specified in the DataSource property of the Form control, and the Form control is in View or Edit mode. Here, we are querying the data from the sharepoint list according to the dropdown selected value.
