Remove, RemoveIf and Clear functions in Power Apps
1. Remove function
The Remove powerapps function is used to remove a specific record or records from a data source. We can use the All argument to remove all copies of a record; otherwise, only one copy of the record is removed.
Power Apps Syntax A. First Syntax Remove(DataSource, Record1 [, Record2, ... ] [,RemoveFlags.All ] )
The function has the following parameters:
• Record(s) – It is the required parameter. The record or records to remove.
B. Second Syntax Remove(DataSource, Table [, RemoveFlags.All ] )
The function has the following parameters:
- DataSource – It is the required parameter. The data source that contains the records that we want to remove.
- Table – It is the required parameter. A table of records to remove.
- RemoveFlags.All – It is an optional parameter. In a collection, the same record may appear more than once. We can add the RemoveFlags.All argument to remove all copies of the record.
Note:
- The most common way to specify the record to remove is to use the LookUp function to retrieve the record from the data source.
- Another option is if we are using a Gallery control and we want to delete the current record, the ThisItem operator is supported for referencing the record in the Gallery control.
Example: To create a collection, we can follow the following steps:
Step 1: + Insert a Button control in the Power Apps studio and set its Text property to Create Collection.
Step 2: Set button control's OnSelect property to the below power apps formula:
Power Apps Formula
ClearCollect(
    MyCollection,
    { Name: "Ashish", Country: "India", Profession: "Engineer" },
    { Name: "Deepak", Country: "America", Profession: "Engineer" },
    { Name: "Anjali", Country: "India", Profession: "Doctor" },
    { Name: "Ayushman", Country: "America", Profession: "Lawyer" }
)
Step 3: Select the button while holding down the Alt key. Add a Vertical Gallery control and set its Items property to MyCollection. Delete the next Arrow from the Gallery template.
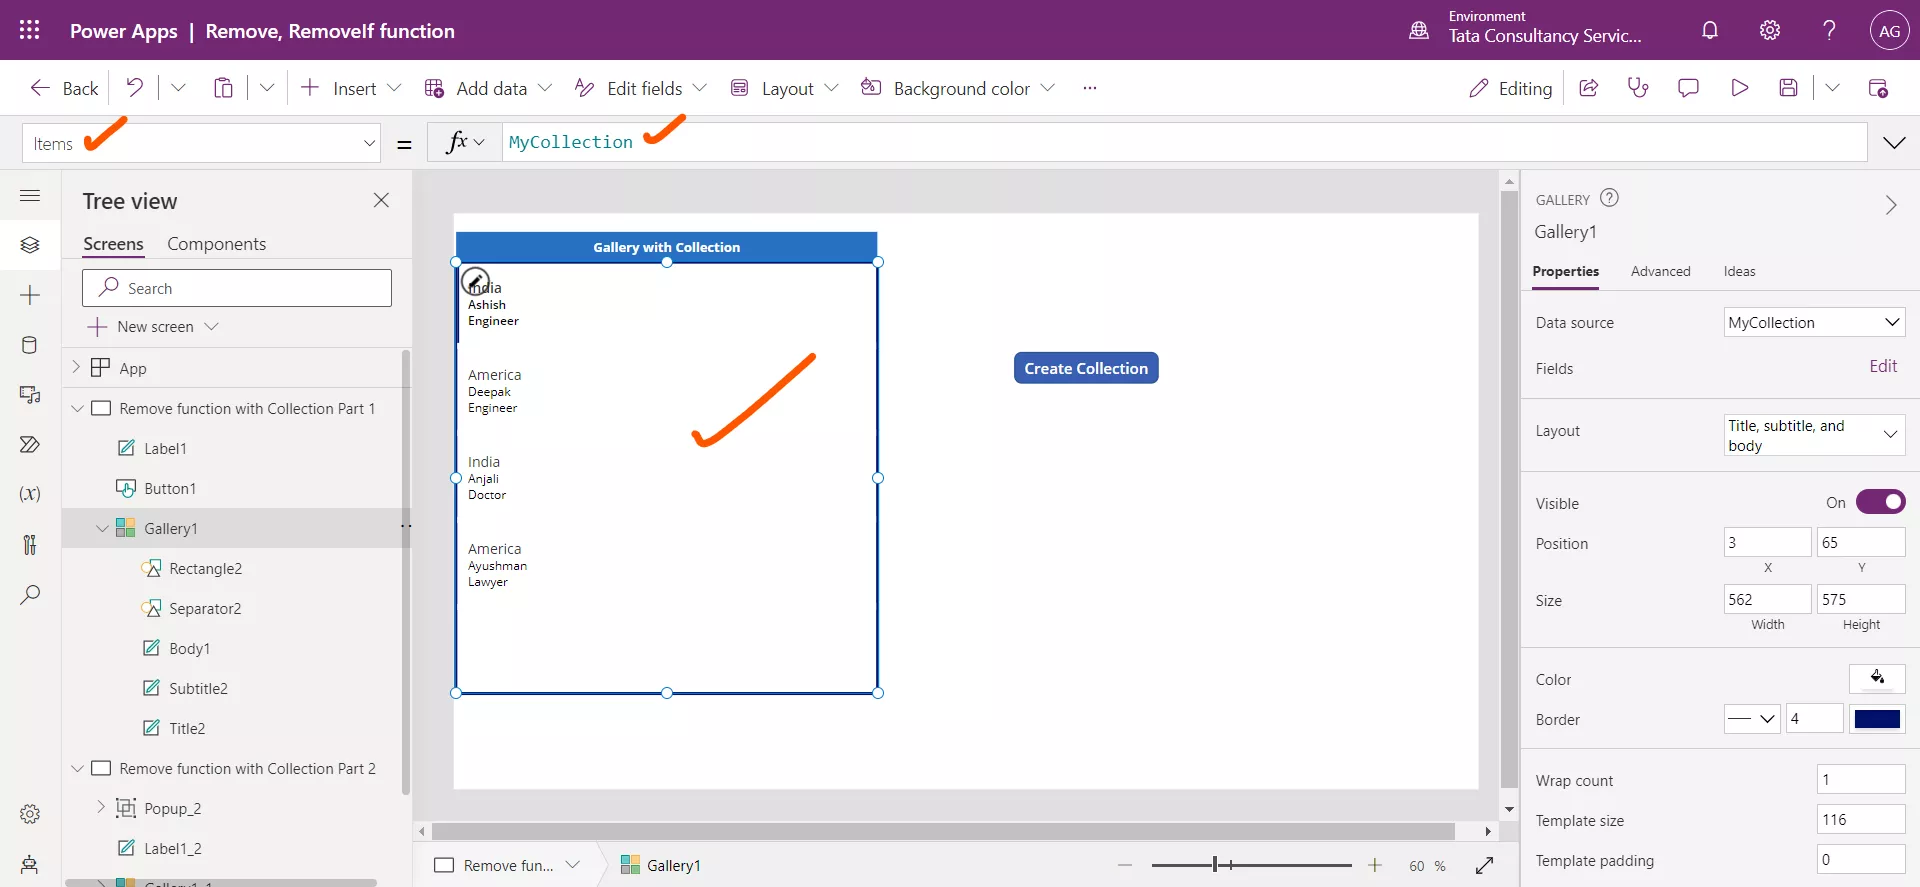
Step 4: Add another Button control, named it Text property to "Remove Record". Write the following formula to the OnSelect property of this button.
Power Apps Formula
As the LookUp function finds the first record that satisfies the condition. So, this function removes the first record where the profession is Engineer.
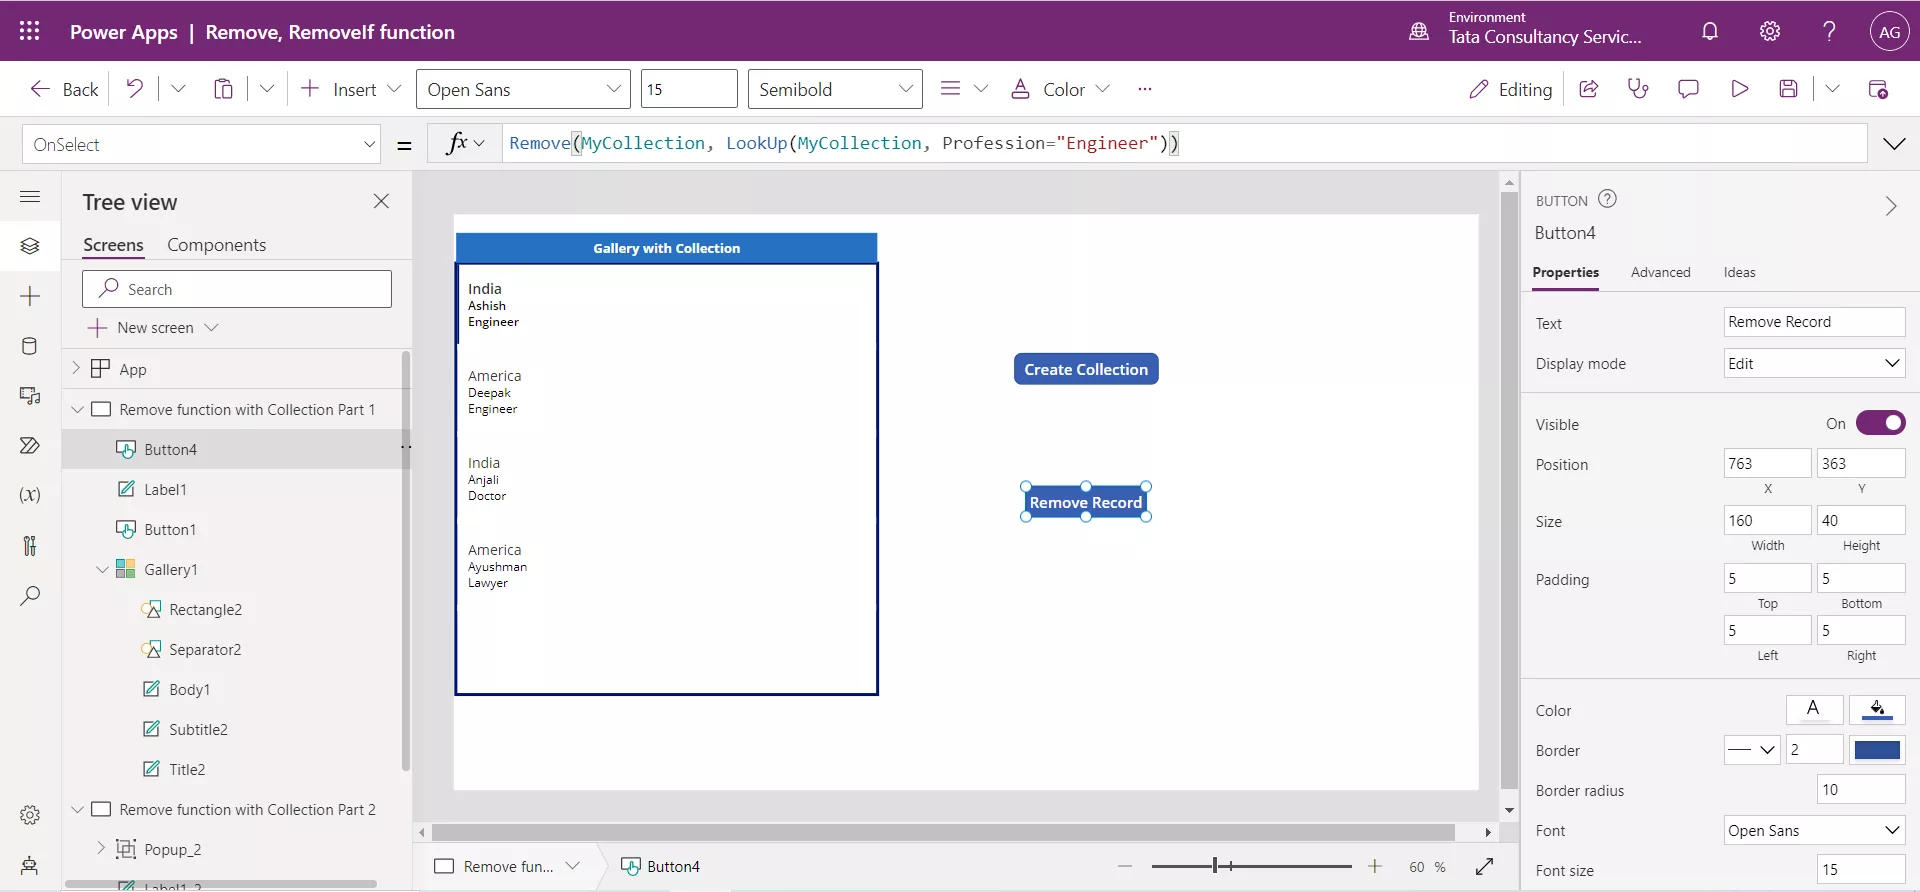
Click on the Remove Record button. We can see that the first record with Profession Engineer is deleted.
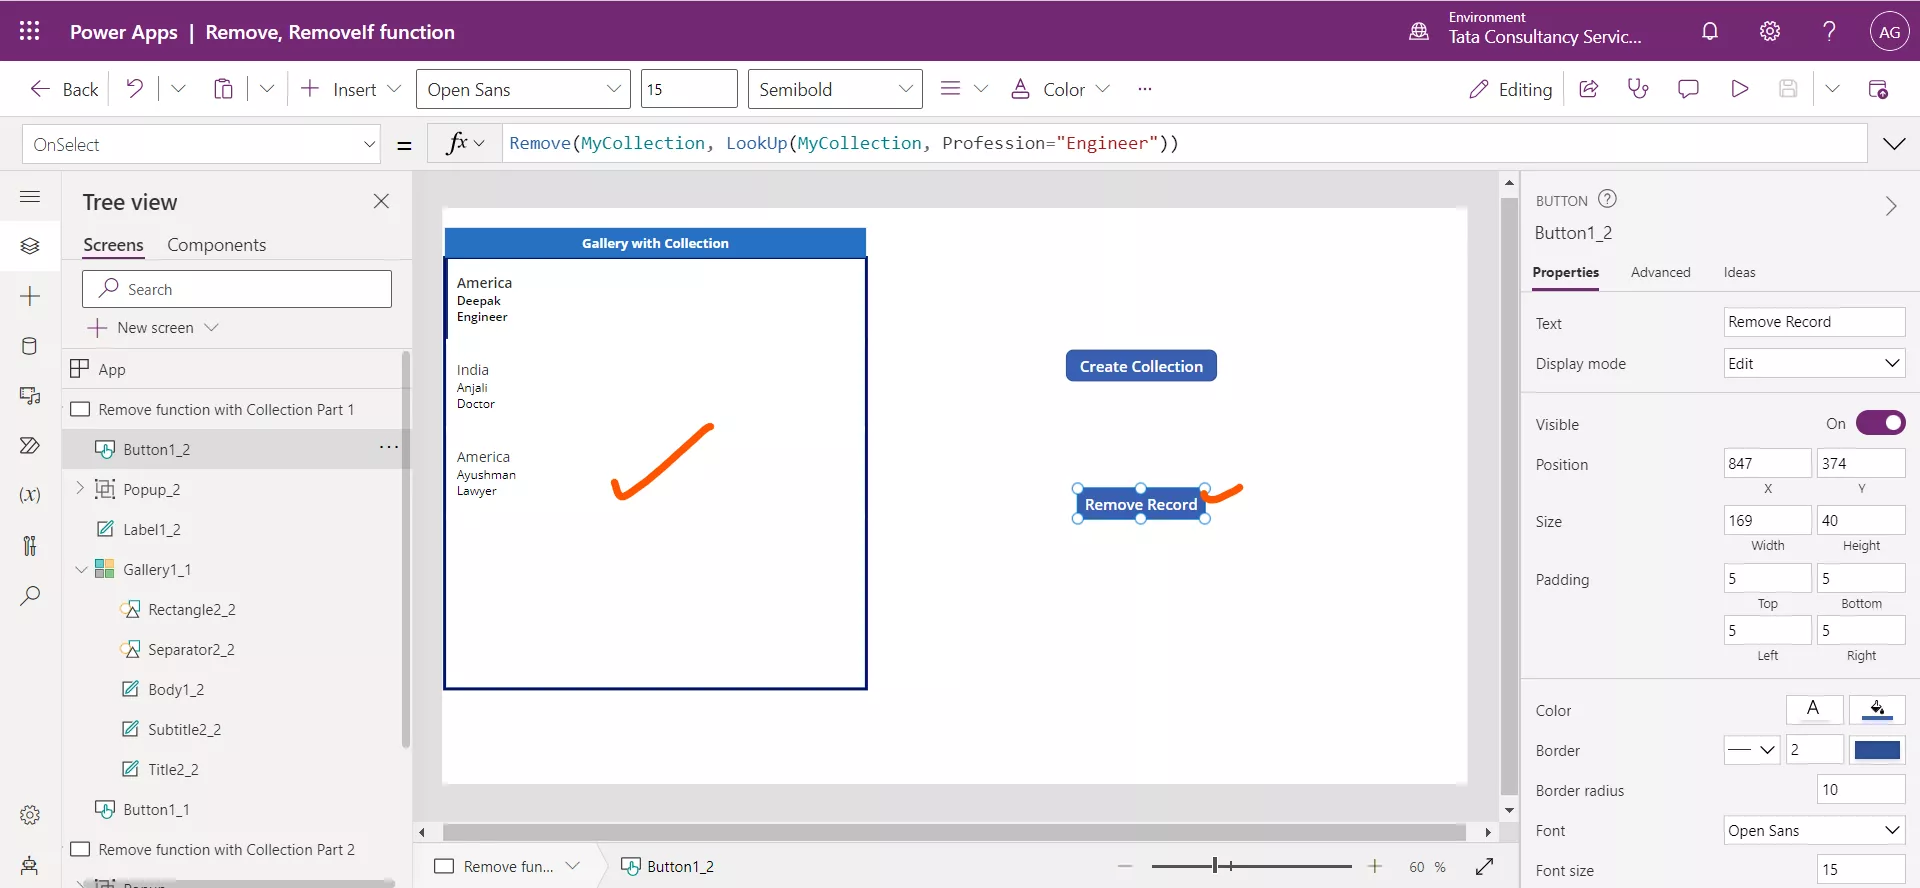
When we click on the Remove Record button again. Again, we can see that the record where the Profession is Engineer is deleted.
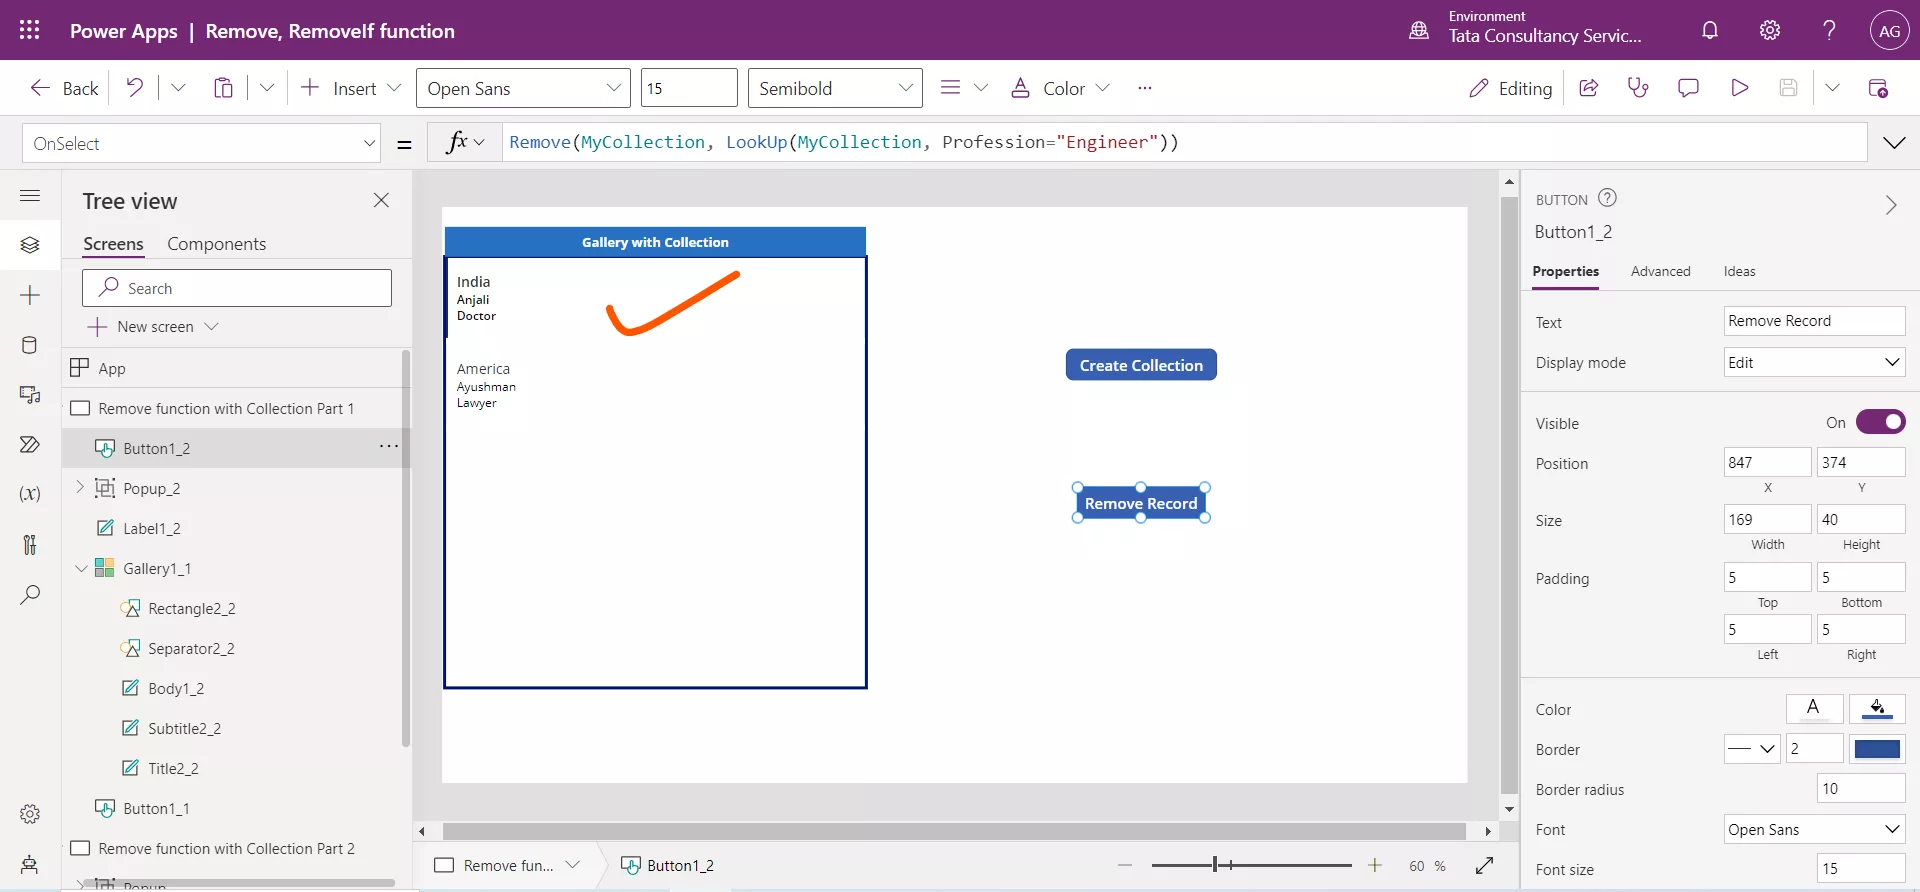
Now if we select Remove Record button again, no record is deleted, because there is no more record where the Profession is Engineer.
Step 6: Click on the Create Collection button again, to get all the records again in our collection variable MyCollection. We can give multiple records at the same time in a formula as an argument to remove all at one click. Now, set the OnSelect property of Remove Record button to the following powerapps formula.
Power Apps Formula
And then select the Remove Record button.
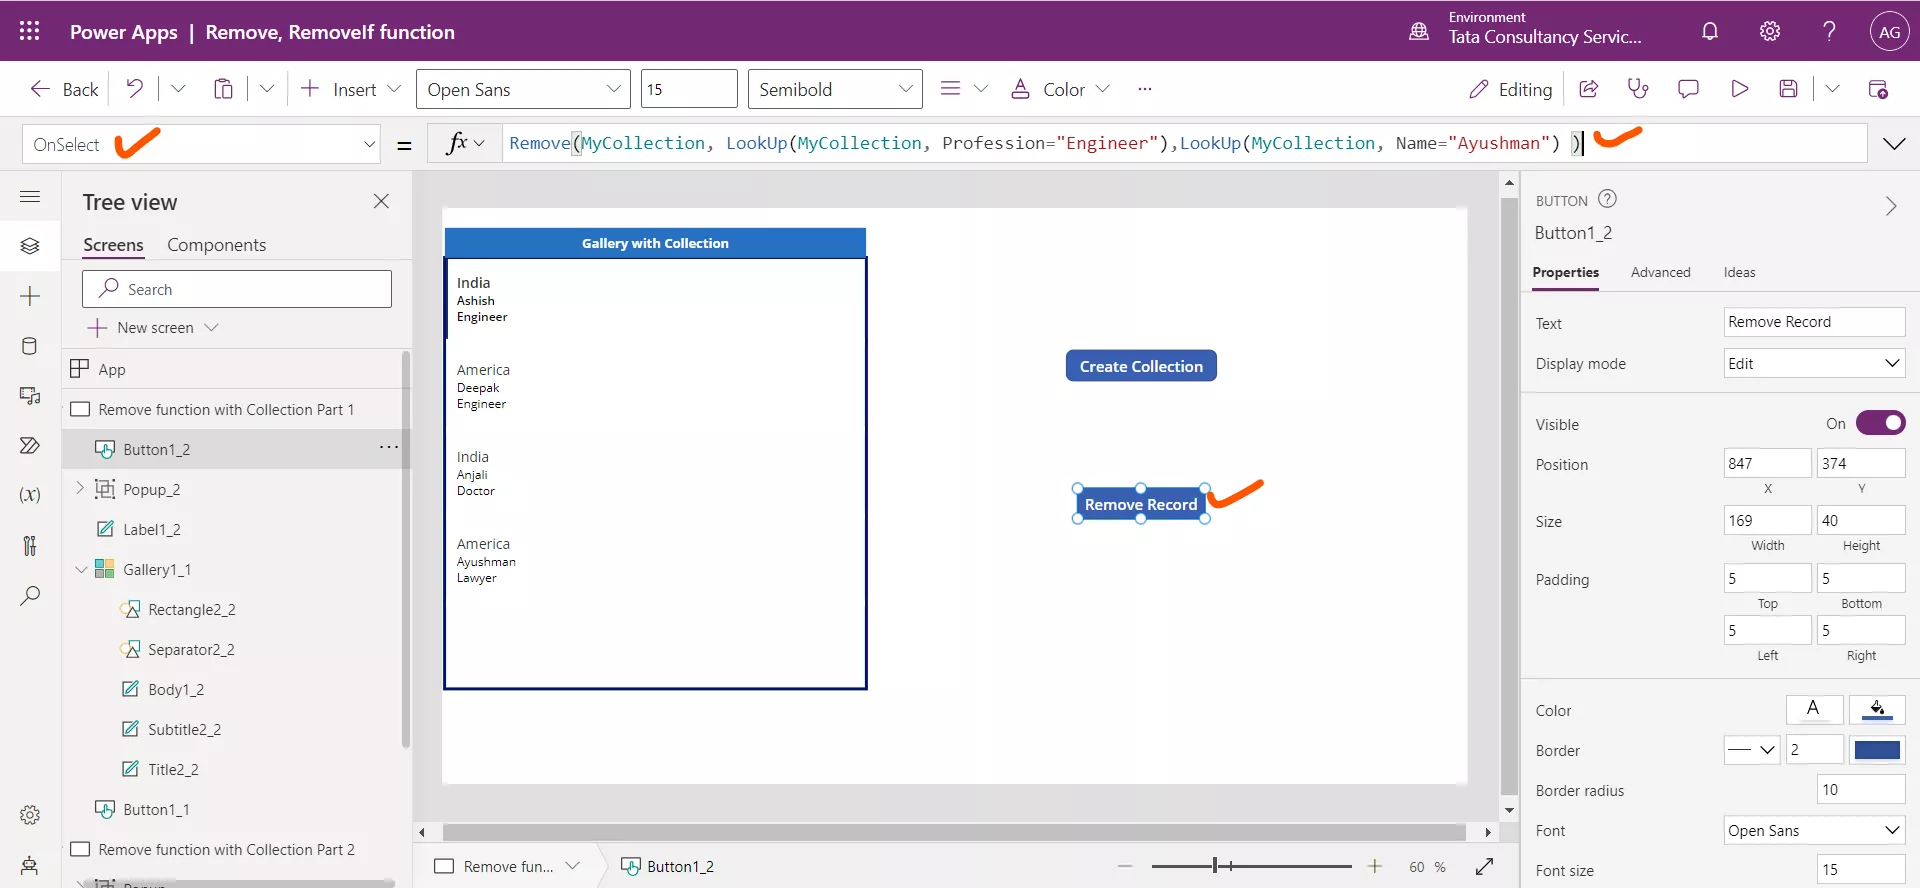
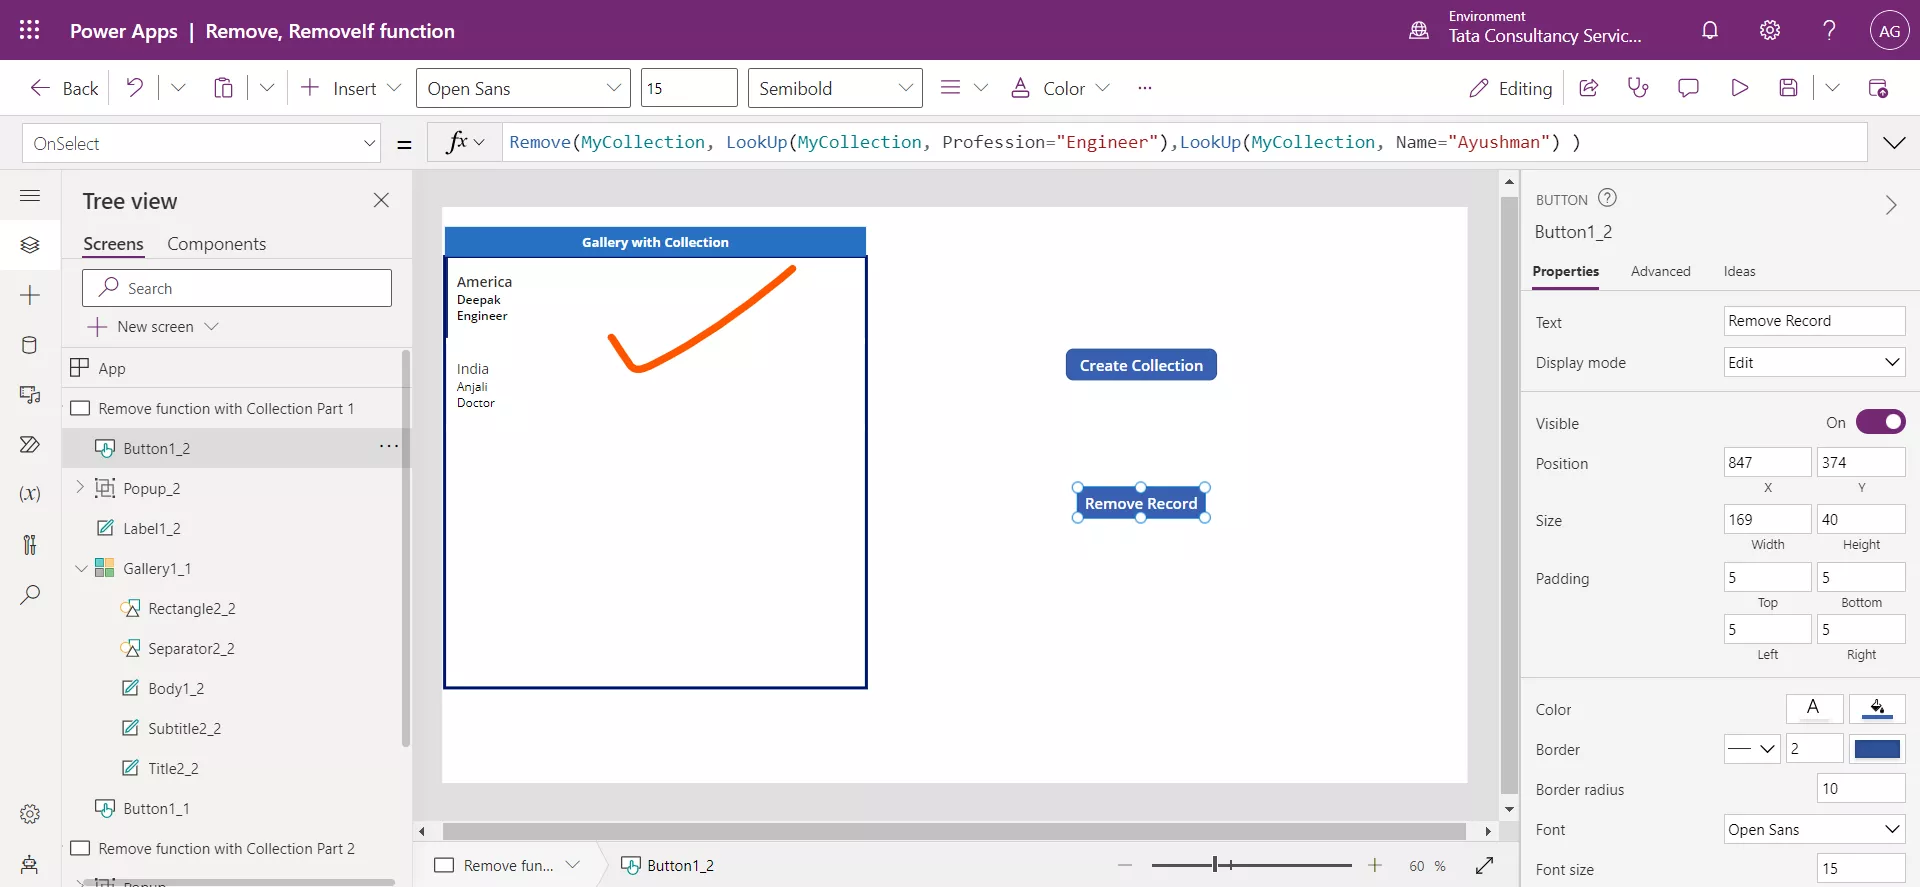
This formula removes two records from the data source.
Delete Record using Trash Icon If we want to give the user the ability to delete a record from a Gallery control, add a Trash icon to the Gallery template displaying the data source ‘MyCollection’ and then set the OnSelect property of the icon control to the following power apps formula.
Power Apps Formula
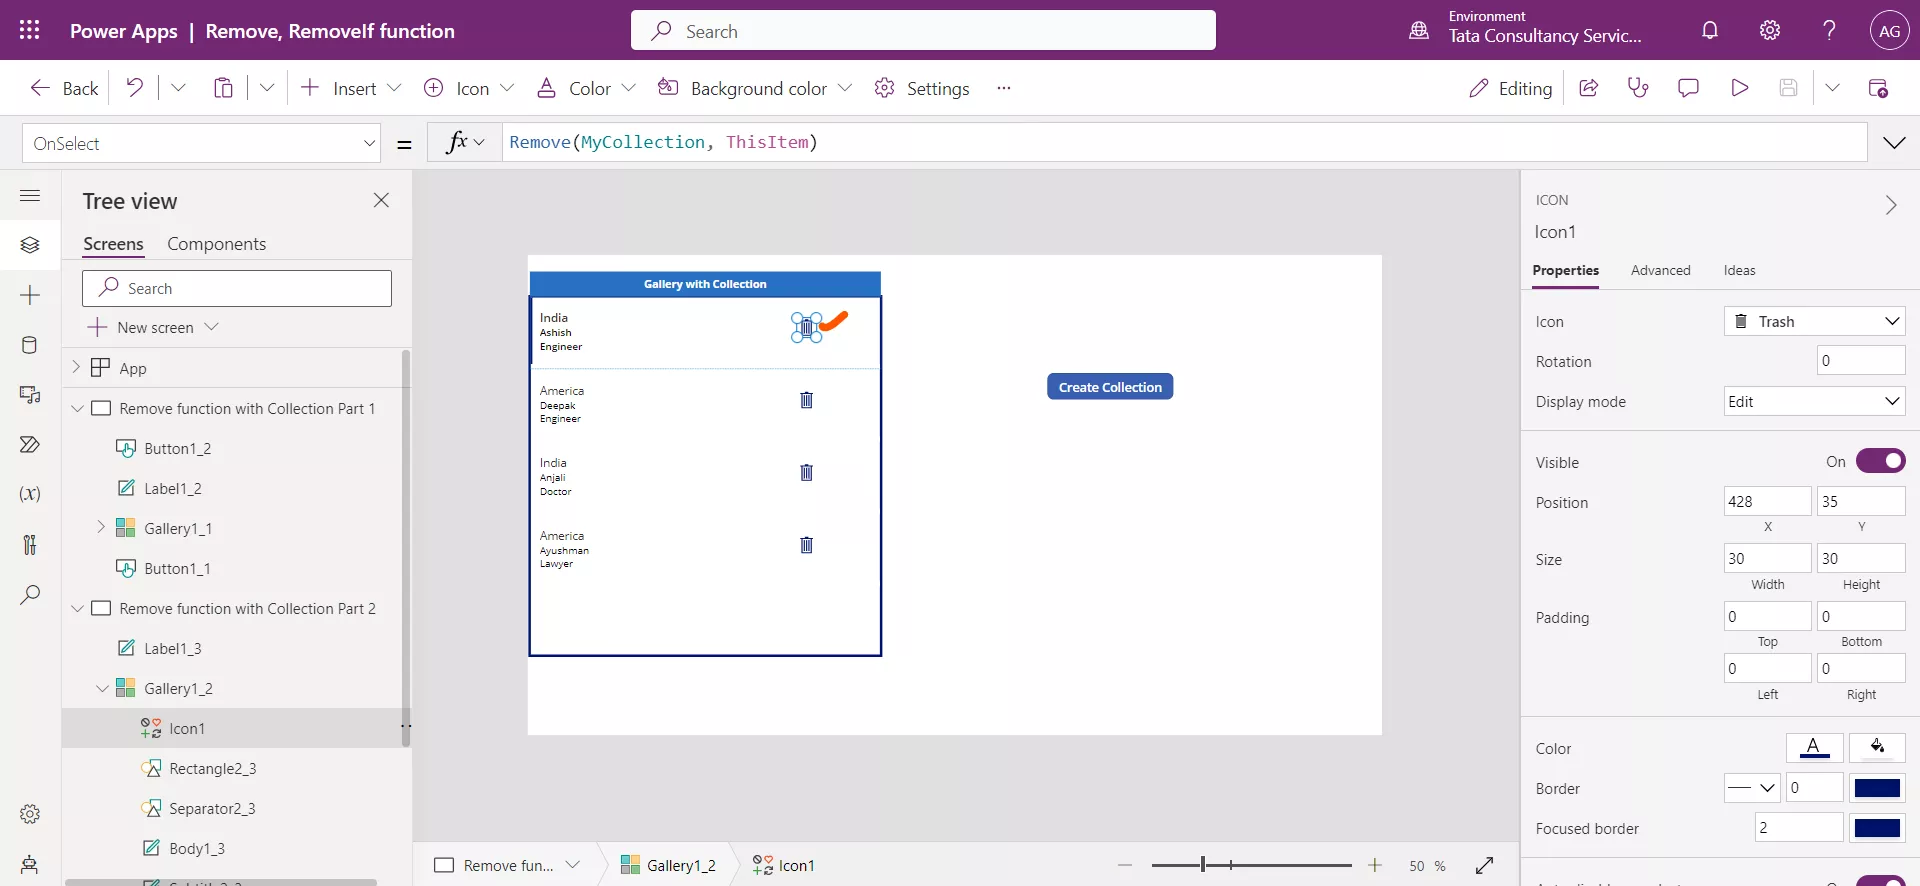
To delete a record from the 'MyCollection' data source, follow these steps:
1. Press and hold the Alt key.
2. Select the Trash icon corresponding to the record you want to delete.
By performing these steps, the selected rows will be deleted from the collection. However, it is advisable to provide a warning message to notify the user that the record will be deleted. It might be beneficial to implement a check or a pop-up dialog to confirm whether the user truly wants to delete the record.
Pop up confirmation in case of Collection To implement the confirmation popup, we can set the following Power apps formula on the OnSelect property of Trash Icon.
Power Apps Formula
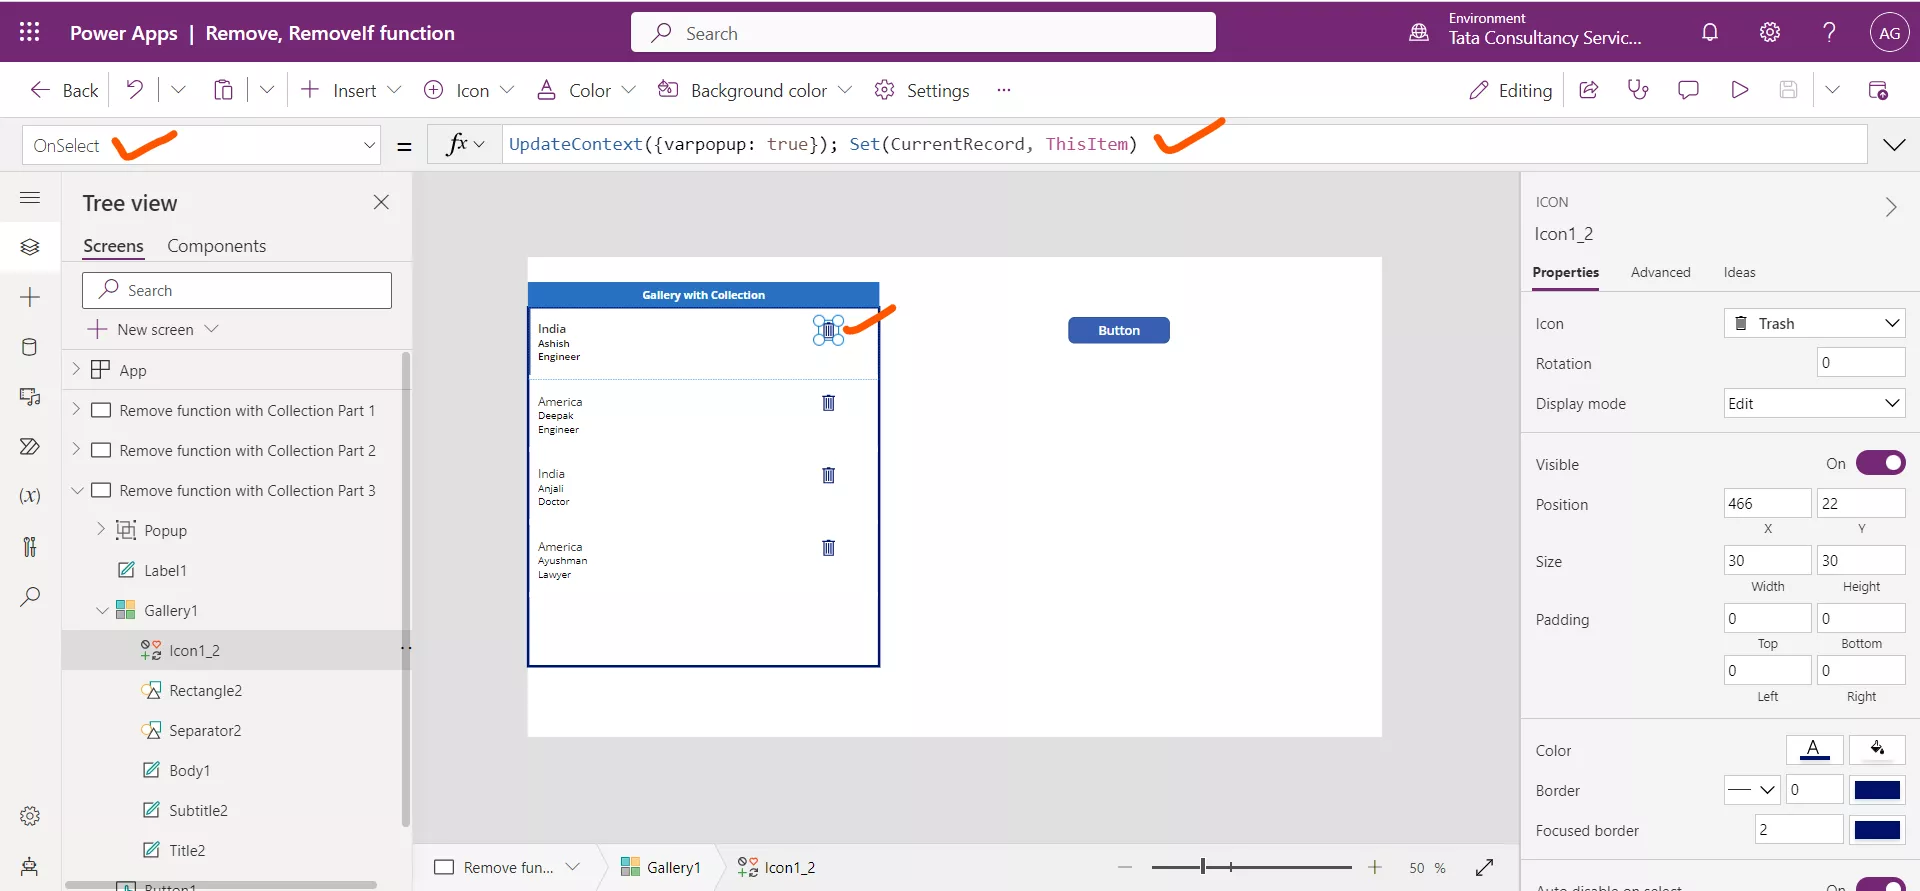
Create a Popup group control (it is nothing but a group of a Text label, a Rectangle and two Button controls). There are two button controls and set their Text properties to Cancel and Delete.
Set the Text property of Text label control to the following powerapps formula.
Power Apps Formula
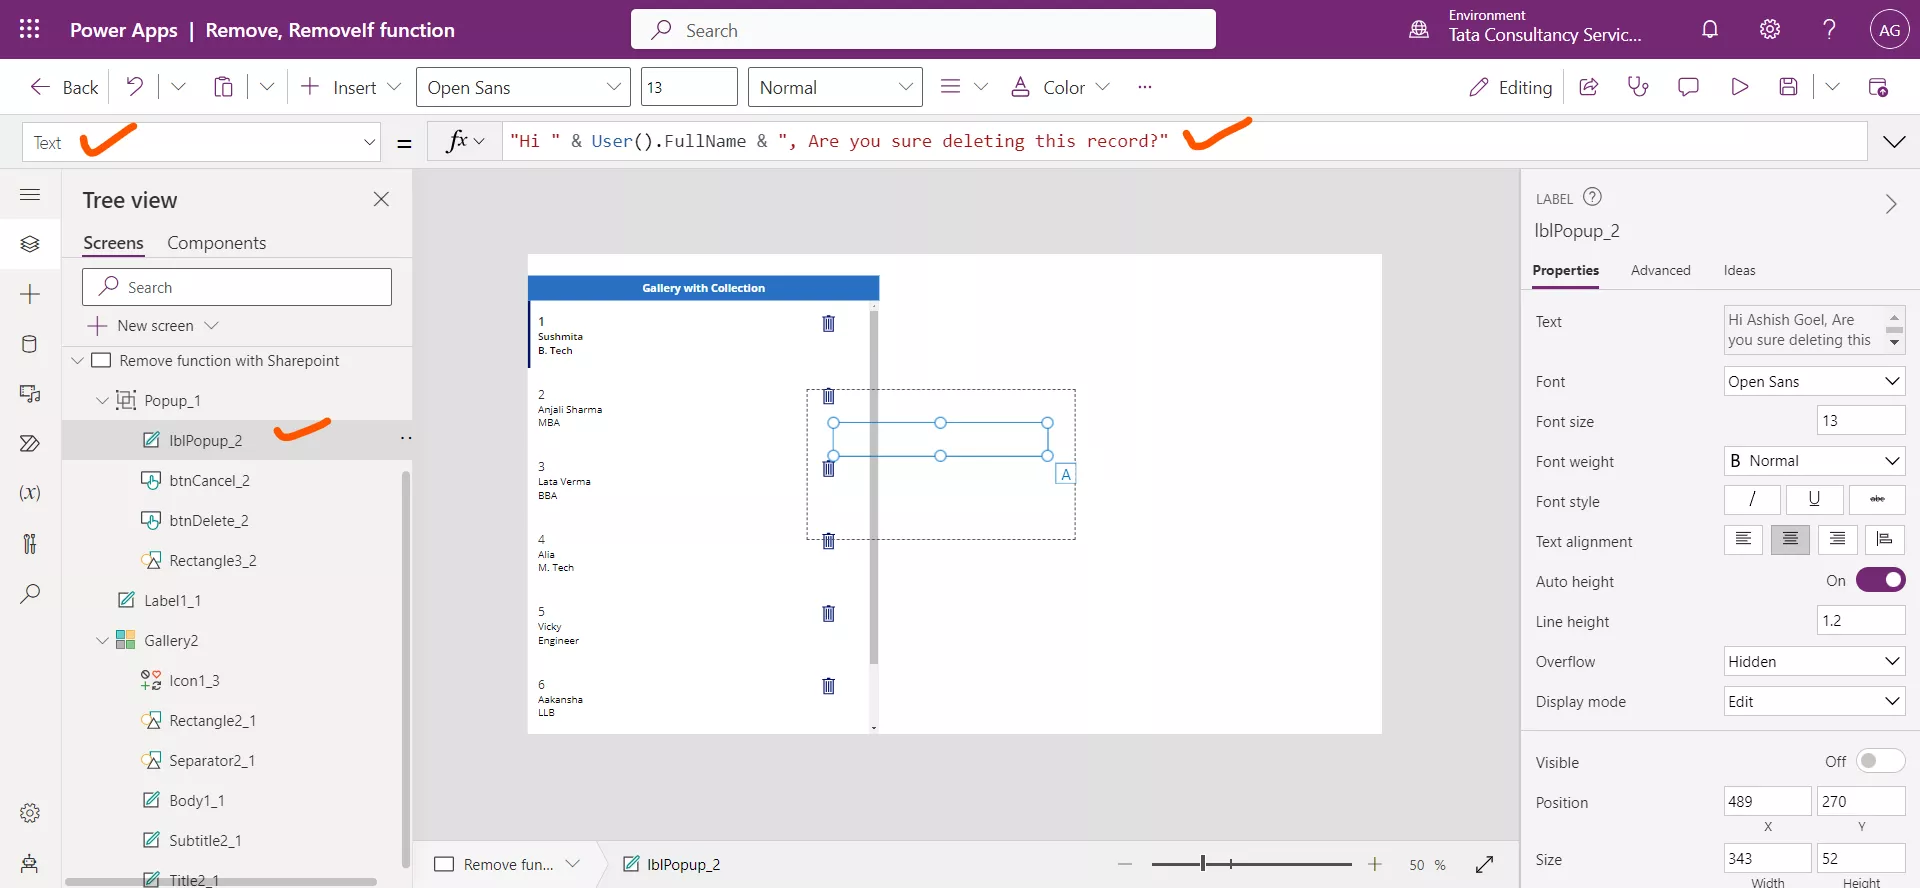
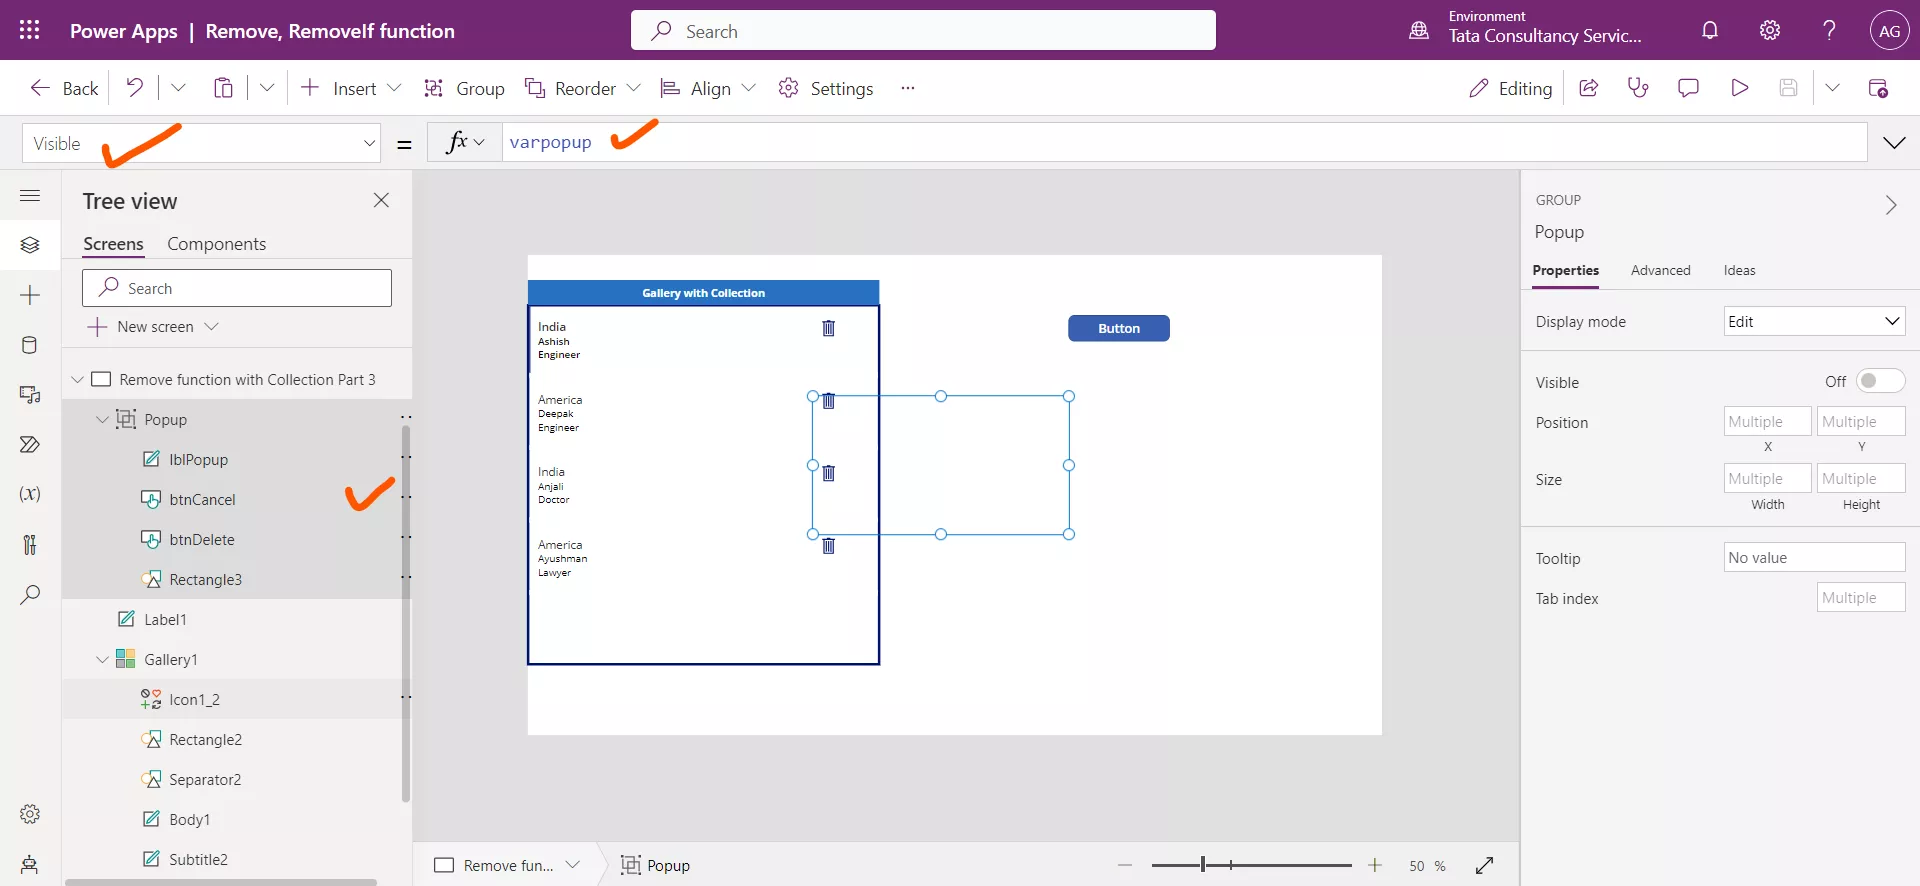
Set the Visible property of the group to the context variable to varpopup.
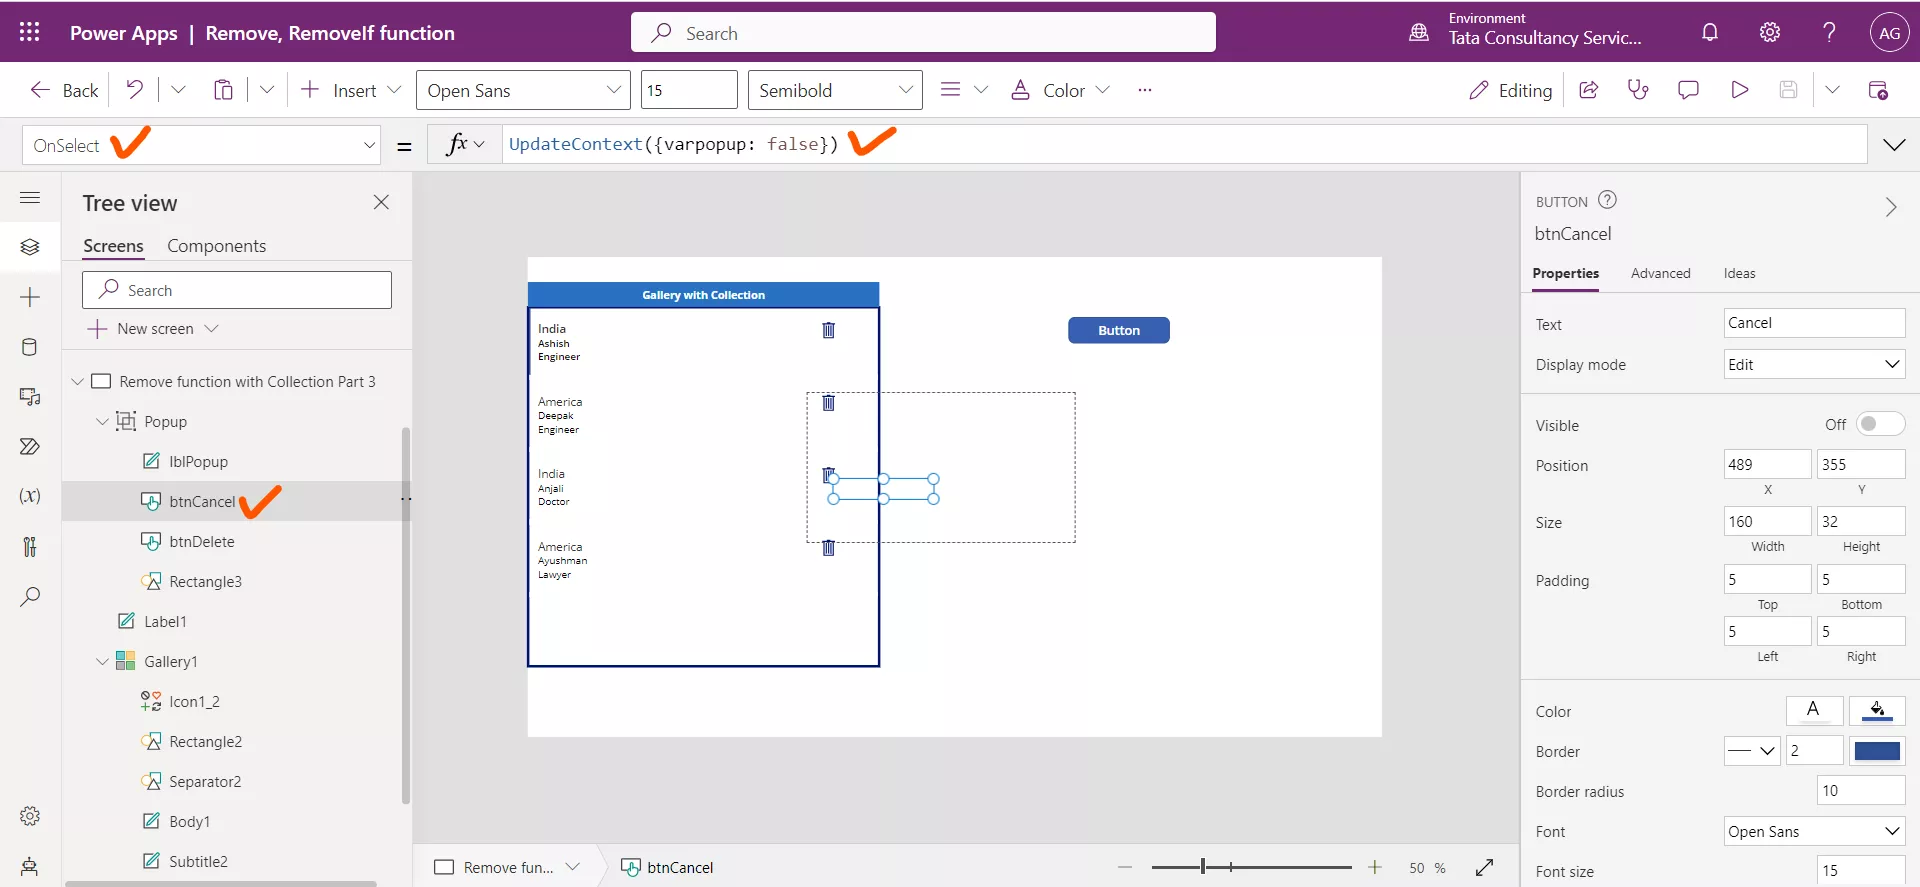
Set the following formula on the OnSelect property of the Cancel button.
Power Apps Formula
The formula sets the context variable varpopup to value false which hides the popup group, and the record from the gallery or datasource is not deleted.
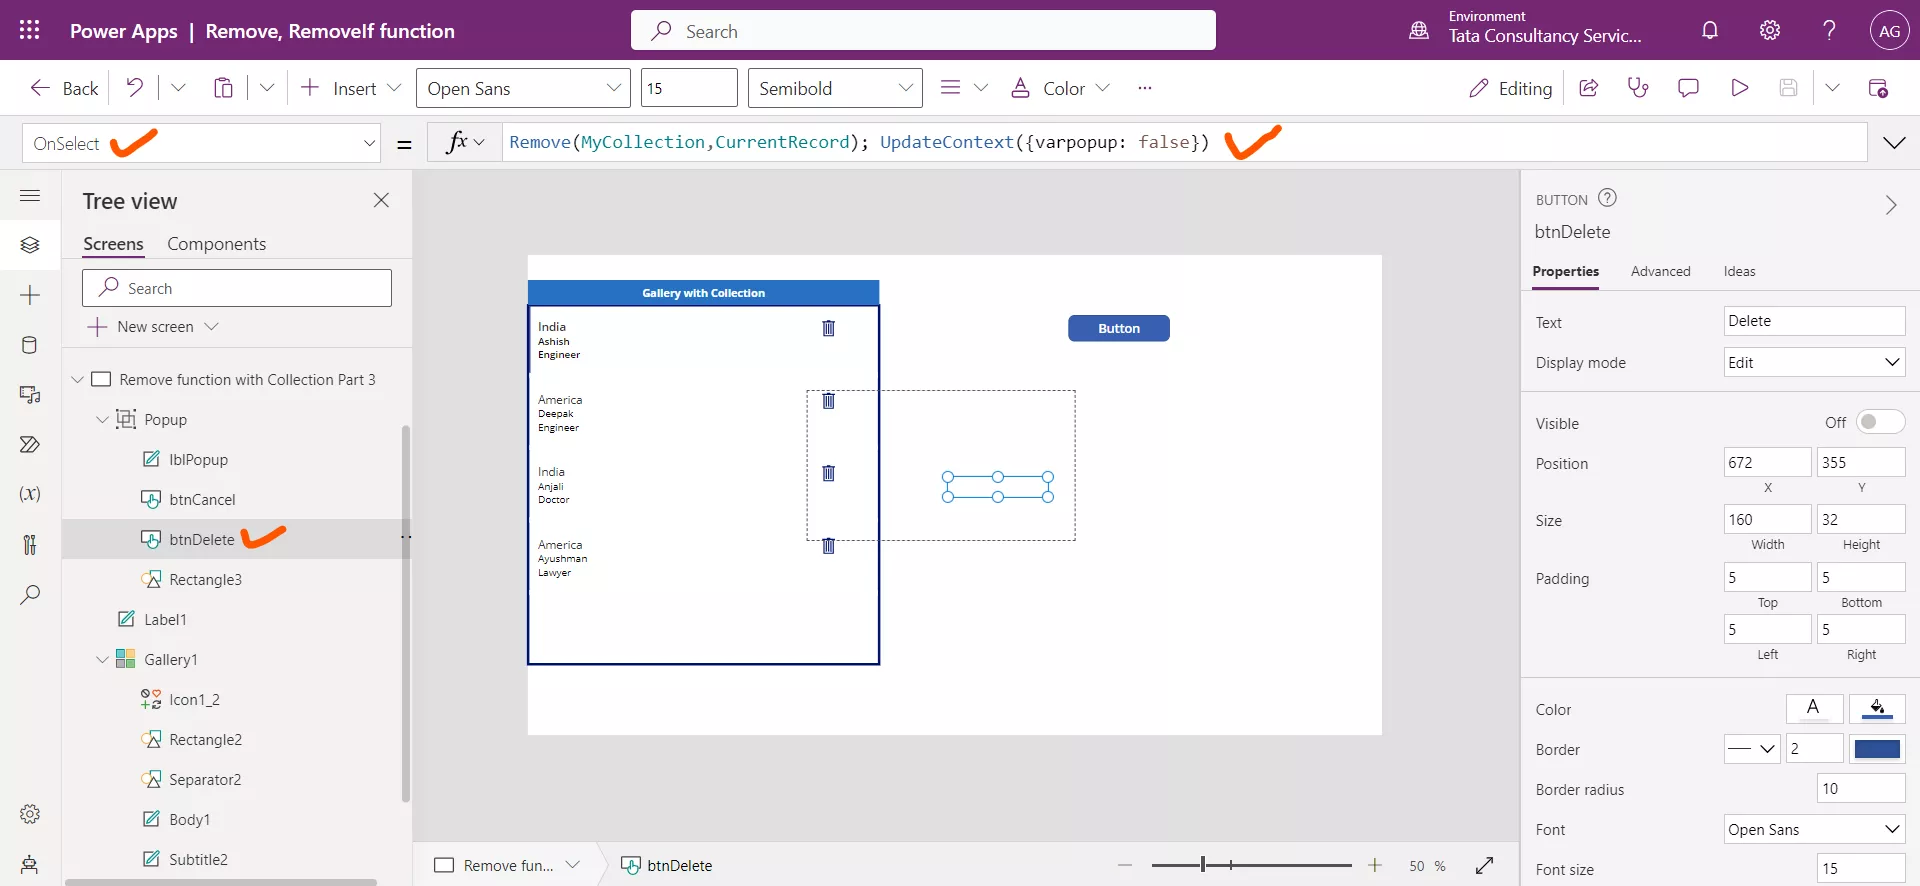
On the Delete button, we set the following formula on the OnSelect property of the control.
Power Apps Formula
The formula deleted the record from the collection, MyCollection and then hides the popup group, by setting the context variable varpopup to value false.
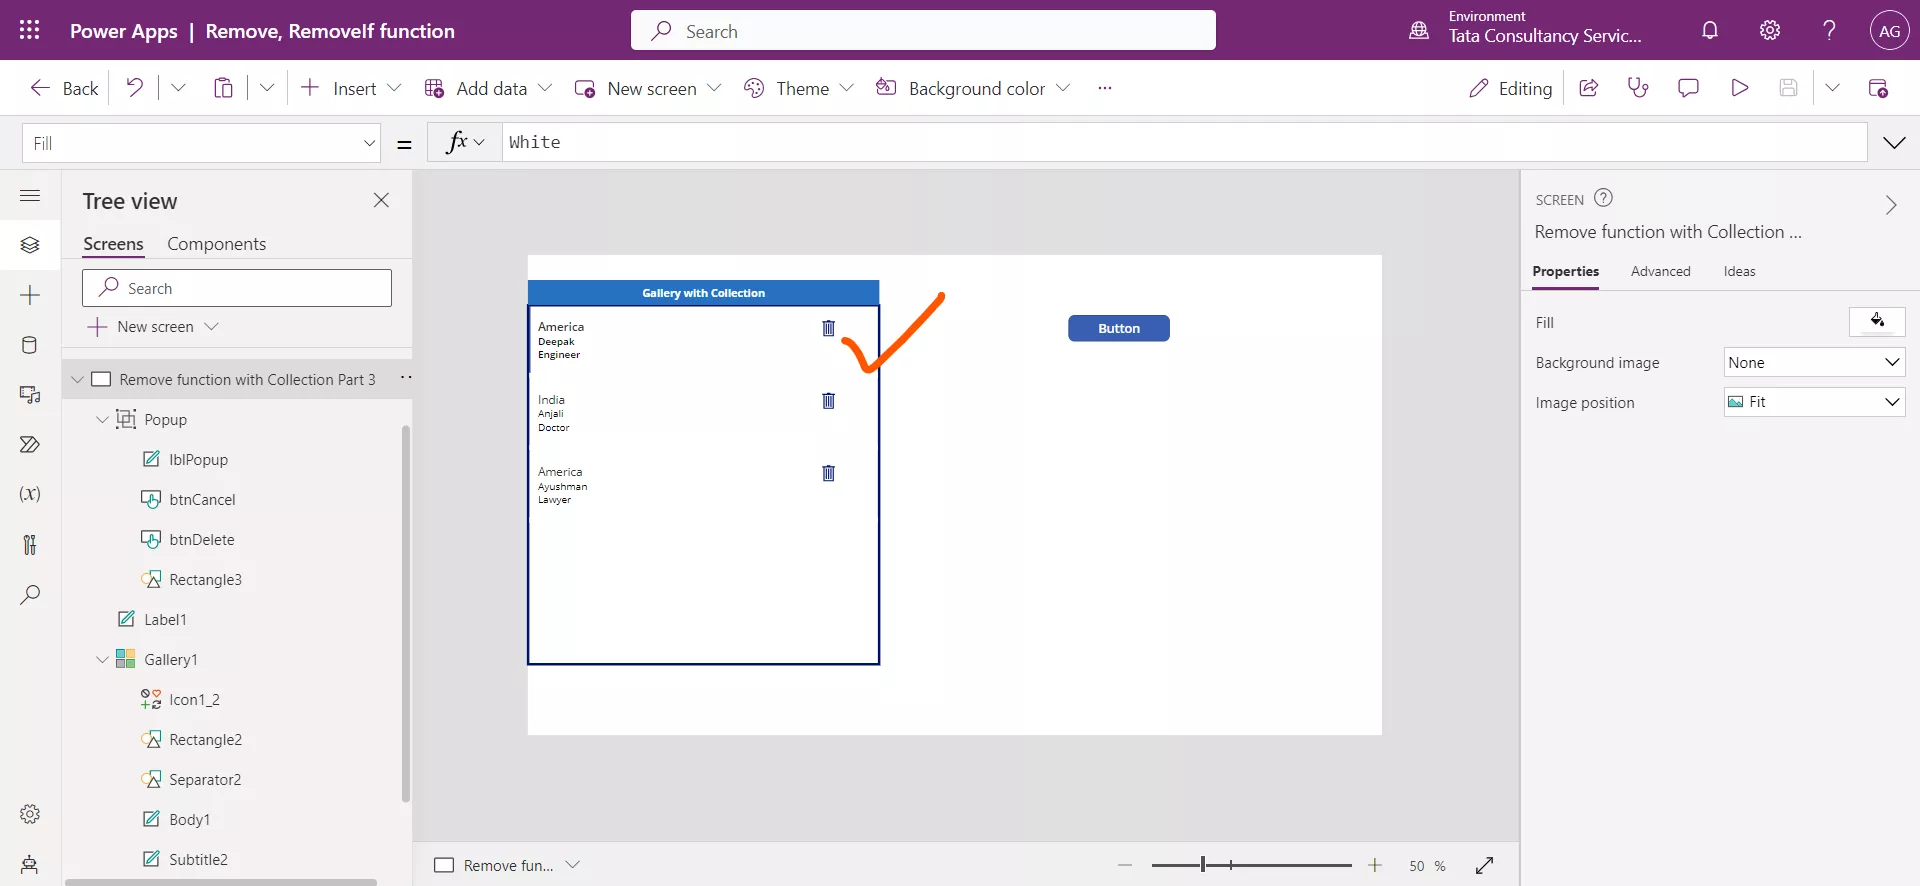
When we click on the Trash icon in the gallery, we can see that the popup group is visible and we can see that the CurrentRecord shows the following record.
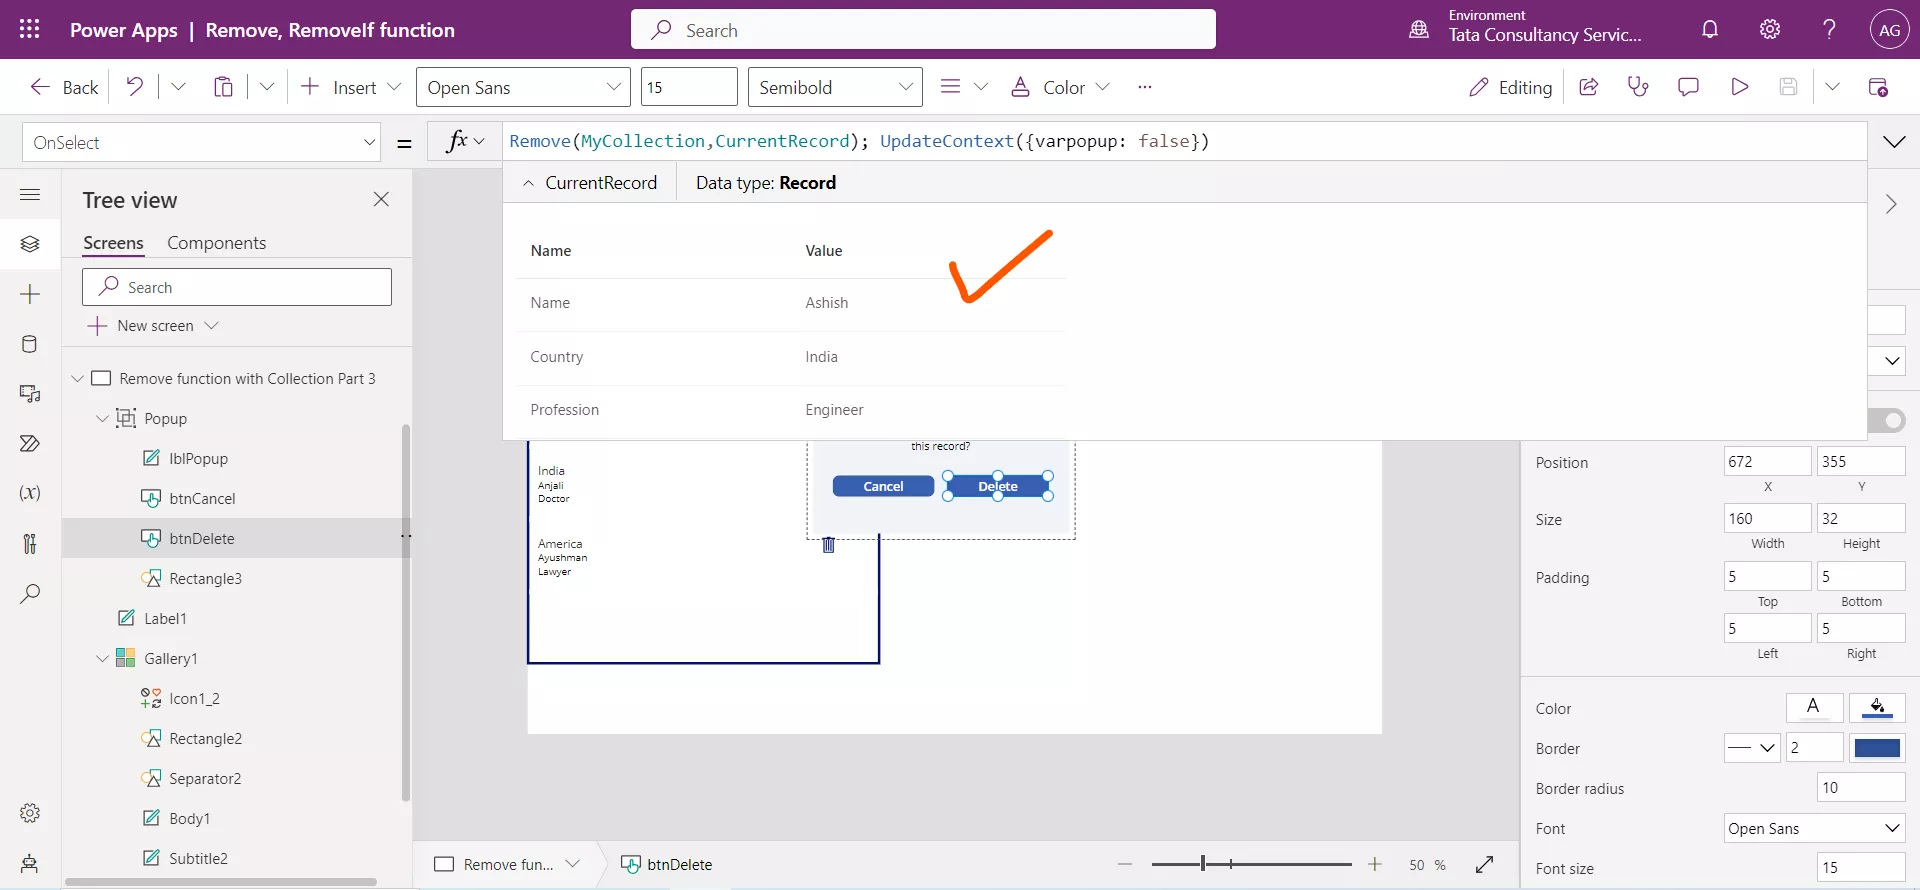
When we click on Delete button the record is deleted.
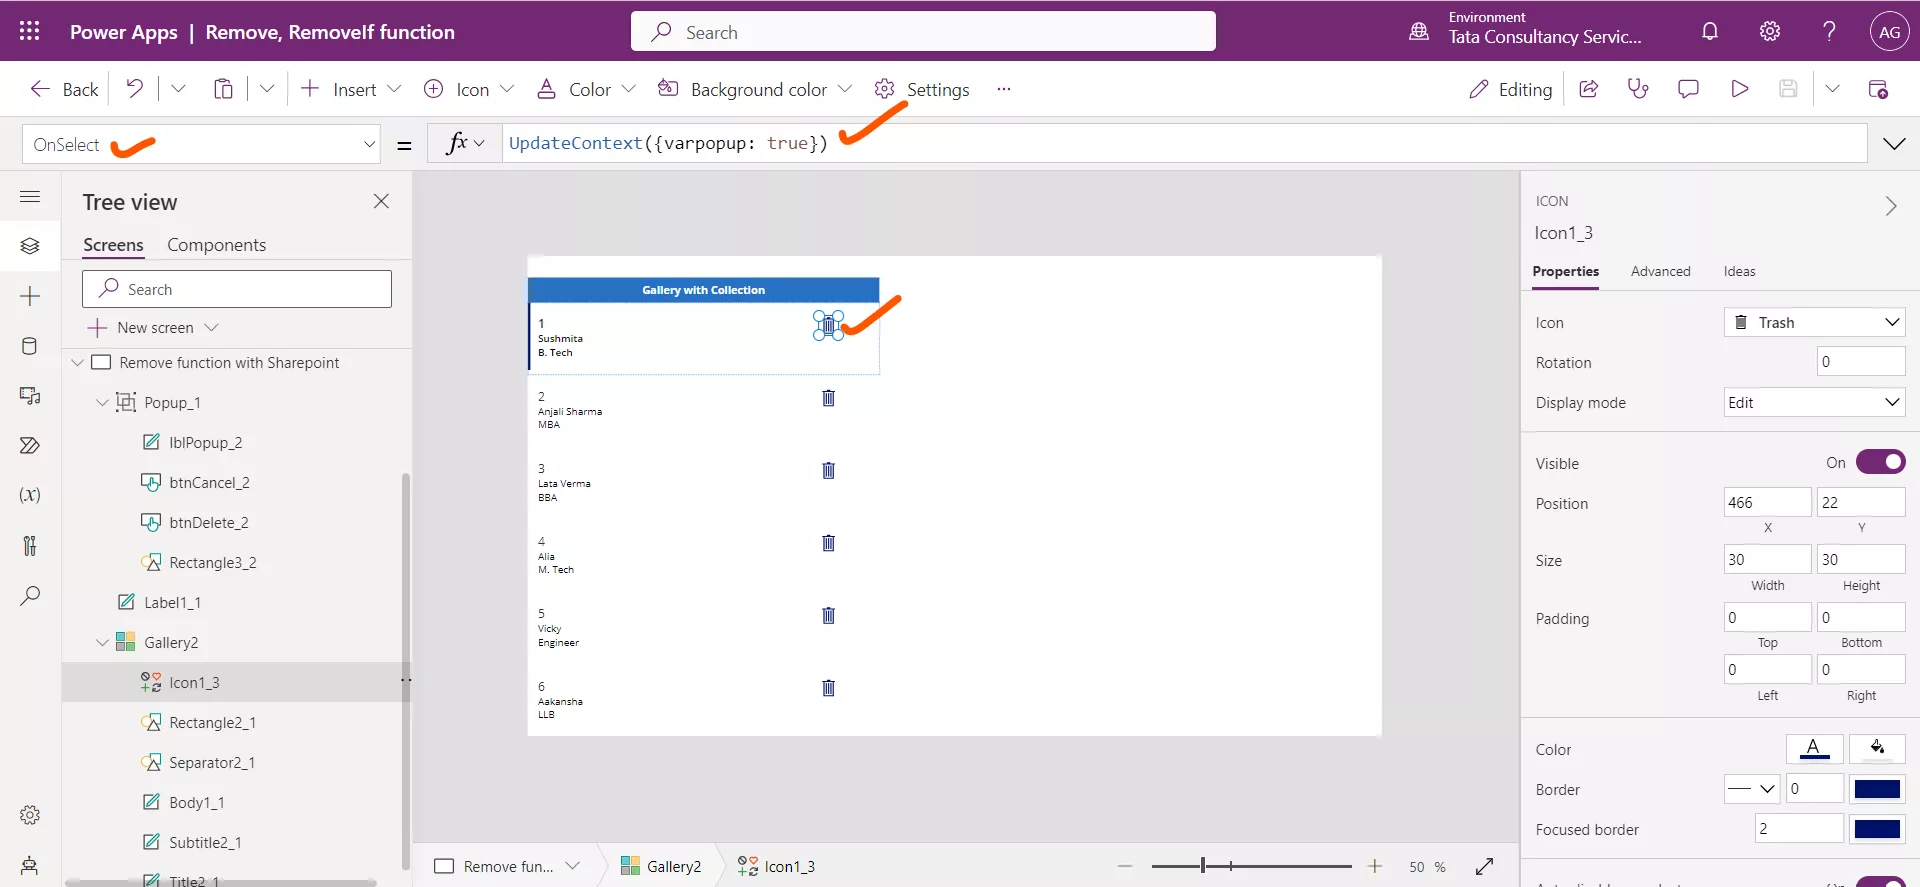
When we are using sharepoint list as a datasource By employing the context variable, the popup group visibility can be controlled. Set the OnSelect of the Trash icon to the following powerapps formula.
Power Apps Formula
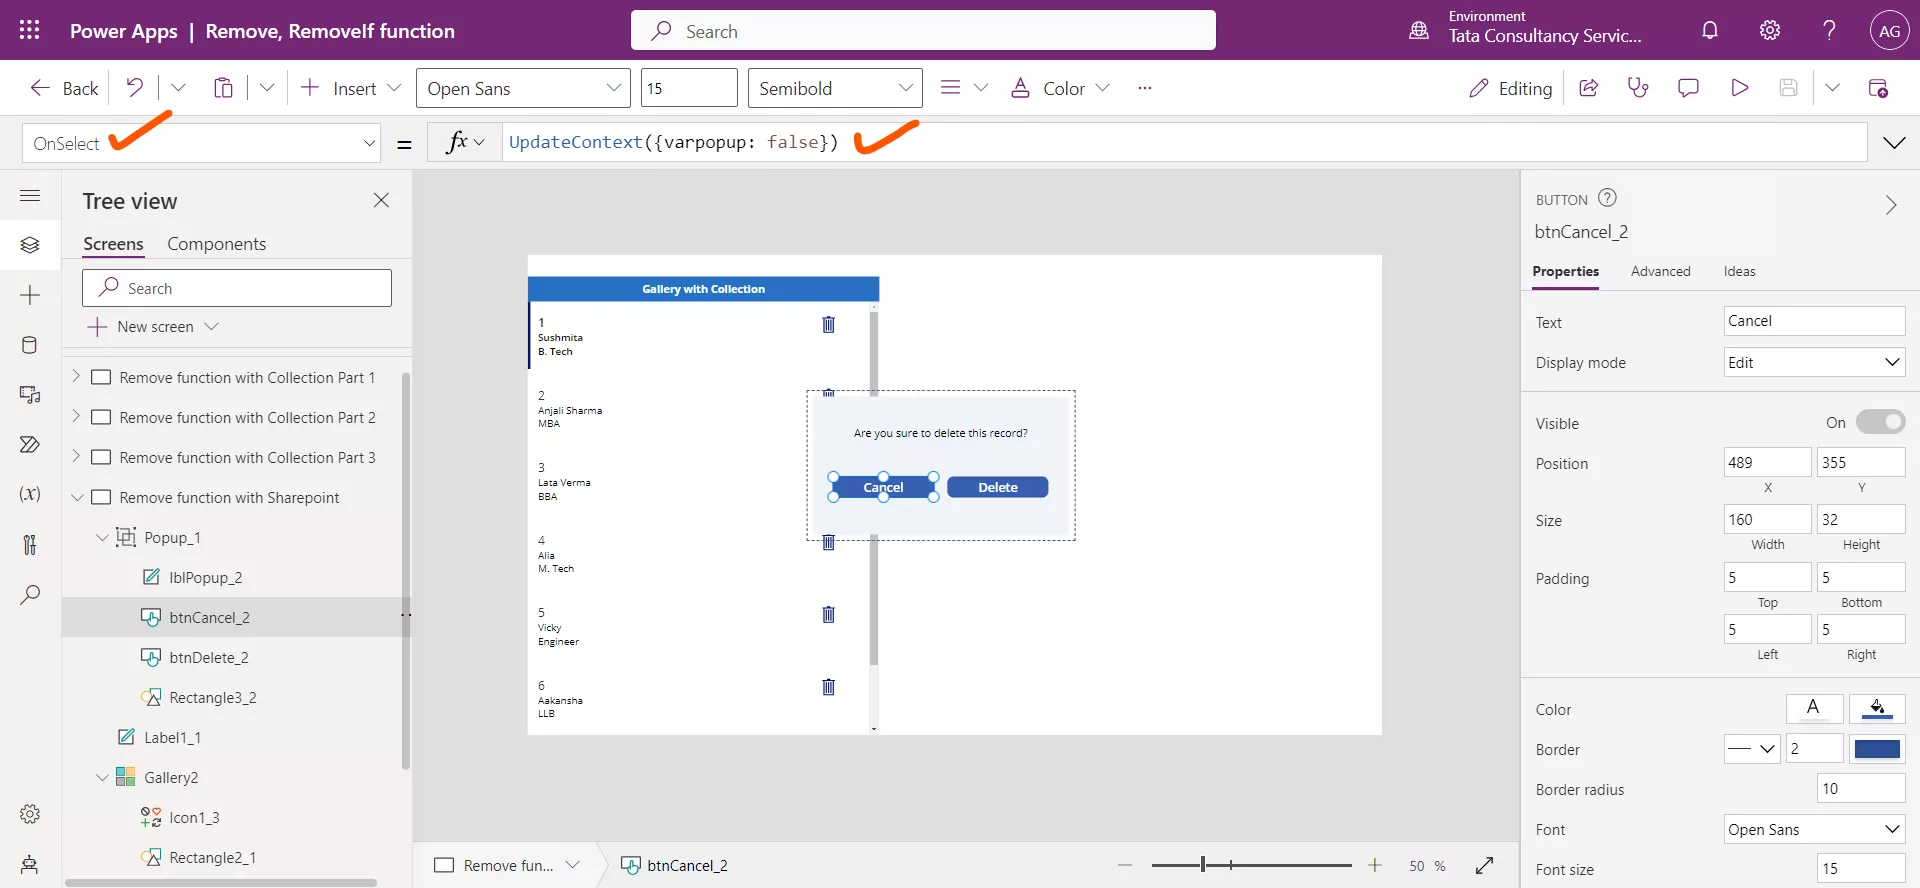
On the Cancel button set the following power apps formula.
Power Apps Formula
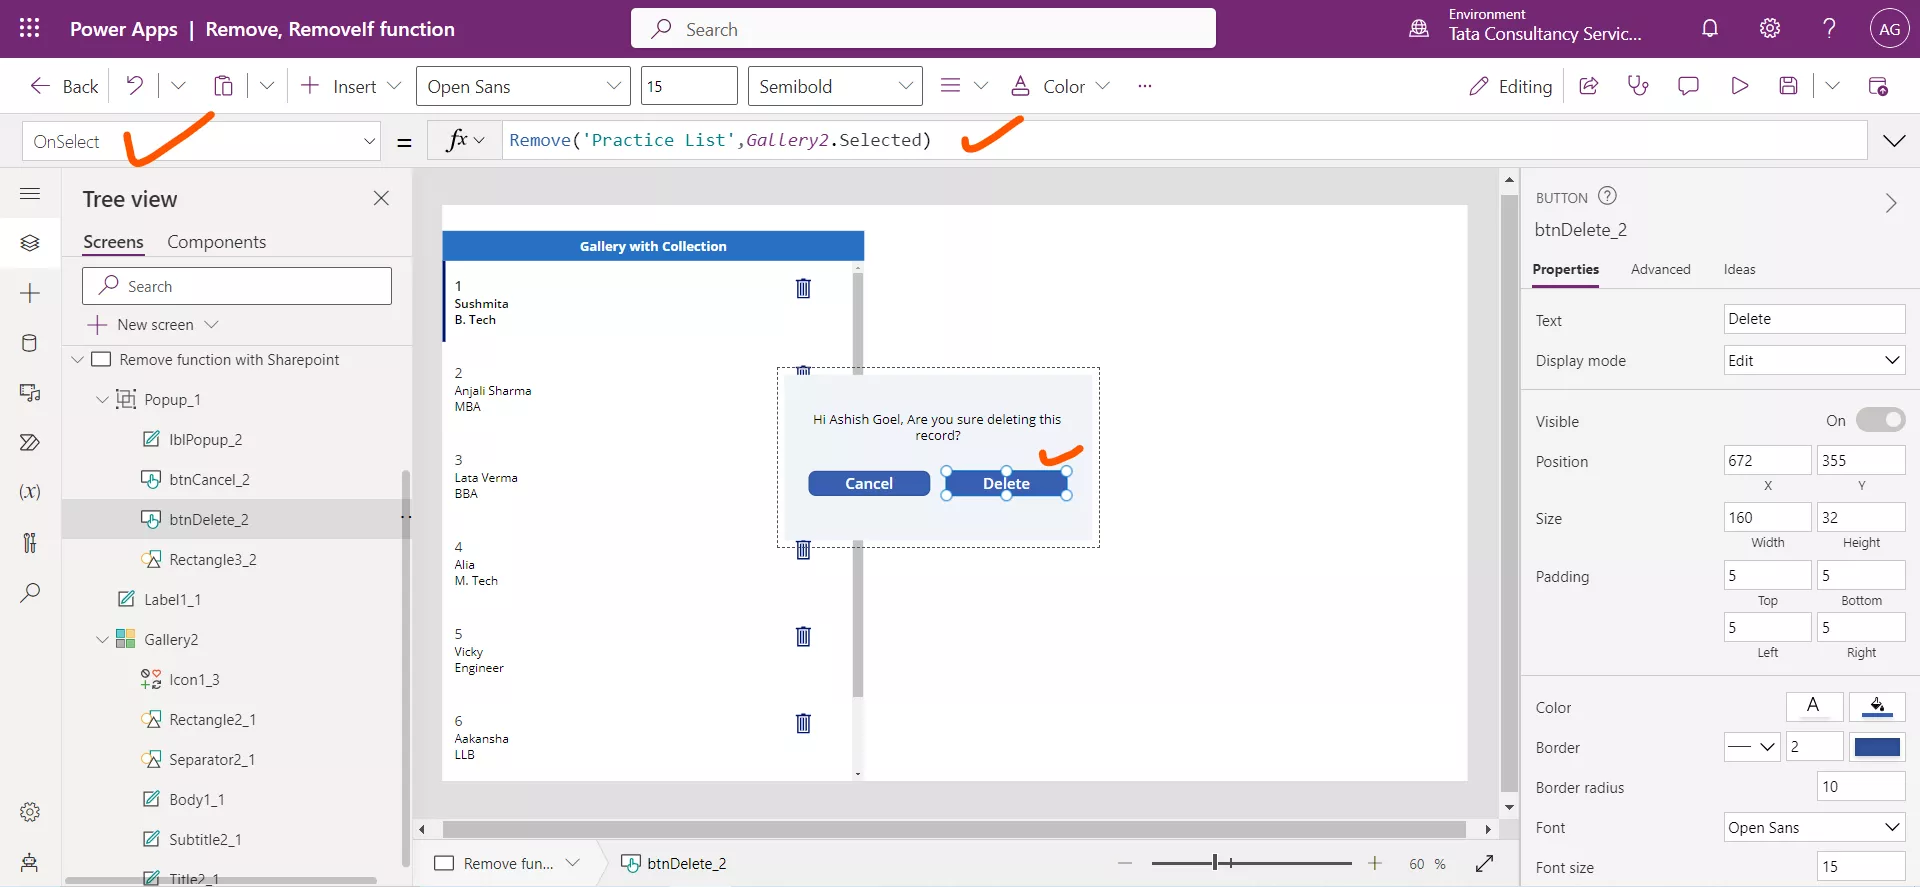
On the Delete button set the following power apps formula.
Power Apps Formula
The above formula is used to remove a selected item from a gallery from a Sharepoint list called 'Practice List'. Here, Gallery2 is the name of our Gallery control. After executing this formula, the selected item will no longer be present in the datasource. And then hides the popup group.
2. RemoveIf function
We can use the RemoveIf function to remove a record or records based on a condition or a set of conditions. Each condition can be any formula that results in boolean value i.e., true or false and can reference columns of the data source by name. Each condition is evaluated individually for each record, and the record is removed if all conditions evaluate to true.
Note: In RemoveIf function there is no confirmation before removing the record, we need to add explicitly this functionality.
Power Apps Syntax RemoveIf(DataSource, Condition [, ... ])
The following are the parameters of this function:
- DataSource – It is the required parameter. It specifies the data source that contains the record or records that we want to remove (i.e., Collection or Sharepoint List).
- Condition(s) – It is the required parameter. A formula that evaluates to true for the record or records to remove. We can use column names from the DataSource in the formula. If we specify multiple Conditions, all must evaluate to true for the record or records to be removed.
Example:Step 1: Add a + New Screen and follow the same steps as before to create a collection.
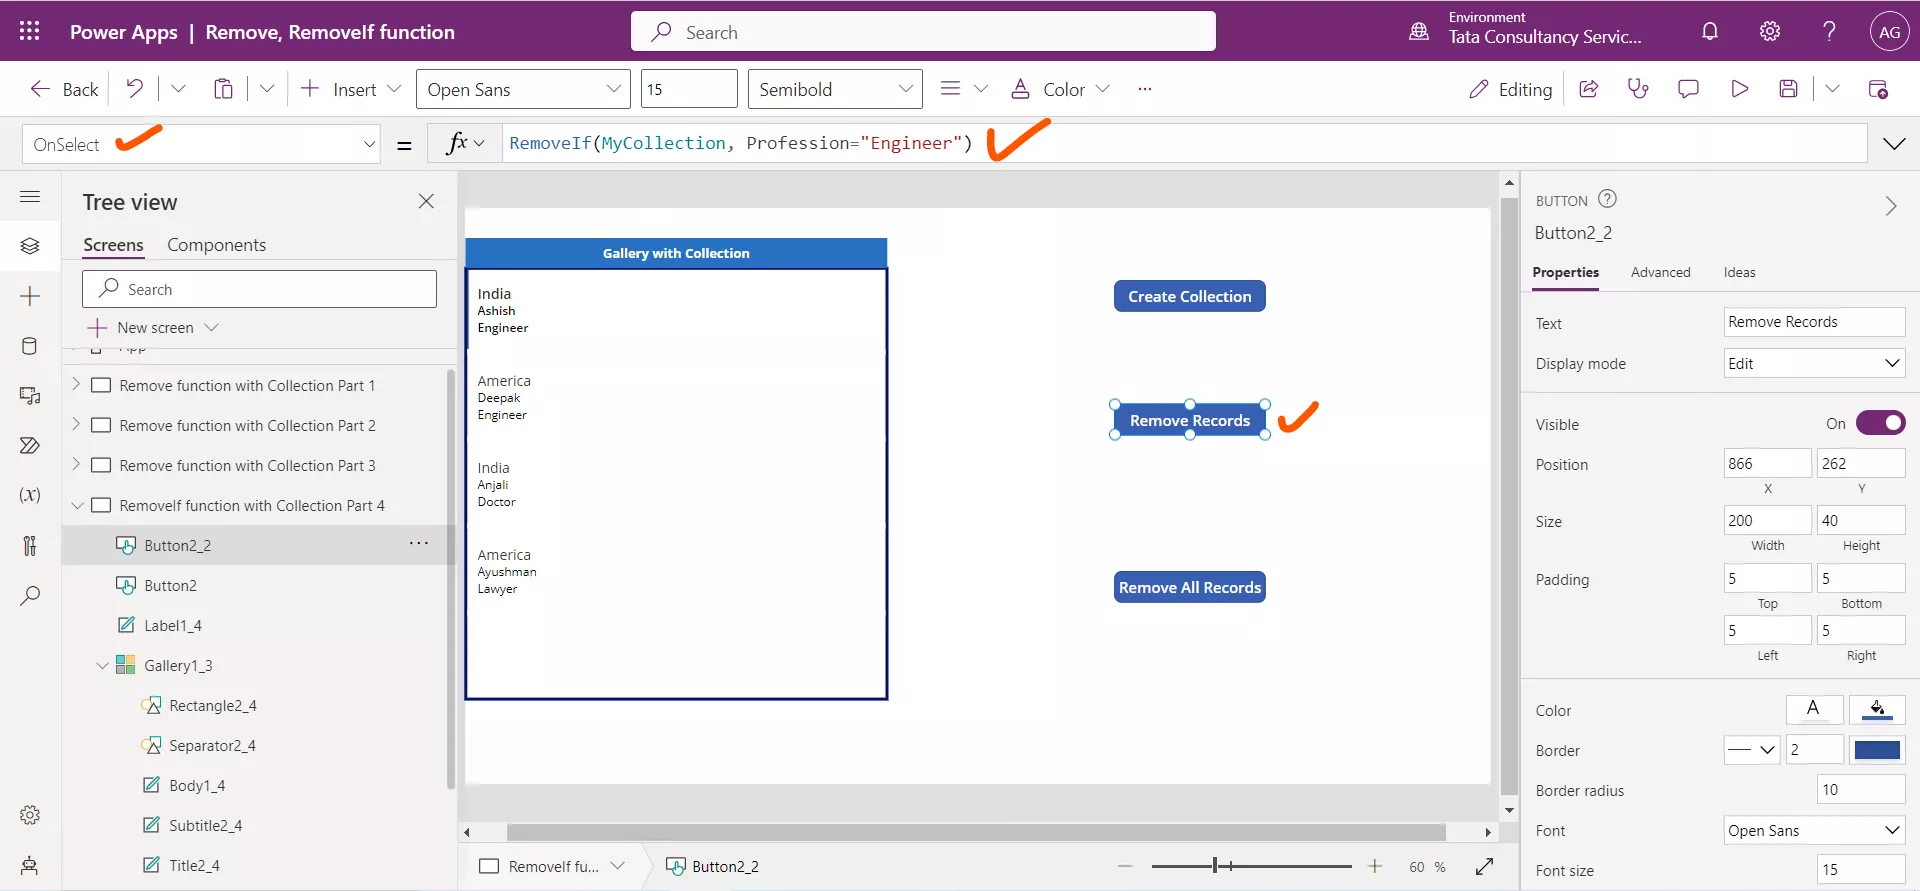
Step 2: On the Remove Records button, write the following powerapps formula on the OnSelect property.
Power Apps Formula
A condition is evaluated for each record where the profession is Engineer, and if the condition return true for that record, that record is removed from the table.
We can specify multiple conditions in the RemoveIf function.
PowerApps Formula
The formula is used to remove items from the collection 'MyCollection' based on specified conditions. The RemoveIf function iterates through each item in the collection and checks if the specified conditions are met. If an item satisfies all the conditions, it will be removed from the collection. After executing this formula, any items in 'MyCollection' that have the Profession field set to "Engineer" and the Name field set to "Deepak" will be removed from the collection.
Delete all the records from a data source at once If we want to remove all the records from the data source write the following formula on the OnSelect property of the button.
PowerApps Formula
We can use the Sharepoint as the datasource
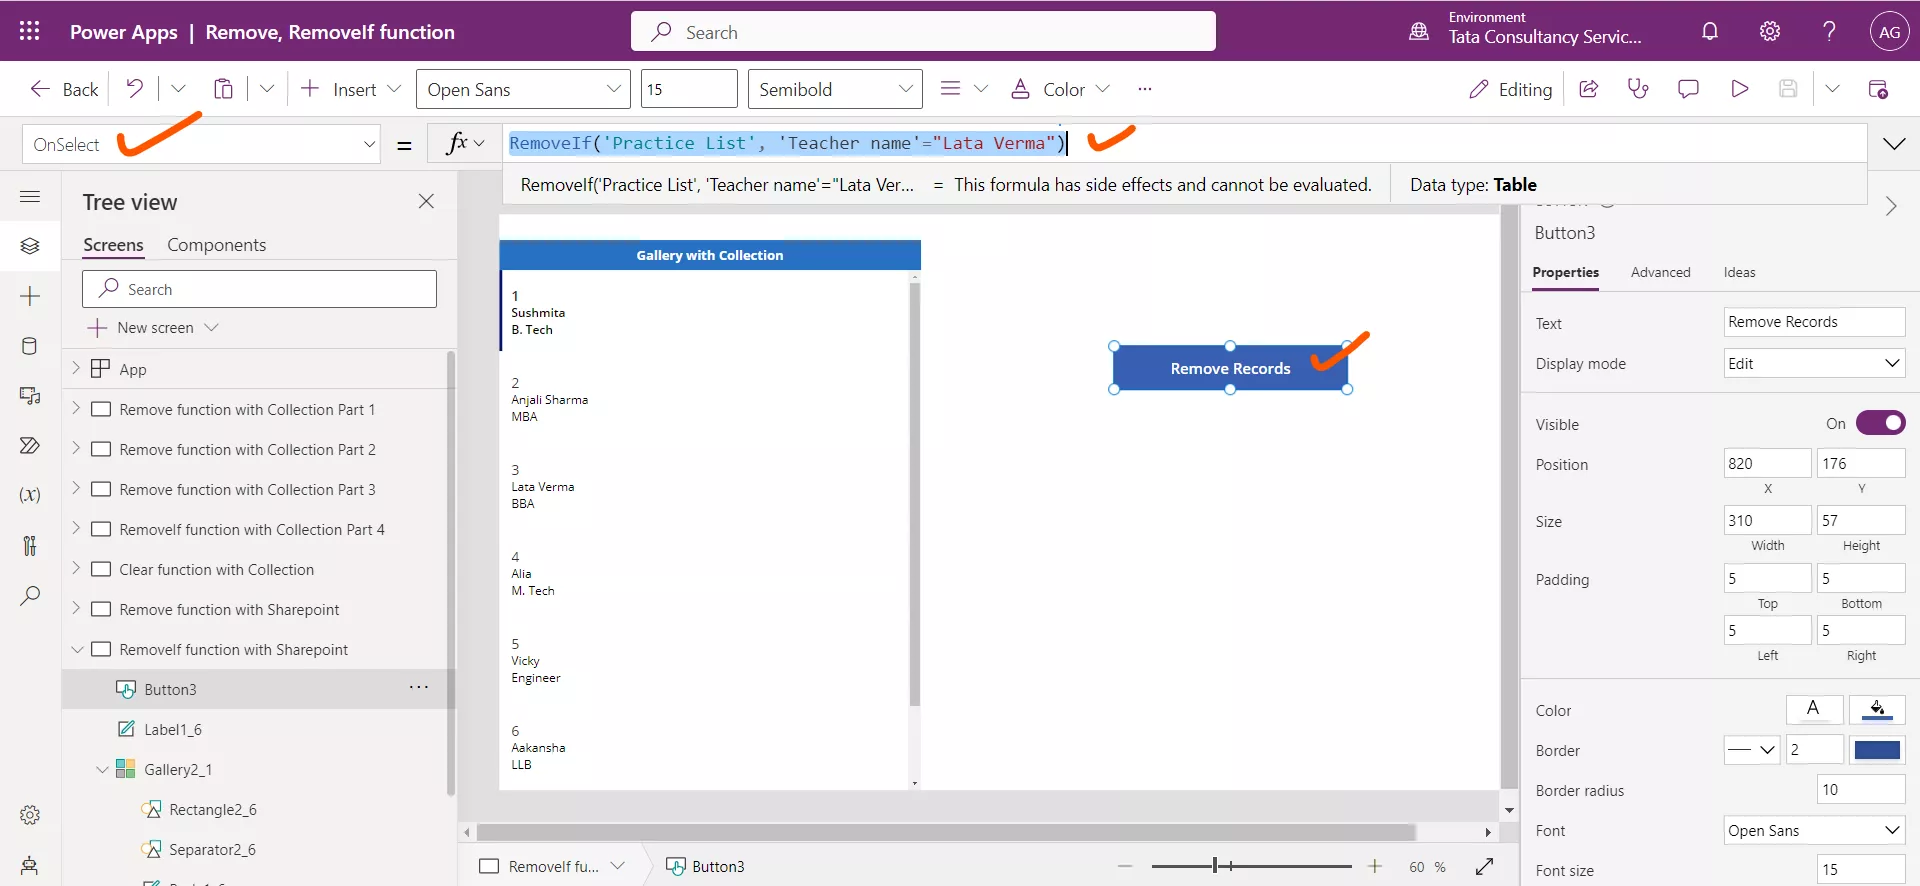
We can use the sharepoint list as the datasource with the RemoveIf function.
PowerApps Formula
Note on Delegation The RemoveIf function is delegable in case of Sharepoint List.
3. Clear() Function
We can also use the Clear function to remove all the records in a collection. The columns of the collection will remain. The only input we pass to the function is the collection name.
Power Apps Syntax Clear(Collection)
The parameter Collection is the required one, and it specifies the name of the collection variable that we want to clear.
Example: We can use the following formula to delete all the records from a collection.
PowerApps Formula
This formula will delete all the records from the MyCollection collection without changing the columns of the collection.
Important note: 1. Note that Clear only operates on collections and not other data sources. For other data sources we can use RemoveIf(DataSource, true). Use caution as this will remove all records from the data source's storage and can affect other users.
2. As we have noted the ClearCollect function deletes all the records from a collection and then adds a different set of records to the same collection. With a single function, ClearCollect offers the combination of Clear and then Collect. We can use the ClearCollect as to reload the values.