Patch Function in Power Apps
On this Page
In canvas powerapps, we use Gallery controls to display records from our data source and Forms control to view, create, and edit an individual record, but sometimes forms are not enough. In those scenarios, we have a function called Patch function in power apps for updating our tabular data sources directly.
The Patch function is used to edit or create one or more records in a data source, but not delete them, or merges records outside of a data source. Use the Patch function to modify records in complex situations, such as when we do updates that require no user interaction or use forms that span multiple screens.
To update records in a data source more easily for simple changes, use the Edit form control instead. When we add an Edit form control, we provide users with a form to fill in and then save the changes to a data source with the SubmitForm function.
1. Using Patch Function to create a record
The Patch function can be used to create a new record in our data source. Power Apps Syntax Patch(DataSource, Defaults(DataSource), ChangeRecordTable1 [, ChangeRecordTable2, … ] )
To create a new record, there are three parts to the formula.
- DataSource – It is the required parameter. The data source that contains the records that we want to create. This could be a tabular data source (such as Microsoft Dataverse or SharePoint) or a collection.
- BaseRecordTable – It is the required parameter. Here the result of Defaults function is used. It creates a record with default values for the data source. If a column within the data source does not have a default value, that column value will not be present.
- ChangeRecordTable(s) – It is the required parameter. One or more tables of records that contain the name of the columns followed by the value to write to that column to modify for each record of the BaseRecordTable. Change records are processed in order from the beginning of the argument list to the end, with later property values overriding earlier ones.
a) Patch function with the Defaults function and Table of change records
The following powerapps formula will create a new record in the ‘My Users’ data source and will set the Region column to Sonipat and Country column to India. Notice that we do not define any primary key information (the ID column) that will be updated by the data source according to its settings.
The Defaults function notifies that we are creating a new record in the data source. The example formula is as follows:
Power Apps Formula
b) Patch function with Updates Property of Form control
We can also use the Updates property of a form control with the Patch function.
Suppose we have added a form control and set its datasource, as shown in the following image.
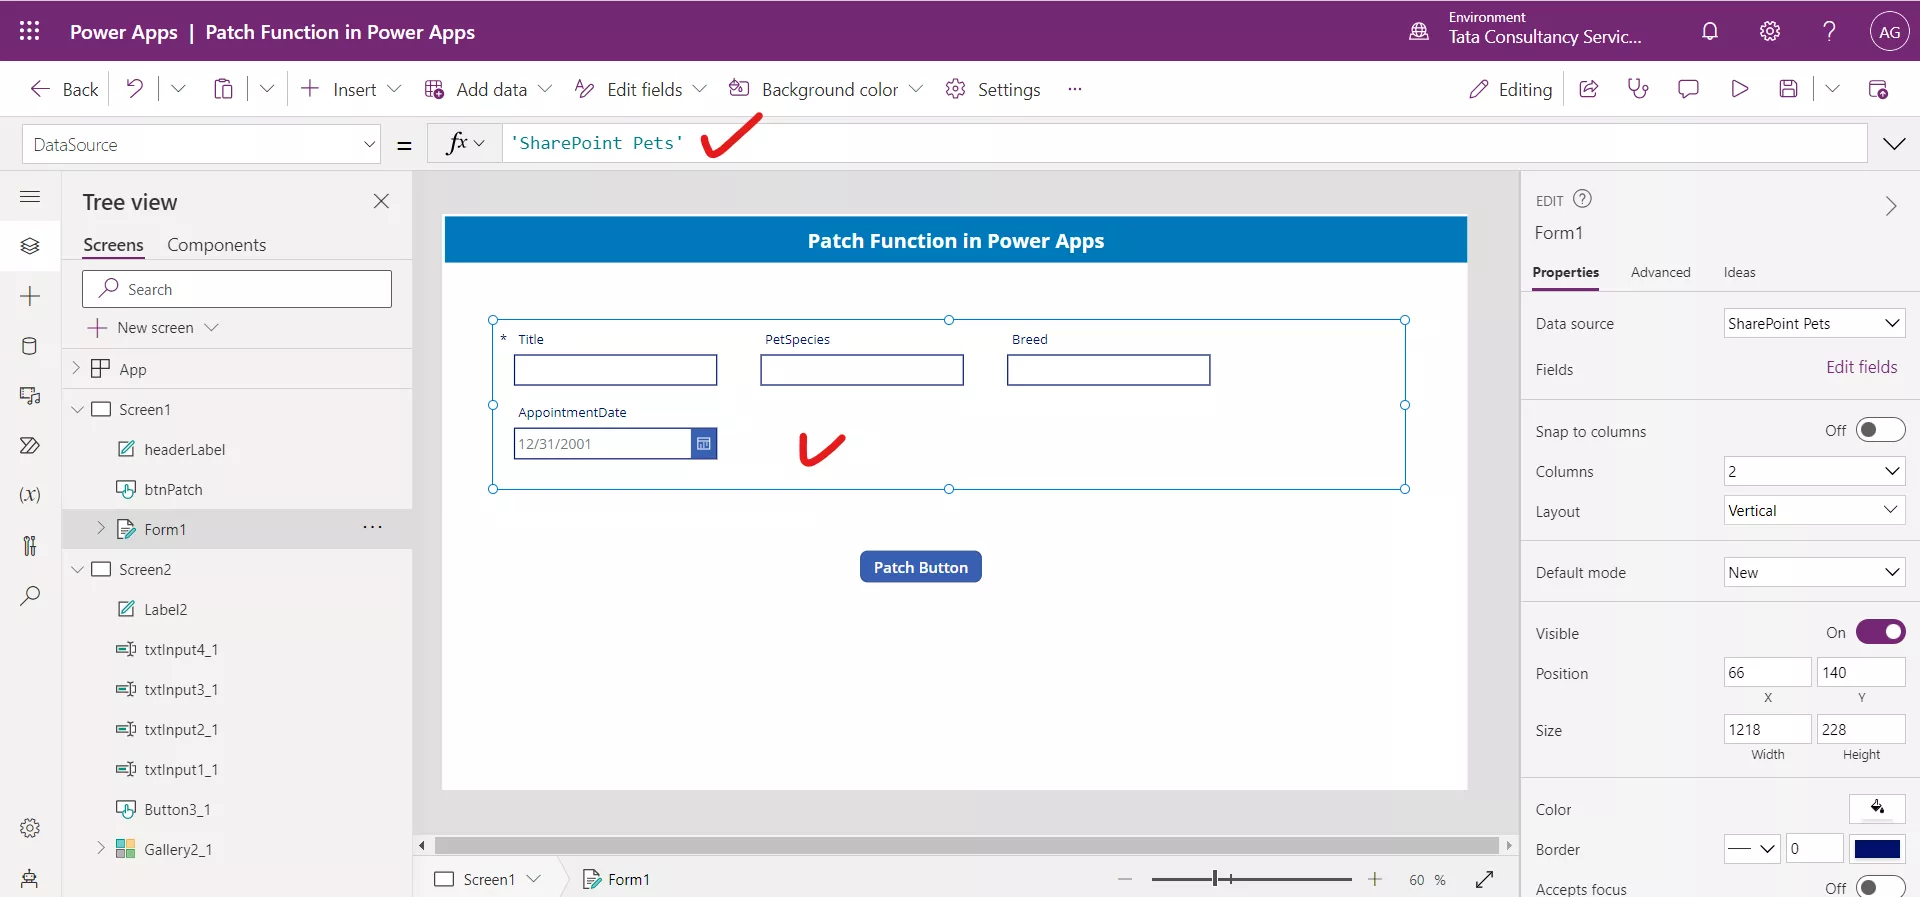
On the Patch Button, the following powerapps formula is written on its OnSelect property of the control.
Power Apps Formula
Here, Form1 is the name of the form control.
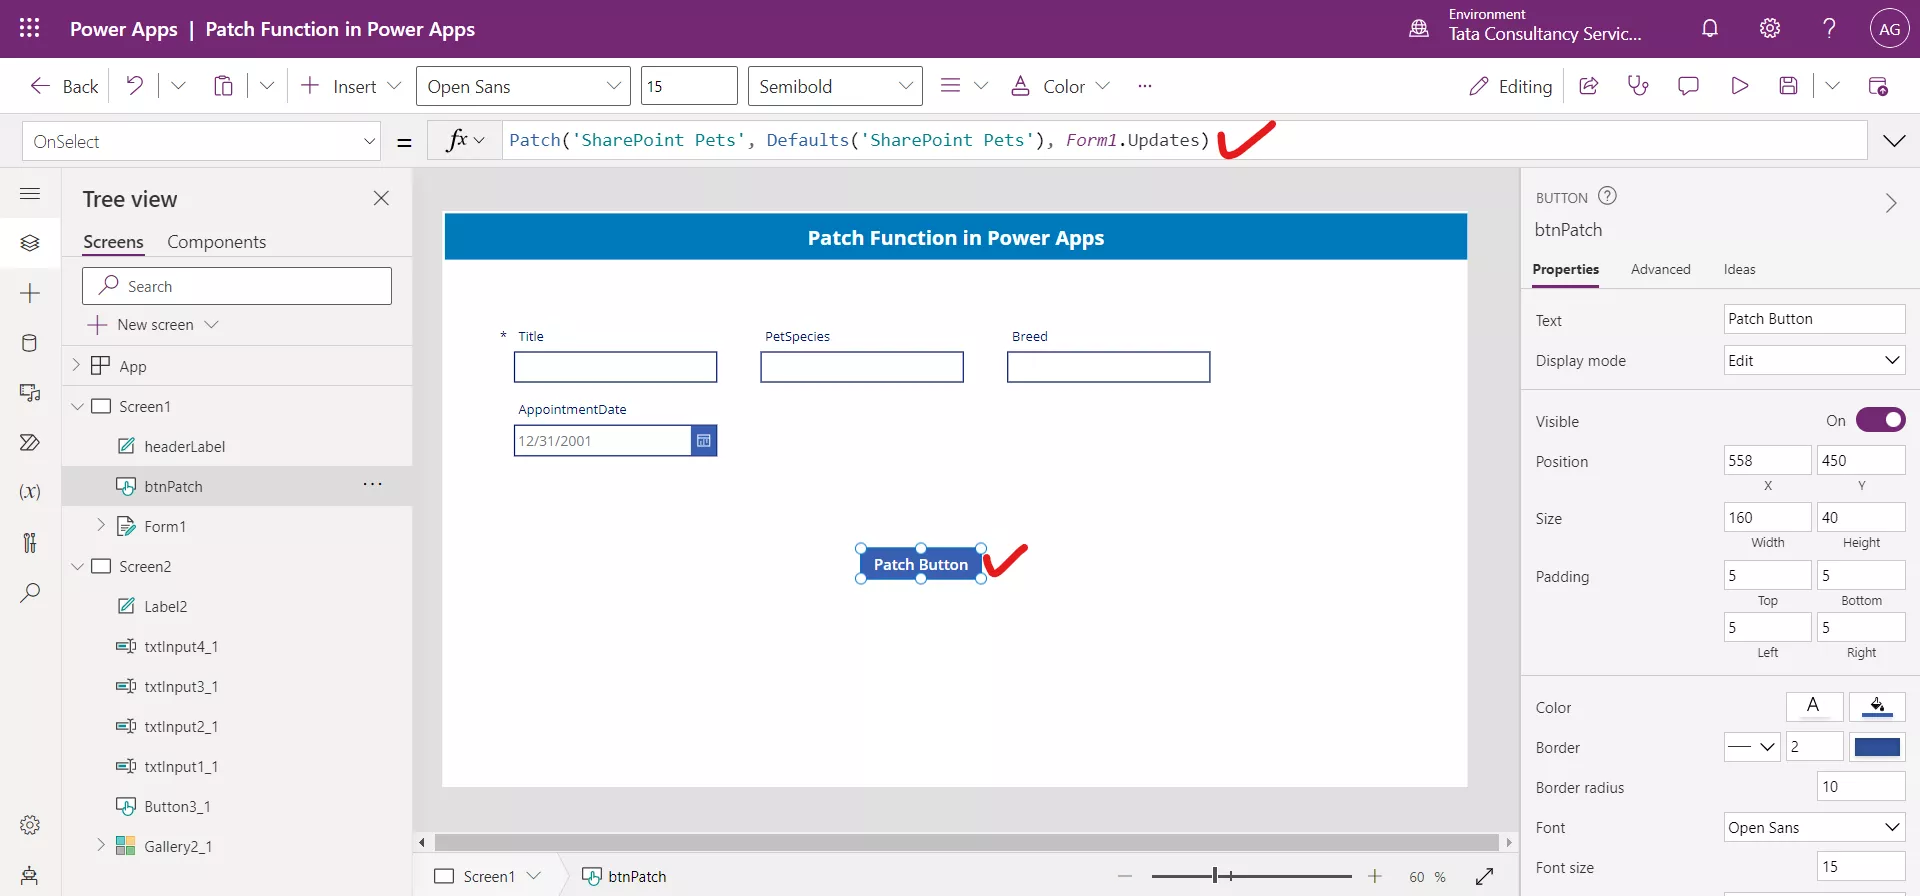
The Form1.Updates also returns the table of records which can be leveraged here to create a new record.
Note: If there are more than one form used for the same datasource and we need to patch them all, then the formula can be written as: Power Apps Formula Patch('SharePoint Pets', Defaults('SharePoint Pets'), Form1.Updates, Form2.Updates, Form3.Updates)
2. Using Patch to modify or update a record
We can use the Patch function to modify an existing record. The Patch function modifies the values of specific fields, without affecting other properties.
Power Apps Syntax Patch(DataSource, BaseRecord, ChangeRecordTable1 [, ChangeRecordTable2, … ] )
- DataSource – It is the required parameter. The data source that contains the records that we want to modify. This could be any tabular data source (such as Dataverse or SharePoint) or a collection.
- BaseRecord – It is the required parameter. It specify the record which we are going to modify.
- ChangeRecordTable(s) – Required. One or more tables of records that contain the name of the columns followed by the value to write to that column to modify for each record of the BaseRecordTable. Change records are processed in order from the beginning of the argument list to the end, with later property values overriding earlier ones.
How to Find the Base Record to Modify it? a) Using the LookUp Function The most common way to specify this record is to use the LookUp function to retrieve the record from the data source.
For example, this formula changes the Region Column value to “Panipat” where the Name is “Ashish”. But it only updates in the first record it founds. If there is existing value in that field, it will be overwritten.
Power Apps Formula
LookUp( ‘My Users’, Name = "Ashish" ), { Region: “Panipat” } )
b) Using the ThisItem operator
Another option if we are using a Gallery and we want to update the current record is to use the ThisItem function for referencing the record.
c) Using the Gallery.Selected Another option if we are using a Gallery and we want to update the current record which is selected then we can leverage the Gallery.Selected to specify the current selected record of the gallery control.
Note:
- Column names given in the function are case-sensitive.
- Update the value with the correct data type.
3. Using Patch to merge records (outside of a data source)
The Patch function can be used to merge two or more records. Records are processed in the order from the beginning of the argument list to the end, with later property values overriding earlier ones. Patch returns the merged record and does not modify its arguments or records in any data sources.
Power Apps Syntax Patch( Record1, Record2 [, …] )
• Record(s) - It is the required parameter. At least two records that we want to merge.
Example: Merges two records outside of a data source.
Power Apps Formula
- The values in the Name column of each record do not match. The result contains the value (Amit) in the record that is closer to the end of the argument list instead of the value (Ashish) in the record that's closer to the start.
- The first record contains a column (Marks) that does not exist in the second record. The result contains that column with its value (87).
- The second record contains a column (Passed) that does not exist in the first record. The result contains that column with its value (true).
Resultant Record return by the Patch function is
4. Updating the datasource columns with Patch Function
There are four sources to pass values in our formula to Patch our data source:
a) Patch a hardcode text value in the text column
We can directly give a hard coded value in the double quotes (“”) to the column name, as shown in the following formula.
Power Apps Formula
This formula creates a new record and sets the Status column to the string value of "Pending".
b) Patch using a Variable in the text column We can reference a variable. For example, we can store the string "Under Review" in a variable named varStatus with the following formula.
Power Apps Formula
Then our Patch formula would be:
Power Apps Formula
This formula creates a new record and sets the Status column to the string value of "Under Review".
c) Patch using a Dropdown Selected value
We can reference the value from the property of a control. An example would be setting the value from a drop-down menu named Dropdown1 that contained the status. Our Patch formula would look like:
Power Apps Formula
This formula creates a new record and sets the Status column to the value of the selected item in the drop-down control whose name is Dropdown1.
d) Patch Using a Formula We can use the output of a formula. An example would be setting the value of the Score column using the Sum of TextInput1 and TextInput2 controls. Our Patch formula would look like:
Power Apps Formula
5. Patch Formula Syntax according to the Field Data type
a) For Choice Column
To patch a choice column, choice column requires a record or tabular data to patch. So, the following syntax is written in order to patch the value in the choice column.
Power Apps Formula
Here, Status is a Choice column and {Value: “Approved”} specifies the value i.e., “Approved” to patch in the Status column field. Here, we are using the hard coded value but we can give specify the value from formula, variable, dropdown selected value.
For example, if the value comes from the dropdown.
Power Apps Formula
Here, ddMyChoice is the name of the dropdown control.
Note: We can also use the following formula as ddMyChoice.Selected returns the data type record.
Power Apps Formula
b) Text Column
To Patch a text column, its syntax is simple as compared to choice column above.
Power Apps Formula
c) Person column
Power Apps Syntax
{
    Claims: Concatenate(
        "i:0#.f|membership|",   // Required prefix for SharePoint people field
        User().Email            // Current user's email
    ),
    Department: "",               // (Optional) Leave blank or assign department value
    DisplayName: User().FullName, // Current user's full name
    Email: User().Email,          // Current user's email
    JobTitle: "",                 // (Optional) Leave blank or assign job title
    Picture: ""                   // (Optional) Can store profile image URL
}
Using above syntax, we can specify the current user saved in the Person type column.
By using the below power apps formula, we can specify the any user in the person type column.
Power Apps Formula
Patch(
    MyList,                      // Your SharePoint list or Dataverse table name
    Defaults(MyList),            // Creates a new record with default values
    {
        MyPerson: {              // 'MyPerson' should be a Person or Group column
            Claims: "i:0#.f|membership|Ashish@companyname.com",  // Required format for SharePoint user field
            Department: "",                                      // Optional field
            DisplayName: "Ashish Goel",                          // User’s full name
            Email: "Ashish@companyname.com",                     // User’s email
            JobTitle: "",                                        // Optional field
            Picture: ""                                          // Optional (can hold profile image URL)
        }
    }
)
6. Example: The following examples give the demonstration of Patch function uses.
a) Insert a record in the Sharepoint list There is a Vertical Gallery control and set its data source to the “Teachers Data” and four text input controls rename the Text input control and set their default values to blank. Set their Hint Text to the Title, Name, Education, and Salary.
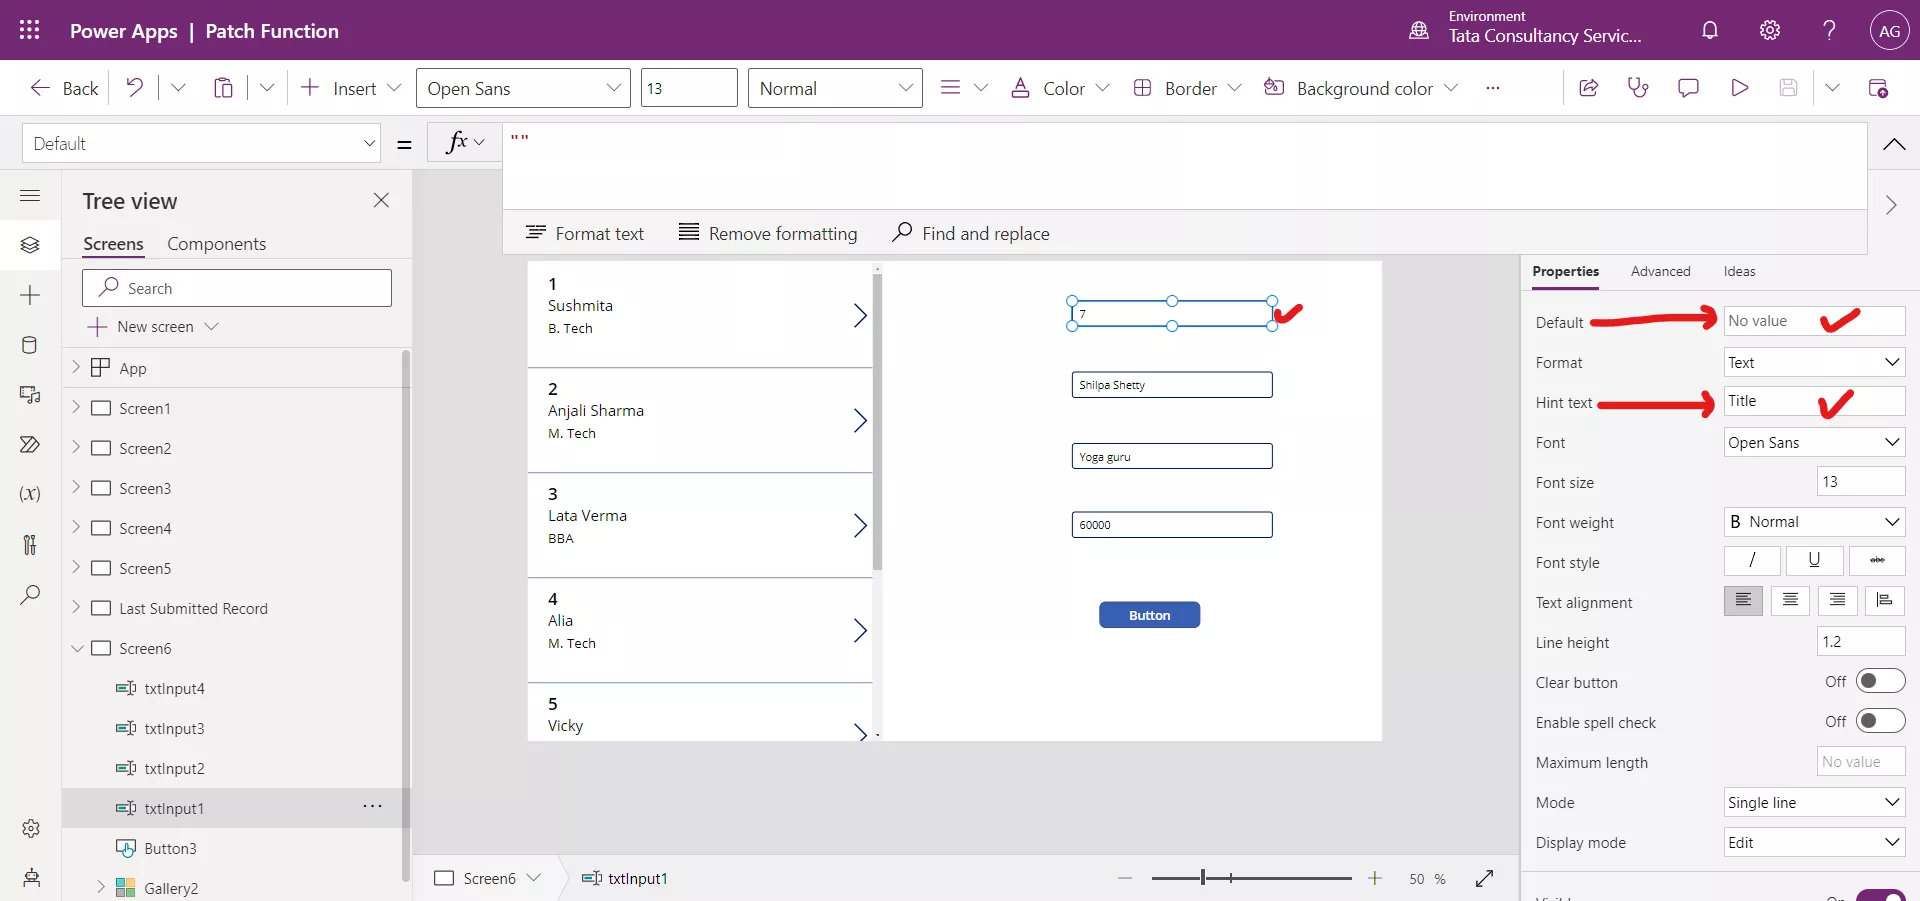
The “Teachers Data” is the sharepoint list, which is used here as the data source.
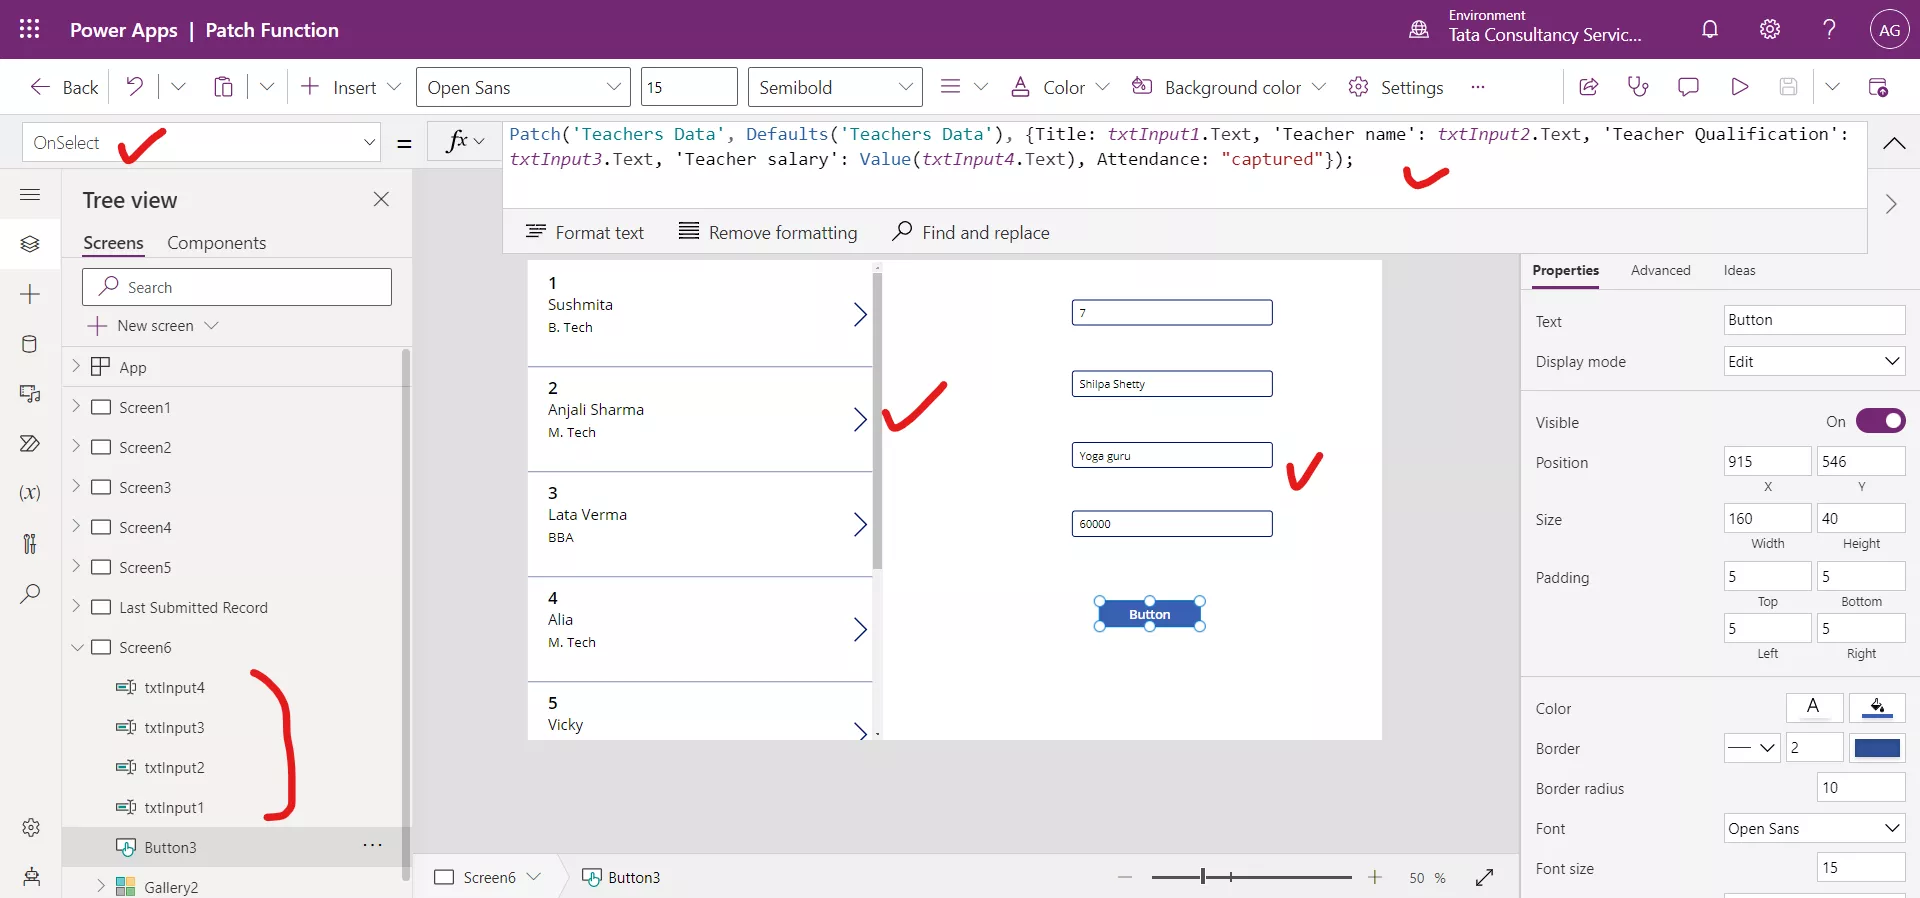
Set the OnSelect property of the Button control to the following formula:
Power Apps Formula
Patch(
    'Teachers Data',                   // Data source (SharePoint list or Dataverse table)
    Defaults('Teachers Data'),         // Creates a new record with default values
    {
        Title: txtInput1.Text,                     // Assigns Title from txtInput1
        'Teacher name': txtInput2.Text,            // Assigns Teacher name from txtInput2
        'Teacher Qualification': txtInput3.Text,   // Assigns Qualification from txtInput3
        'Teacher salary': Value(txtInput4.Text),   // Converts text to number before storing
        Attendance: "captured"                     // Sets Attendance to "captured"
    }
)
In the formula txtInput1, txtInput2, txtInput3, and txtInput4 are the names of the Text Input controls. We can notice that the formula is setting the Attendance column value to “captured” for each new record.
After adding the record scroll down the gallery control to check the newly created record. If we see the record then the patch function successfully adds the record in the sharepoint list.
b) Modify or Update the existing record in the Sharepoint list without the use of Form control using Patch function
i) By using the Gallery control and some other controls
Step 1: Select the Insert tab and add four Text Input controls in the app or alternatively after adding the one control, Select the control and press Ctrl + C and Ctrl + V to copy and paste the control.
Step 2: Also add a Vertical Gallery control and set its data source to the “Teachers Data”.
Step 3: Clear the Default property of the Text Input controls to make it blank and set their “Hint Text”.
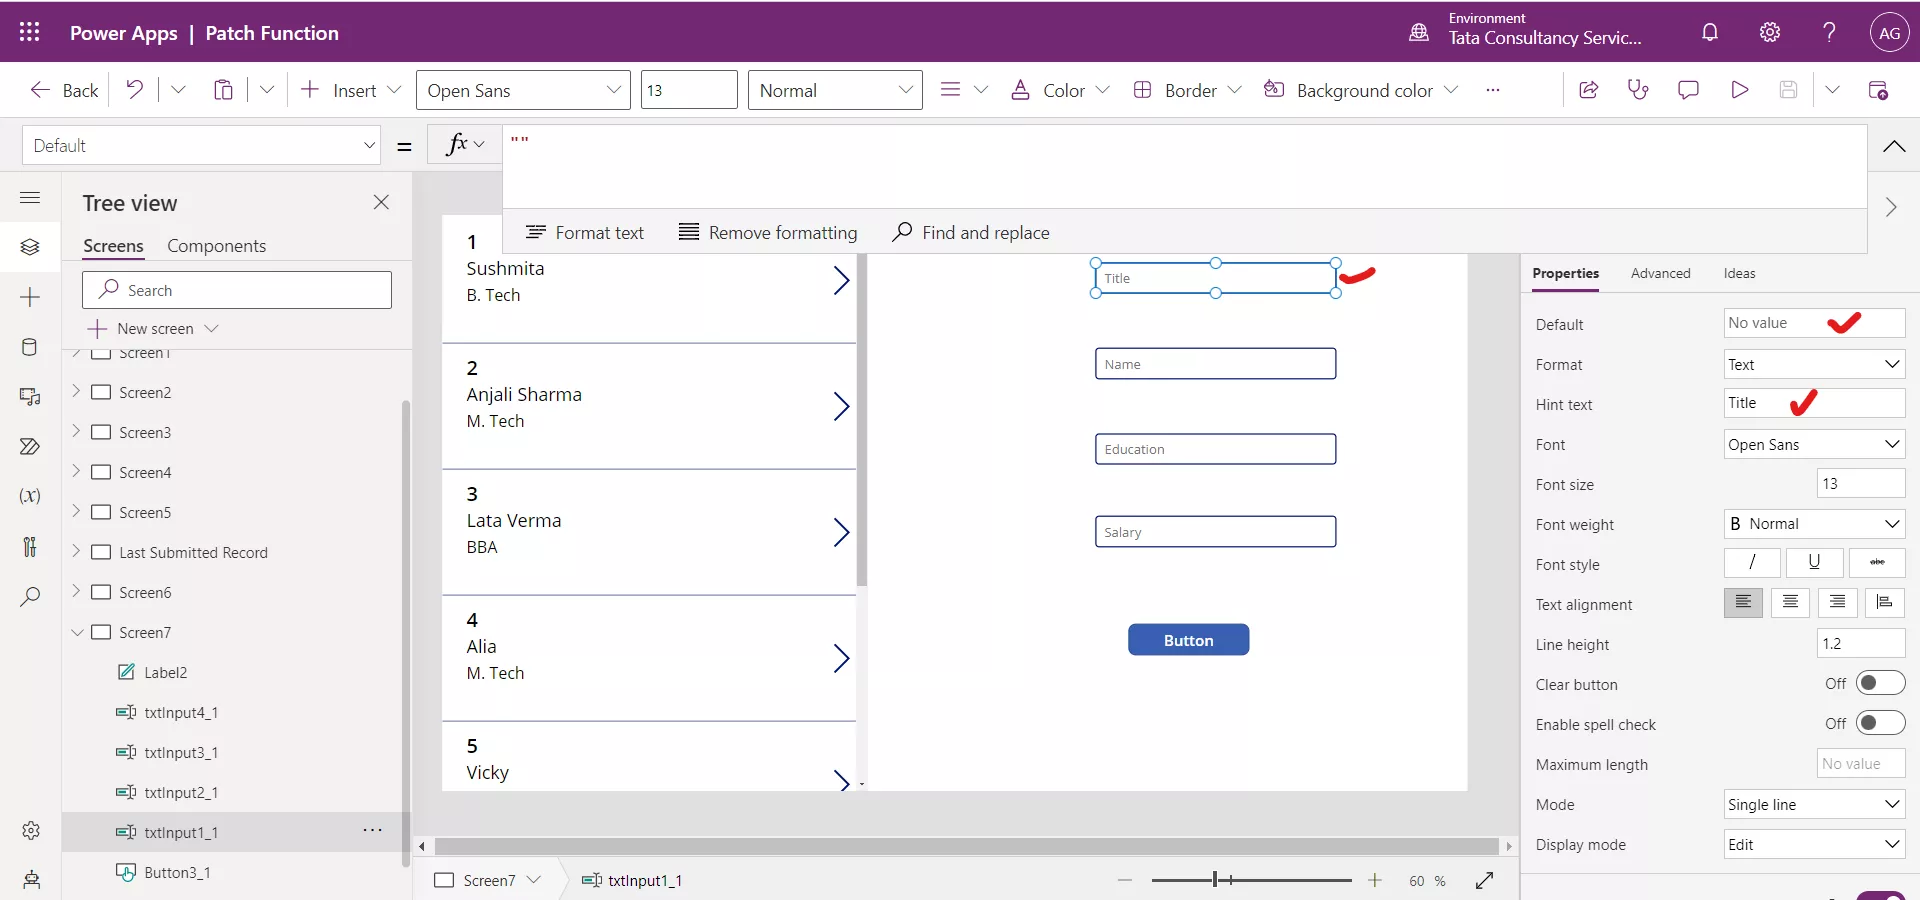
Step 4: Select the Text Input controls and set their Default property to the respective columns.
Power Apps Formula
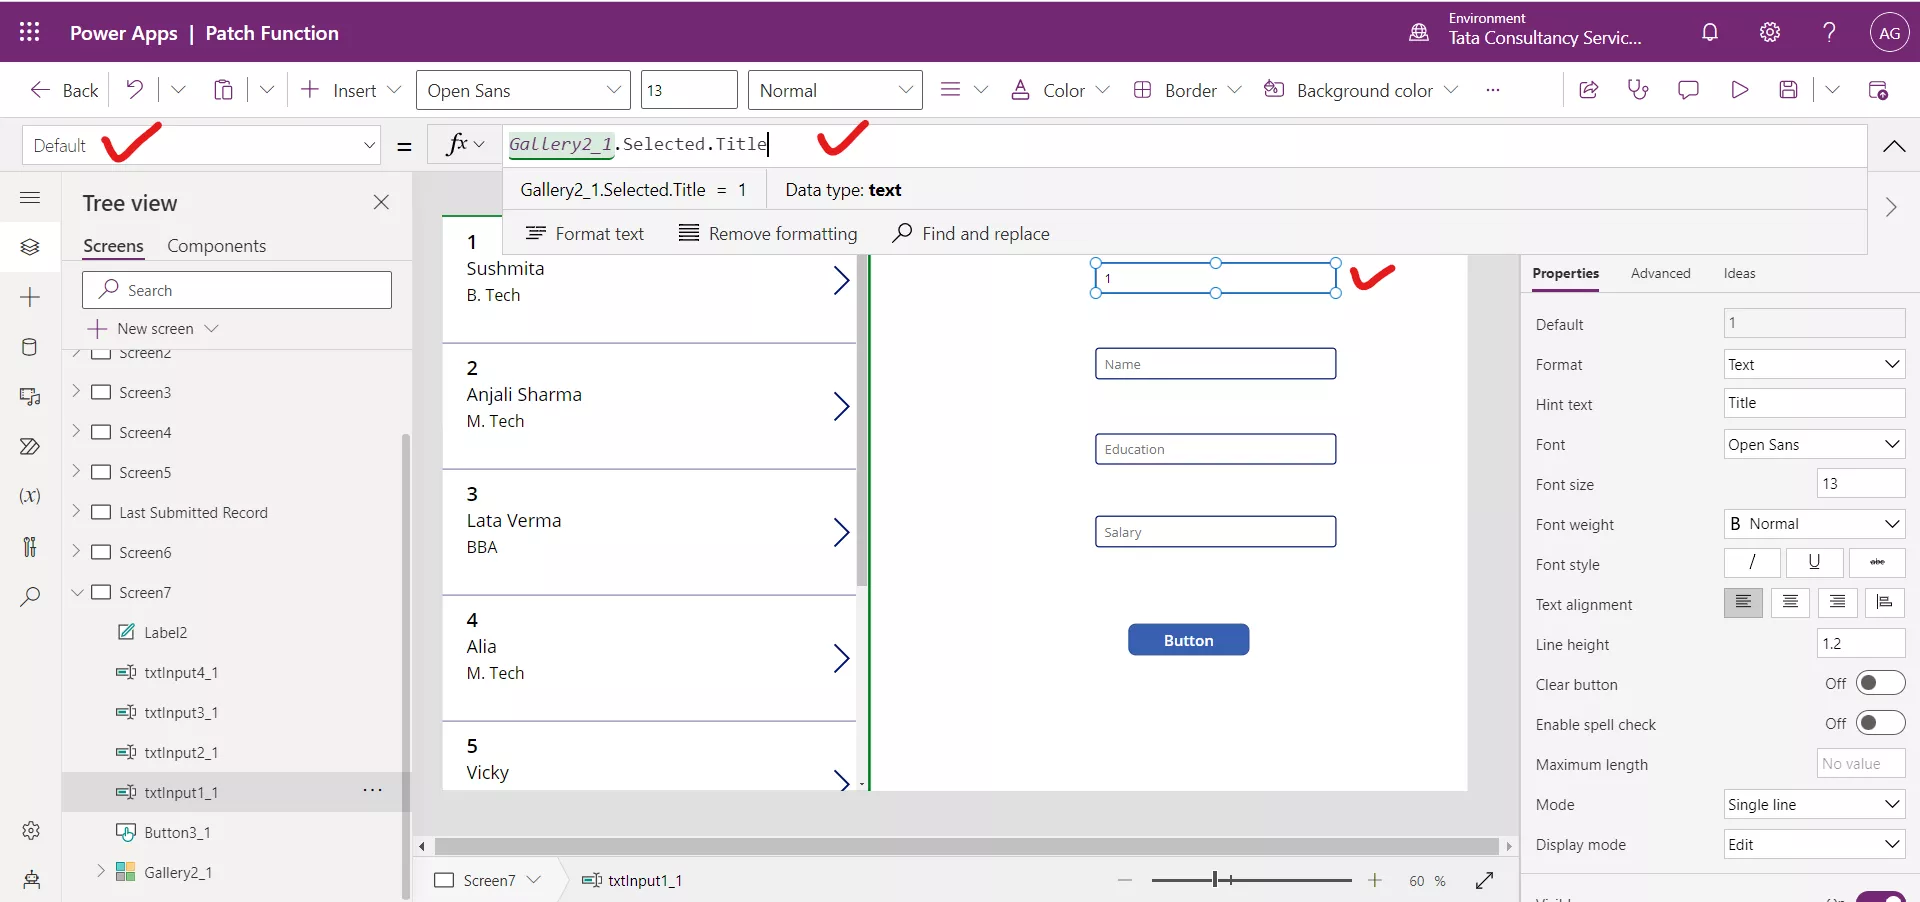
This Text Input control will now display the Title of the selected record from the gallery.
Step 5: Repeat this process for the other text input controls. Set the Default property to the following formula:
Power Apps Formula
Here, Gallery2_1 is the name of the gallery control and “Teacher name” is the name of the column.
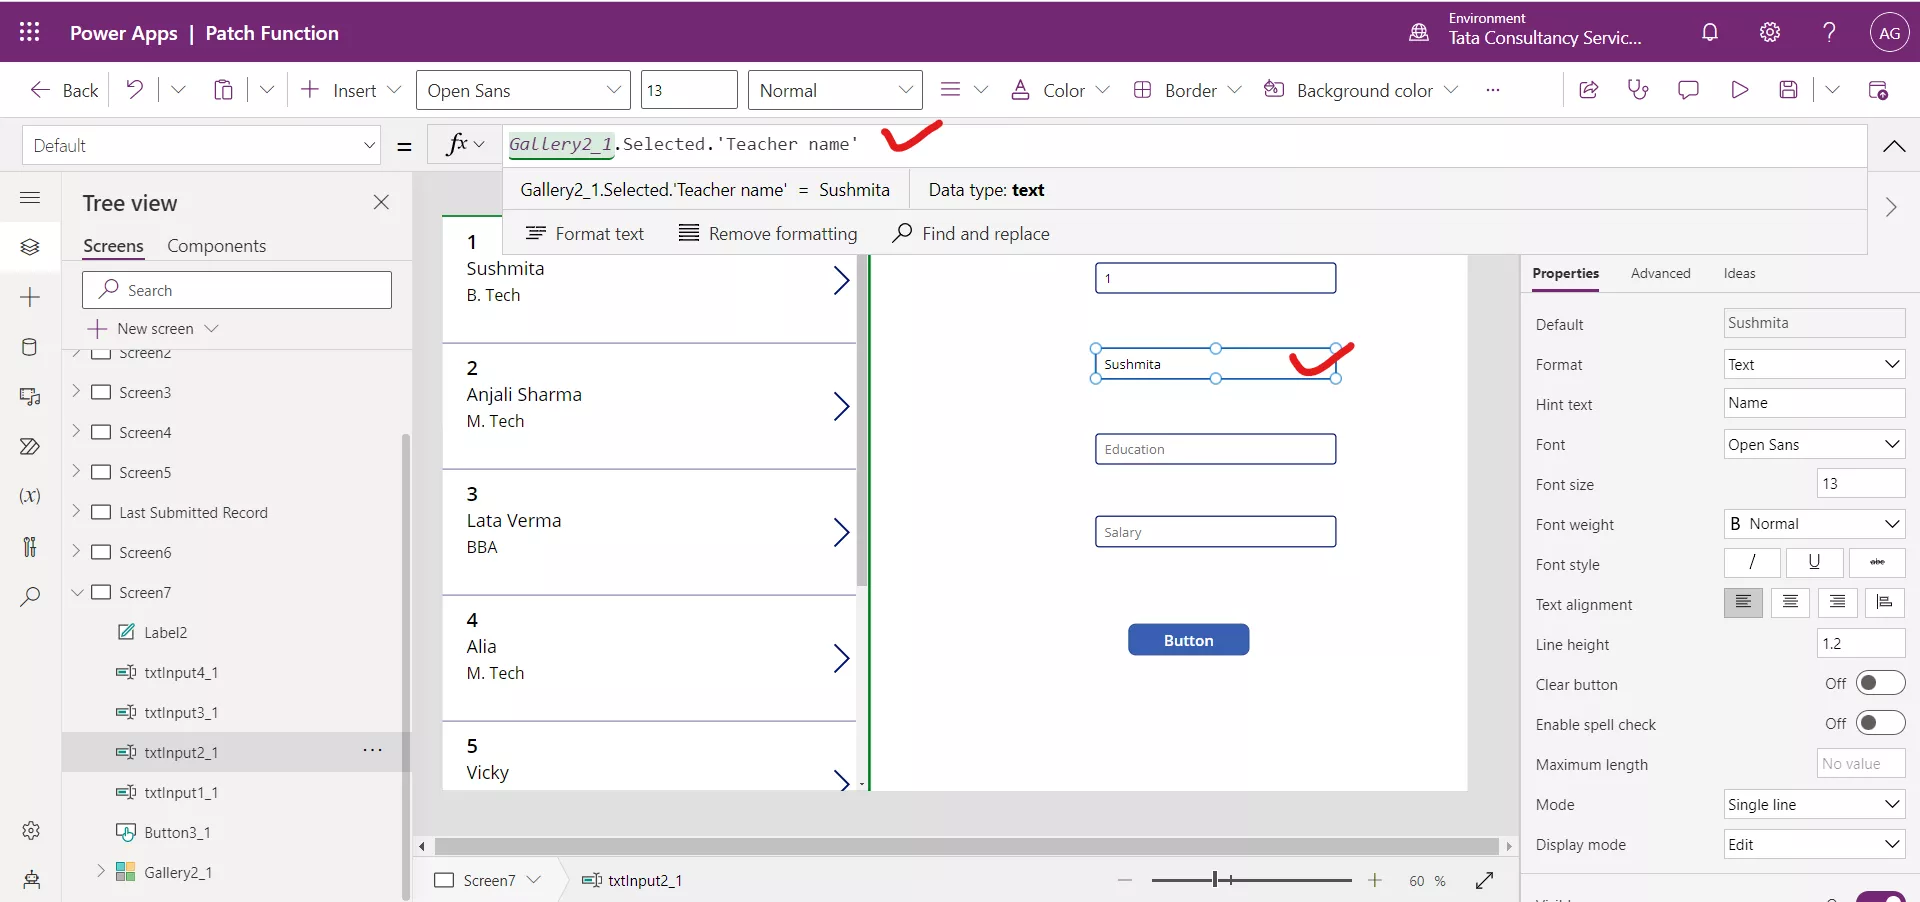
Step 6: Select the Button and set its OnSelect property of the button to the following formula:
Power Apps Formula
LookUp('Teachers Data', Title= txtInput1_1.Text),
{
'Teacher name': txtInput2_1.Text,
'Teacher Qualification': txtInput3_1.Text,
'Teacher salary': Value(txtInput4_1.Text)
}
)
Here, “Teachers data” is the name of the sharepoint list and txtInput1_1, txtInput2_1, txtInput3_1, txtInput4_1 are the name of the Text Input controls.
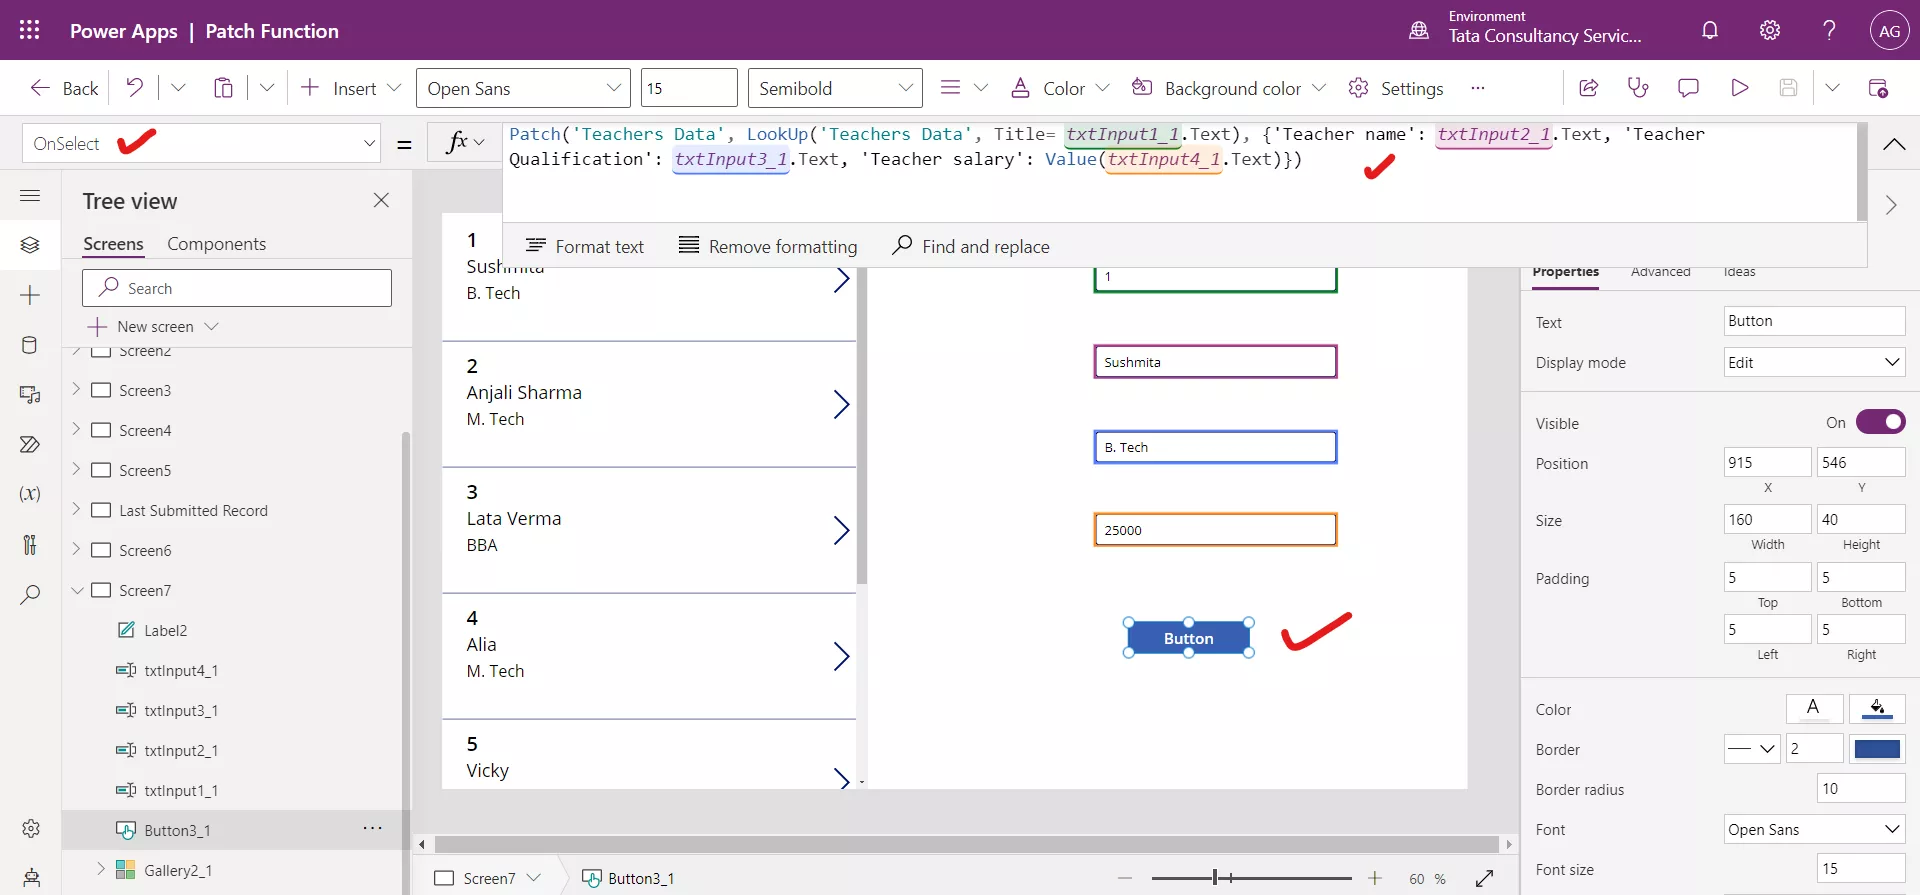
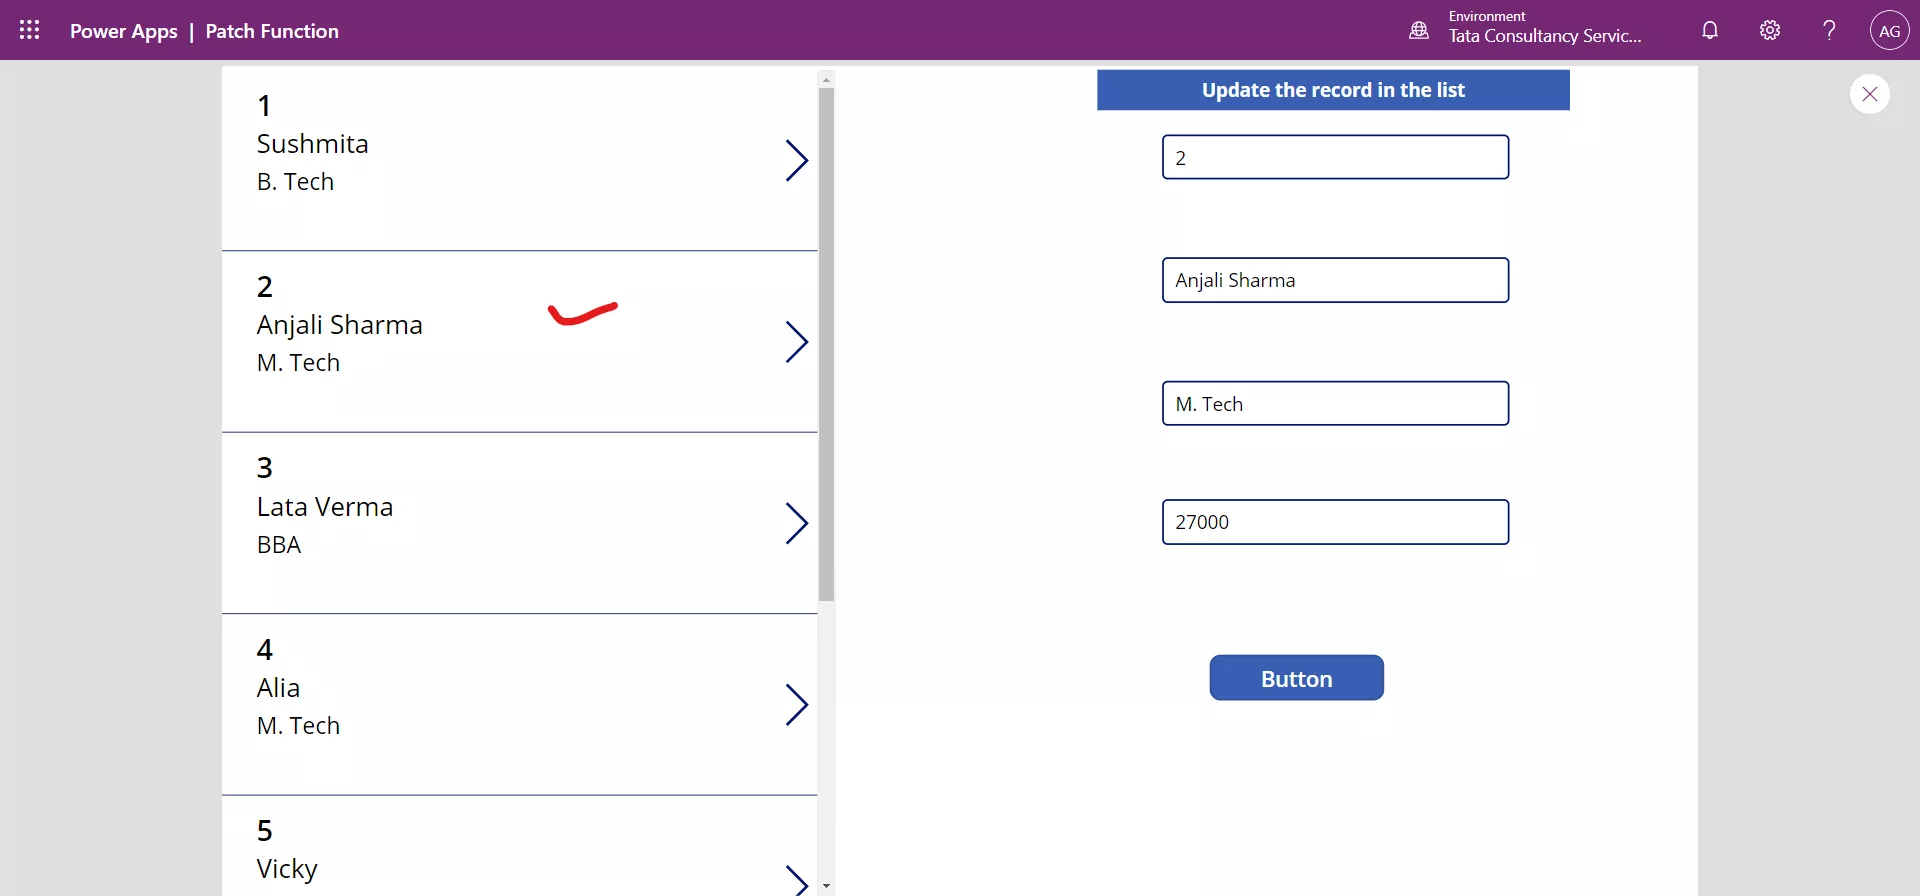
The LookUp function finds the first records that satisfies the condition, i.e., LookUp('Teachers Data', Title= txtInput1_1.Text). Once the app finds the record it updates the record using the patch function. Preview the app by click on the play icon in the Power Apps Studio at the top-right of the command bar. Select one of the records in the gallery. Suppose we select the second record.
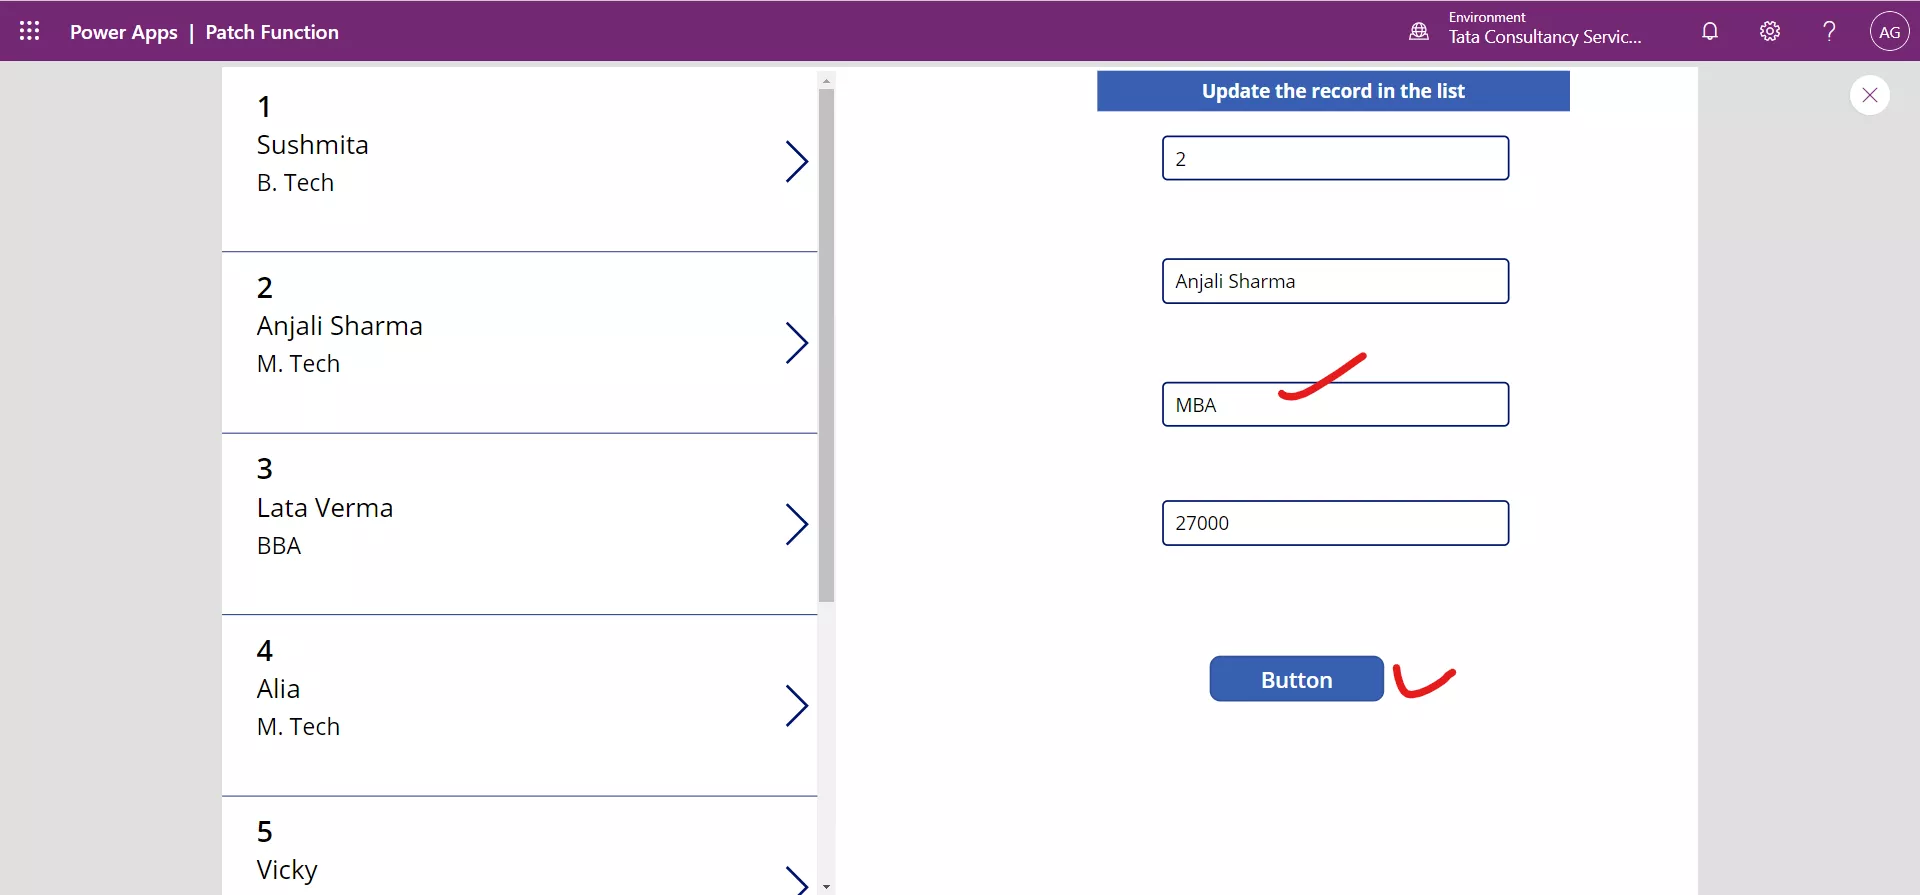
Here let us change the “Teacher Qualification” value to MBA, and then click on the Button.
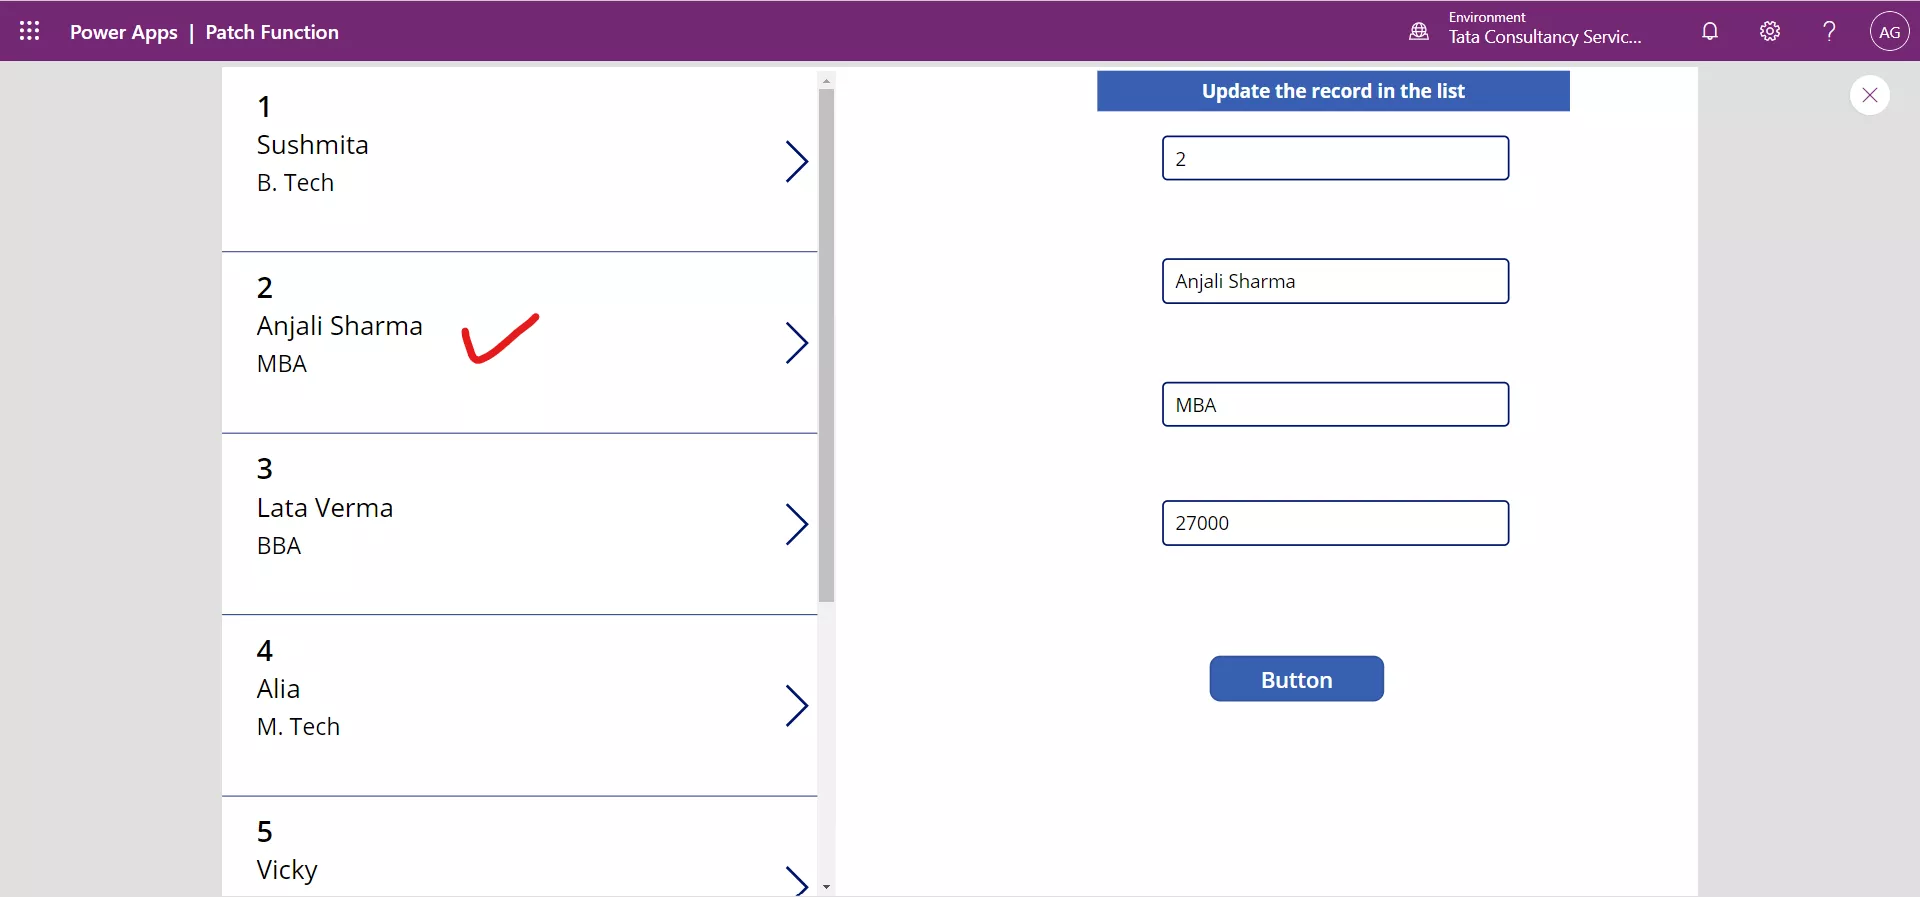
The record will be updated in the Sharepoint list and in the Gallery control as well, because gallery is connected to the Sharepoint list (Our datasource).
d) By using the Gallery control itself
Step 1: Add a vertical gallery control and set it to the data source.
Step 2: Add a checkbox in the Gallery control
Step 3: Set the Default property to the following powerapps formula.
Power Apps Formula
It signifies that when the Attendance column value is “Yes” then the checkbox is checked otherwise not.
Step 4: In order to control the attendance by using the gallery control. Set the OnUncheck property of the check box control
Power Apps Formula
So once the user clicks on the checkbox to uncheck it, then the Patch function patches the value “No” to the corresponding record Attendance column.
Step 5: Set the OnCheck property of the check box control
Power Apps Formula
So once the user clicks on the checkbox to check it, then the Patch function patches the value “Yes” to the corresponding record Attendance column.
7. The Patch Function to create Log Records
We can use the Patch function to update or creating the record without the actual user interaction to create and update the record. For example, if we want to update a logging data source every time a user clicks a button to navigate to another screen we could use the formula for the OnSelect property of the button.
Power Apps Formula
{UserName: User().FullName,
WhenClicked: Now()}
);
Navigate(ProjectScreen, ScreenTransition.Fade)
This formula would create a new record in the data source named LogTable. The UserName column sets to the FullName property of the user who is signed in, and the WhenClicked column sets to the Date and Time of when they clicked the button. This would open the screen named ProjectScreen using the Fade screen transition.
8. Bulk changes to records in the Data Source
The Patch and Remove are both functions that are used to affect one record in the data source. If we need to affect change on more than one record, there are two options:
a) Use the ForAll function, to loop through a table of data and run a Patch or Remove function for each record in the table.
b) Use the Collect function to write from one table to another. Each record of the source table is added as a separate record to the target table.