Views in Dataverse
We can modify forms to create an efficient data entry experience for users. Forms are the main UI in which app users can interact with the records that are being stored in underlying tables. Views are the primary forms in which app users can review records that are being stored in tables. Both components are fundamental to a model-driven app.
Views in dataverse define:
• The columns that are shown,
• the width of the columns,
• default sort behavior,
• order of the columns and
• default filters of the records that are shown in the list.
The tables that we created have a set of default views that we can use to show meaningful data to the users. We can modify the default and create our own custom views.
A. Customize a default view
We can modify the default views of the table. Follow the following steps to modify the default views:
Step 1: Sign in to Power apps with an organizational account.
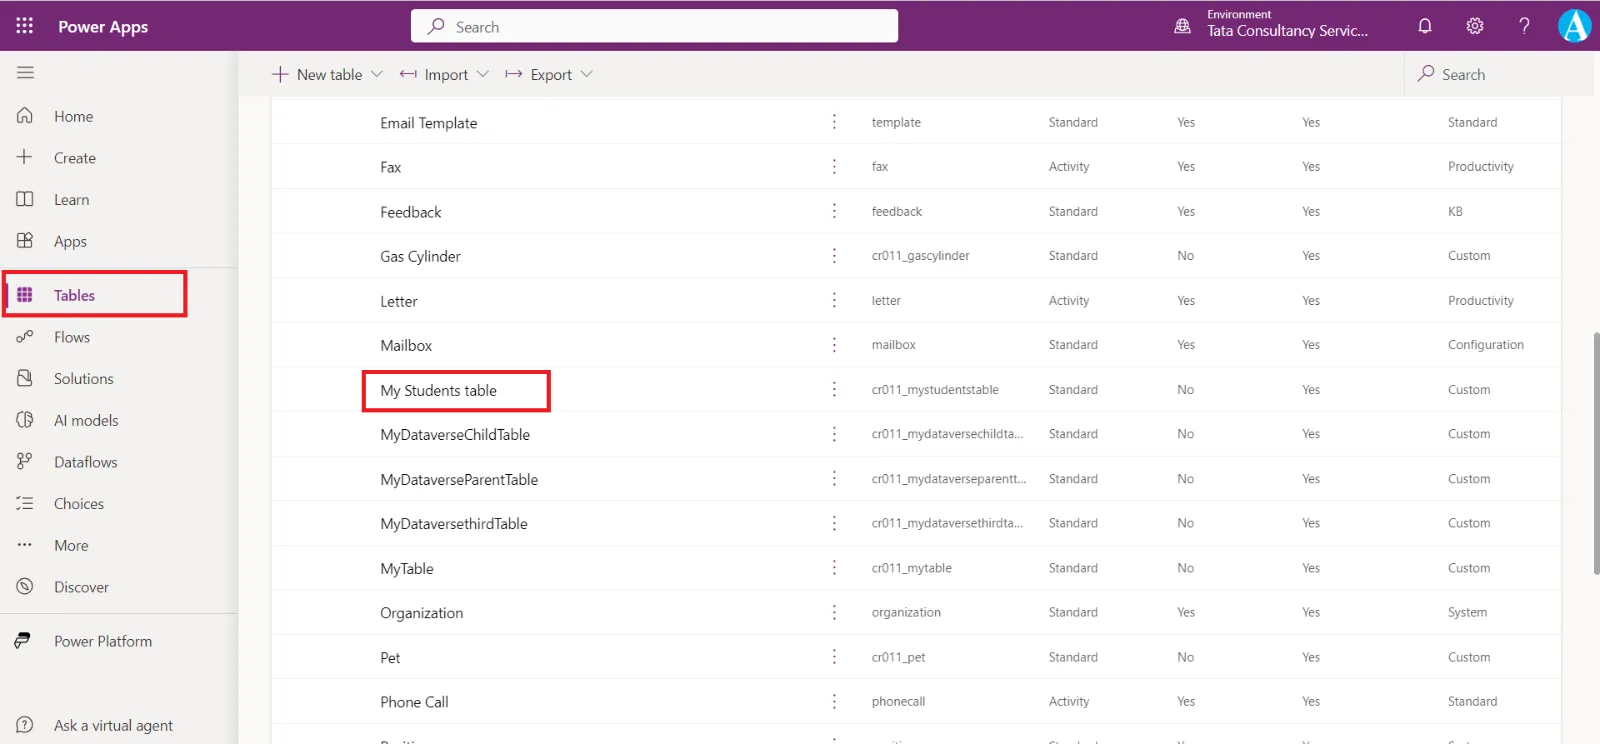
Step 2: Click on the Tables from the left navigation. Then select the table whose views we want to edit.
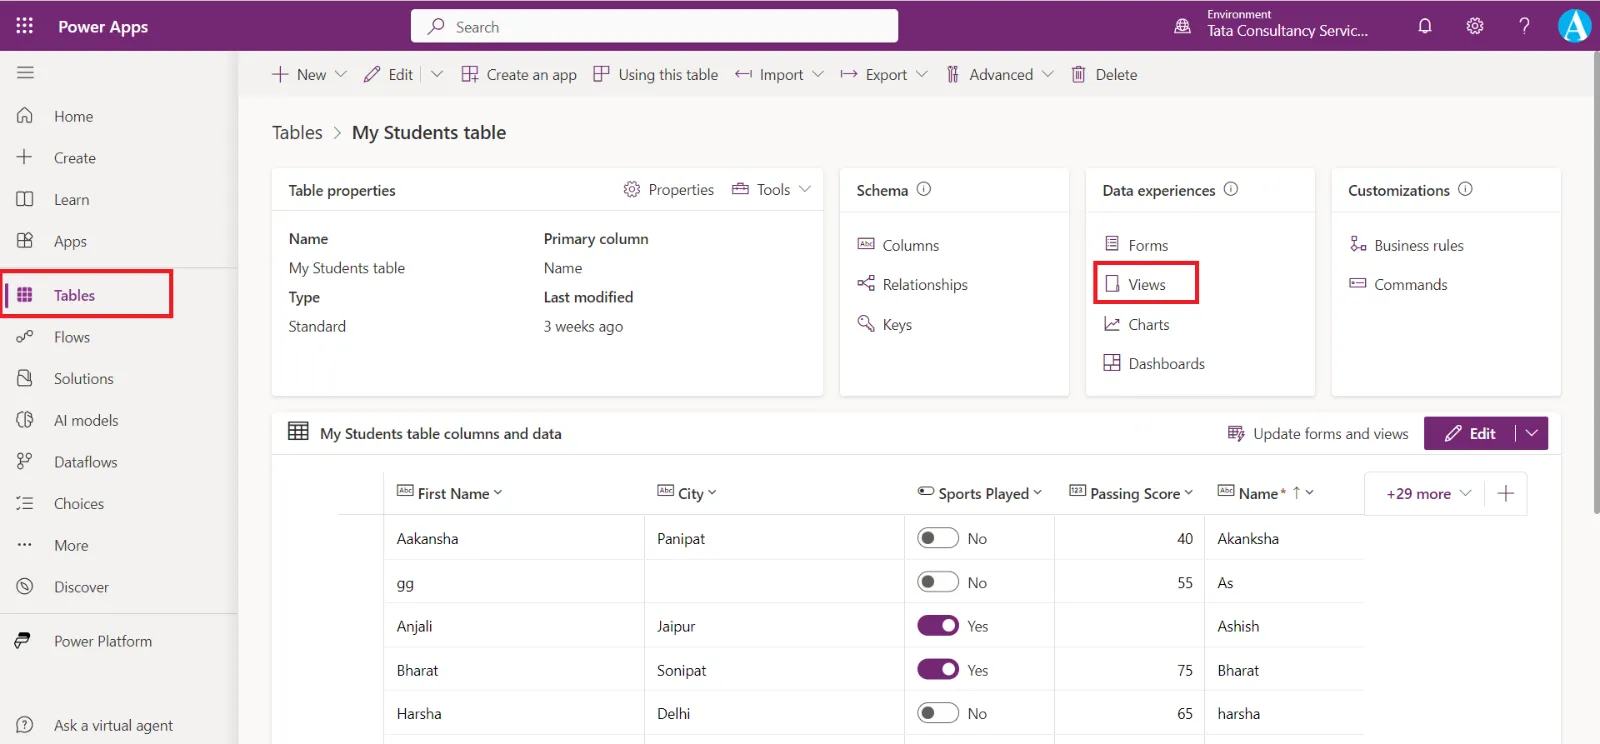
Step 3: Select Views from the Data experiences pane in the Tables dashboard.
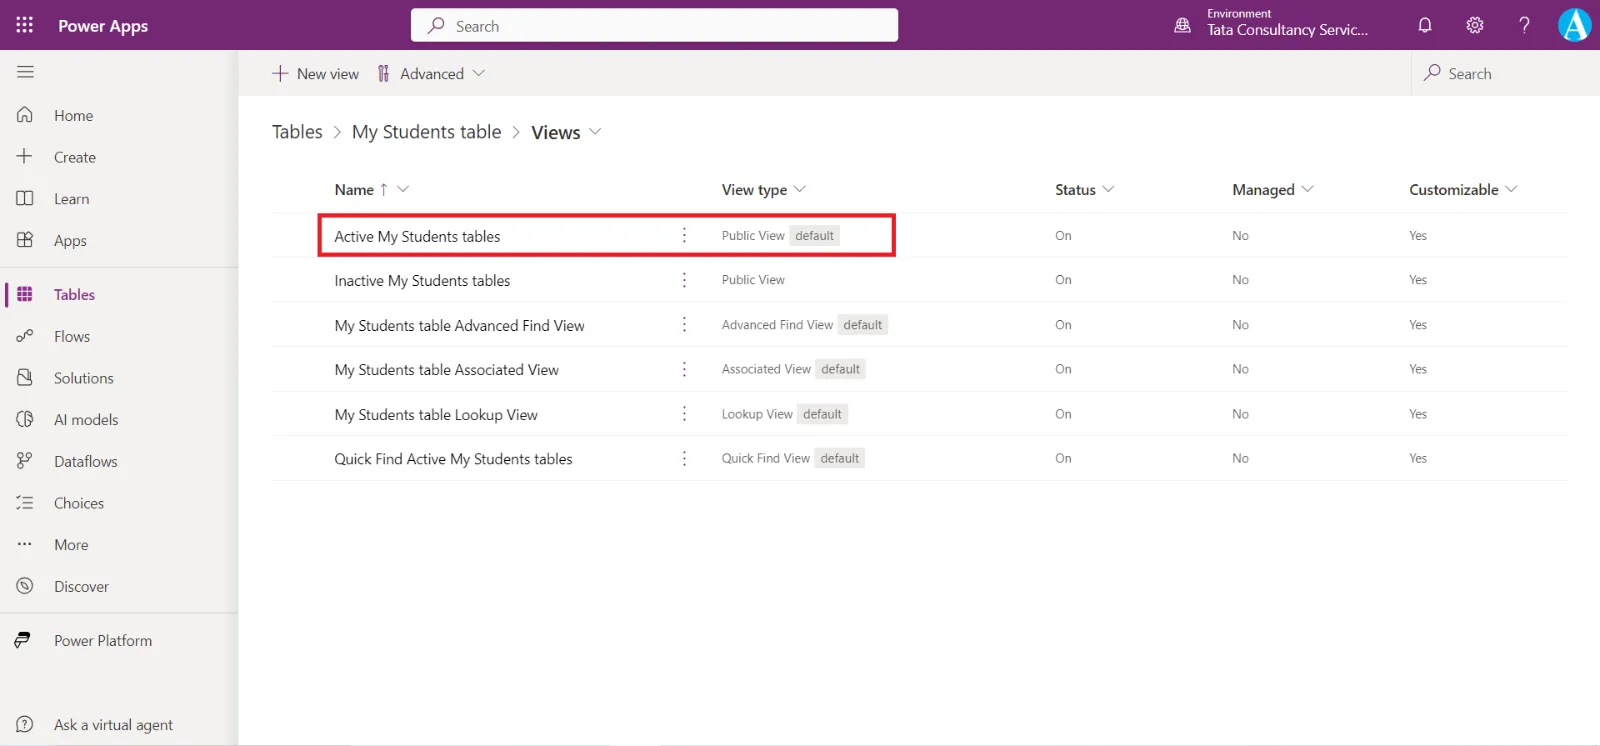
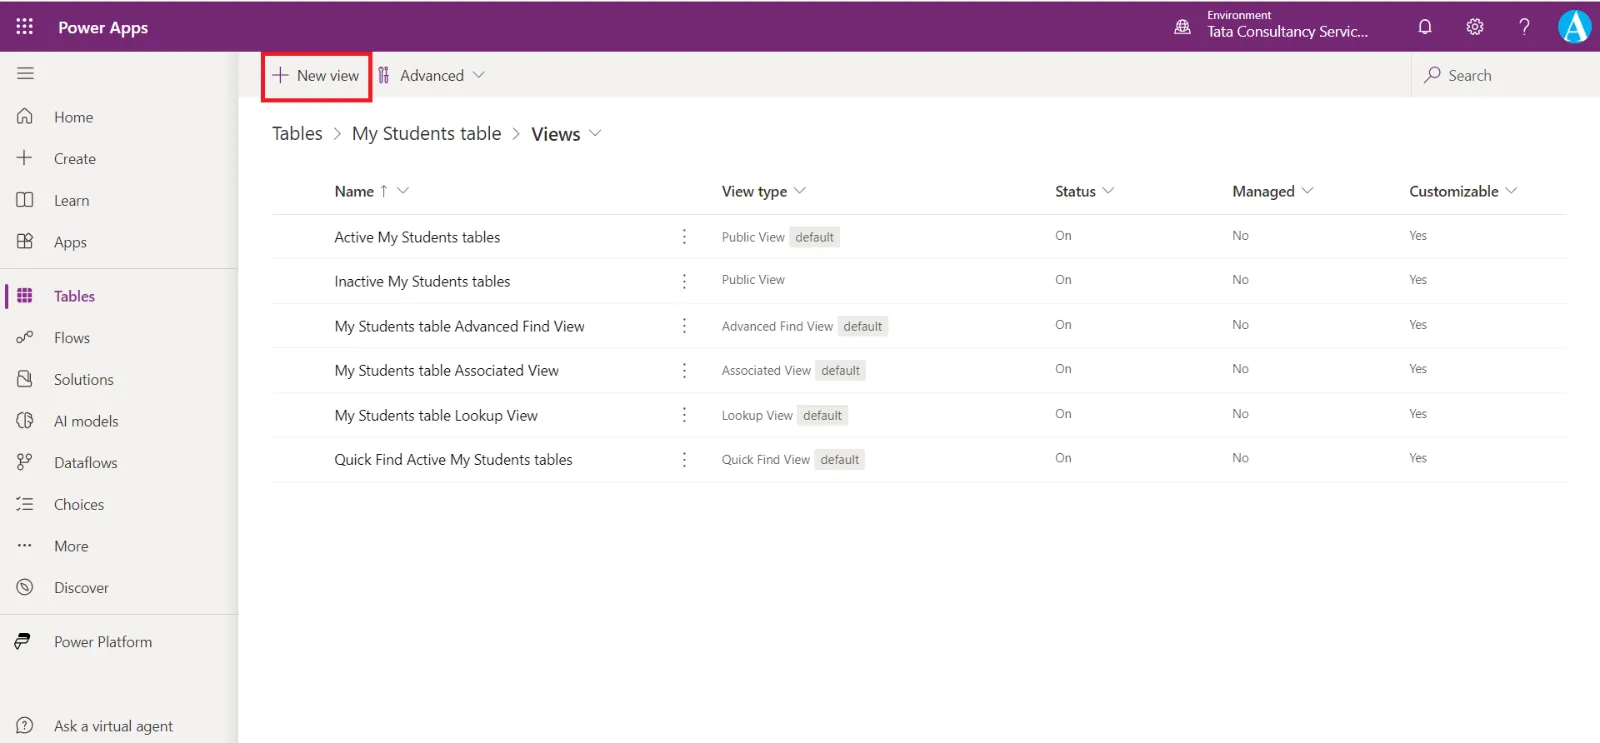
Selecting Views opens a list of views of data associated with this table. This list displays the Name, the View type, and other key settings, such as the active Status, its Managed property, and whether it's Customizable or not. We can open an existing view or create a new view.
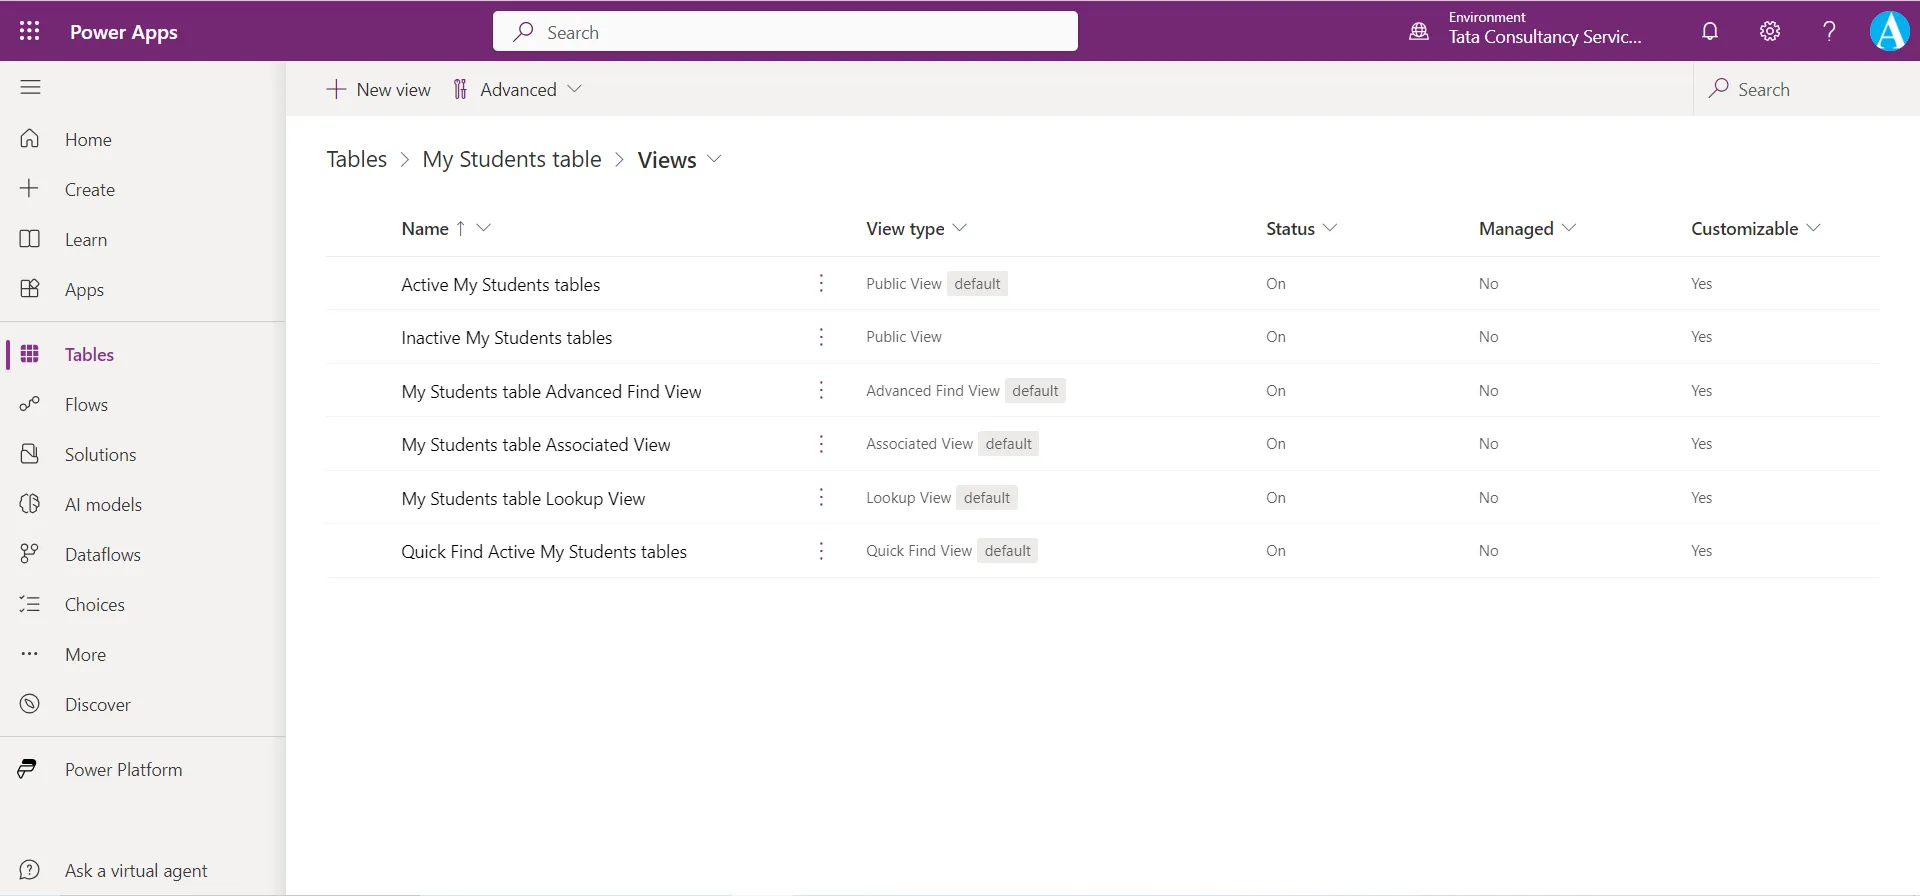
Select Active My Students tables.
Step 4: In the view designer studio, select + View column, select the column that we want to add the view. (As we add each one, our view will reset. Continue selecting + View Column to add all the columns). We can also search the name of the column in the search bar to filter the list.
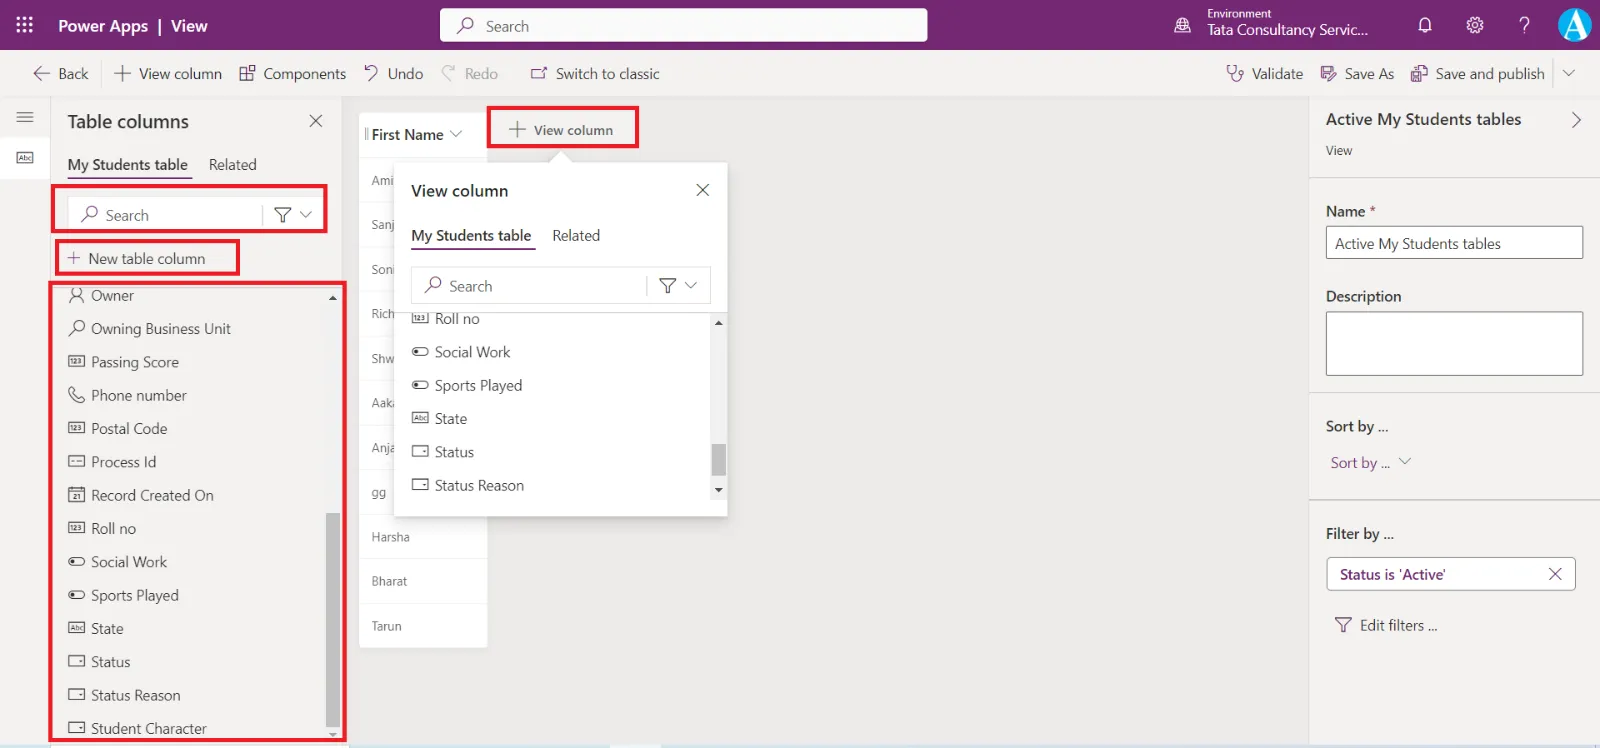
Note: We can also add the columns to the view by clicking on the column we want to add in the Table columns pane. Or dragging and dropping into our view preview pane in the center of the screen. We can insert them between existing columns by dragging them to the proper location in the header.
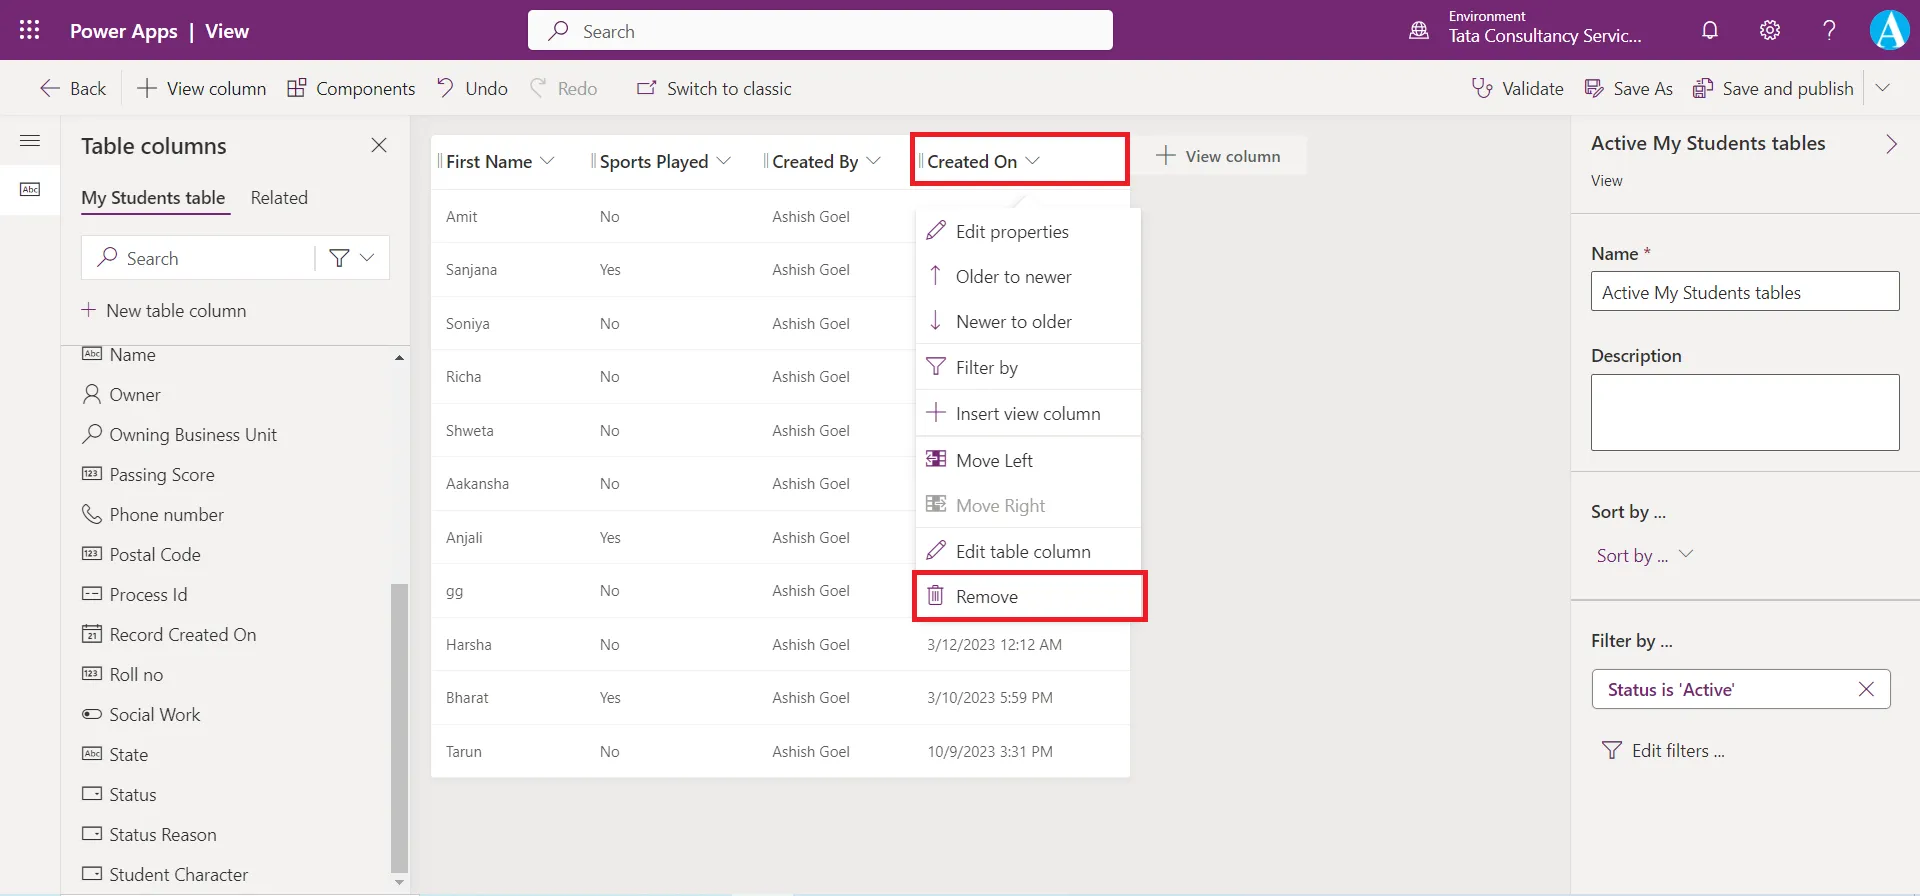
We can also remove the columns from the view by clicking on the column header and select Remove from the context menu. For example, select the Created On column, and then select Remove.
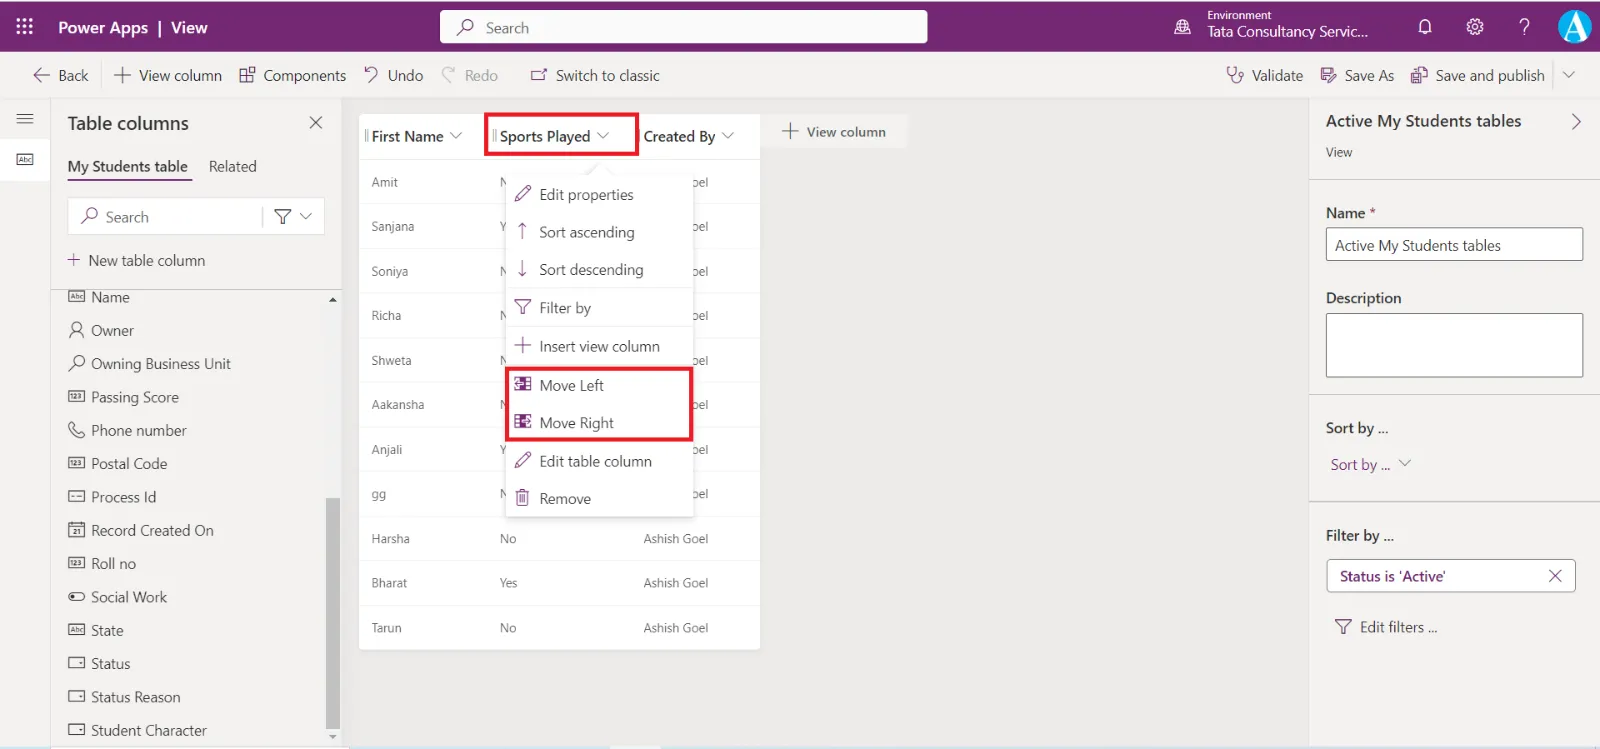
Step 5: To arrange the columns, select the column header to move, and then select Move Left or Move Right until our view looks like this. We could also drag and drop the column headers to arrange the order as well.
Step 6: To change the size of a displayed column, we can drag the column separators or proceed through the following steps:
a. Select the column header, and then select Edit properties.
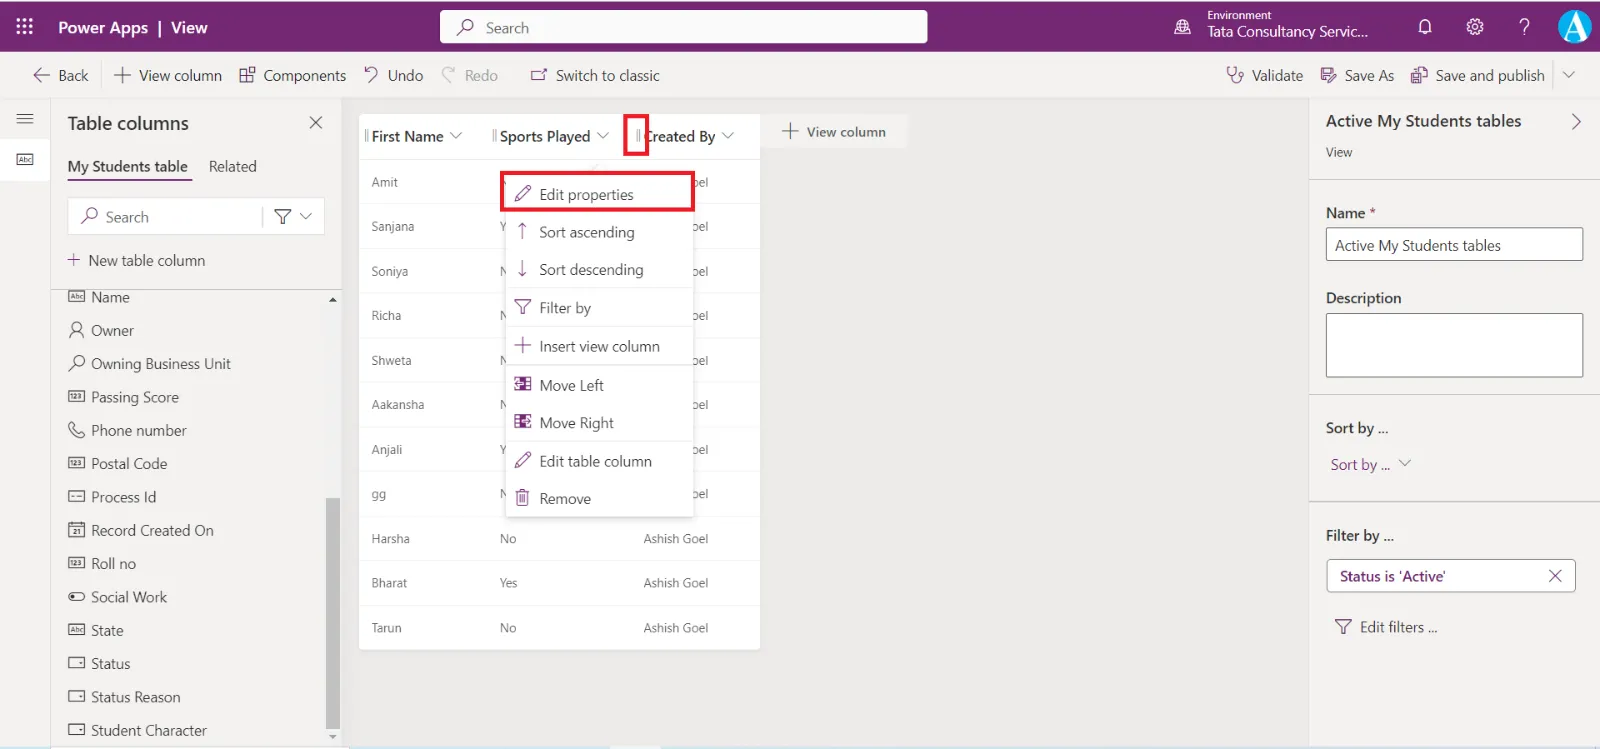
b. Modify the View column width property (set it to 150px).
Note: 300px is the maximum view column width.
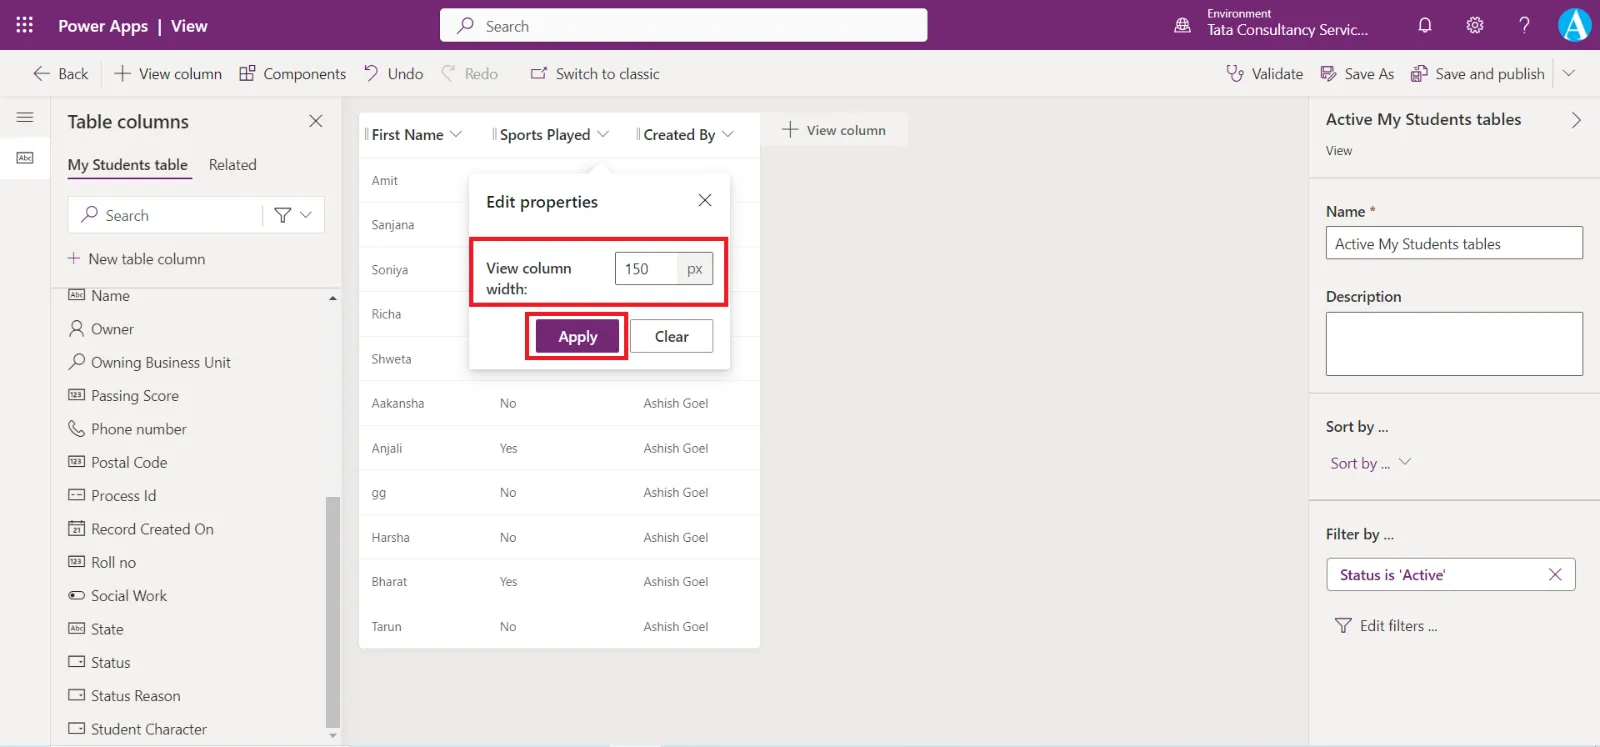
c. Select Apply to complete the modification.
We can see that the column width is successfully modified.
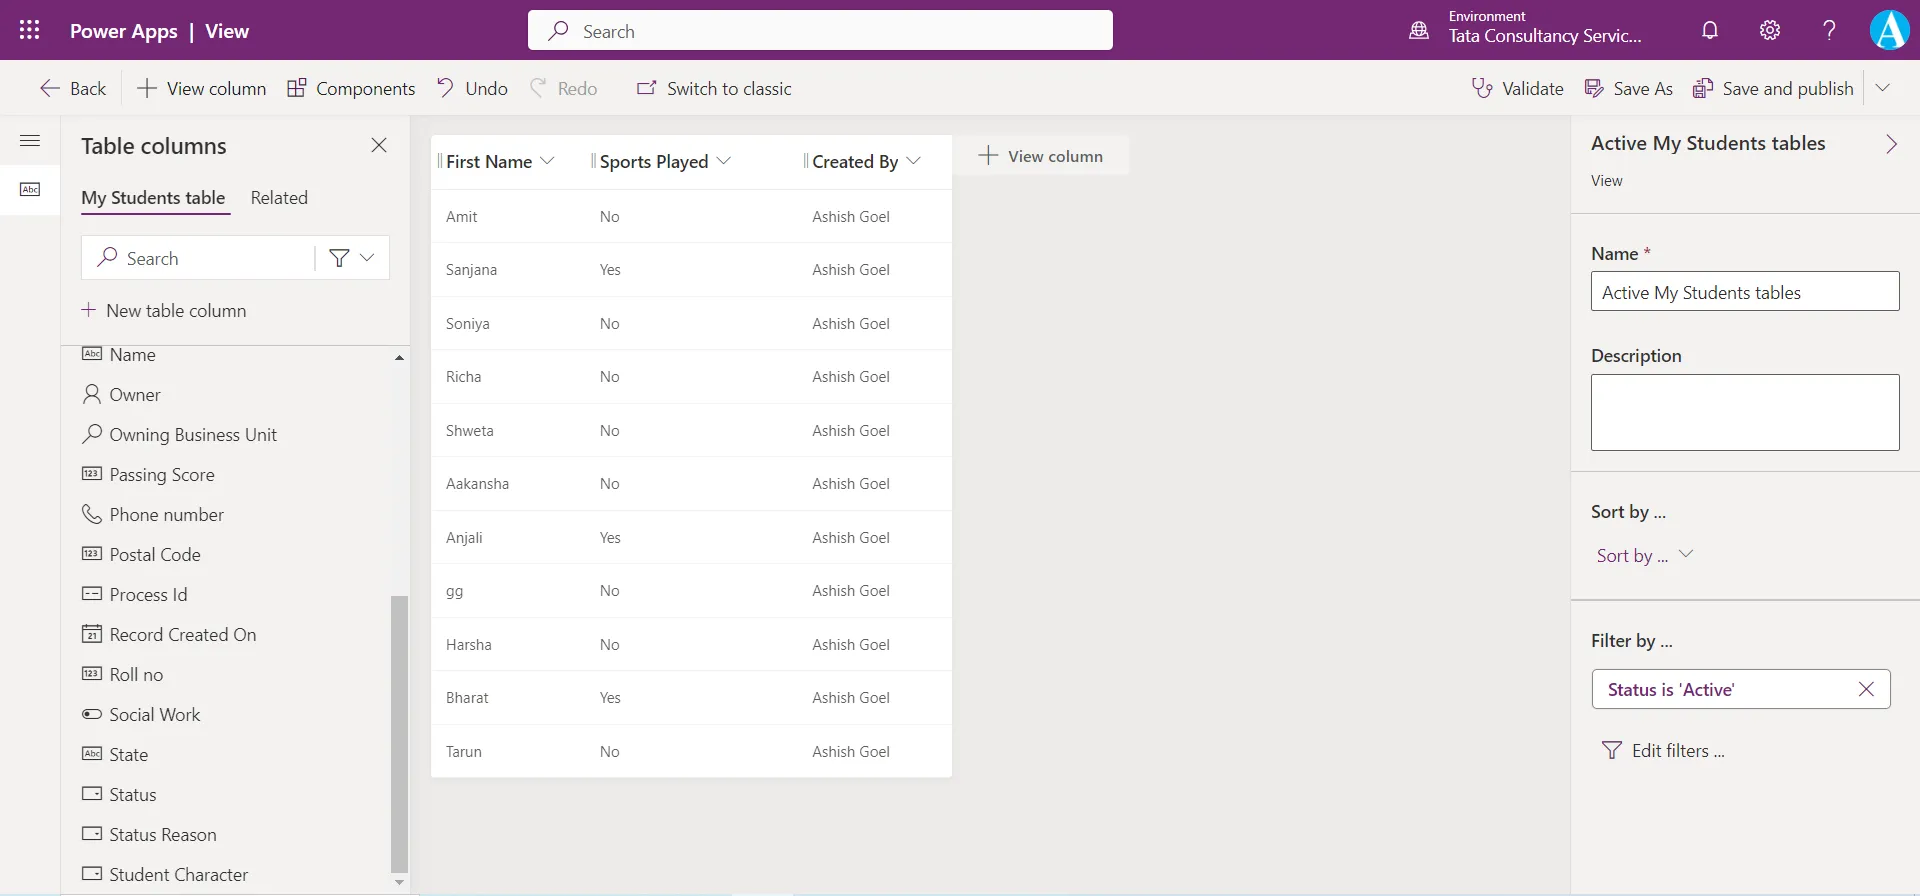
Step 7: We can also add the columns from the related tables to the same view. The related tables are the ones with those a relationship is made with our current table.
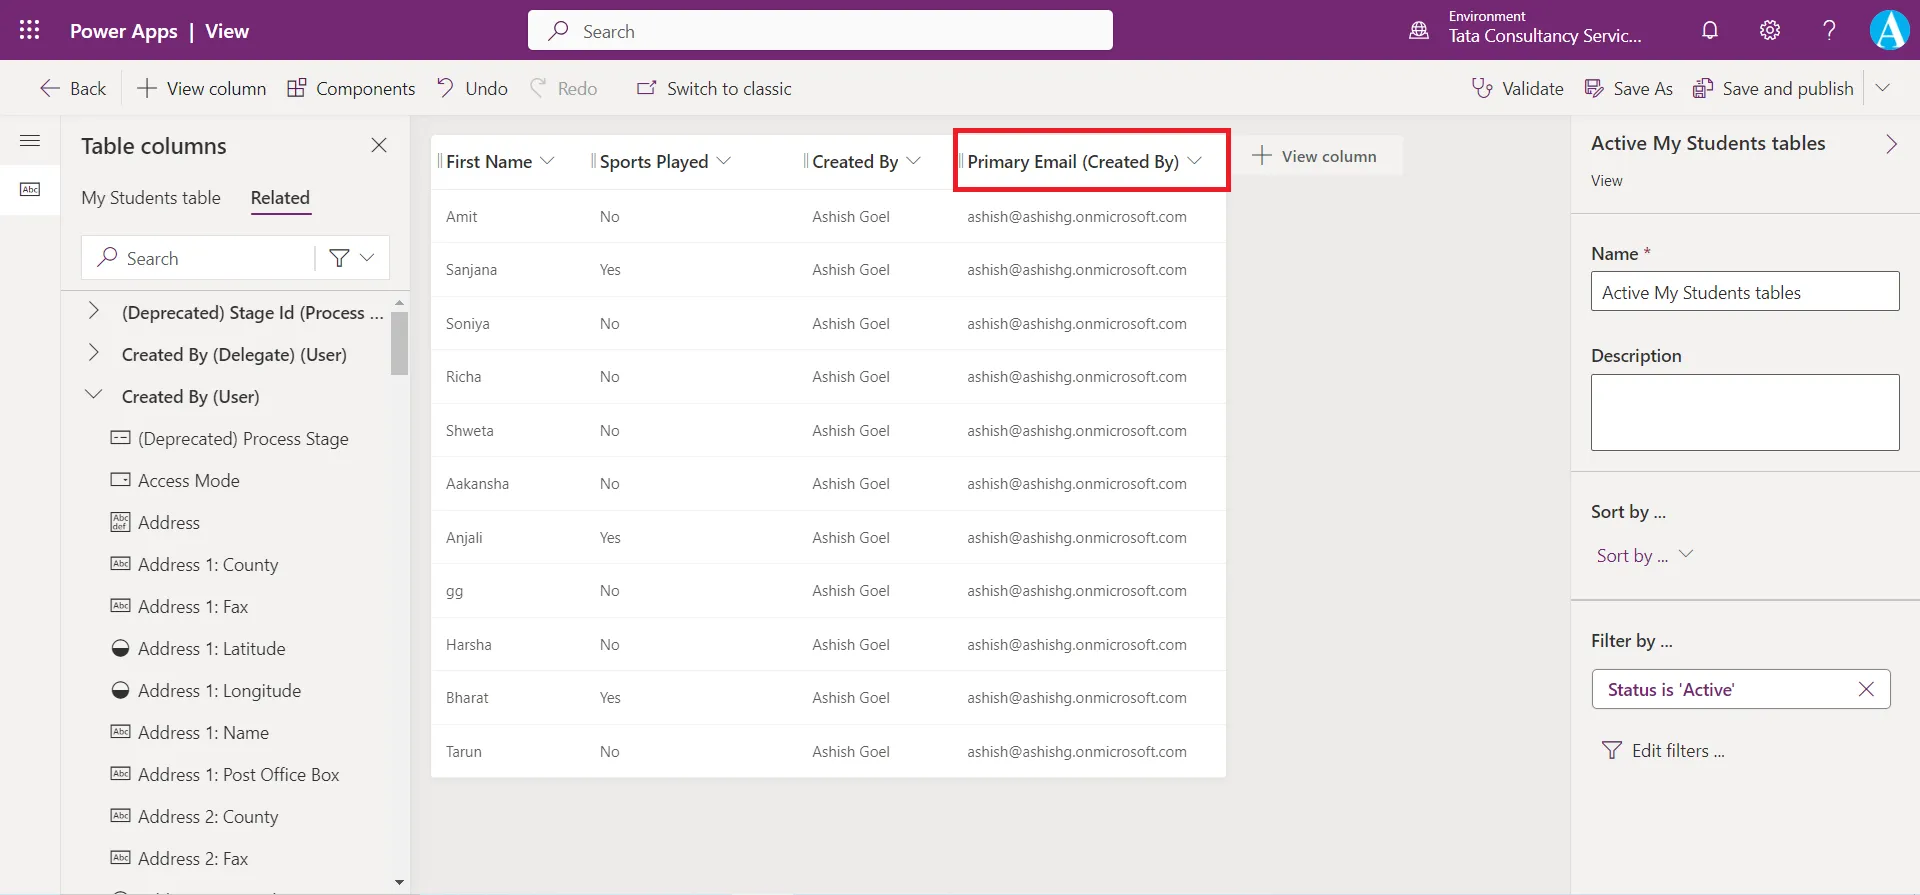
To add fields from the related table, select Related under Table columns. A list of tables that have a relationship with this table will display. By default, all tables in Dataverse have standard relationships with other standard tables, such as the User table.
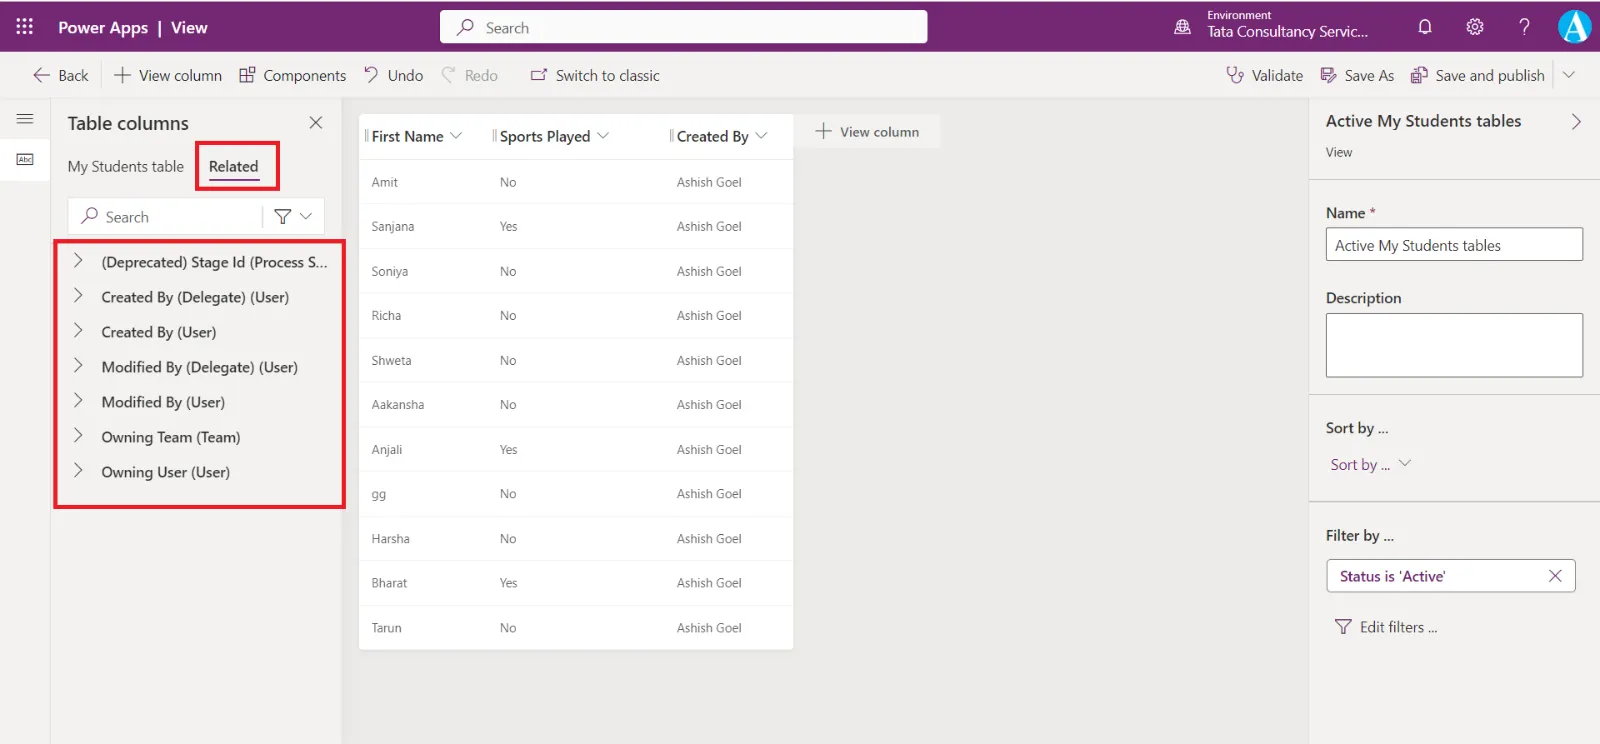
Find and select the table from which columns are used and select columns from the list. For example, the Primary Email column from the Created By table is added to the view, as shown in the image below.
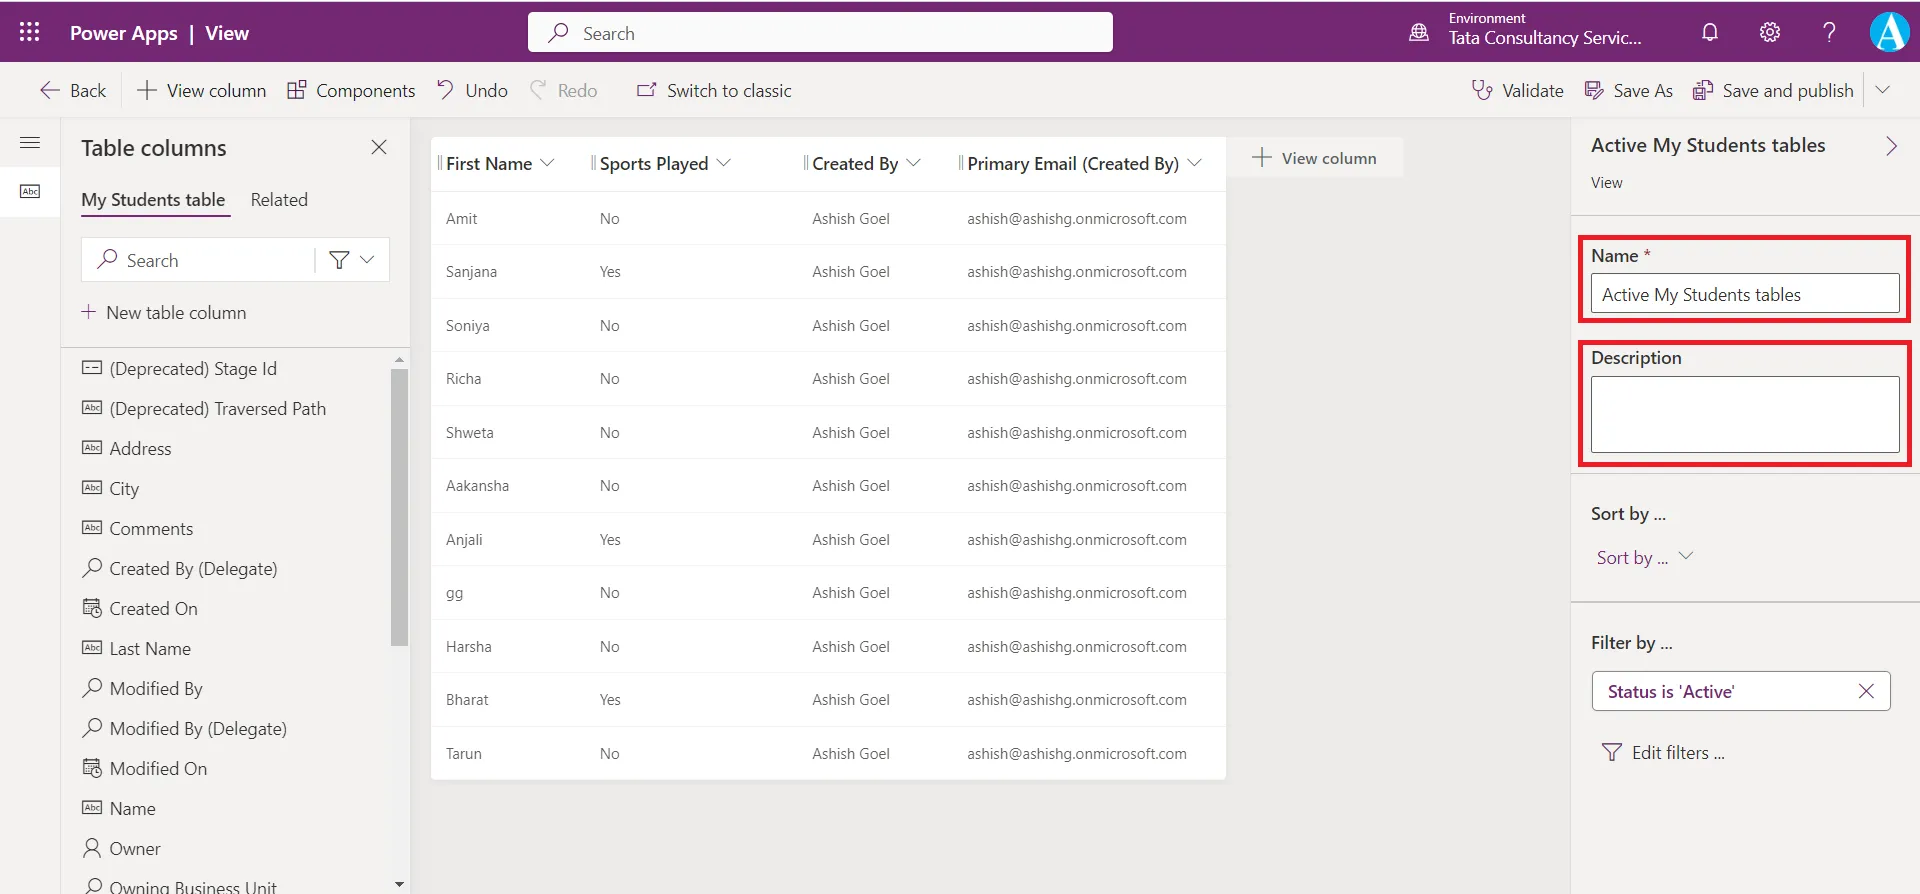
Step 8: We can also change the Name of the view and give the Description to the view.
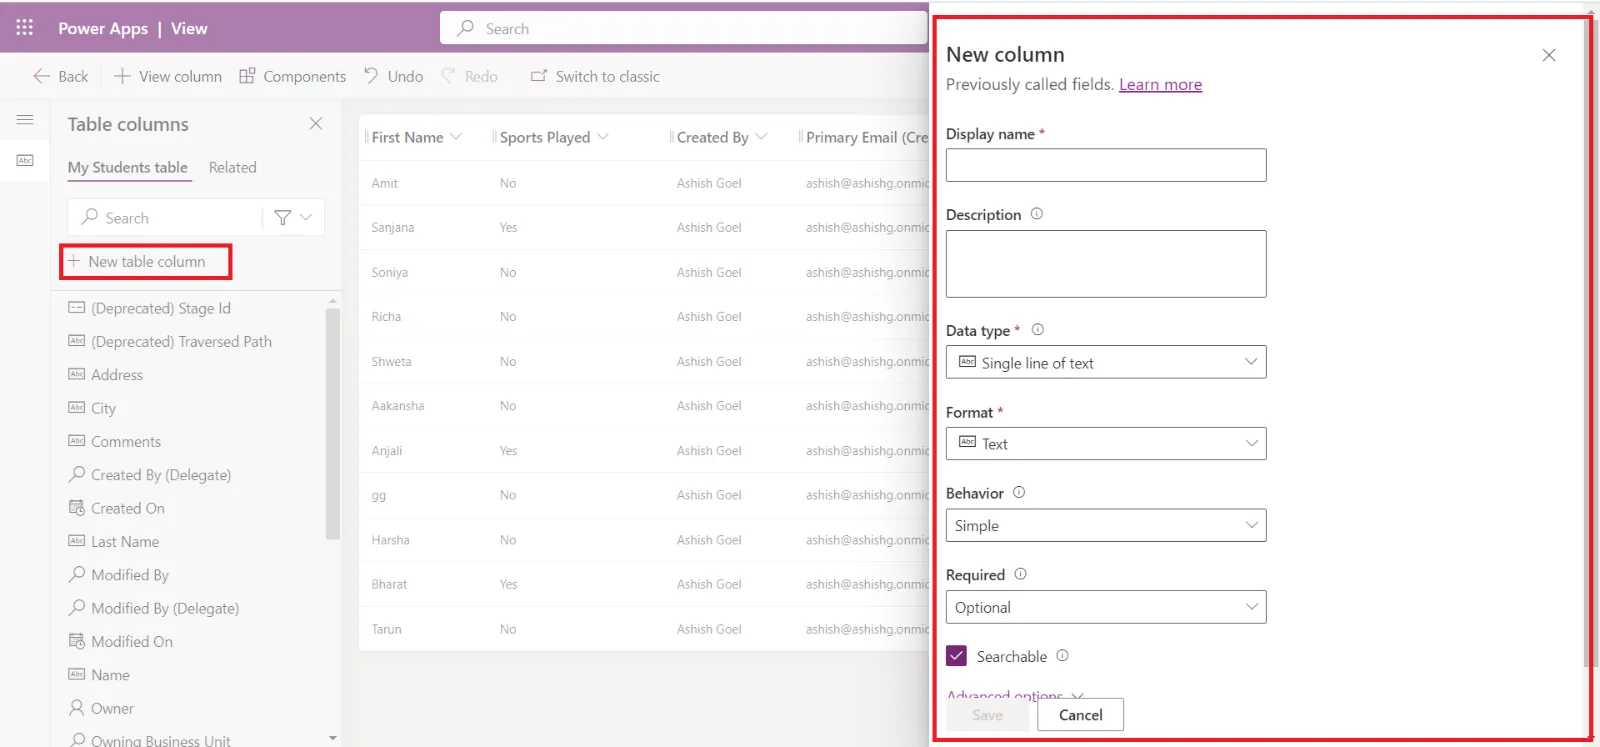
Step 9: We can create a new column inside the view designer itself for the table. To create a new column, select the + New table column button just below the Search field in the Table columns pane.
Step 10: After modifications have been completed, on the view designer toolbar, select Save to override the existing view, or select Save As to create a new view under a different name.
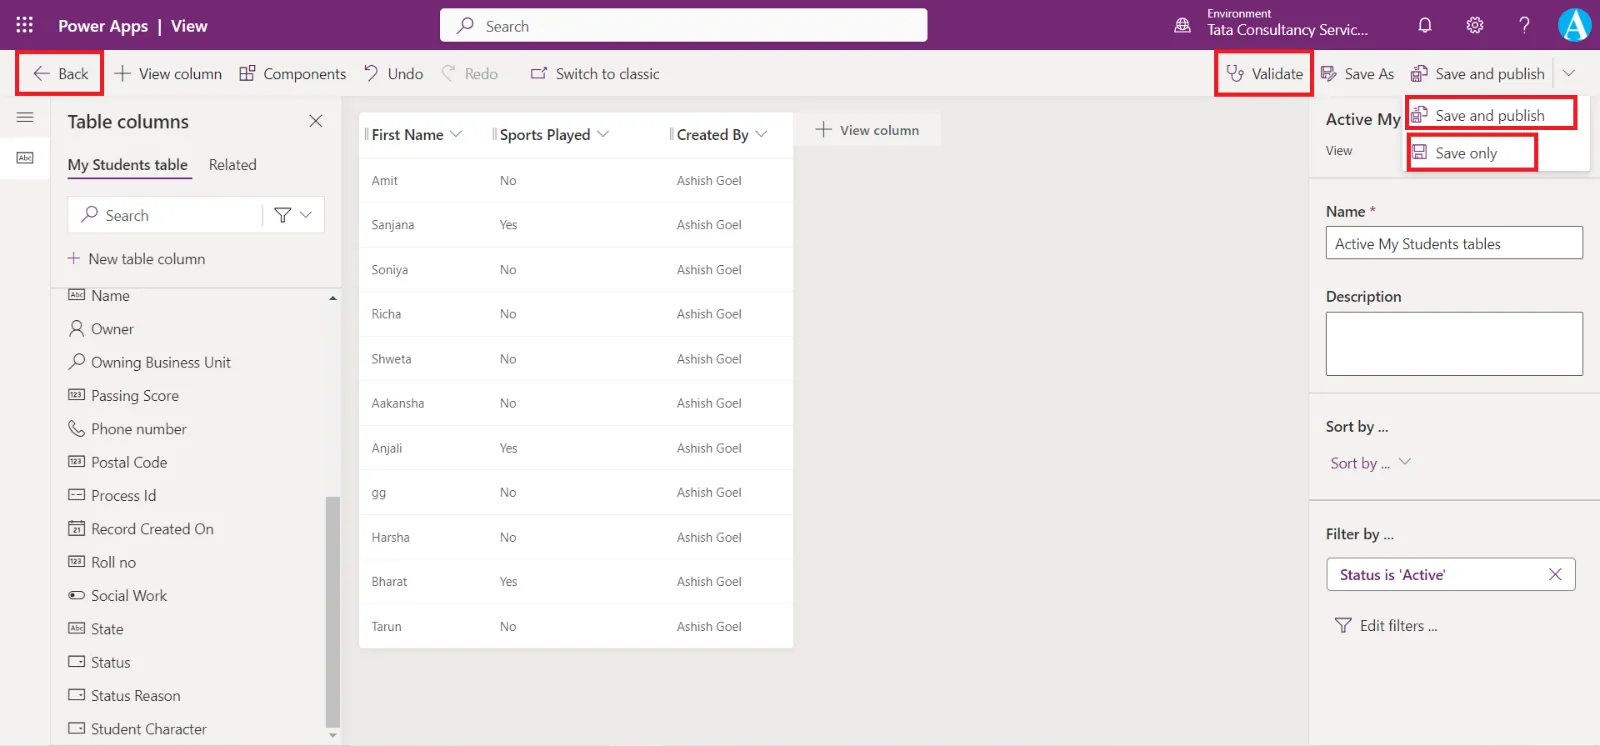
Step 11: To save and publish means render the modifications to the view that's available to all other Power Apps users, select Save and publish, and then navigate back to Tables by pressing the Back button at the top left of the screen.
Sort data in the views
The list of records that are presented in a view are shown in a sequence based on the Sort by definition. This definition is composed of a list of columns that must be part of the visible columns of the view and are processed one after the other.
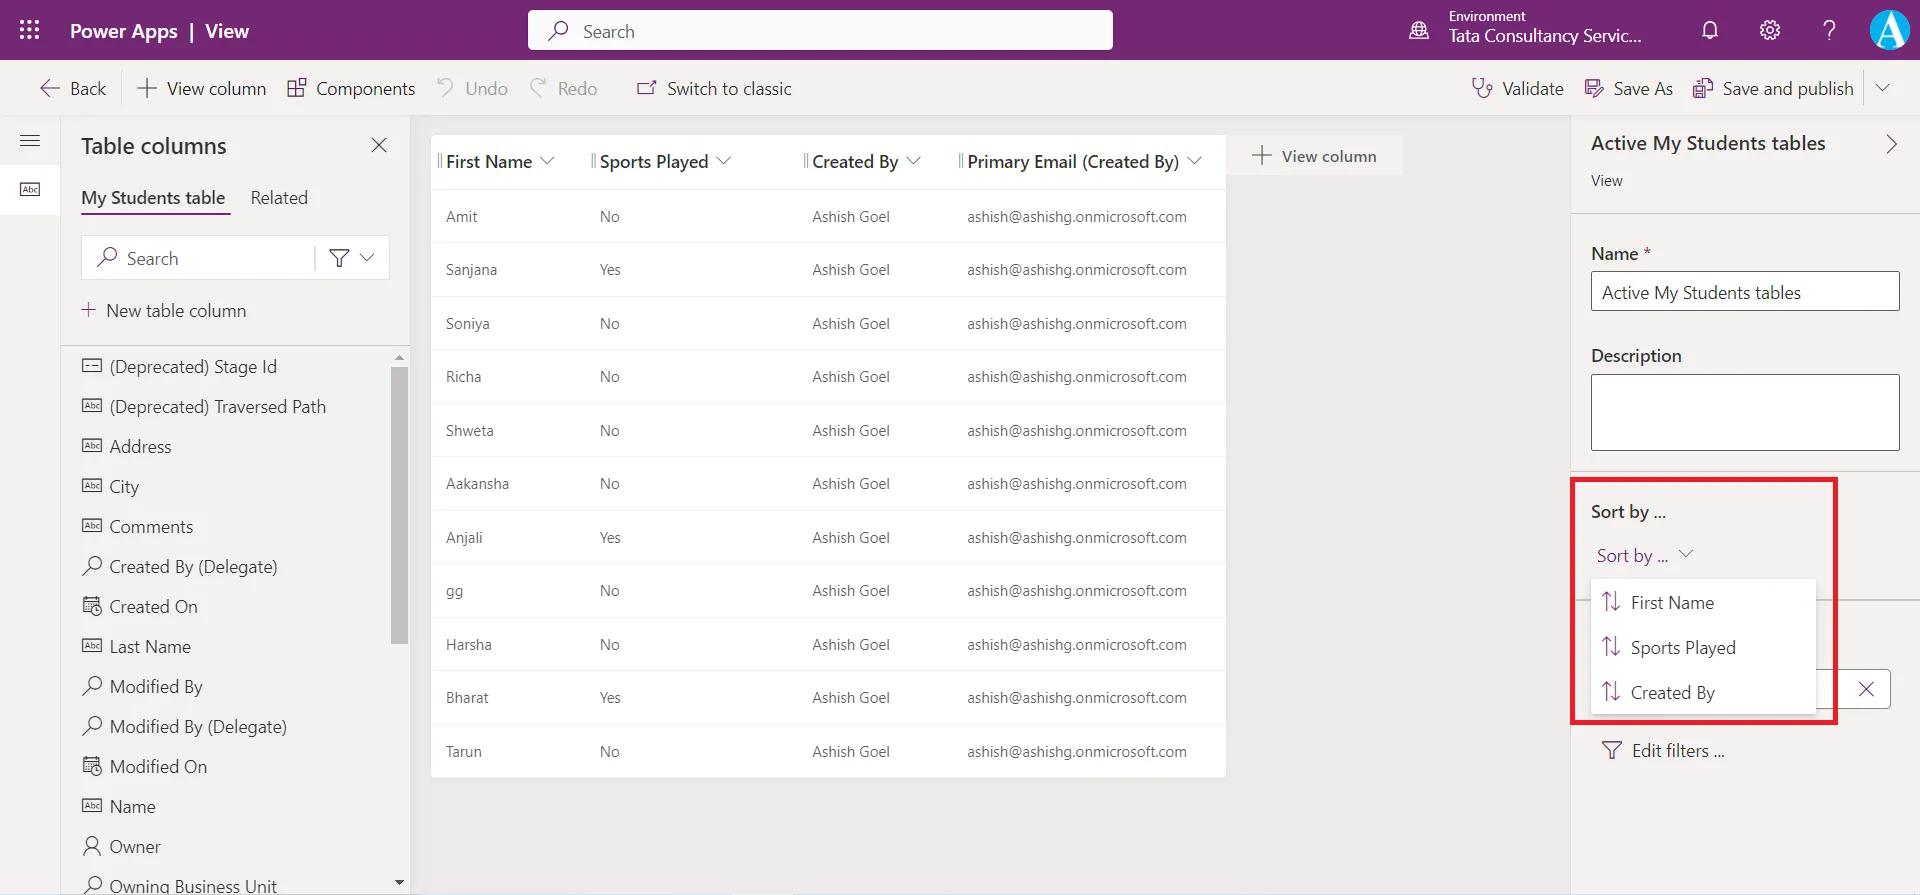
We can sort each selected column in ascending or descending sequence. Set this configuration by selecting the column heading and then the type of sort sequence that's required.
Note: • The up arrow means the sorting is in ascending order, Sort A to Z for text columns, Older to Newer for date columns.
• The down arrow means the sorting is in descending order, Sort Z to A for text columns, Newer to Older for date columns.
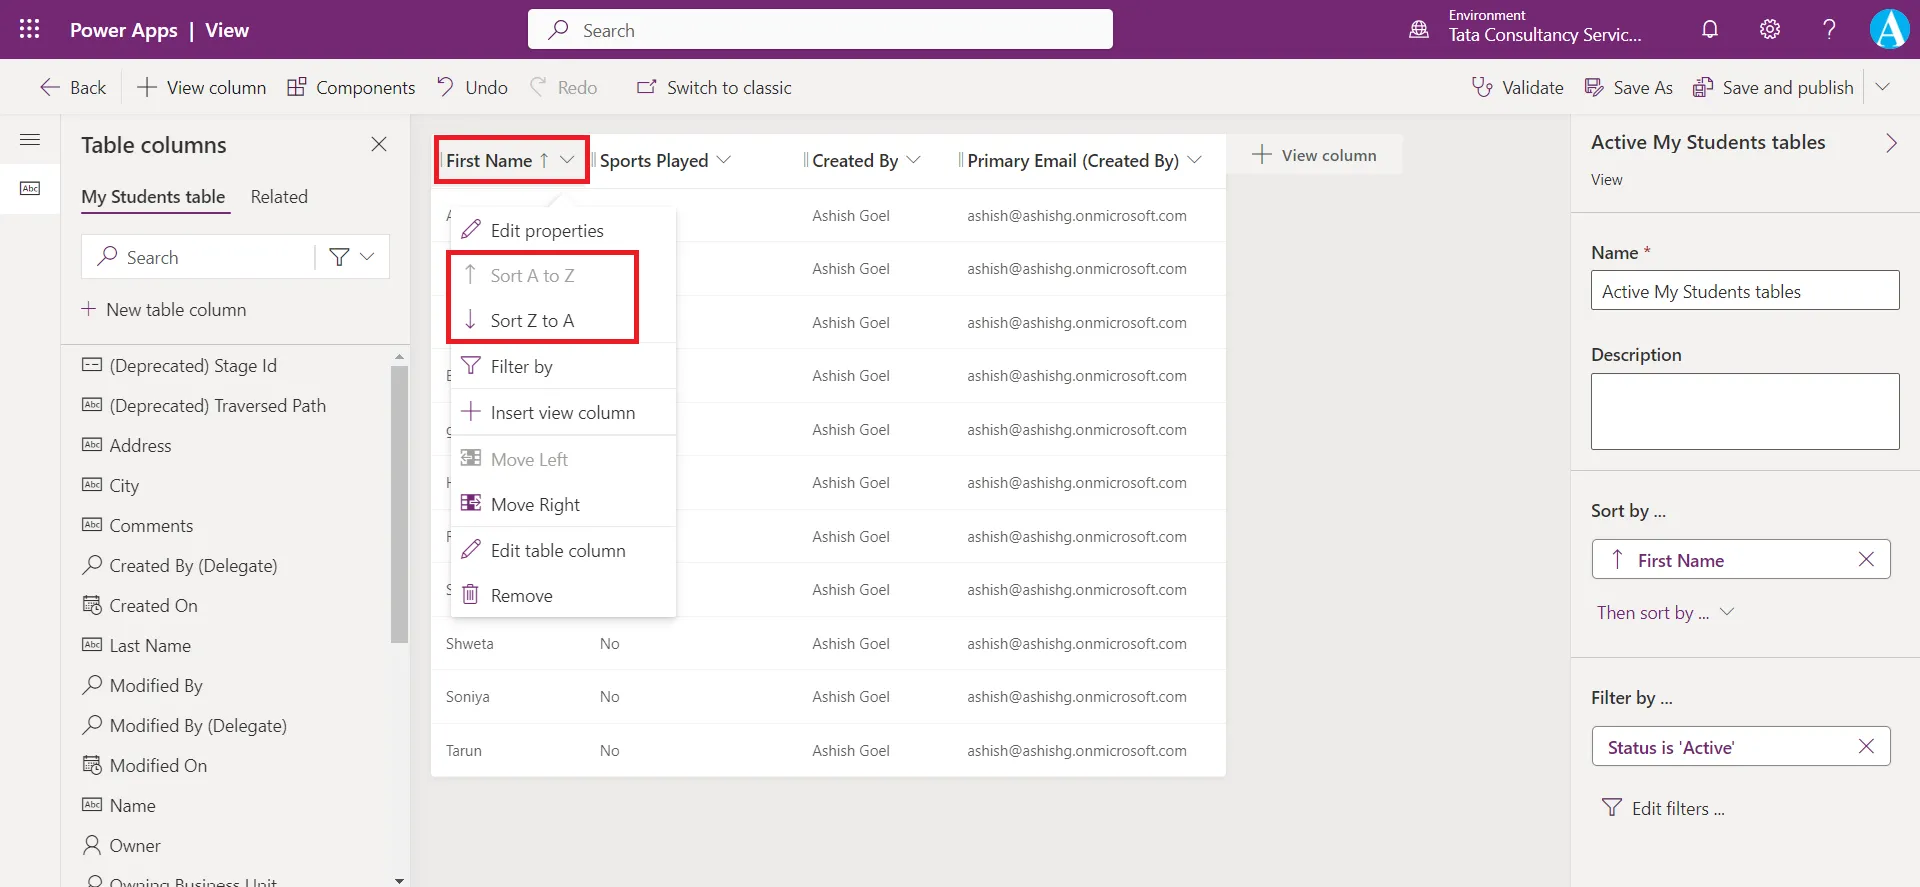
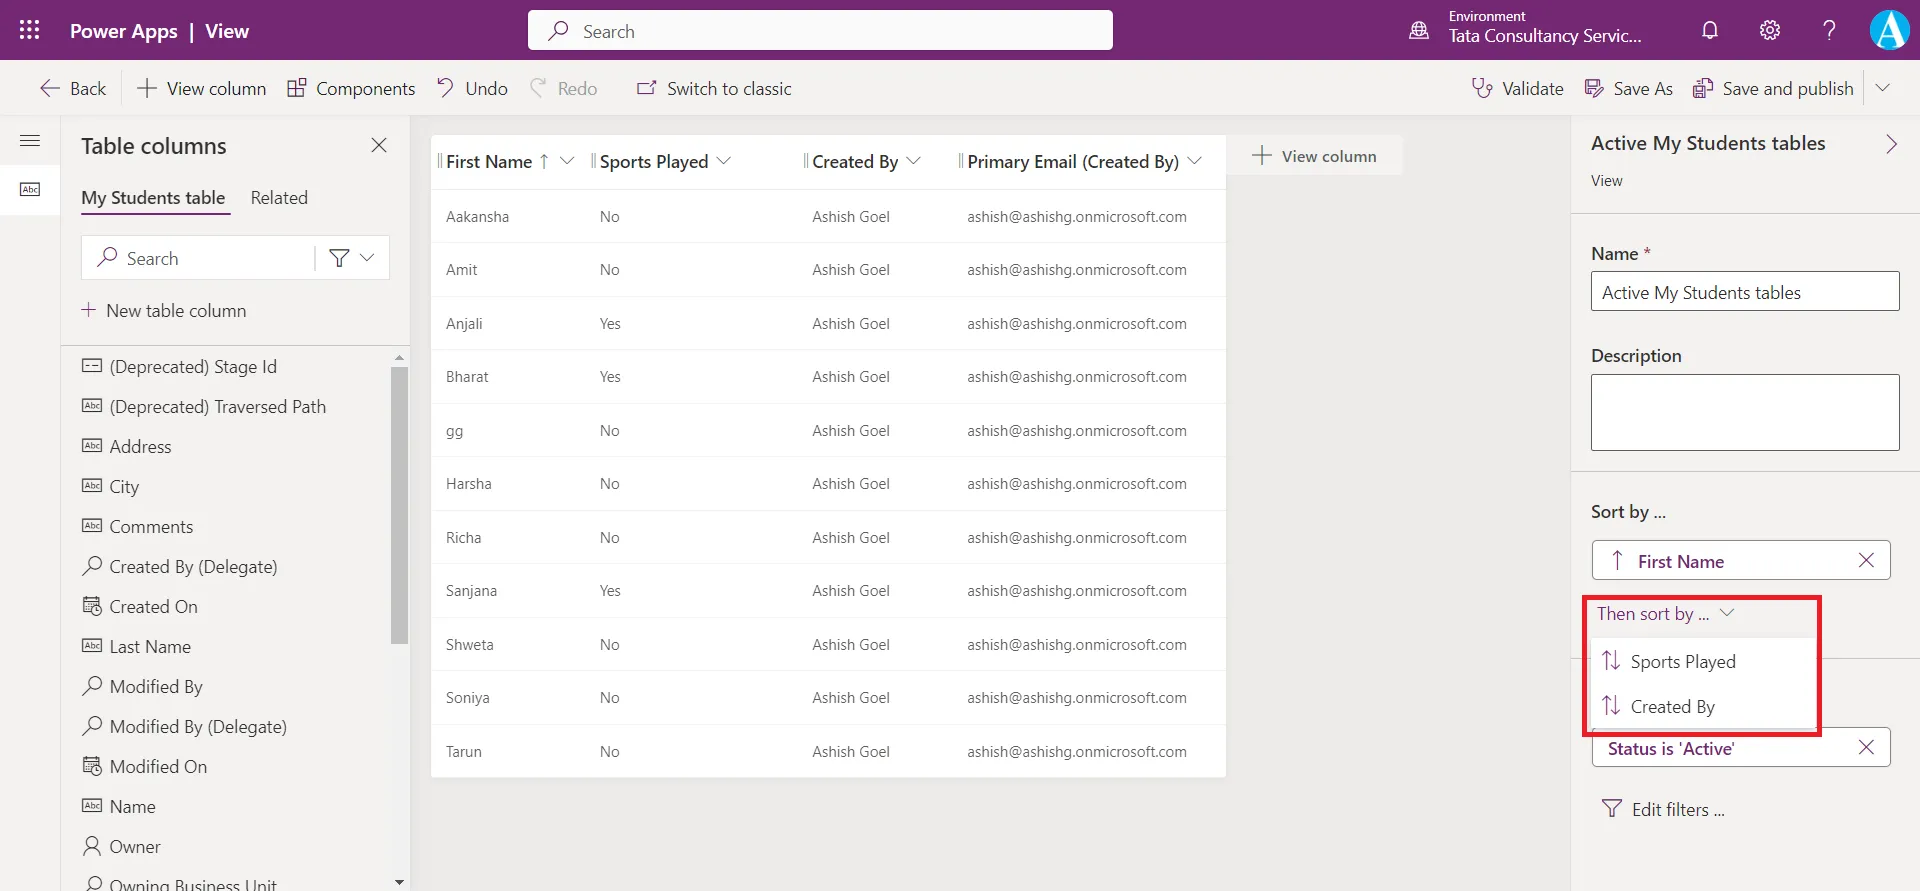
We can also set the sort order by click on the individual columns in the Sort by… section.
When click on Then sort by…
Filter data in the views
To limit the records in a view we can set the Filter by property of that view. The filter definition isn't limited to the visible columns of a view, but for those visible columns, a shortcut is available to add a Filter by criterion.
For the columns added in the view, select the column header in the view editor, then select the Filter by from the menu.
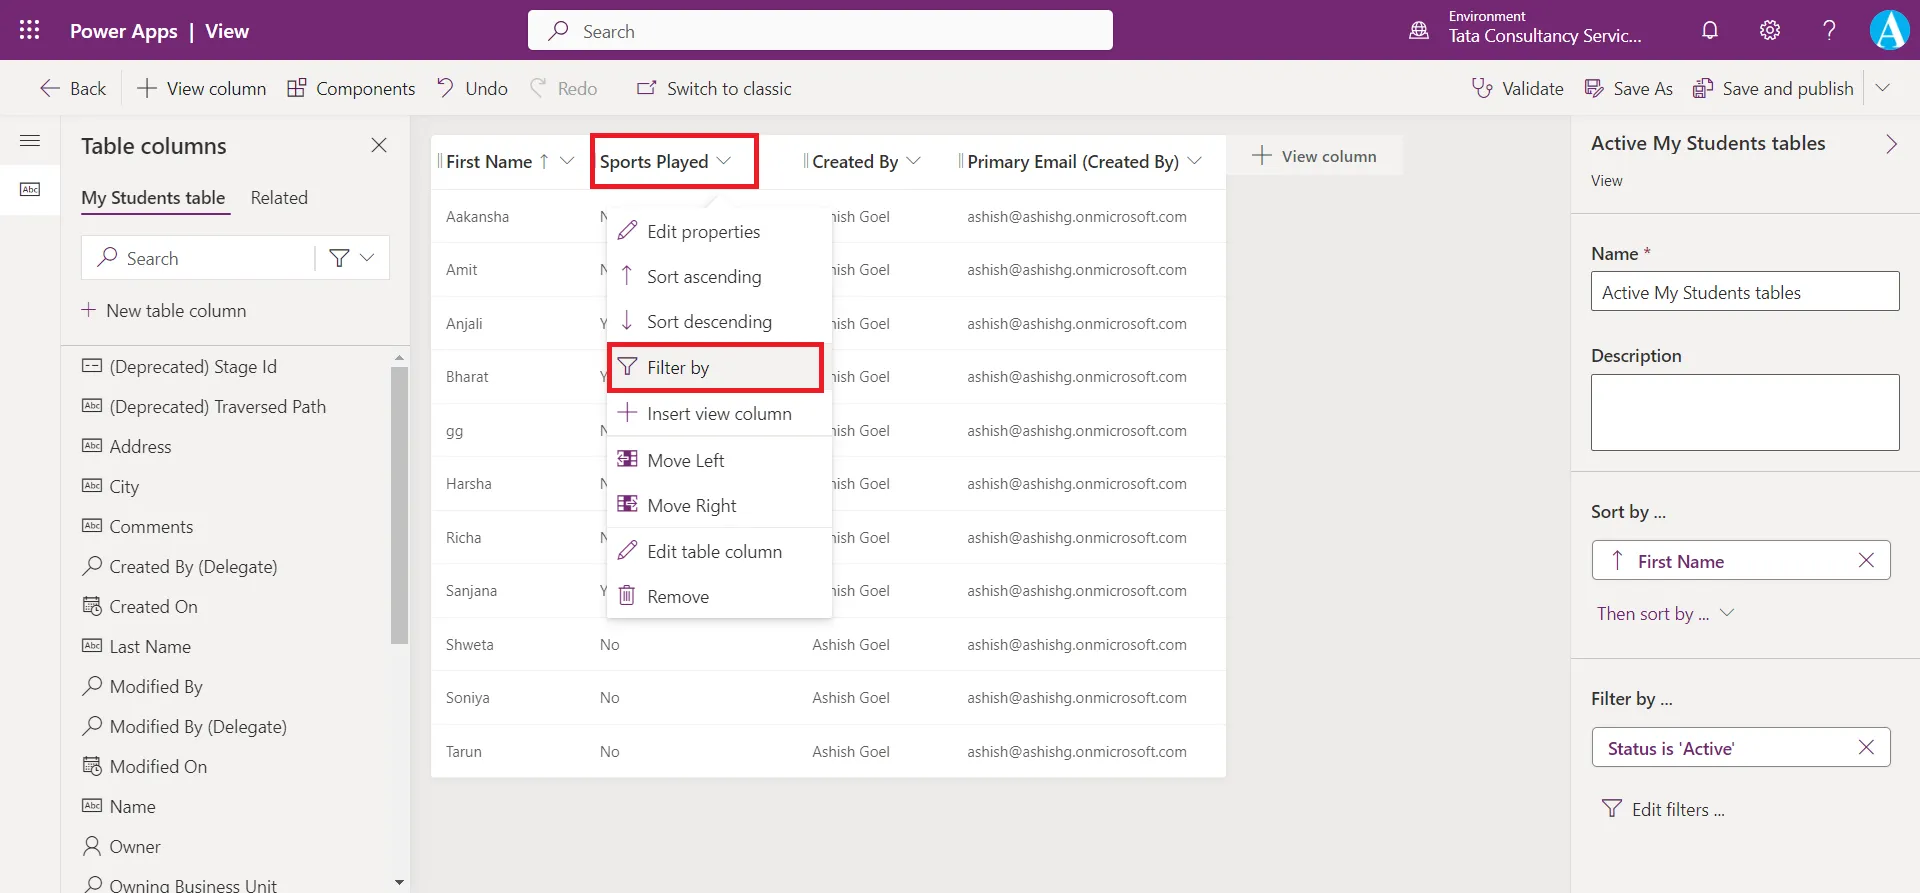
Then a Filter by dialog box opens with two dropdown options as shown in the following image.
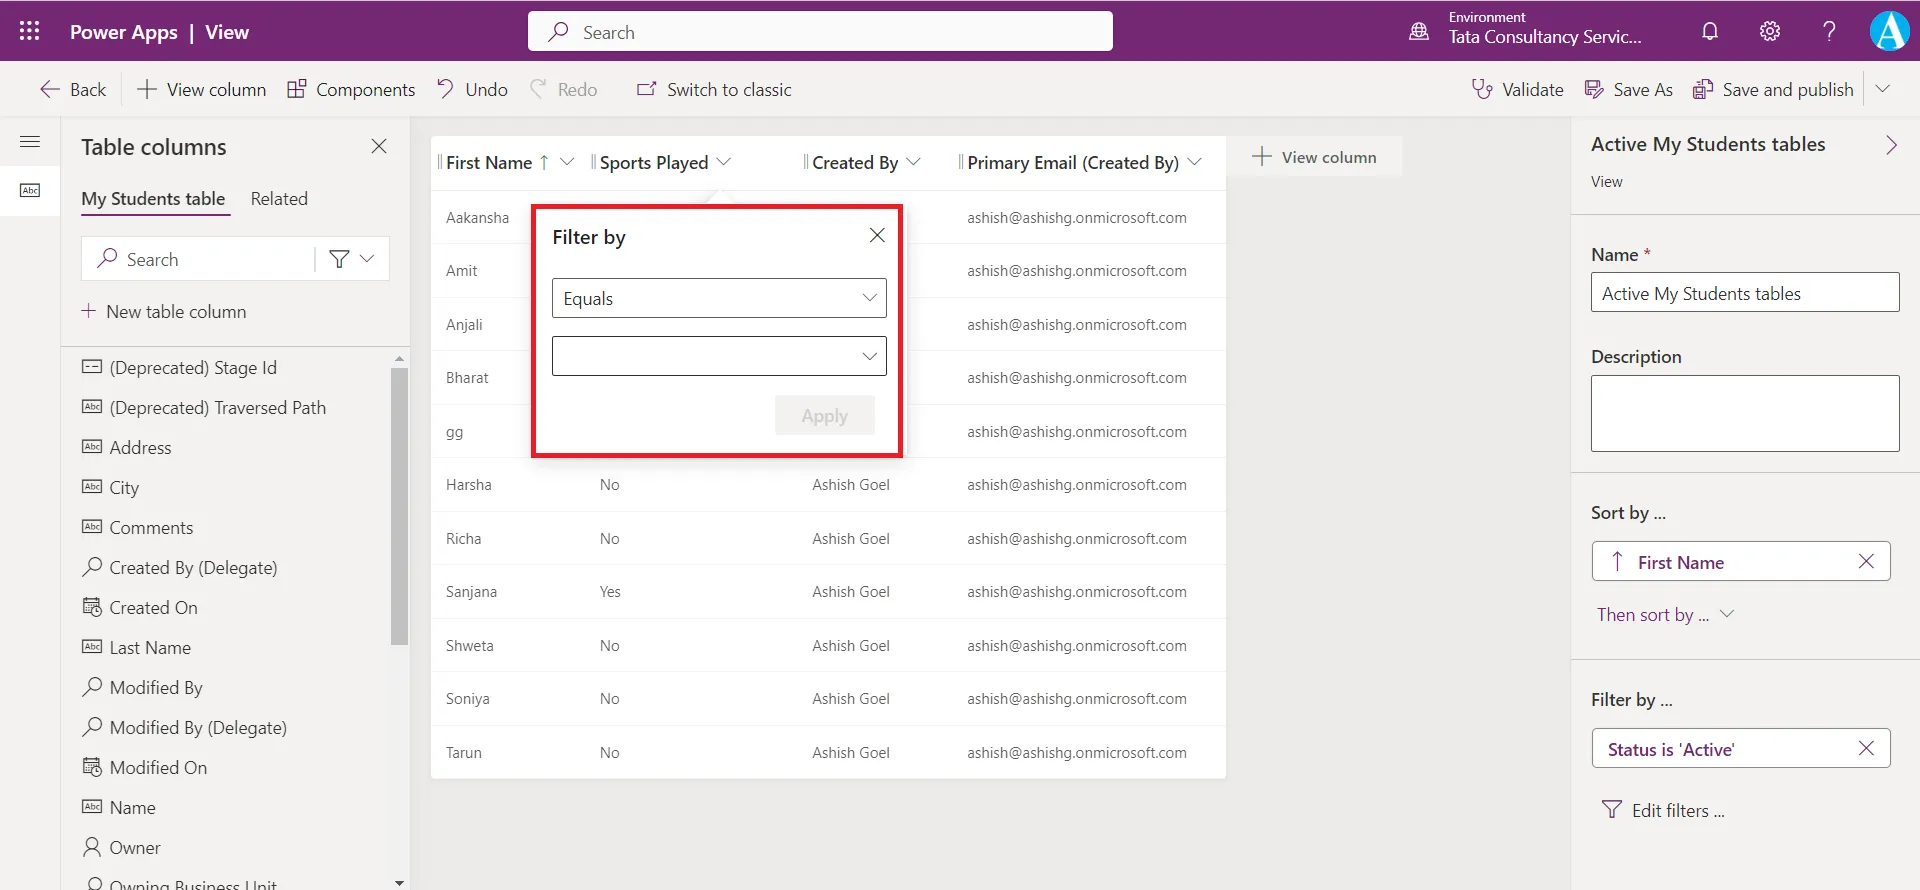
The top dropdown gives us a menu of conditional choices such as Equals, Contains and Begins with.
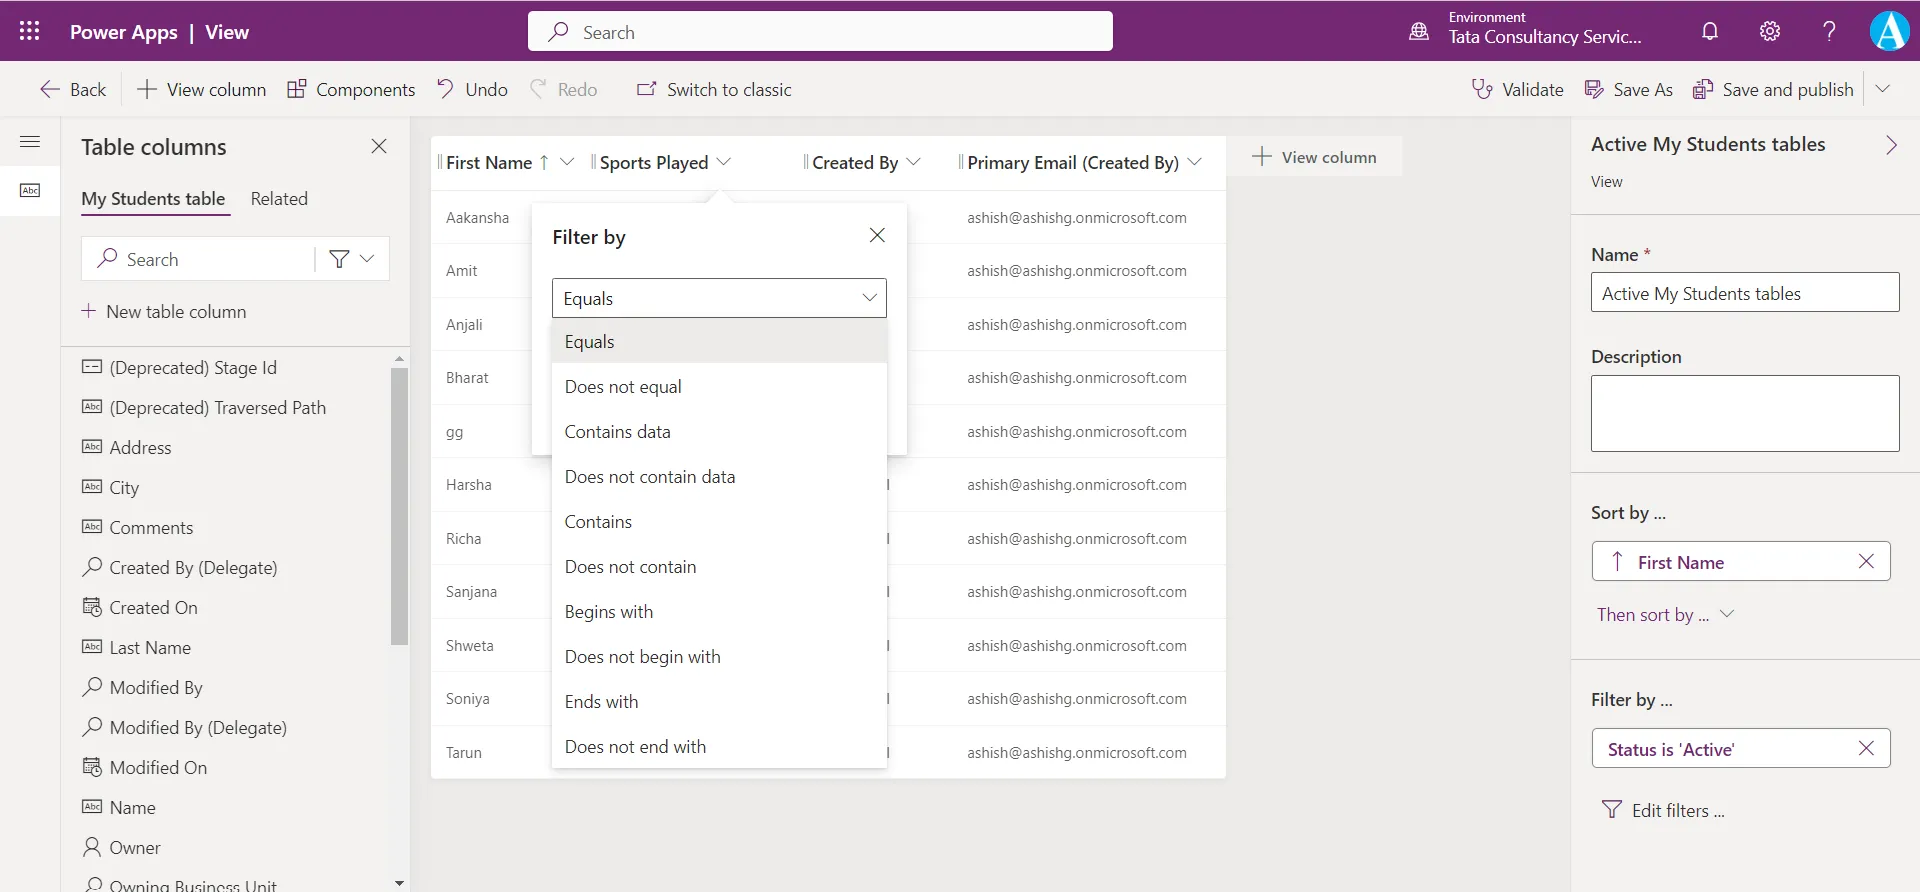
Let’s suppose we select Equals, and select the equals value.
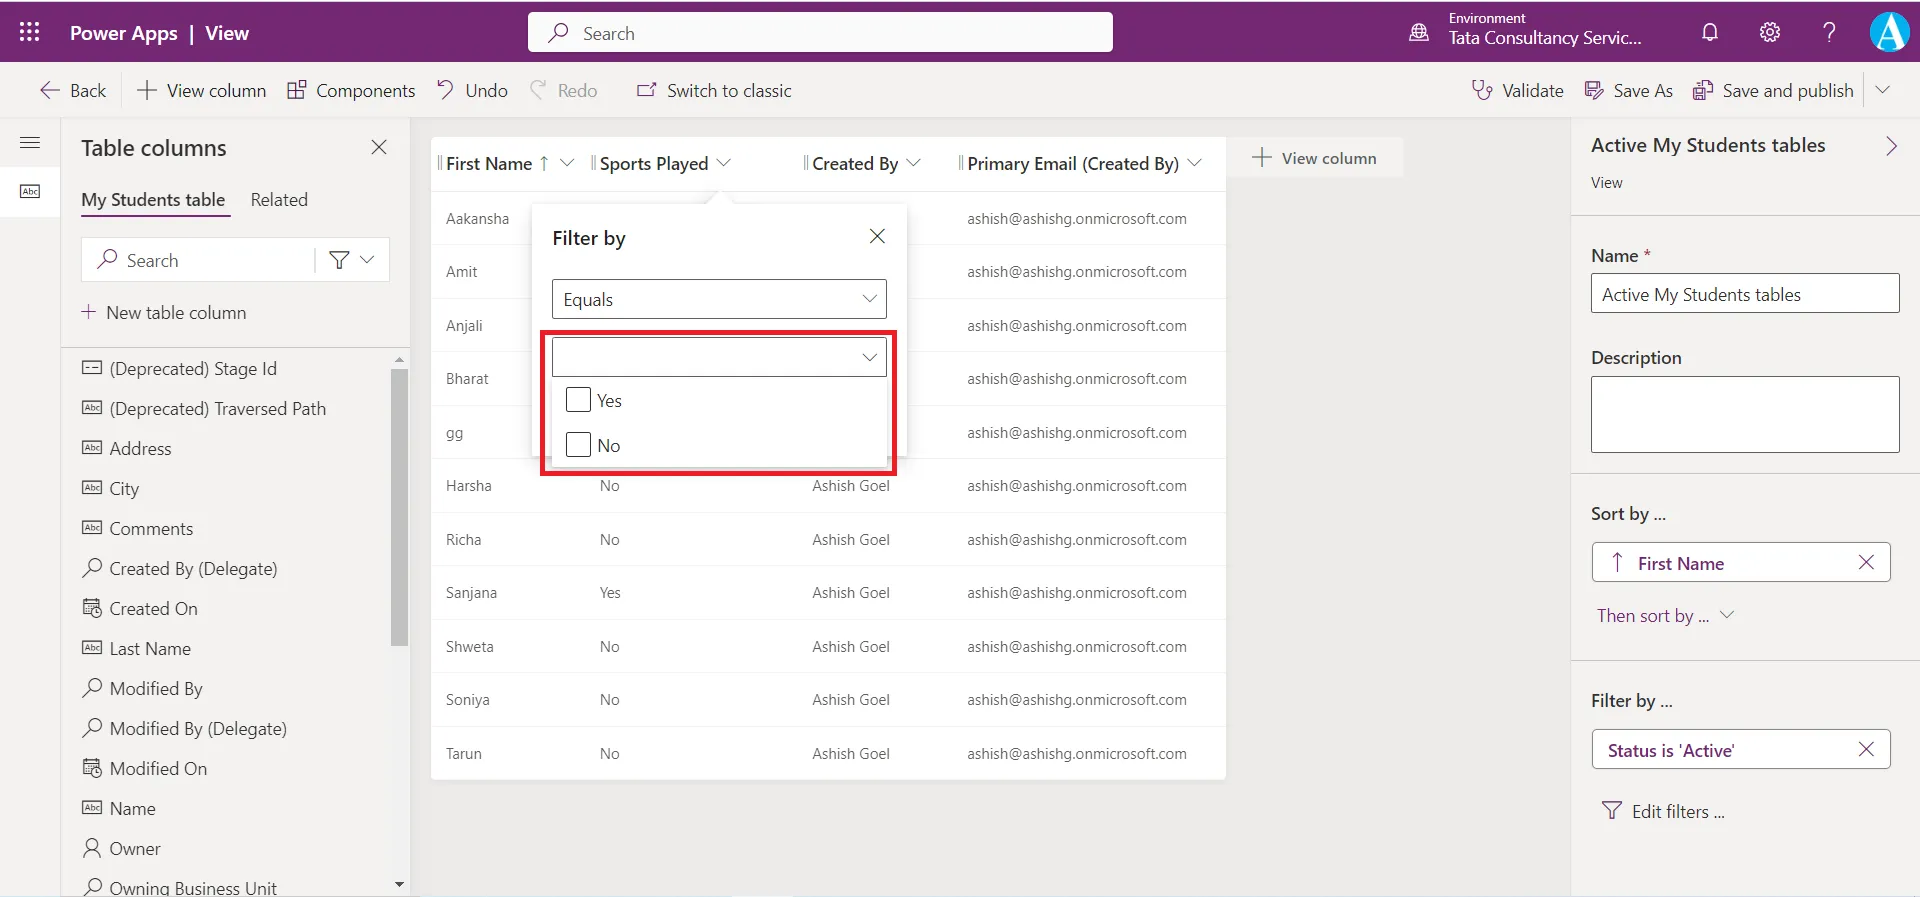
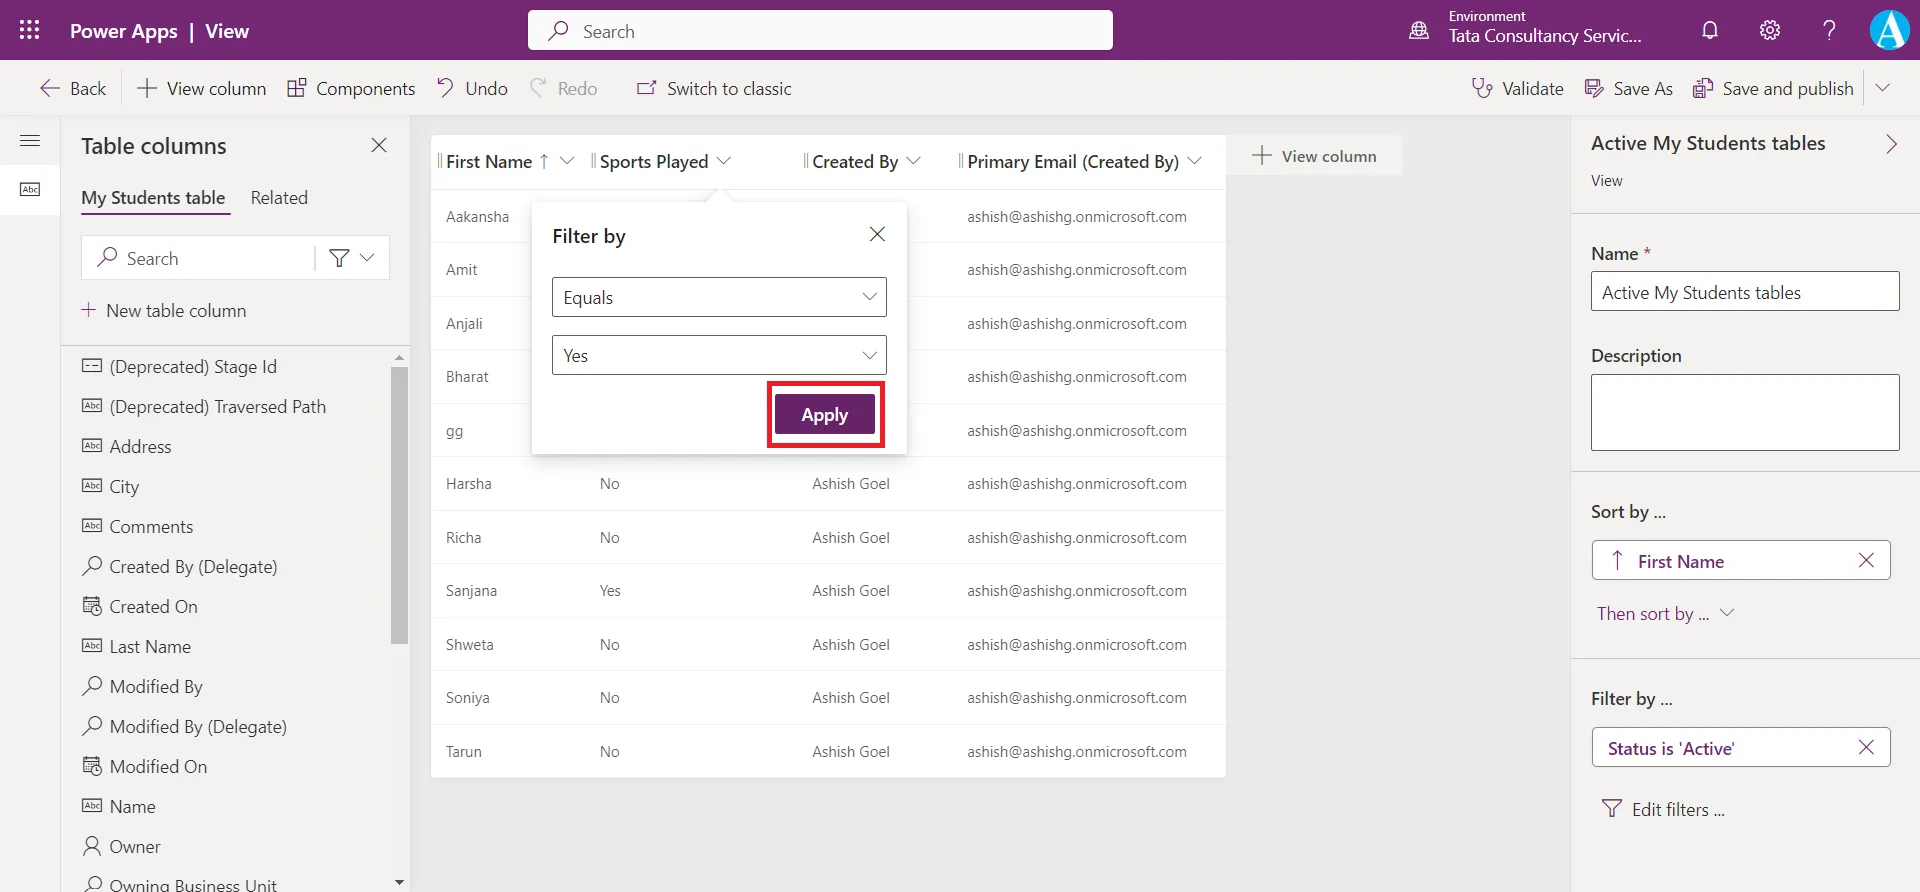
The second dropdown provides you with the opportunity to choose a value from the selected column to use in our filter condition. We notice a checkbox next to each value, so we can select the one to use in our filter condition. Then select the Apply button (below the column value field) to record the filter.
Suppose we select value, Yes. Click on Apply to apply the filtering on the view.
Select the Edit filters… in the Filter by… section at the bottom right of the screen.
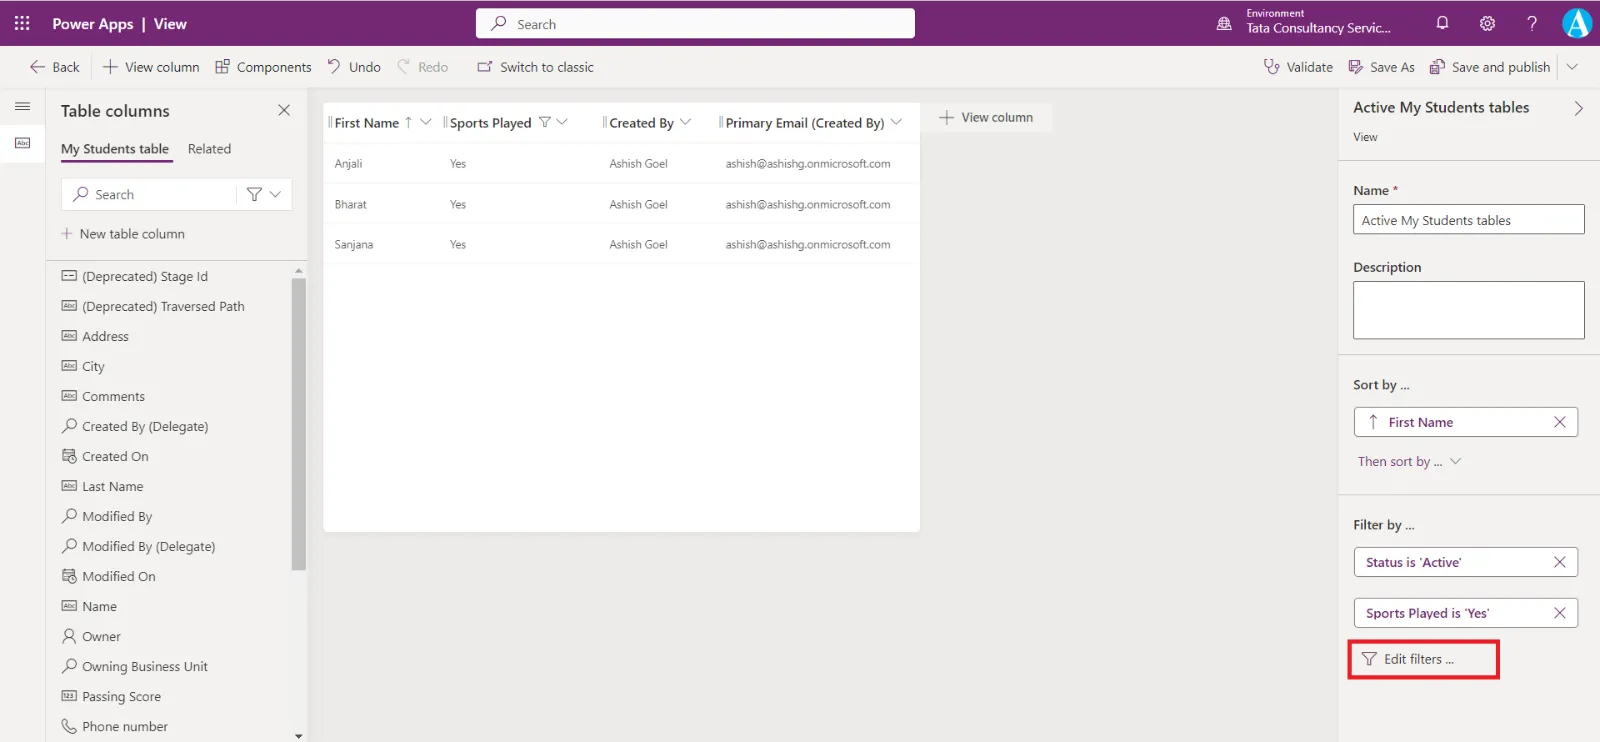
The Edit filters dialog box open, as shown in the image below.
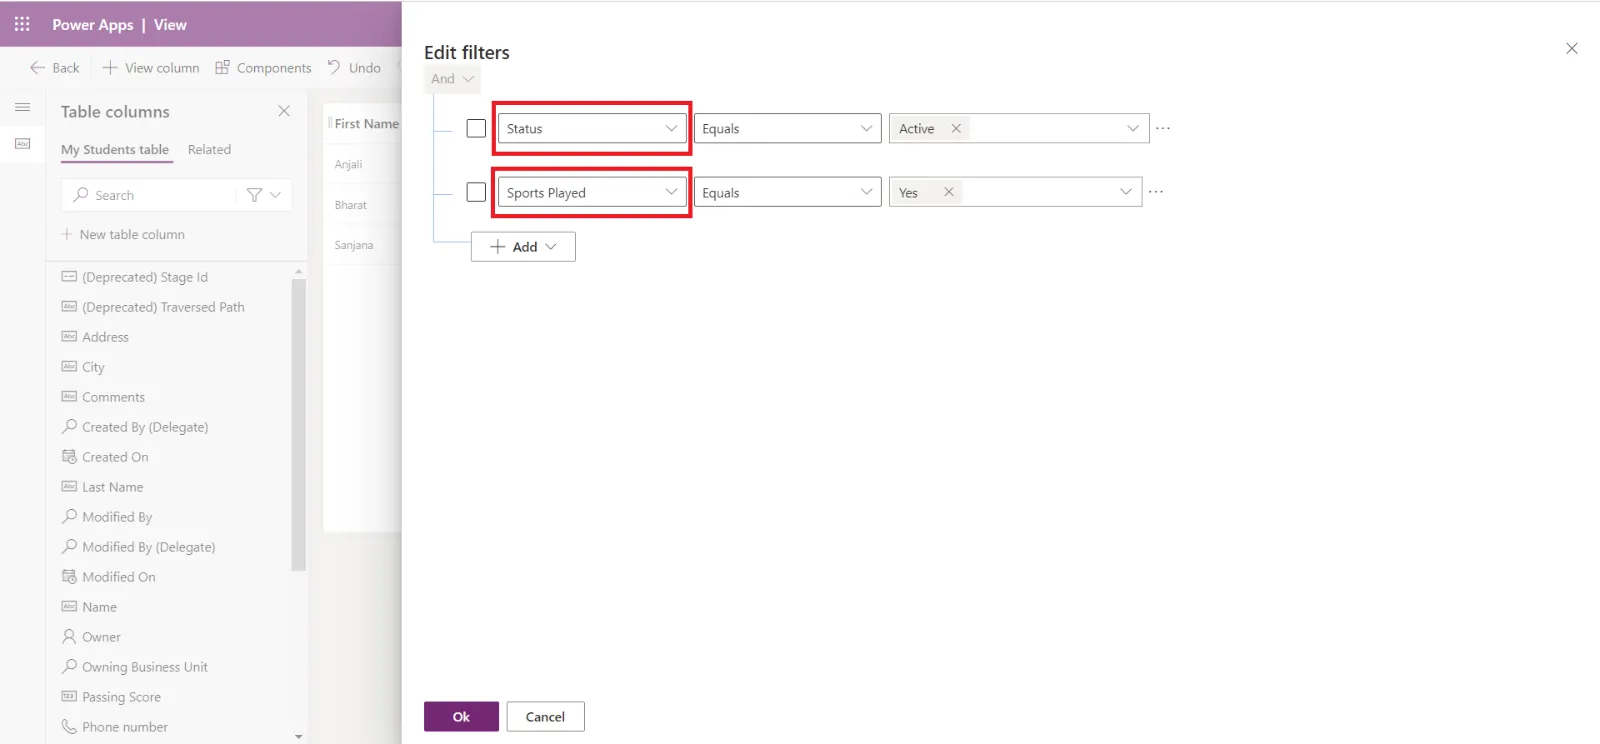
Click on the down arrow we can see all the available columns of our table for which we are creating the view.
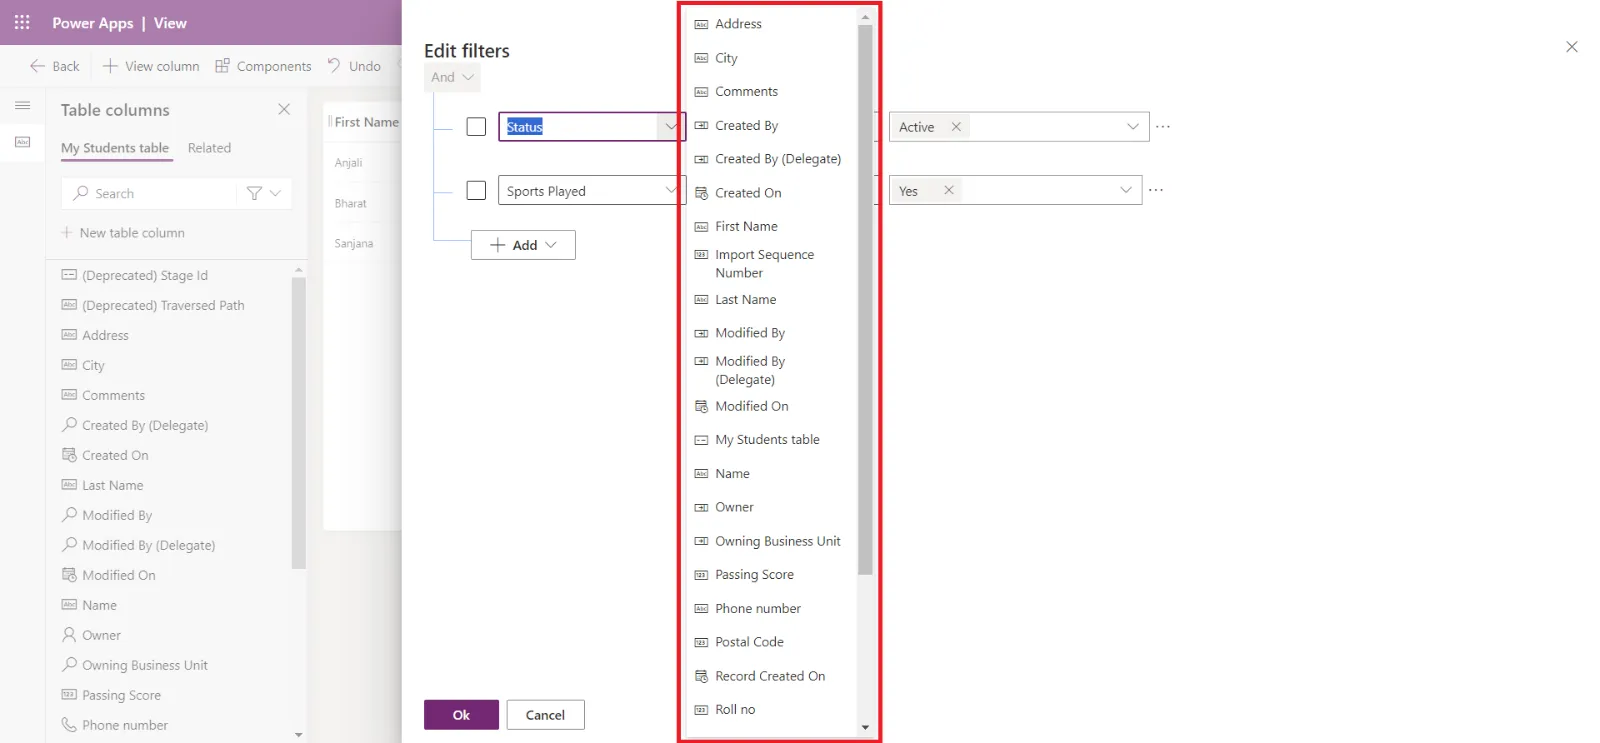
According to our selection of the column we see different options.
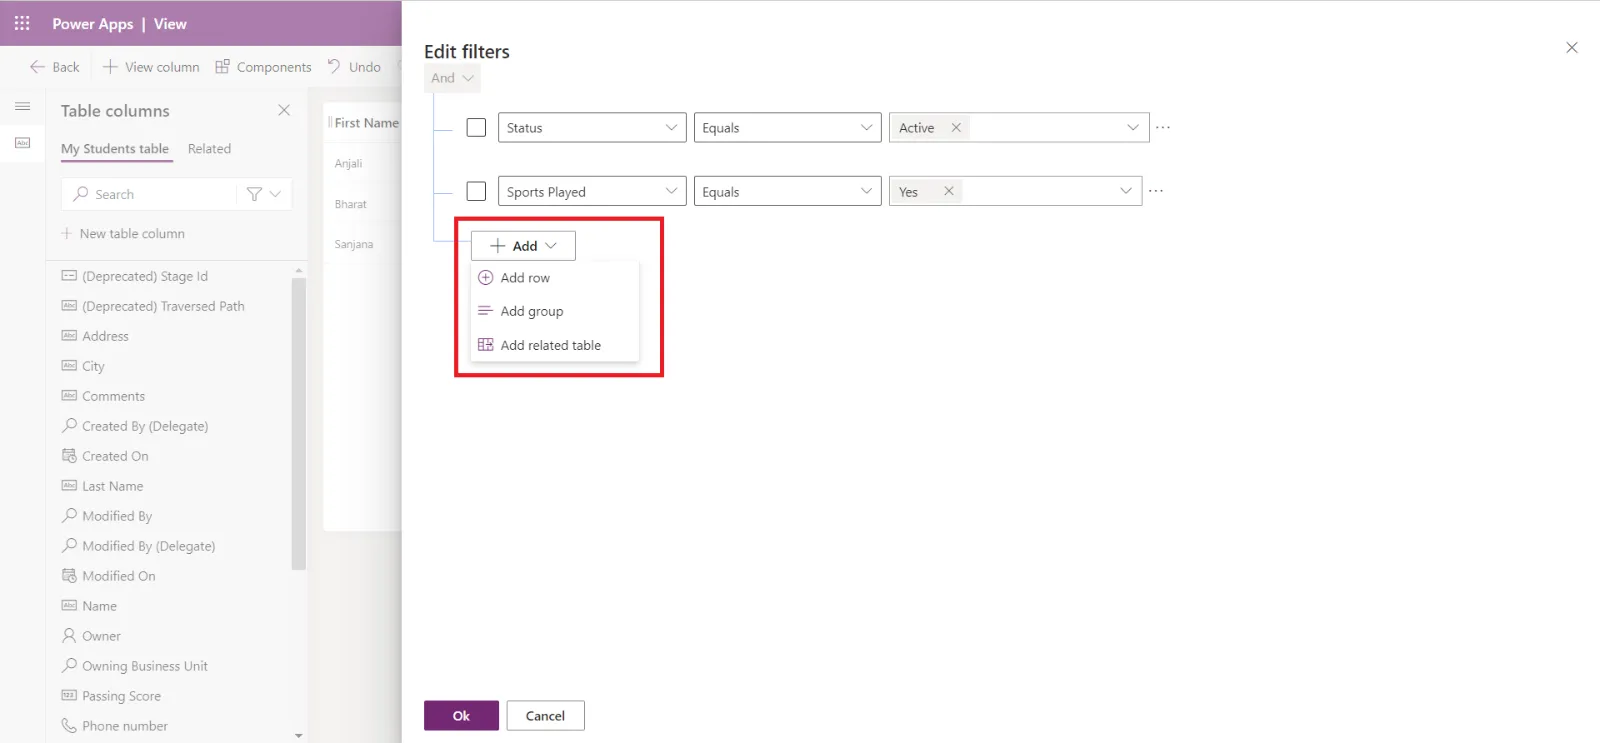
When we add a new criterion, click on + Add. We can see three different options.
• Add row - Add a single criterion.
• Add group - Group multiple criteria together.
• Add related table - Add rules against records that are related to the current one that's being evaluated.
From a simple criterion to a complex set of criteria, we can set a filter definition by using a series of logical operations that determine whether a record should be displayed.
B. Create a new View
To create a new view, open the table we want to create a view for and click on Views from the data experience pane and then click on +New View.
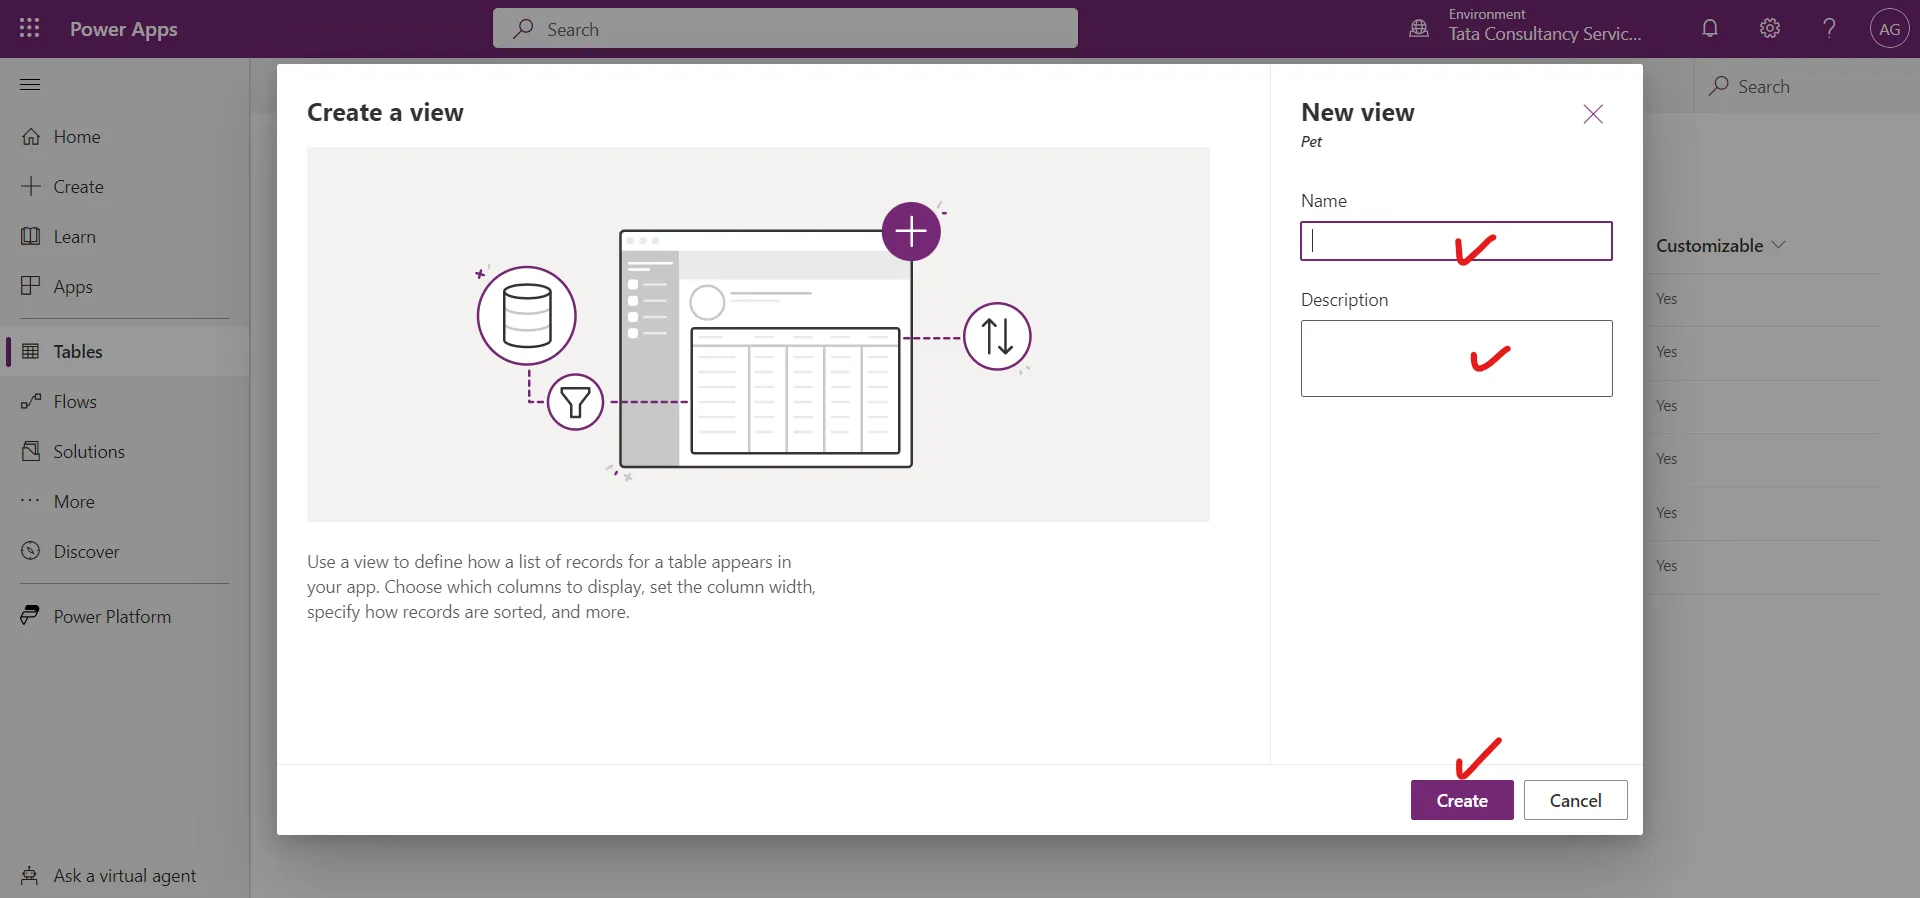
Give a Name and Description to the view and click on Create.
We are now in the view designer. After the modifications, select Save and publish.
After closing the view designer, the newly created view will be added to the list of views that are related to the table.
In the model-driven power app, we can see our all-public view in the main grid of the power apps.
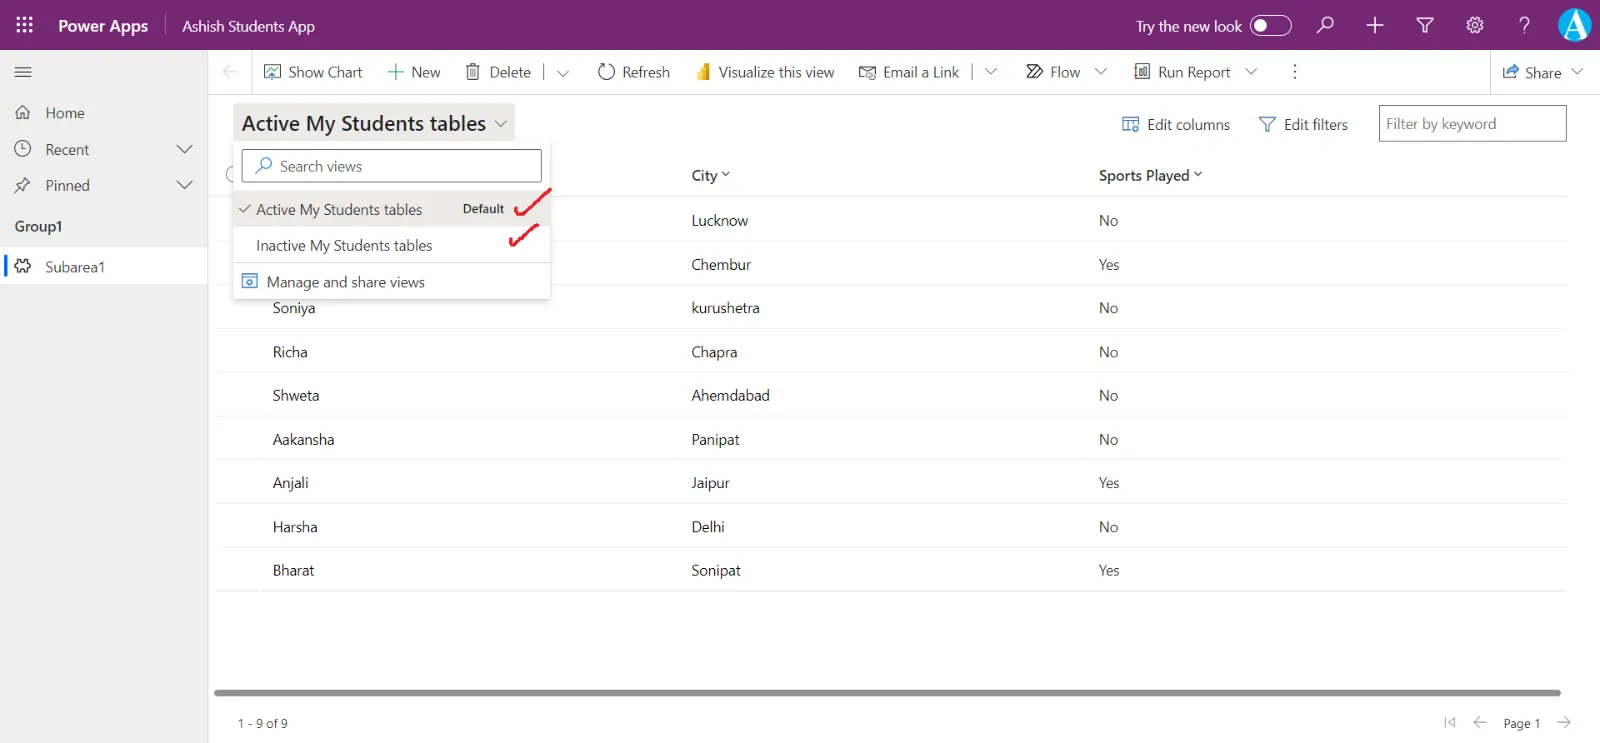
Modify filters and sort criteria in Power Apps
Users of model-driven apps can modify the filters and sort criteria in the application.
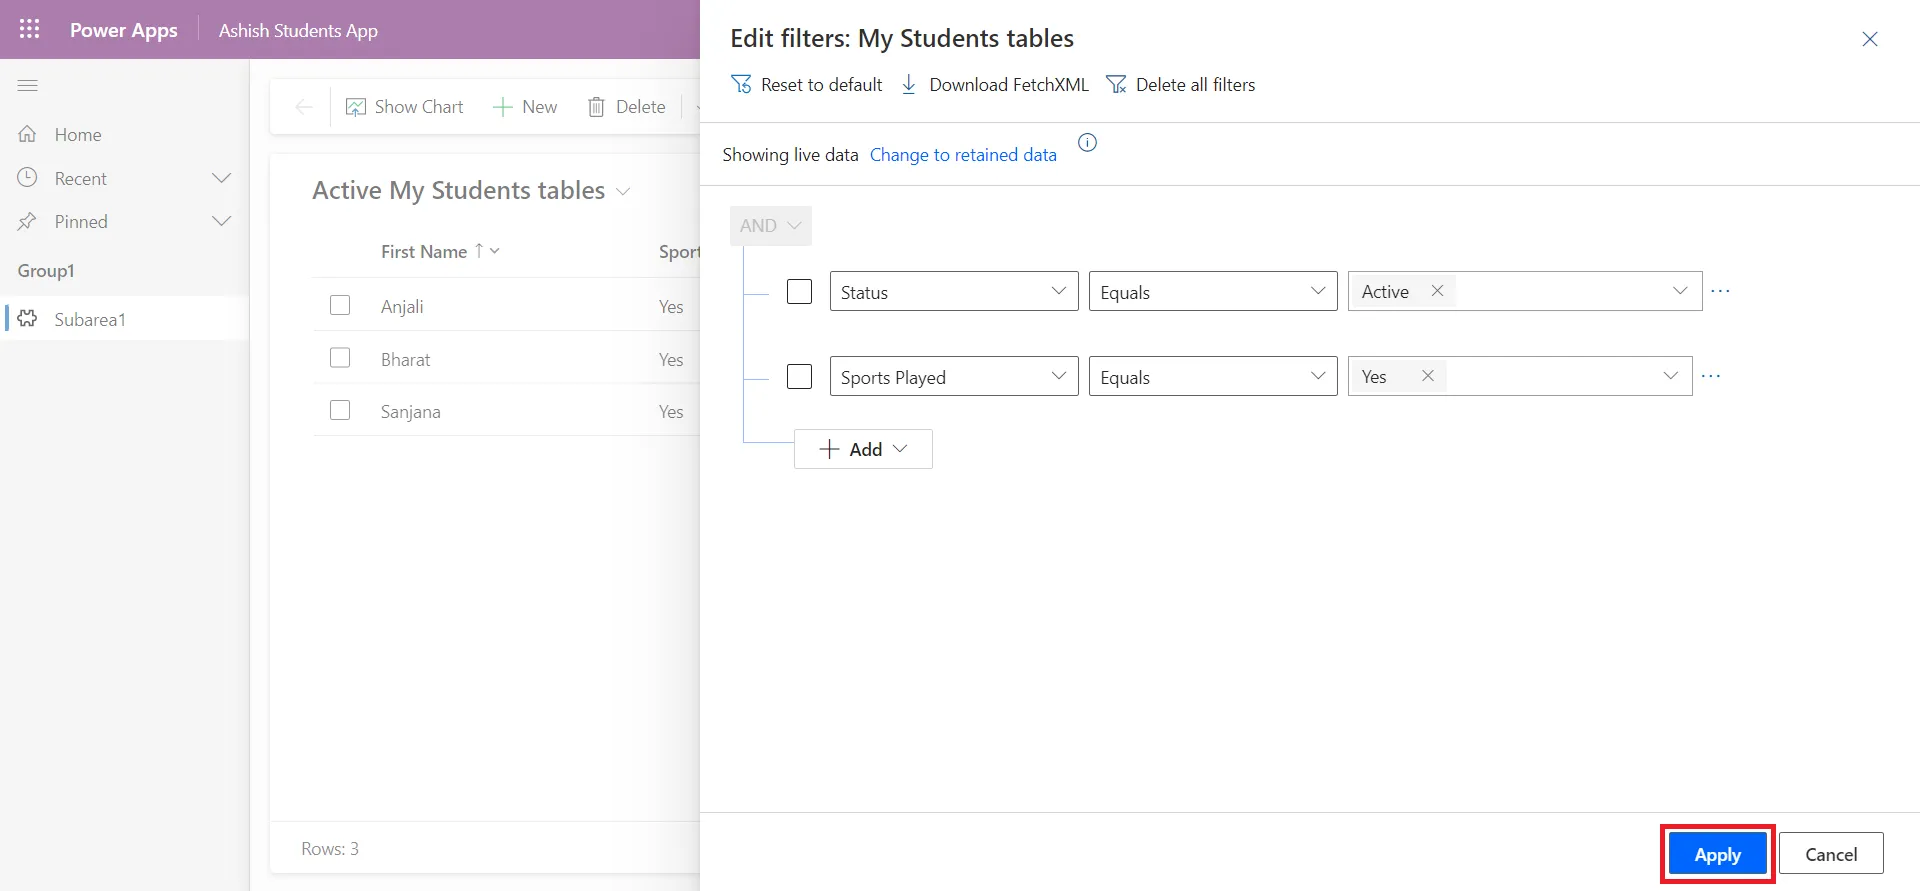
Step 1: Select the Edit filters to modify the criteria and apply the filter temporarily to the current view.
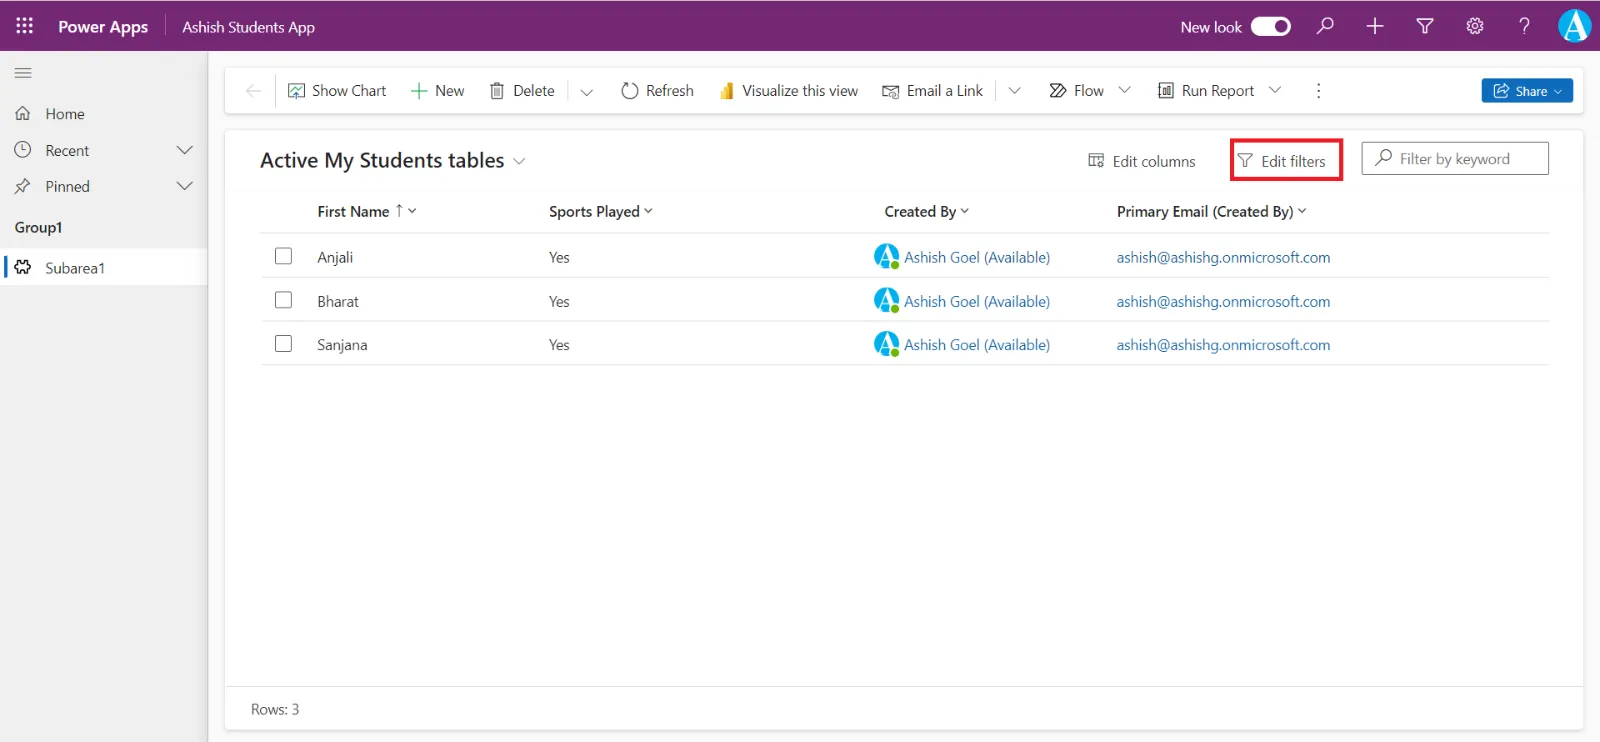
We can add the new criteria, or delete or modify the any number of criteria. After adding click on Apply to apply the filtering in view.
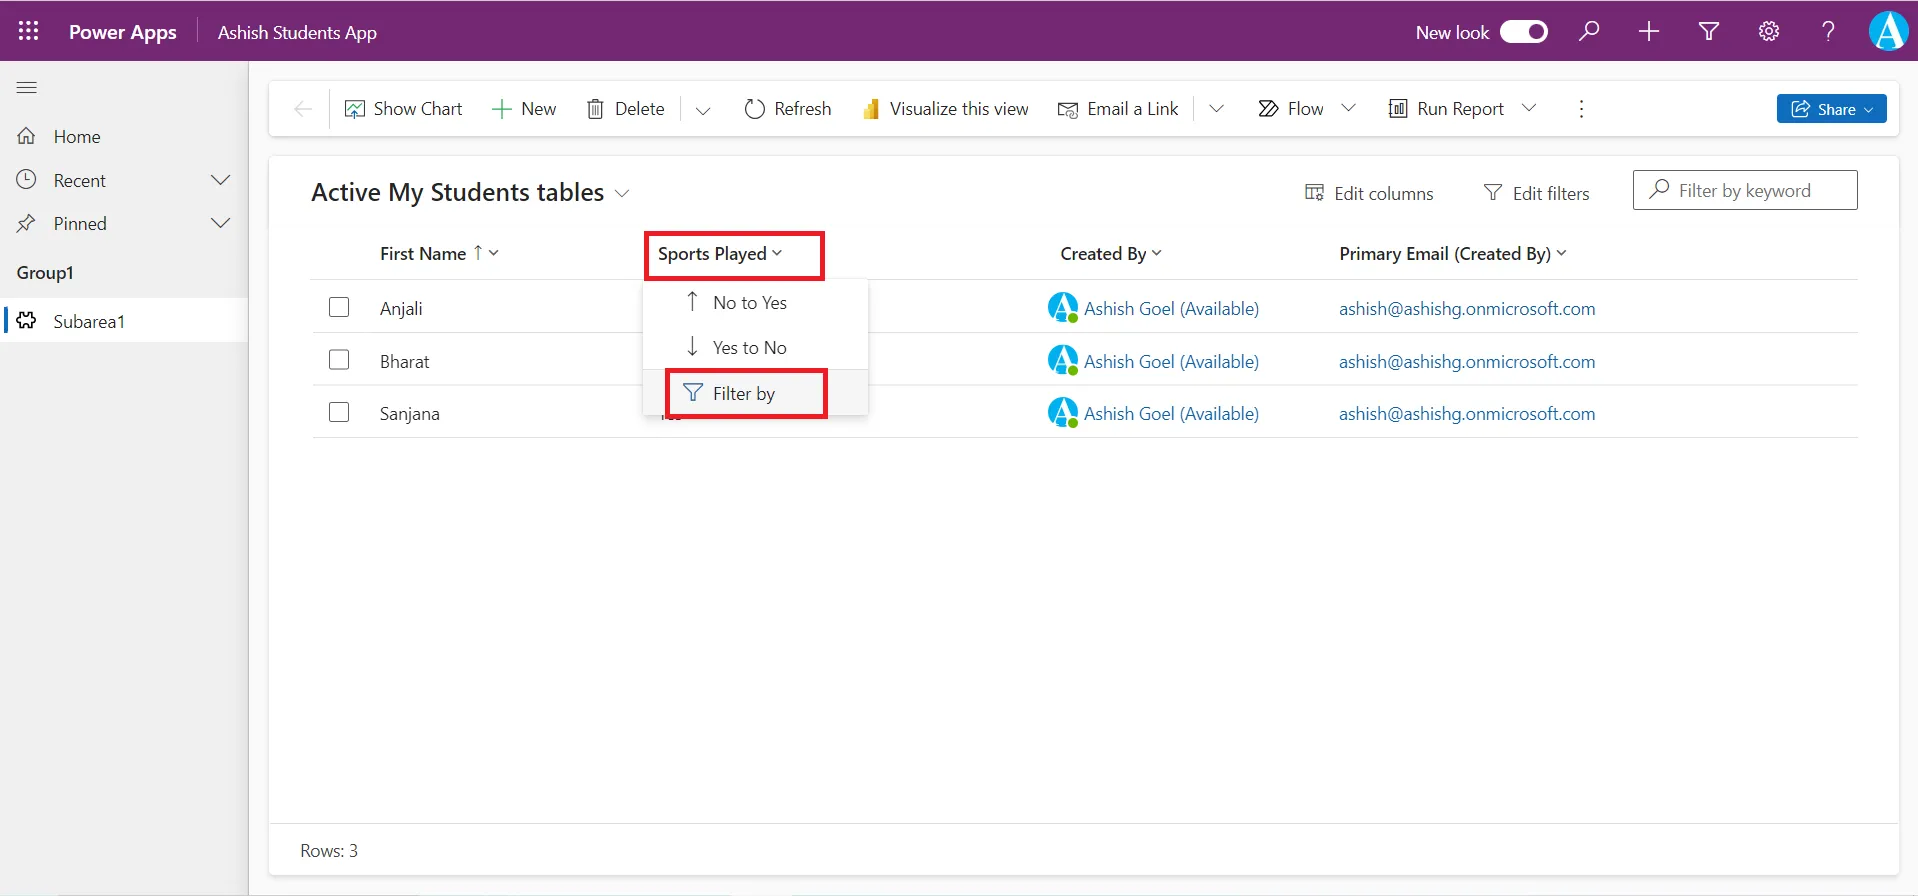
Step 2: Also, we have the option to directly select the column header, select the Filter by, to filter the selected column.
Step 3: We can also apply the sort order.
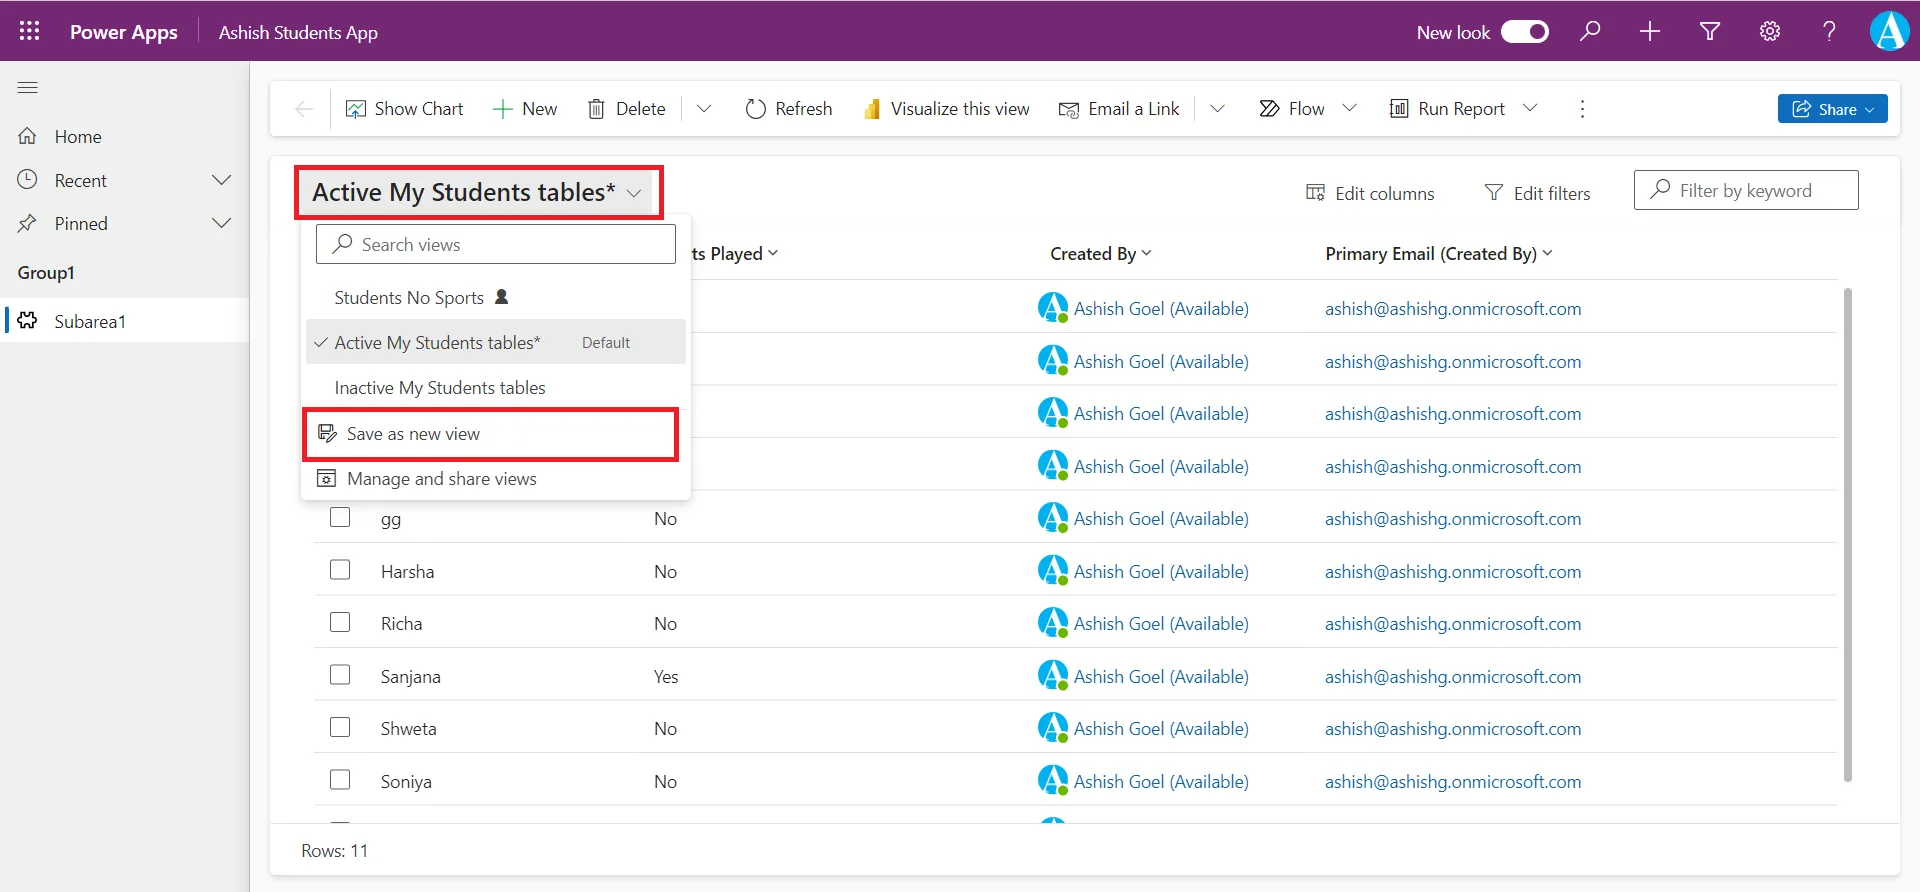
Step 4: An asterisk will be appended to the view name to indicate that such a change was applied. For users who want to save a modified version of a view as a personal view, they can select Save as new view by clicking on the chevron icon.
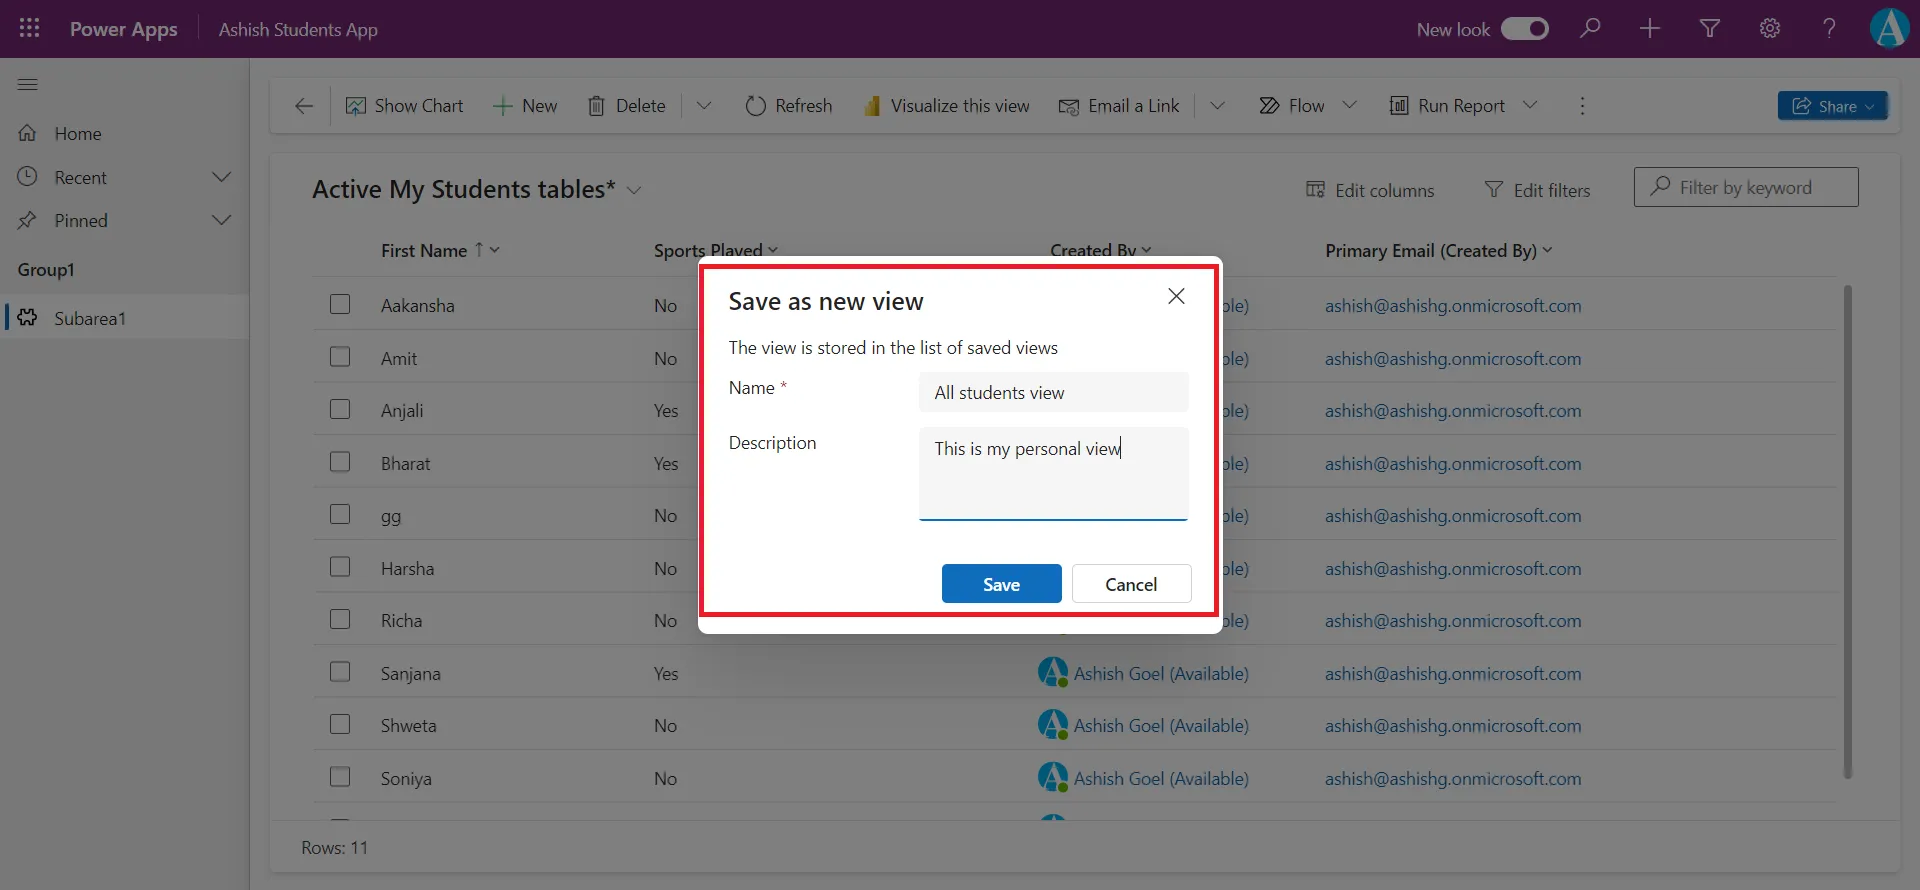
Give the Name and Description to the view, and then click on Save to save the view.
The view is created and is shown as in the image below, it is a personal view.
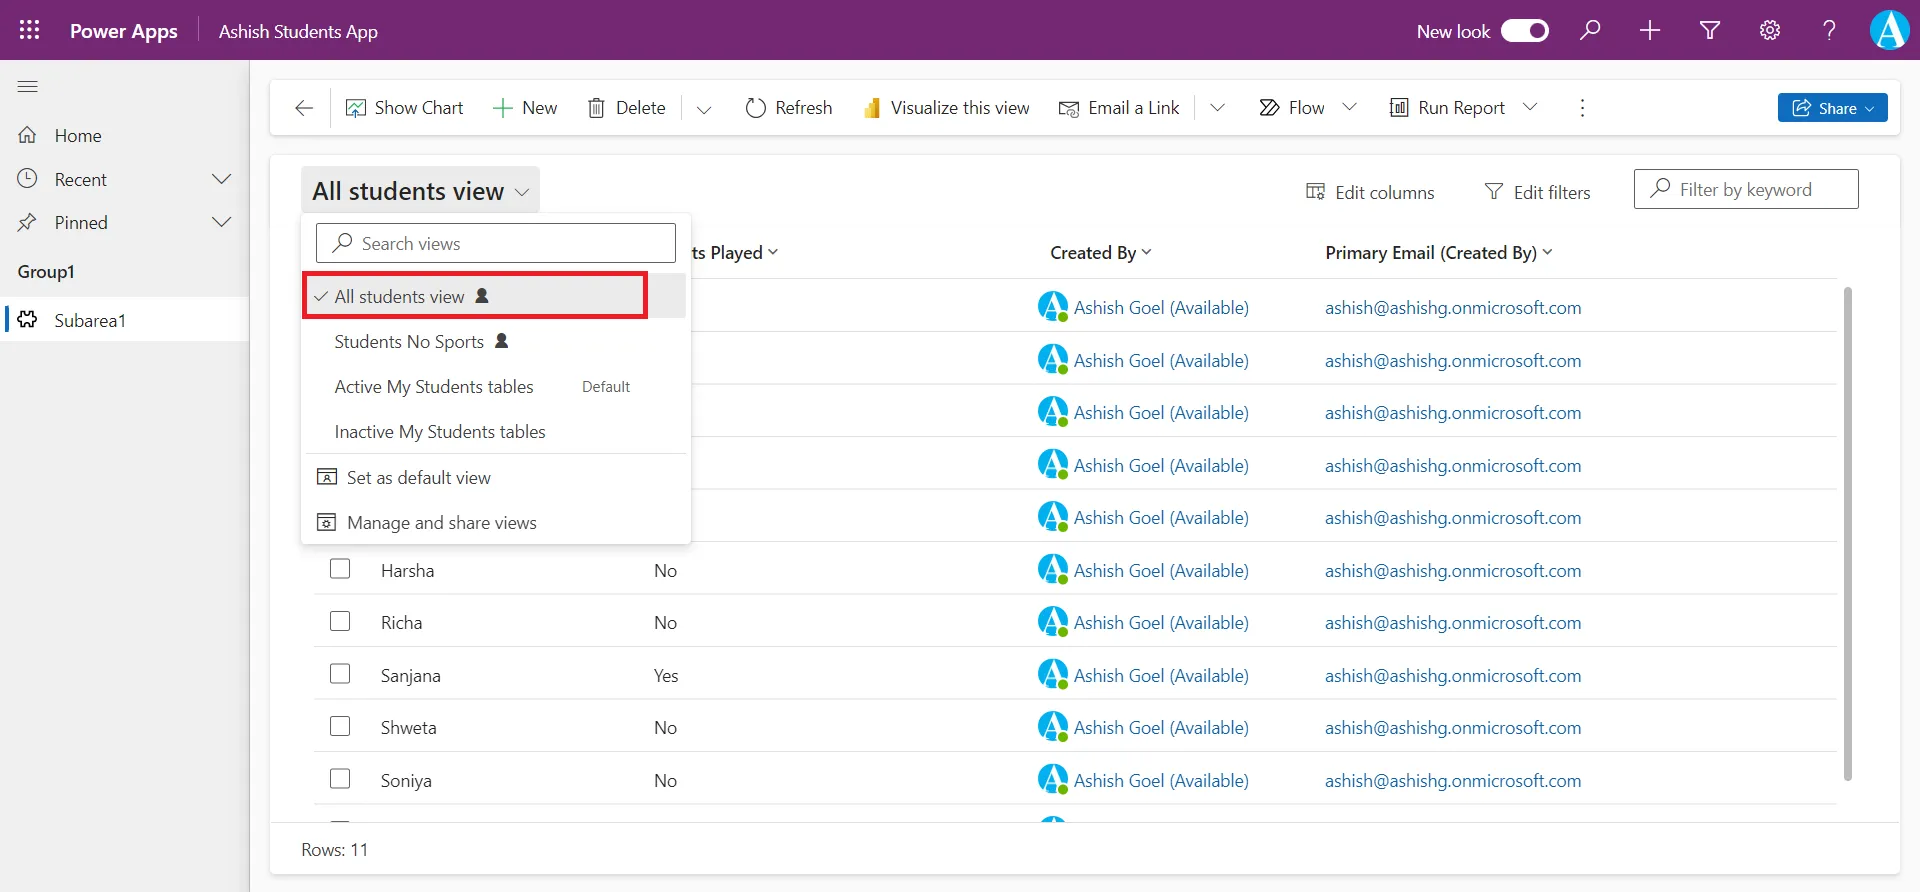
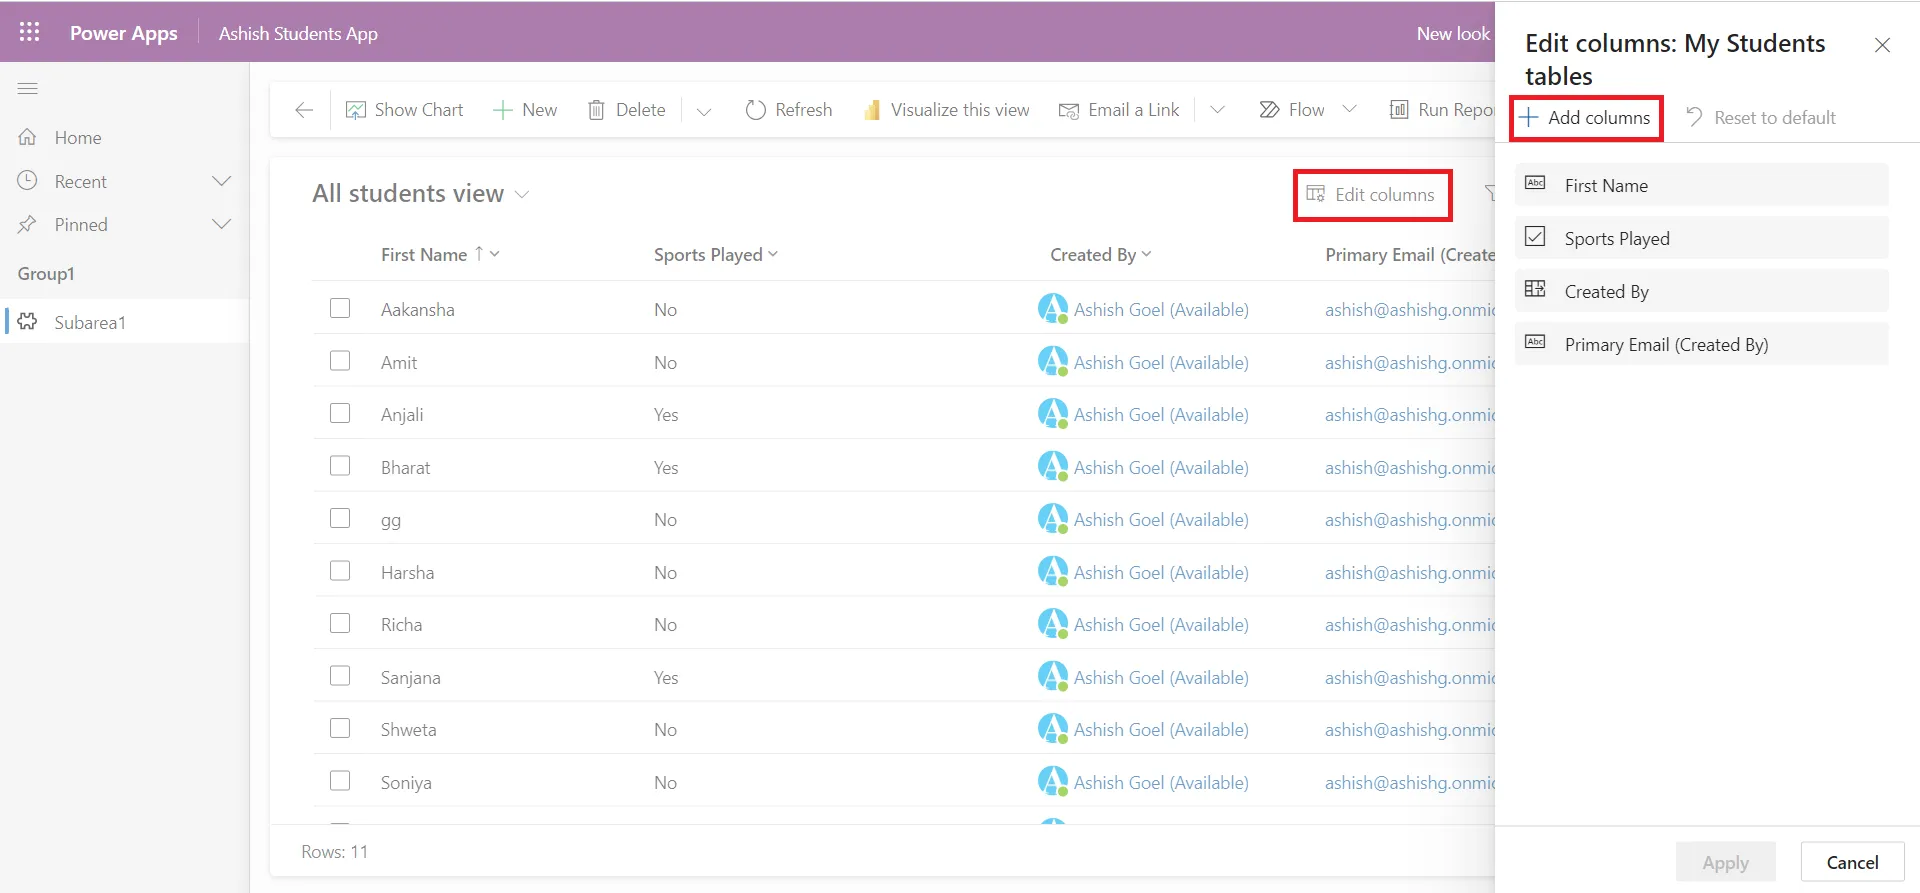
Step 5: By clicking on the Edit columns, we can also order columns by drag and drop in the Edit columns dialog box and add a column to view, by clicking on the + Add columns.
